"TAG" - 1983 Campaign restoration blog
Posted
Moderator


Posted
Old Timer


I assume the fuel system will still work okay without the flap…….

1983 Golf GTi Campaign Edition, Diamond Silver
http://vwgolfmk1.org.uk/forum/index.php?page=topicview&id=projects%2Fyour-mk1-golfs_2%2F-tag-1983-campaign&redirected=1#post_1551531
http://vwgolfmk1.org.uk/forum/index.php?page=topicview&id=projects%2Fyour-mk1-golfs_2%2F-tag-1983-campaign&redirected=1#post_1551531
Posted
Old Timer
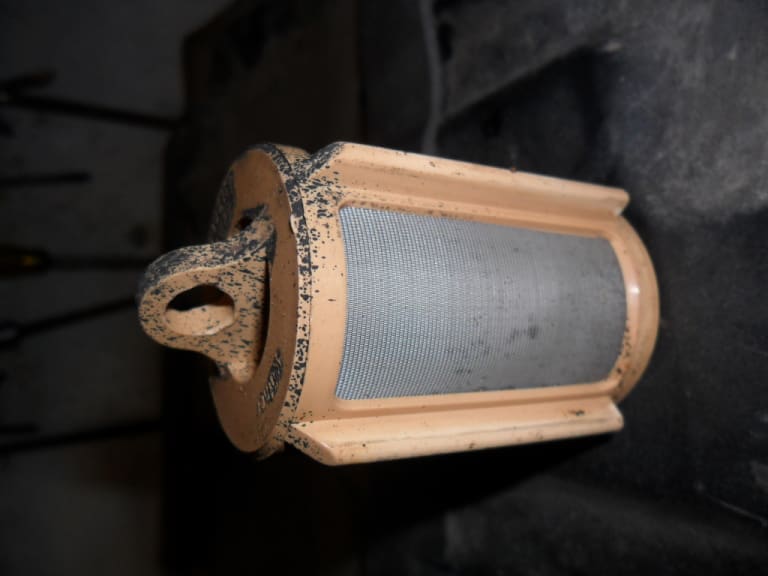


Mk1 Golf - Fuel starvation on right hand bends….Analysis and conclusionNote: Images taken from other forums.
As many of you mk1 owners have already suffered or seen, mk1 golf tend to suffer from detrimental fuel starvation on tight long right hand bends. The general consensus has been that the mk1 tank isn’t up to the job due to the lack of a proper lift pump and a poorly designed tank. But the interesting thing is that this problem doesn’t seem to be consistent across all mk1s. The fact is that some very powerful mk1 machinery run with standard GTi setups and do not suffer any of the issues related to high cornering ‘Gs’ and fuel starvation.
After my mk1 started to suffer the dreaded fuel starvation at the last Curby event, I started to investigate what was going on as prior to this, my mk1 didn’t have this issue.
Upon removing the fuel level sender from the tank, it is possible to see the in-tank fuel swirl pot.

In the centre of the swirl pot, the factory gauze filter can be seen. This can be removed with a hook or pliers.
And here is an exploded image of the swirl pot and its parts.

How it works is that the fuel from the tank passes through into the centre of the filter from where it heads downwards towards the rubber sealing disc and then gets sucked out of the tank along a pipe to the tank outlet.
Here is the bottom of the swirl pot showing the sealing disc location and fuel pickup hole.

So what has happened to my tank? Well, upon removing the filter, I found the bottom of the swirl pot to be full of dirt and rust particles present from a previous filler pipe rupture with resulting dirt and flakes of rust being sucked into the swirl pot.
Using a flexible magnetic pickup, I proceeded to remove all the flake of rust until the area was clean as possible. But as the dirt was removed, it became apparent that the rubber sealing disc had broken down and become perforated. Using some pliers, I removed the damaged disc. The problem that leaves me with is that the swirl pot no longer has a sealed bottom so thus drains itself back into the tank in was filled from. So instead of the fuel pump receiving a steady flow of fuel from the swirl pot on hard corners, the swirl pot empties itself out leaving the pump to run dry and starve the pump of fuel.
The thing is that the swirl pot is not removable from the tank without cutting the tank open and the rubber disc cannot be fitted without removing the swirl pot.
So unfortunately that leaves me with one conclusion. The tank is kaput! I can now either try to find another 2nd hand tank, which will be like walking through a minefield, or fit some expensive after market pumps, external swirl pot and pipe work. I hope others find this info helpful.
Has anyone else come across this????????? I have just restored my tank - but is still ok to use?????
.
1983 Golf GTi Campaign Edition, Diamond Silver
http://vwgolfmk1.org.uk/forum/index.php?page=topicview&id=projects%2Fyour-mk1-golfs_2%2F-tag-1983-campaign&redirected=1#post_1551531
http://vwgolfmk1.org.uk/forum/index.php?page=topicview&id=projects%2Fyour-mk1-golfs_2%2F-tag-1983-campaign&redirected=1#post_1551531
Posted
Old Timer


With regard to the rubber seals in the swirl chamber, as stated by others, the swirl chamber is there to stop fuel starvation when cornering when the tank is low. I have read numerous posts about the seals deteriorating (particularly if the car has been standing for considerable time) and they are not repairable or replaceable. I have no first hand experience of this but I think once the seals have failed the swirl chamber will no longer stay full but will be at the same level as the rest of the tank as the fuel will seep out through the bottom. Hopefully, someone else will be able to give better advice on this. If I were you I would seek advice before refitting the tank given the awkwardness of the job when doing it led on your back! I replaced my tank with a VW Heritage GTI tank, and despite being told I may have fuel starvation issues, I have had none so far and last time I refuelled I squeezed about 38 litres into a 40 litre tank!
Good luck with your repairs and keep up the good work.
Happy New Years.
Matt.
Mars red 1.8 GTI tintop now MOT'd and on the road!
http://vwgolfmk1.org.uk/forum/index.php?page=topicview&id=projects%2Fyour-mk1-golfs_2%2Fwent-to-look-at-a-golf&kfs79=150
http://vwgolfmk1.org.uk/forum/index.php?page=topicview&id=projects%2Fyour-mk1-golfs_2%2Fwent-to-look-at-a-golf&kfs79=150
Posted
Settled In

I fitted a Heritage tank to mine 2 years ago, I normally keep the tank low on fuel in order to keep it as fresh as possible. Never had any issues with fuel starvation even when cornering enthusiastically. There seem to be lots of different aftermarket tanks available and different tanks for different models, perhaps other owners who experienced problems, fitted aftermarket tank or the wrong one without any swirl pot at all?
Posted
Old Timer


How's yours going? Have you found anything out on fuel tank yet?
Mars red 1.8 GTI tintop now MOT'd and on the road!
http://vwgolfmk1.org.uk/forum/index.php?page=topicview&id=projects%2Fyour-mk1-golfs_2%2Fwent-to-look-at-a-golf&kfs79=150
http://vwgolfmk1.org.uk/forum/index.php?page=topicview&id=projects%2Fyour-mk1-golfs_2%2Fwent-to-look-at-a-golf&kfs79=150
Posted
Old Timer


Have a look at my thread for an update!
It has been so hard to find a definitive clear answer on this matter.
My conclusions are:
1. The lack of base on the swirl tank means that the fuel is being taken from the tank without going through the in-tank filter. Not good as any muck goes straight through the pump! I am there hoping to add an in-line fuel filter in the rubber hose between the tank and the pump.
2. I was concerned by a few forum comments that the lack of rubber flap on the base of the swirl pot leads to fuel starvation on long corners. A comment from crazyquiff suggests that the fuel accumulator should hold enough fuel to prevent this issue.
I would not want to fit a "old" second hand tank for obvious reasons; new tanks have a crude swirl pot but no in-tank filter. So I shall keep my tank which is really good - fit the in-line filter and hope that fuel starvation is not an issue.
I will have a chat with crazyquiff first and run this by him.
View topic: GTi Swirl pot issues....>! - The Mk1 Golf Owners Club
1983 Golf GTi Campaign Edition, Diamond Silver
http://vwgolfmk1.org.uk/forum/index.php?page=topicview&id=projects%2Fyour-mk1-golfs_2%2F-tag-1983-campaign&redirected=1#post_1551531
http://vwgolfmk1.org.uk/forum/index.php?page=topicview&id=projects%2Fyour-mk1-golfs_2%2F-tag-1983-campaign&redirected=1#post_1551531
Posted
Old Timer


https://vwgolfmk1.org.uk/forum/index.php?page=topicview&id=chat%2Fgeneral-chat_3%2Fthe-real-meaning-of
1983 Golf GTi Campaign Edition, Diamond Silver
http://vwgolfmk1.org.uk/forum/index.php?page=topicview&id=projects%2Fyour-mk1-golfs_2%2F-tag-1983-campaign&redirected=1#post_1551531
http://vwgolfmk1.org.uk/forum/index.php?page=topicview&id=projects%2Fyour-mk1-golfs_2%2F-tag-1983-campaign&redirected=1#post_1551531
Posted
Old Timer


It was time to tackle the bodywork>>>!!!!!
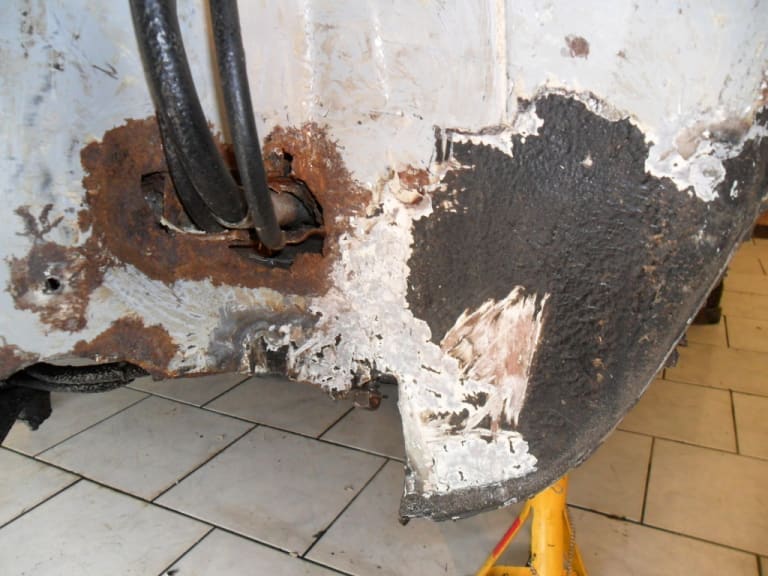
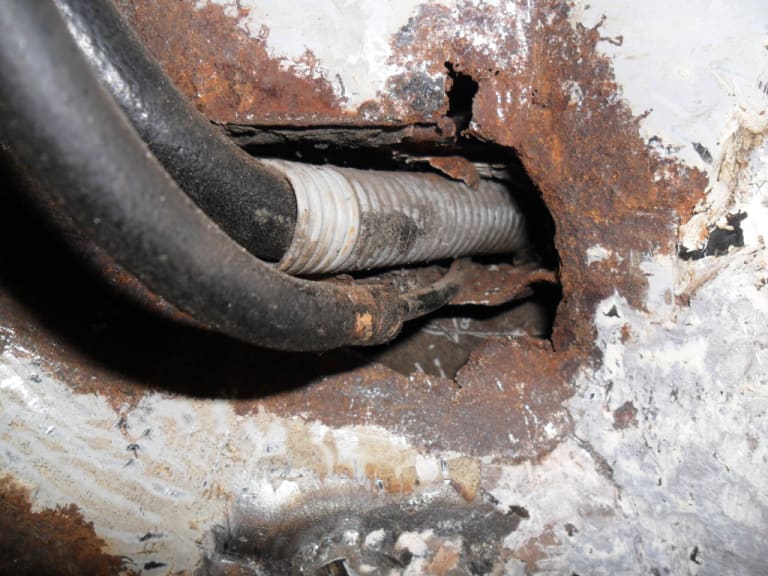
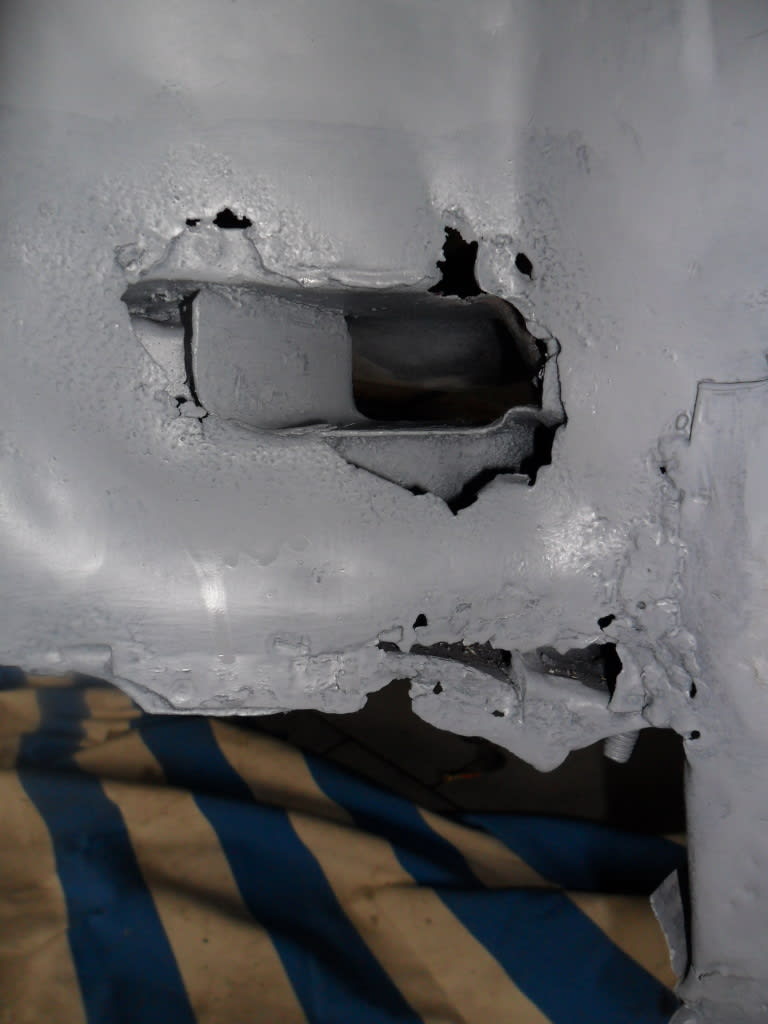
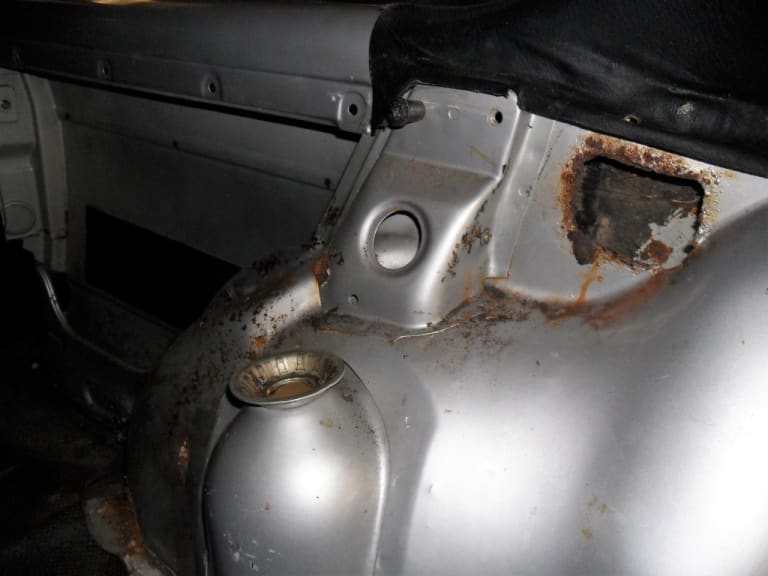
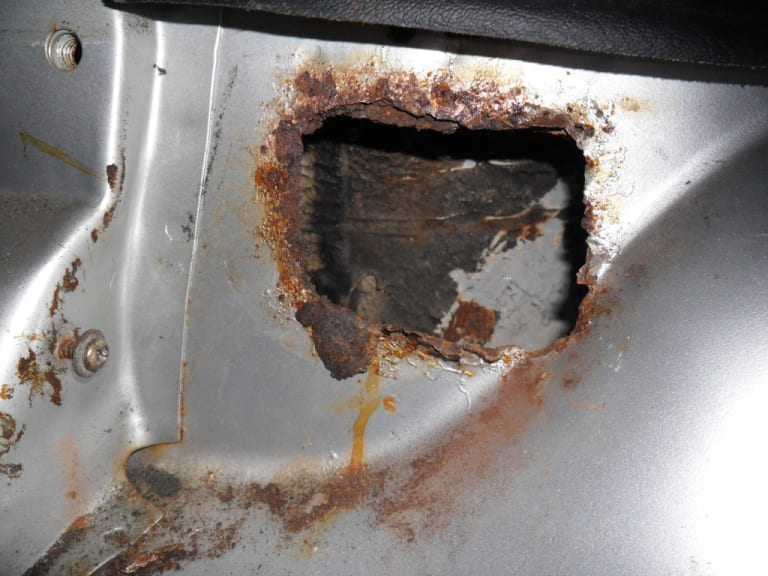
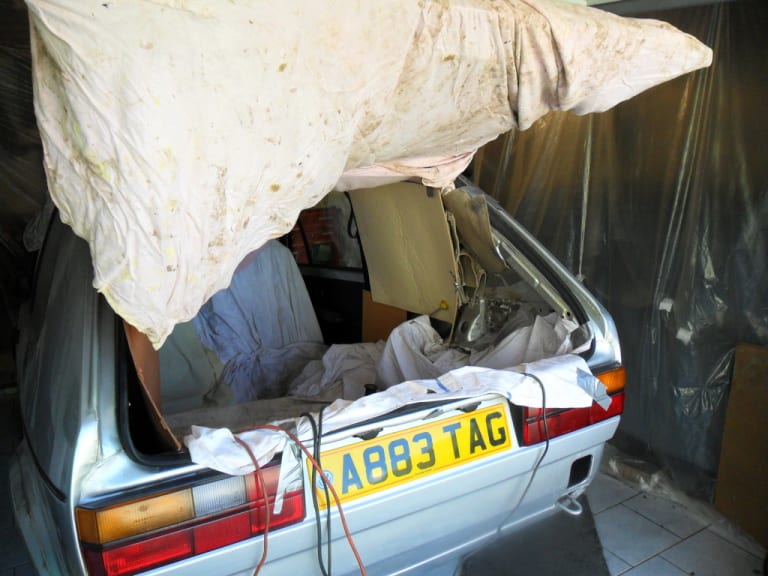
I started on the rear o/s arch area. Having stripped the thick layer of Shutz and then removed the factory PVC underseal I could see what work was required.
First area to tackle was the hole in the bodywork where the fuel pipe/fuel breathers pass through to the fuel tank. The hole, channel through which the pipes pass and the surrounding panel were all in bad condition.
1983 Golf GTi Campaign Edition, Diamond Silver
http://vwgolfmk1.org.uk/forum/index.php?page=topicview&id=projects%2Fyour-mk1-golfs_2%2F-tag-1983-campaign&redirected=1#post_1551531
http://vwgolfmk1.org.uk/forum/index.php?page=topicview&id=projects%2Fyour-mk1-golfs_2%2F-tag-1983-campaign&redirected=1#post_1551531
Posted
Old Timer


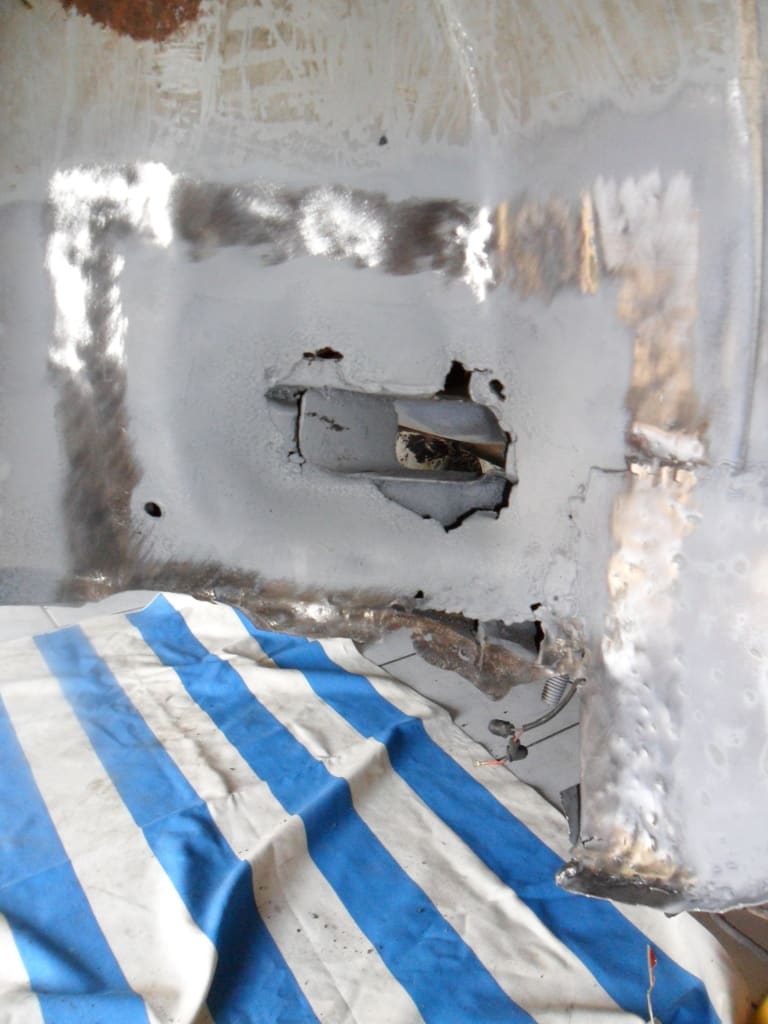
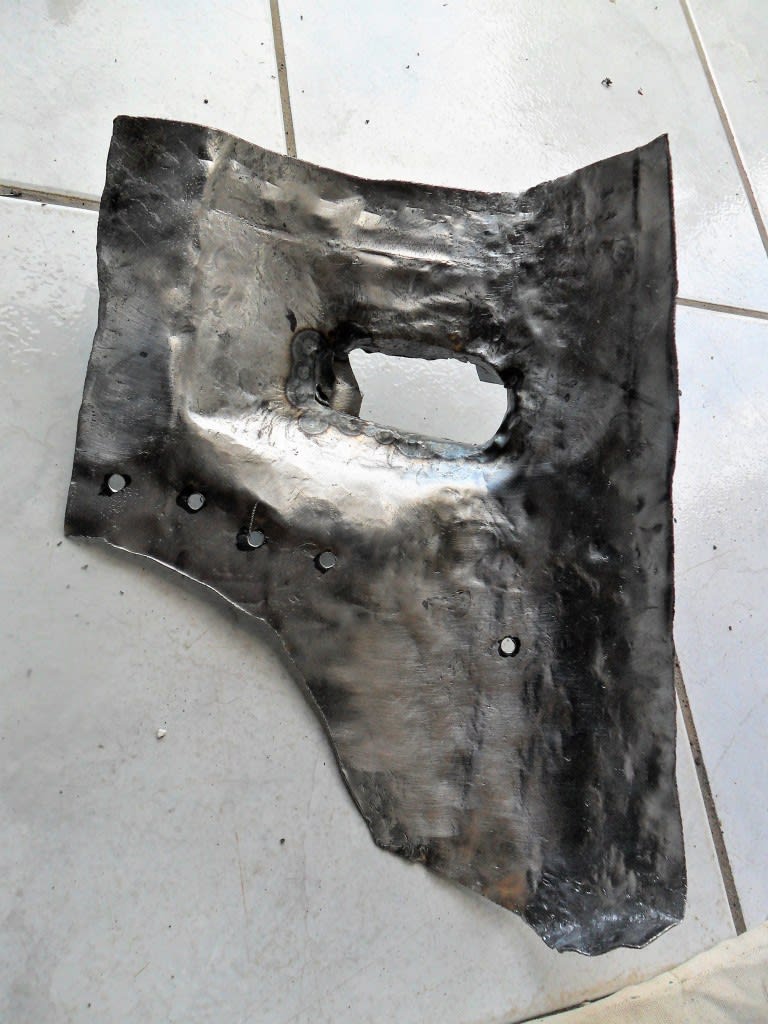
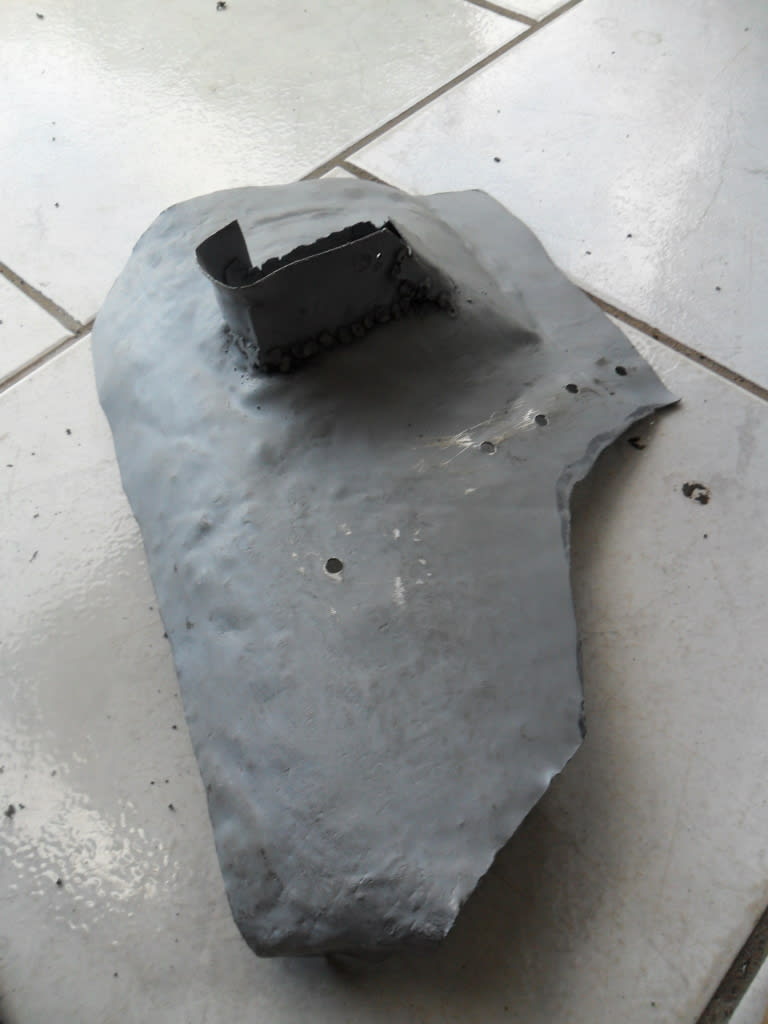
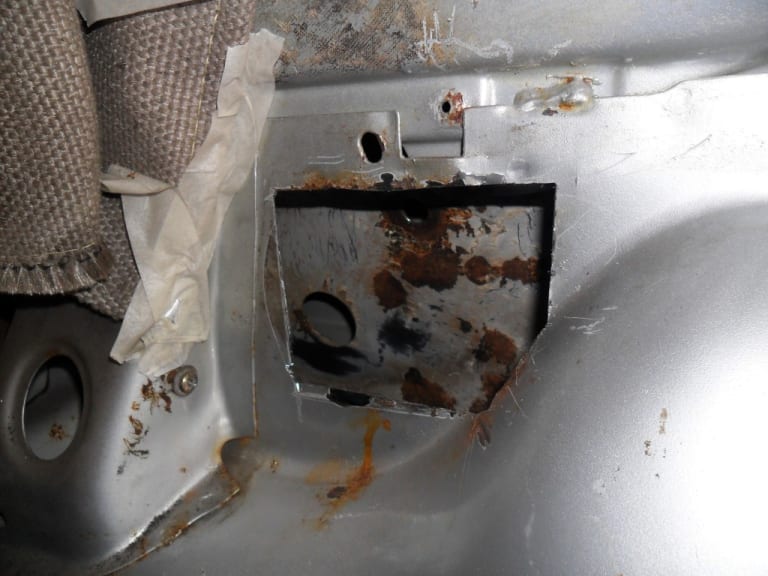
I therefore started to fabricate my first ever car body repair panel………!
Having treated the rust with Bilt Hamber Hydrate 80 and then Bilt Hamber Etchweld (Weld thru etch primer)…..
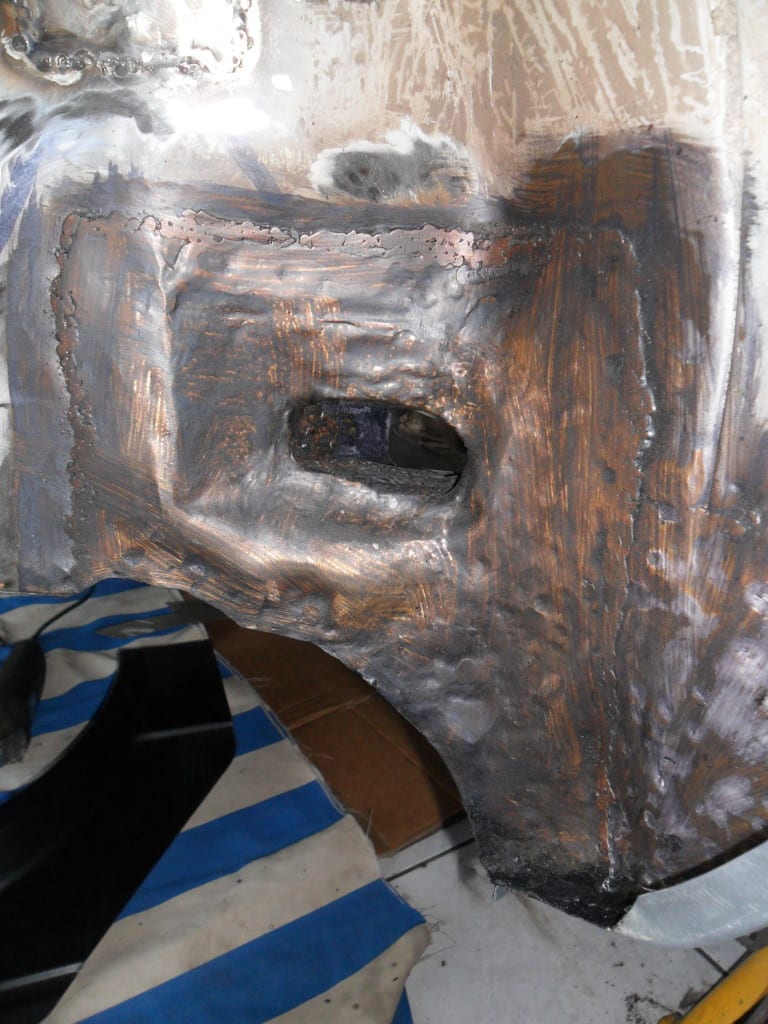
I then made my first ever welding attempts and fitted the rather tricky panel.
Once welded on and ground down I treated again with Hydrate 80.
I am pleased with the result which once seam sealed and stone-chipped should do the job nicely.

1983 Golf GTi Campaign Edition, Diamond Silver
http://vwgolfmk1.org.uk/forum/index.php?page=topicview&id=projects%2Fyour-mk1-golfs_2%2F-tag-1983-campaign&redirected=1#post_1551531
http://vwgolfmk1.org.uk/forum/index.php?page=topicview&id=projects%2Fyour-mk1-golfs_2%2F-tag-1983-campaign&redirected=1#post_1551531
Posted
Old Timer


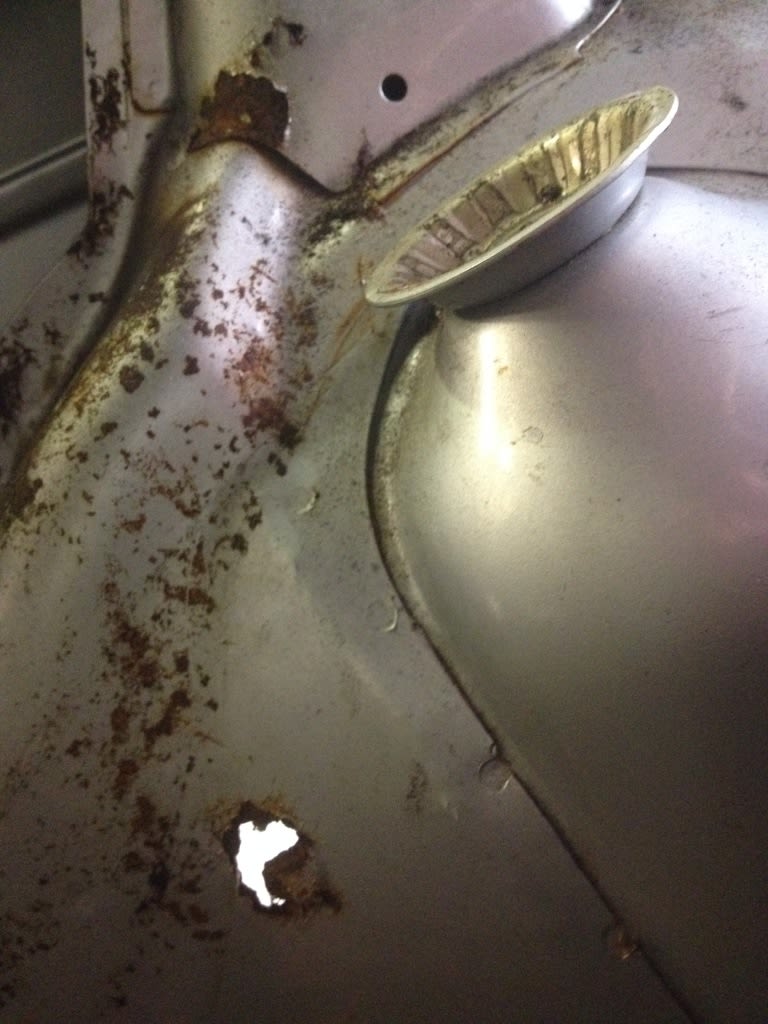
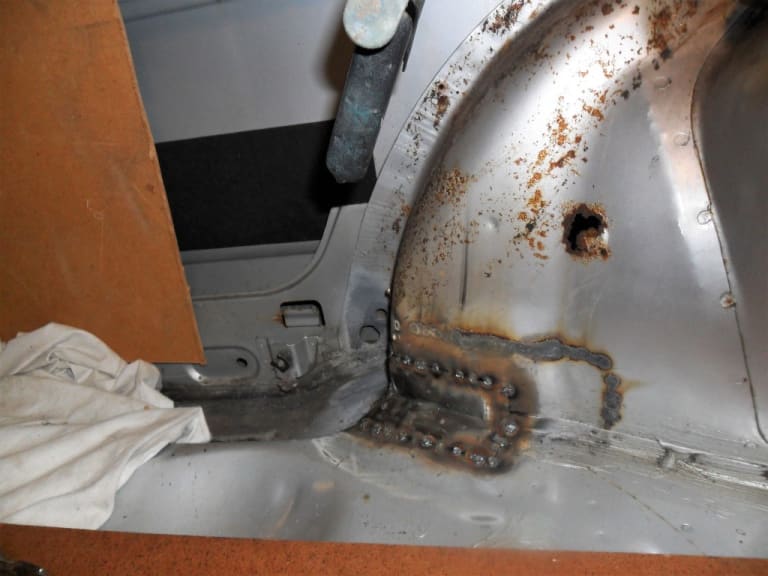
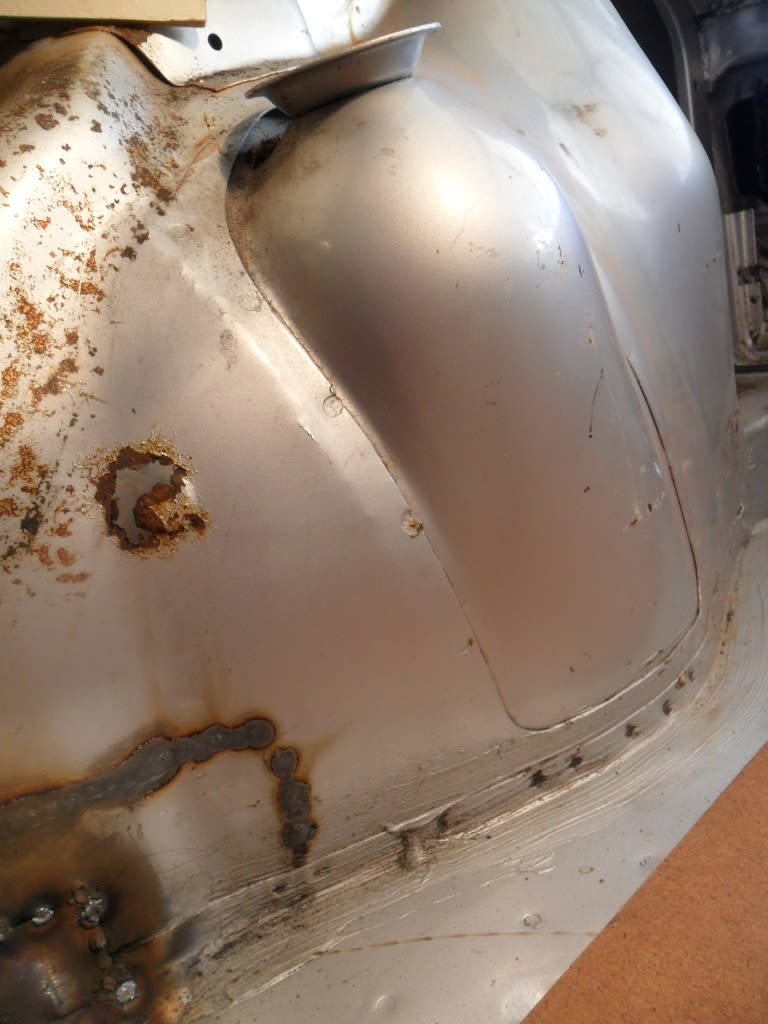
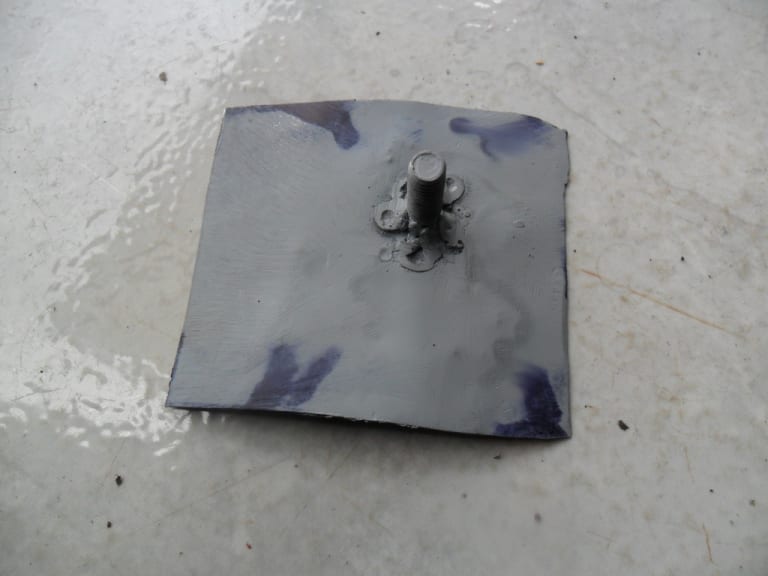
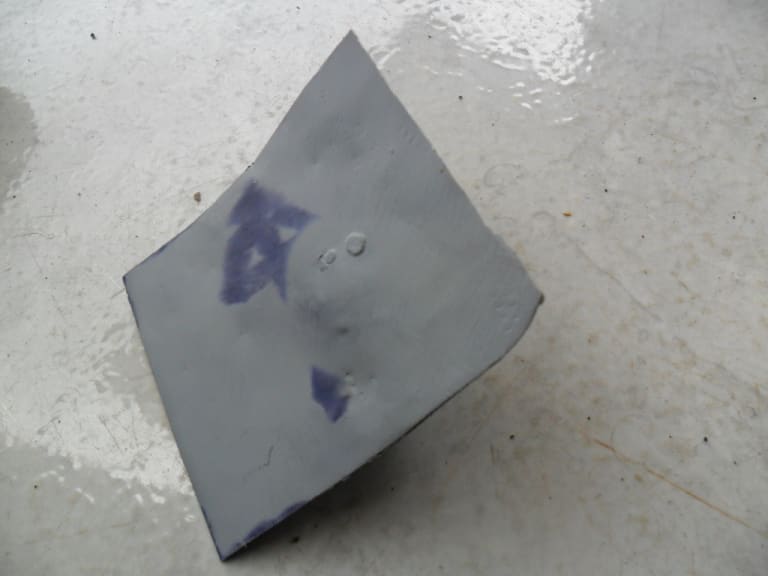
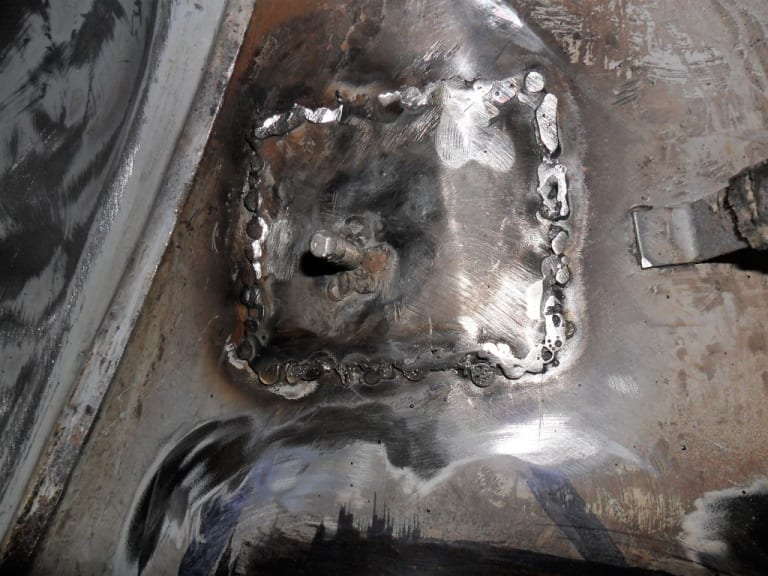
Reason it was missing was that the support stud in the middle had rotted away completely.
Once again cleaned up the area, welded a new stud to a repair plate, treated the area with Hydrate 80 etc and then welded in to place.
1983 Golf GTi Campaign Edition, Diamond Silver
http://vwgolfmk1.org.uk/forum/index.php?page=topicview&id=projects%2Fyour-mk1-golfs_2%2F-tag-1983-campaign&redirected=1#post_1551531
http://vwgolfmk1.org.uk/forum/index.php?page=topicview&id=projects%2Fyour-mk1-golfs_2%2F-tag-1983-campaign&redirected=1#post_1551531
Posted
Old Timer


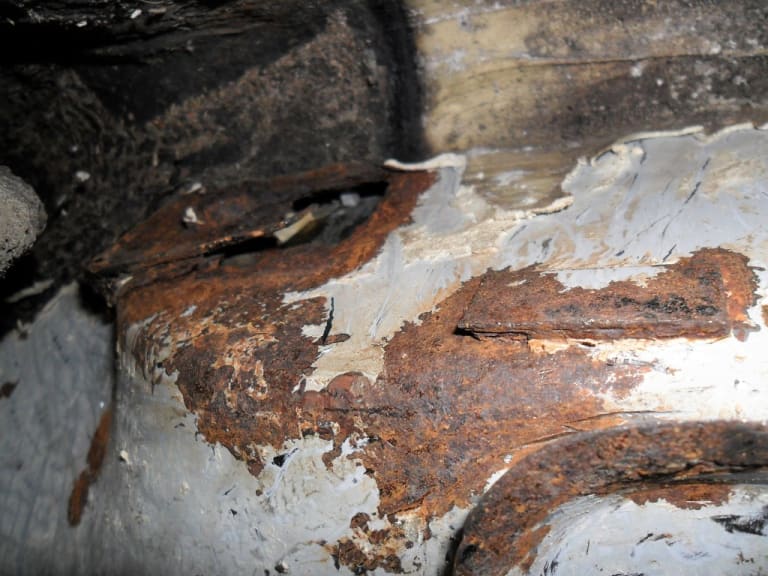
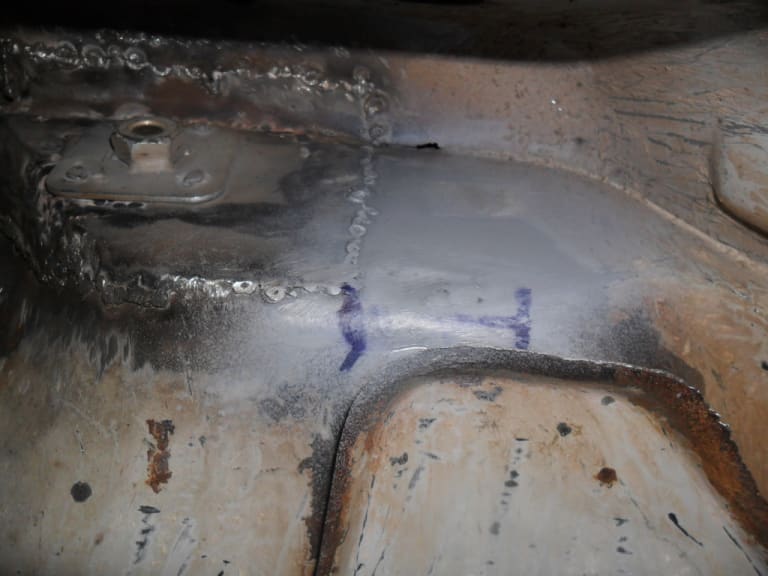
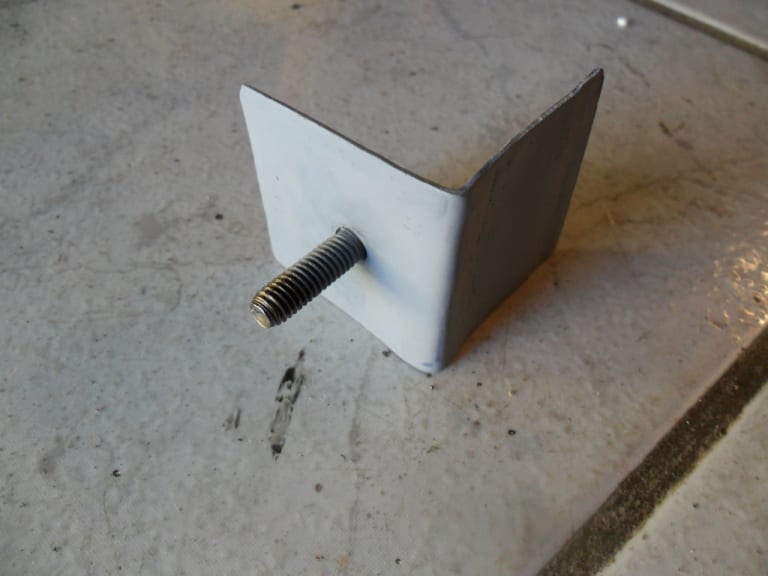
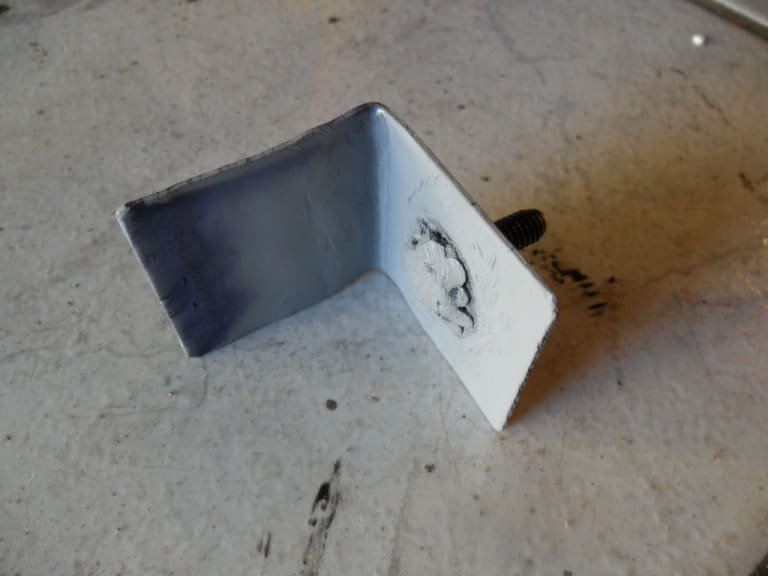
The gravity valve and holder were previously "bunged" into the upper wing and held in by Shutz sealant. Reason = the bracket and stud to hold it were again gone.
Same process……. ground off the remains of the old bracket and welded a stud to a new panel and welded into position

1983 Golf GTi Campaign Edition, Diamond Silver
http://vwgolfmk1.org.uk/forum/index.php?page=topicview&id=projects%2Fyour-mk1-golfs_2%2F-tag-1983-campaign&redirected=1#post_1551531
http://vwgolfmk1.org.uk/forum/index.php?page=topicview&id=projects%2Fyour-mk1-golfs_2%2F-tag-1983-campaign&redirected=1#post_1551531
Posted
Old Timer


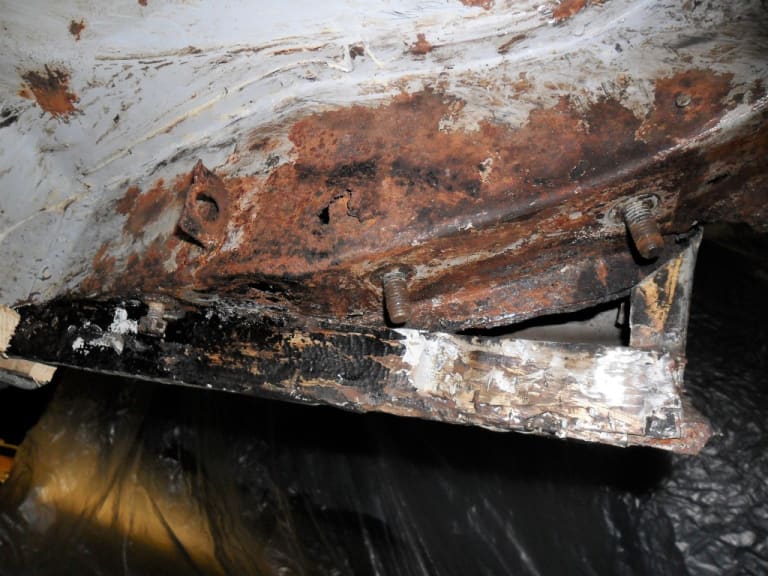
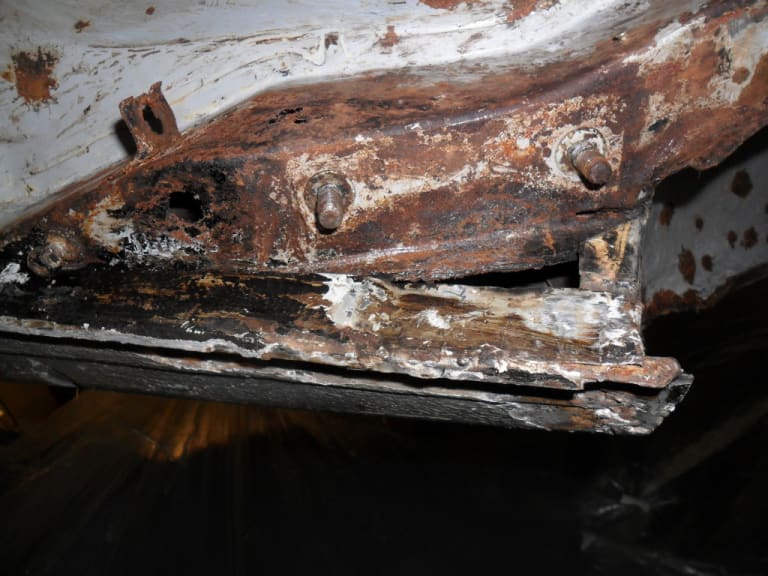
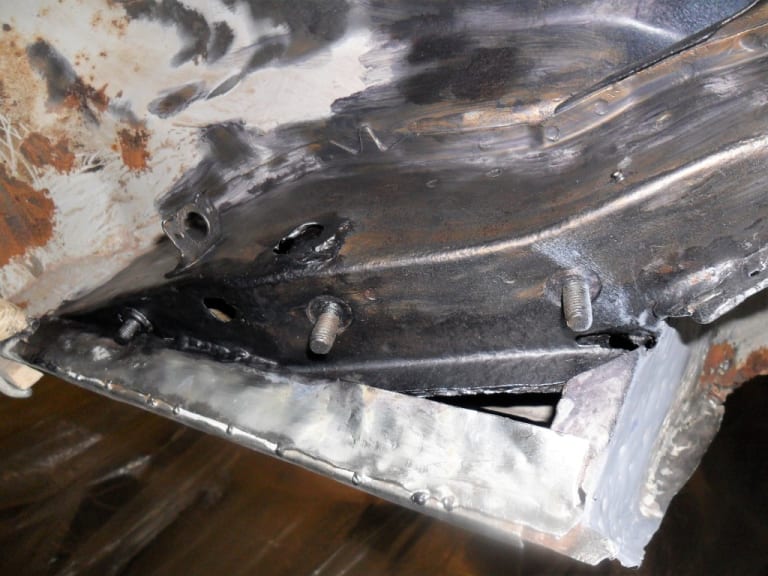
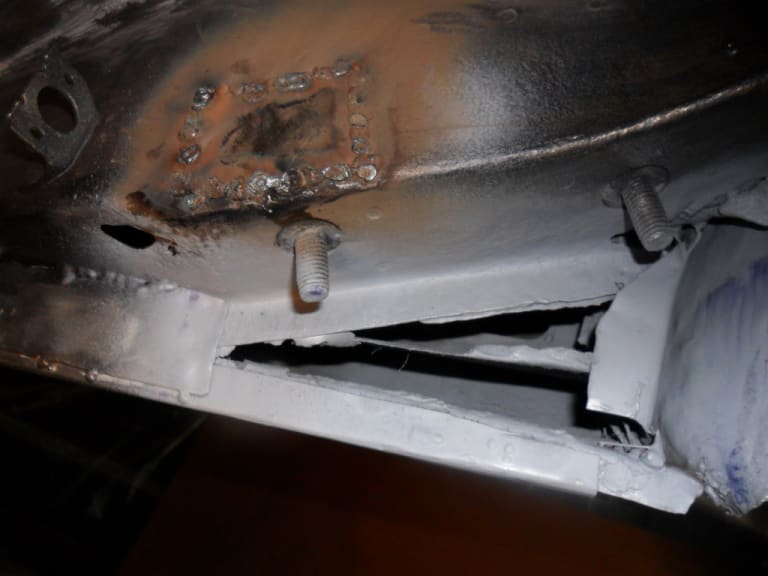
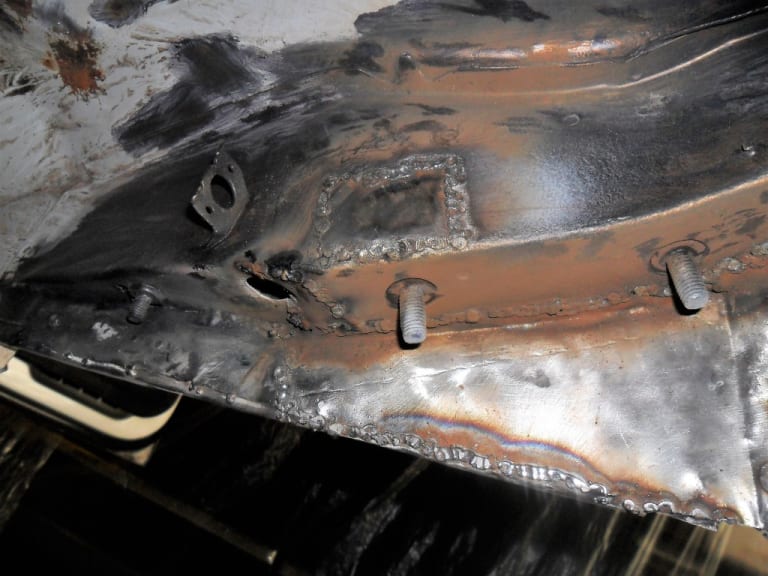
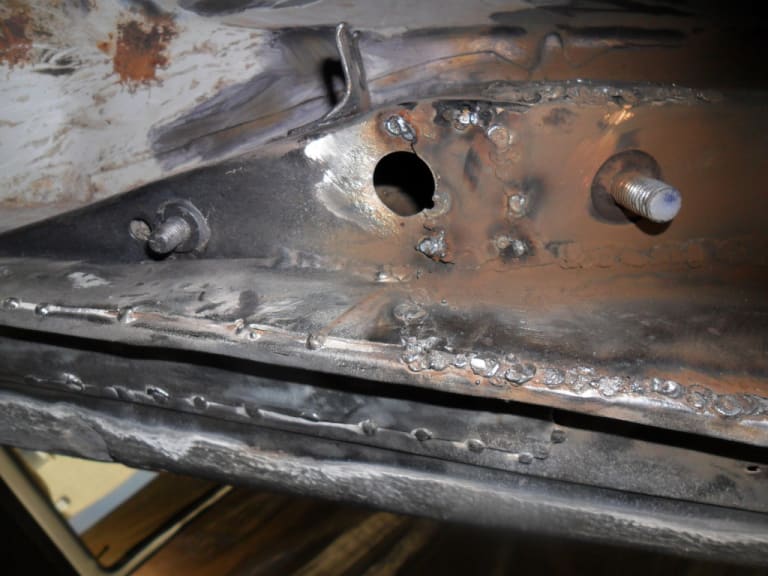
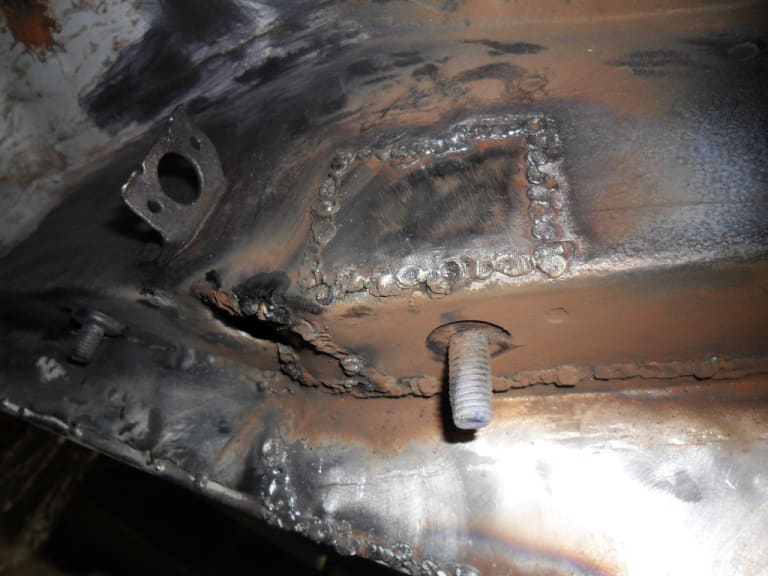
The rear chassis member where the axle bolts to and the the corner of the wing/body where all these points meet was in a poor state. Some previous "repairs" had been done - some good some awful!
Again same process and fabricated new repair panels and welded into place.
1983 Golf GTi Campaign Edition, Diamond Silver
http://vwgolfmk1.org.uk/forum/index.php?page=topicview&id=projects%2Fyour-mk1-golfs_2%2F-tag-1983-campaign&redirected=1#post_1551531
http://vwgolfmk1.org.uk/forum/index.php?page=topicview&id=projects%2Fyour-mk1-golfs_2%2F-tag-1983-campaign&redirected=1#post_1551531
Posted
Old Timer


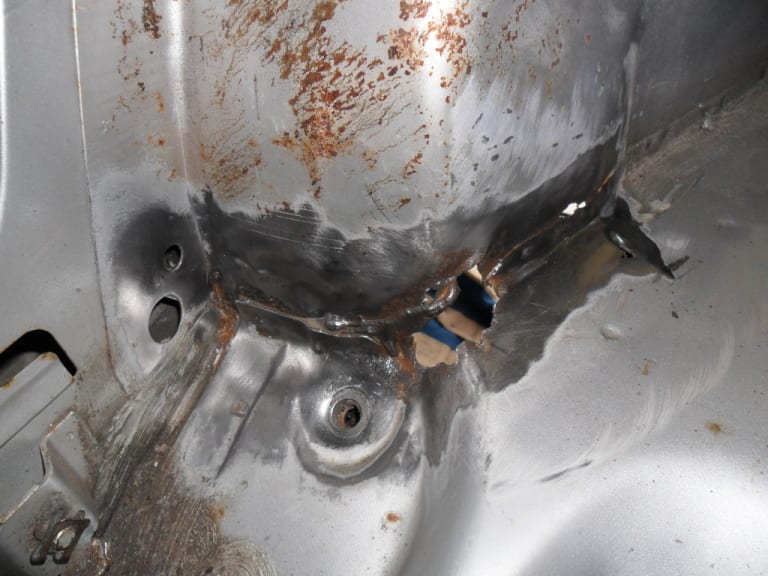
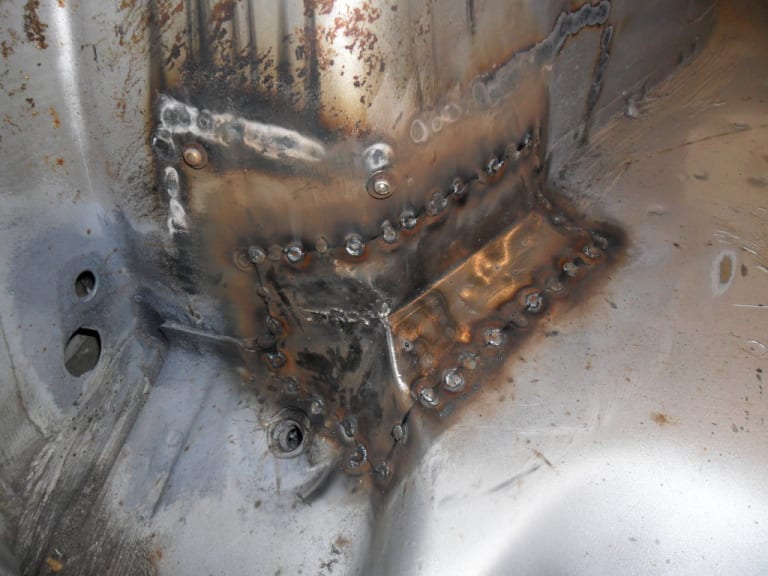
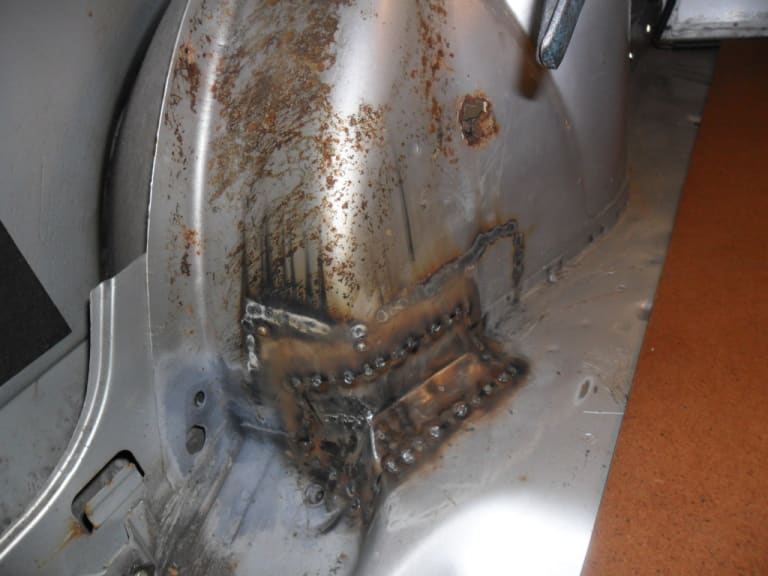
I found a hole going from the base of the rear suspension turret near the lower seat belt bolt in the car through to the rear well.
Again now sorted/……….

1983 Golf GTi Campaign Edition, Diamond Silver
http://vwgolfmk1.org.uk/forum/index.php?page=topicview&id=projects%2Fyour-mk1-golfs_2%2F-tag-1983-campaign&redirected=1#post_1551531
http://vwgolfmk1.org.uk/forum/index.php?page=topicview&id=projects%2Fyour-mk1-golfs_2%2F-tag-1983-campaign&redirected=1#post_1551531
Posted
Old Timer


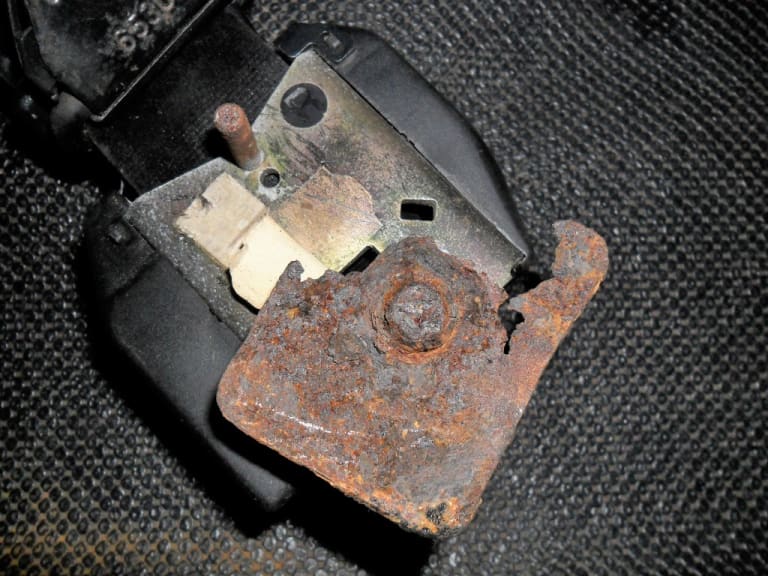
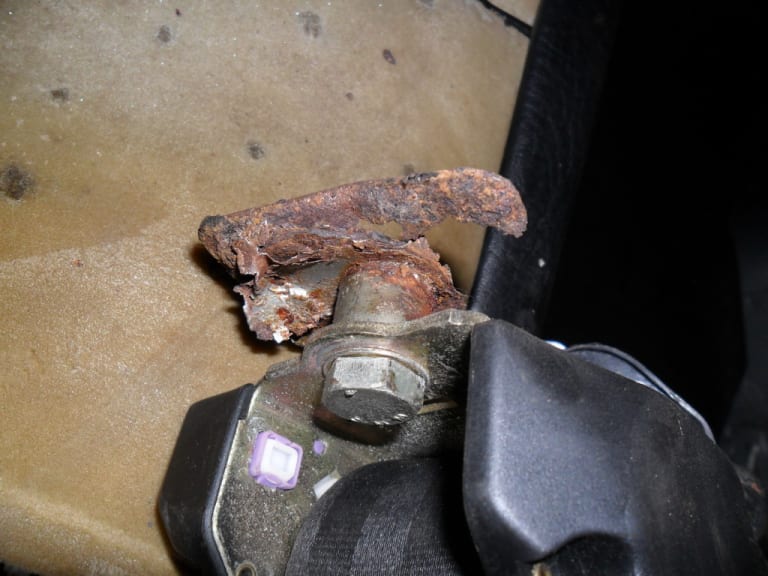
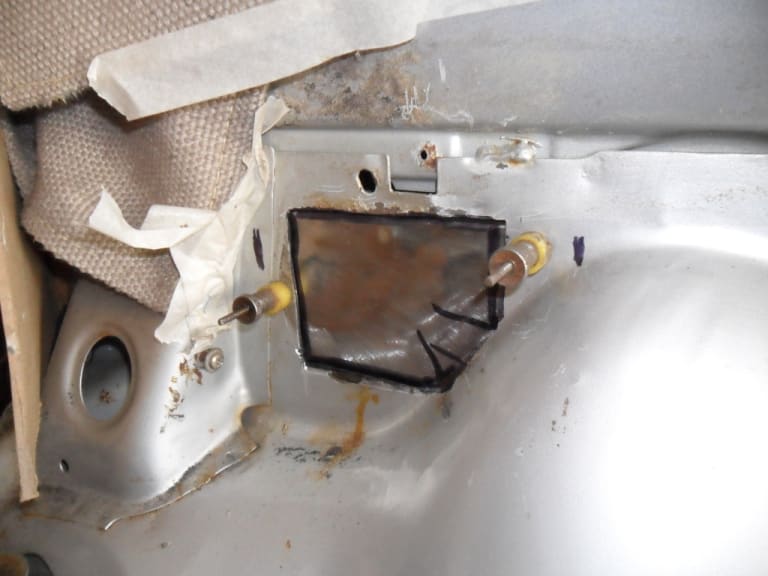
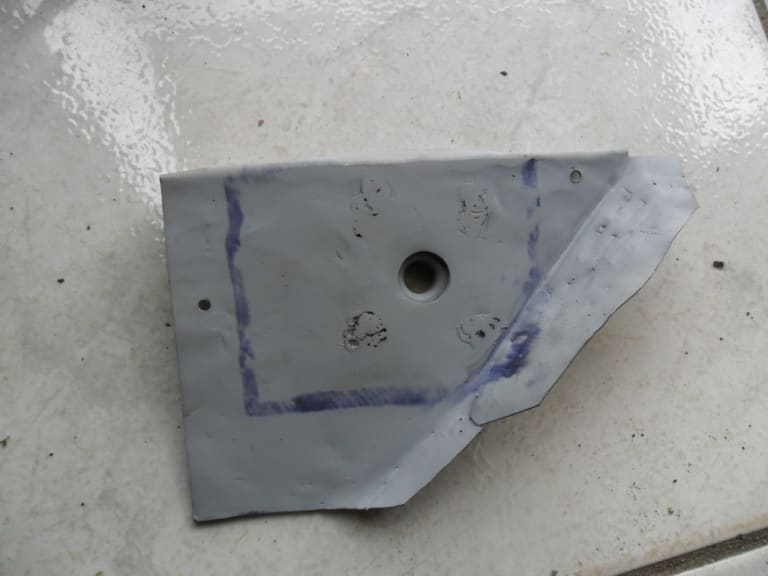
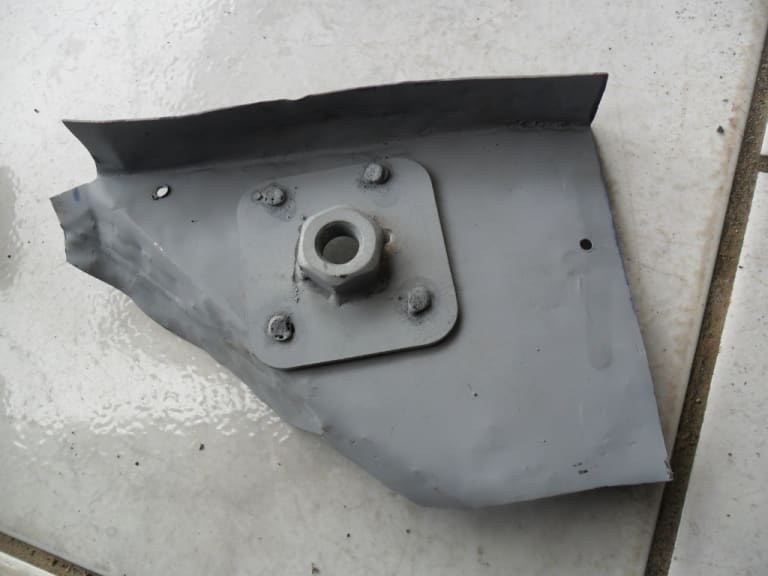
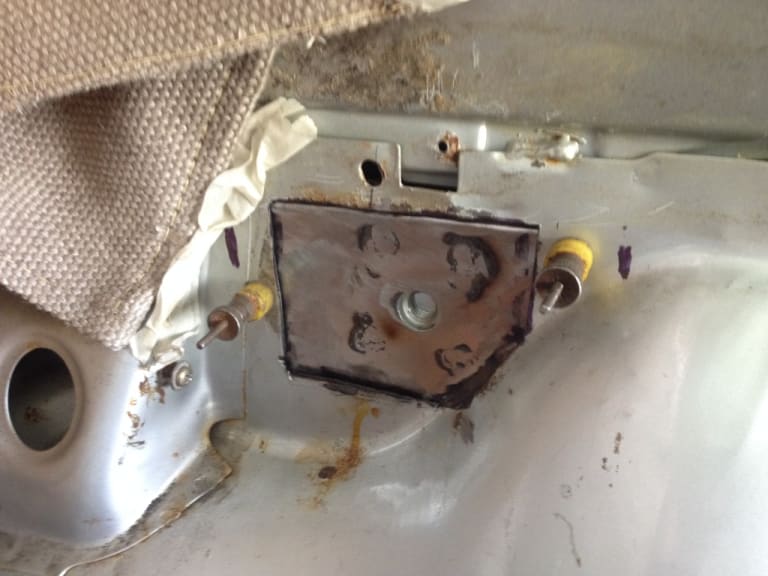
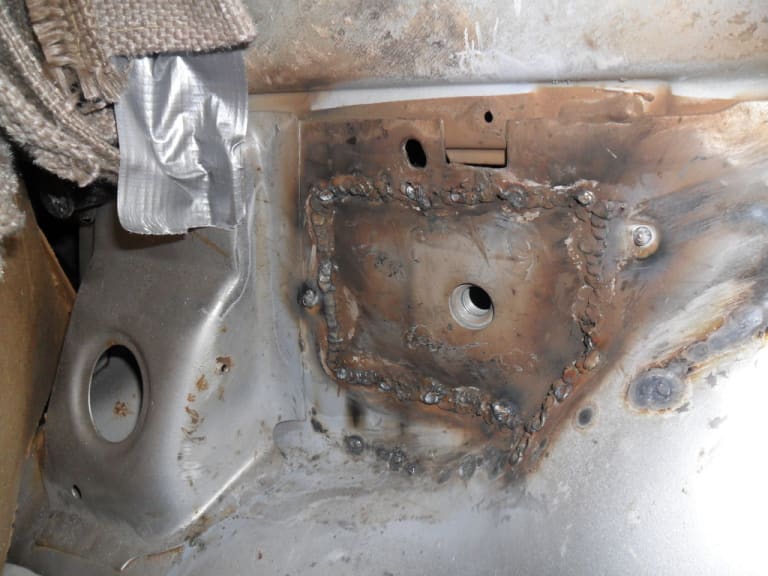
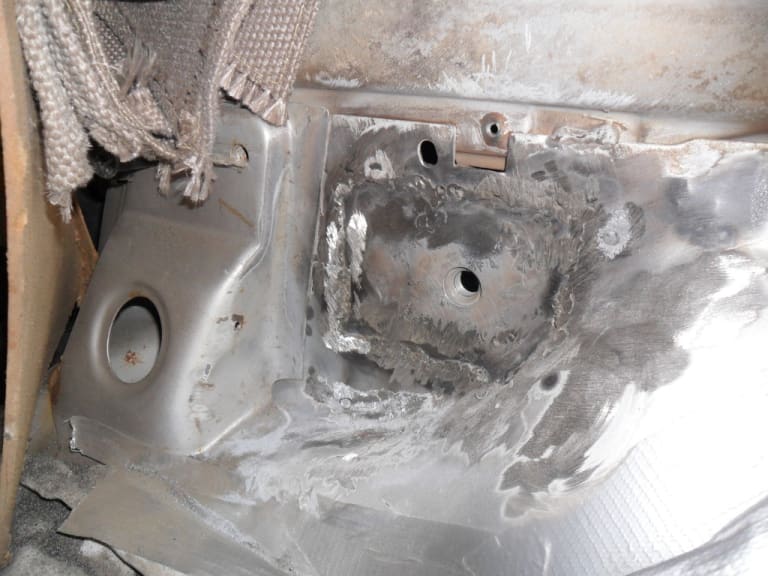
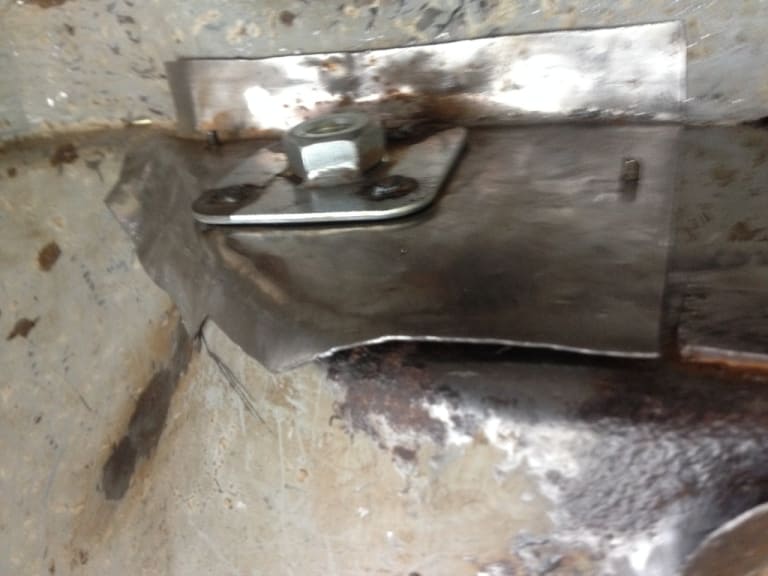
When I came to undo the seat belt the metal tore away with the fitting…>!
New repair panel made. I welded to it a replacement seat belt mount I had bought at VW Busfest. I then fitted the new panel from inside the wheel well - not easy at all and very cramped but I felt it would have more strength with a flange in the wheel well. I temporarily held in it place with two temporary pop-rivet fixings whilst I welded it in place.

1983 Golf GTi Campaign Edition, Diamond Silver
http://vwgolfmk1.org.uk/forum/index.php?page=topicview&id=projects%2Fyour-mk1-golfs_2%2F-tag-1983-campaign&redirected=1#post_1551531
http://vwgolfmk1.org.uk/forum/index.php?page=topicview&id=projects%2Fyour-mk1-golfs_2%2F-tag-1983-campaign&redirected=1#post_1551531
Posted
Old Timer


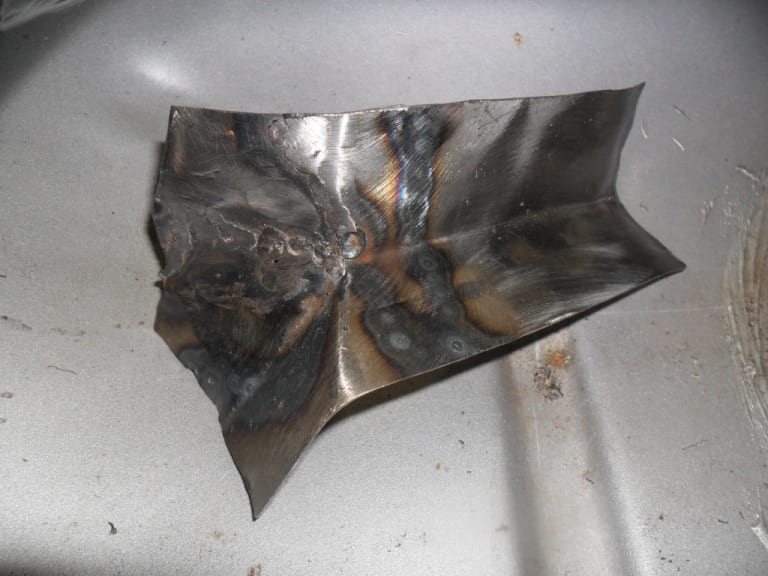
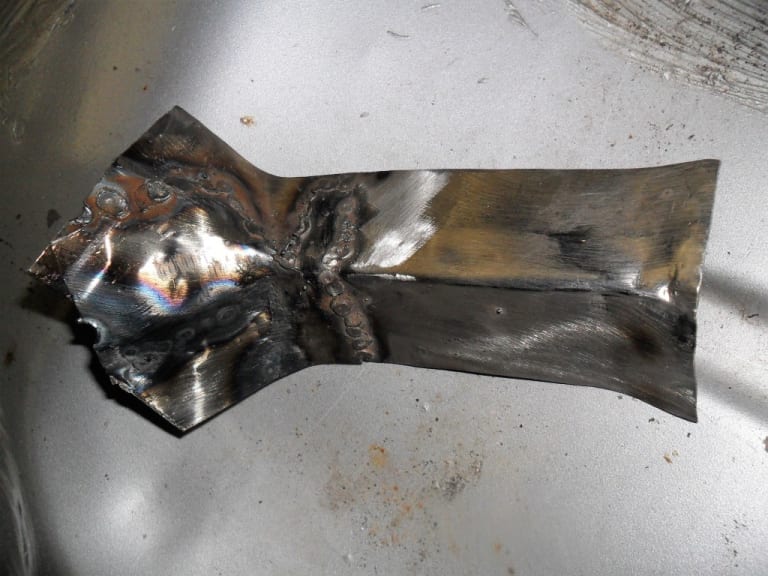
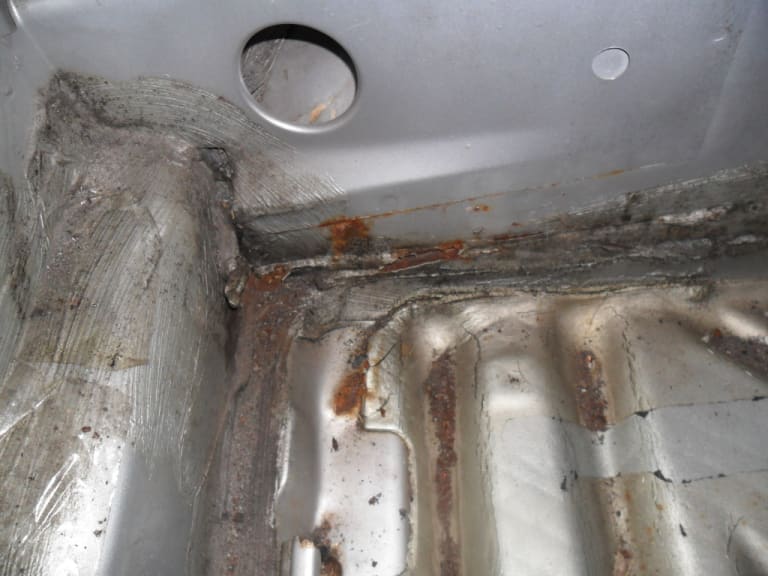
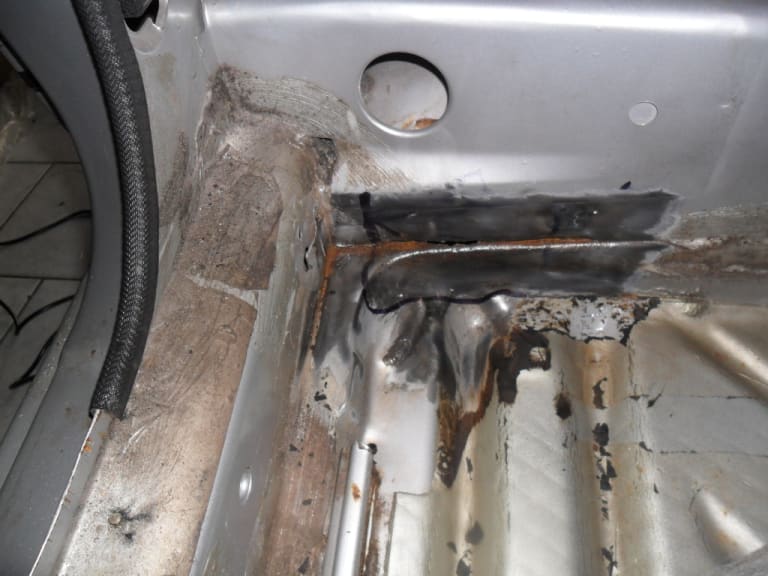
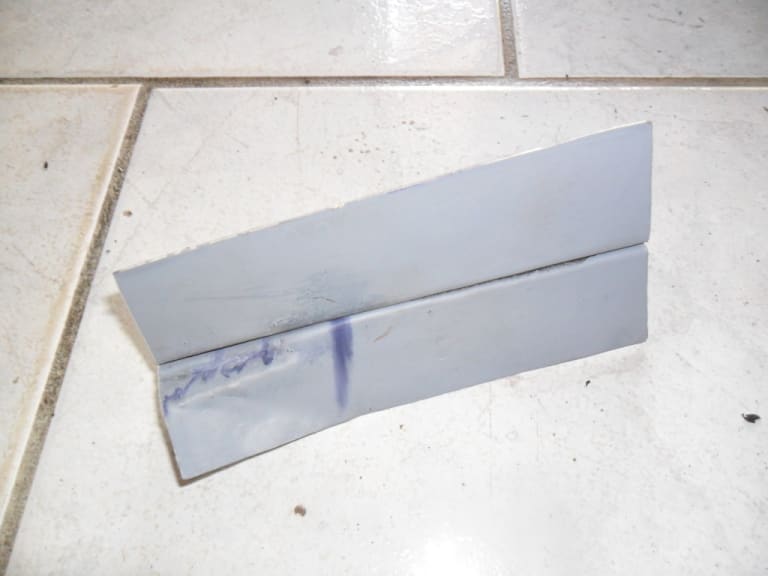
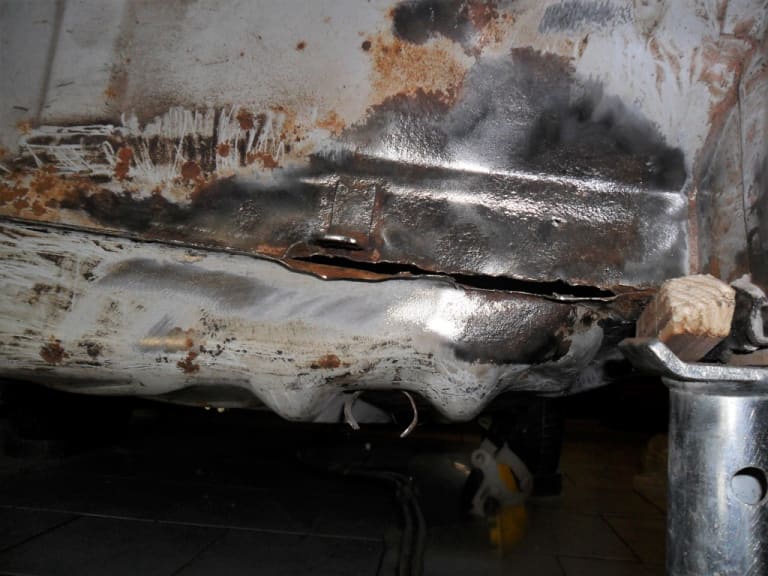
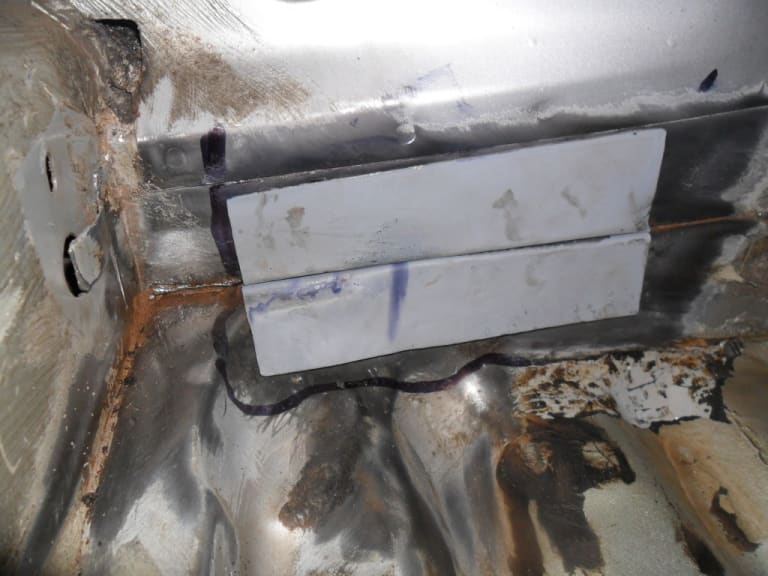
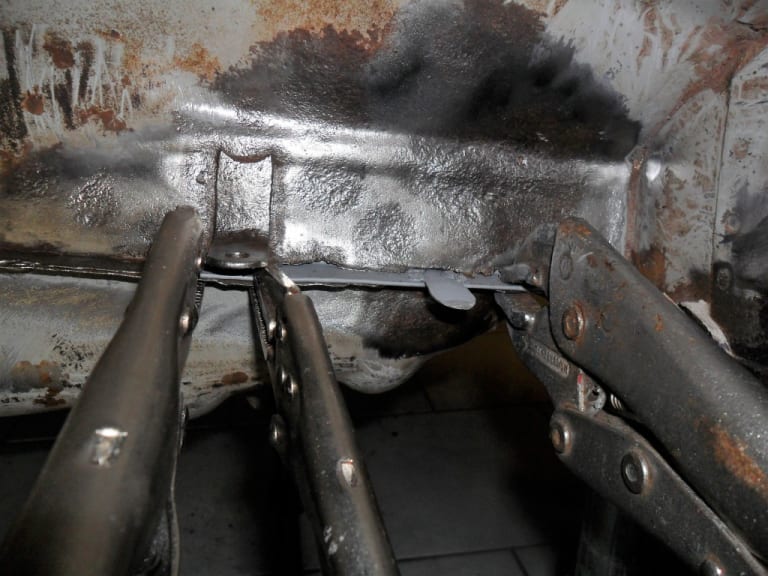
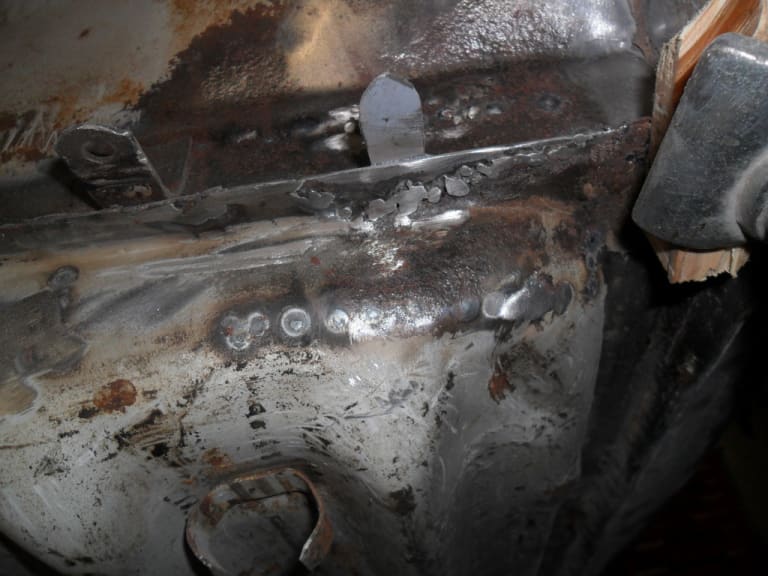
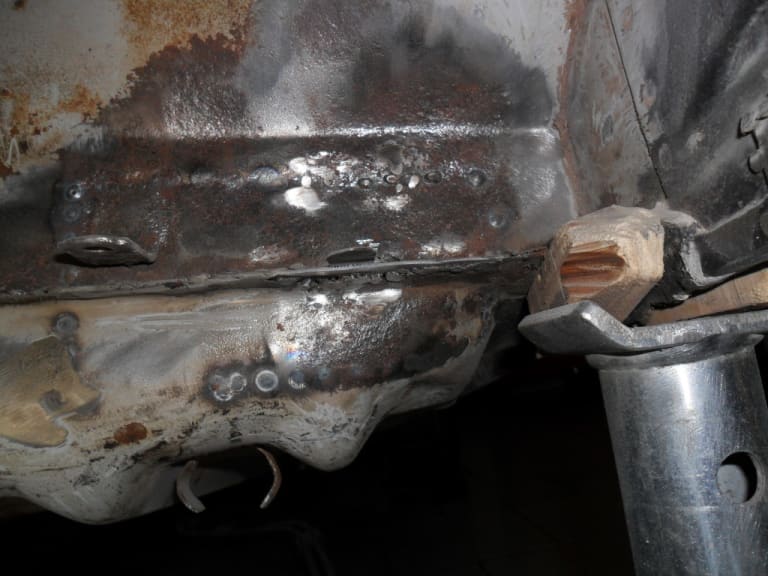
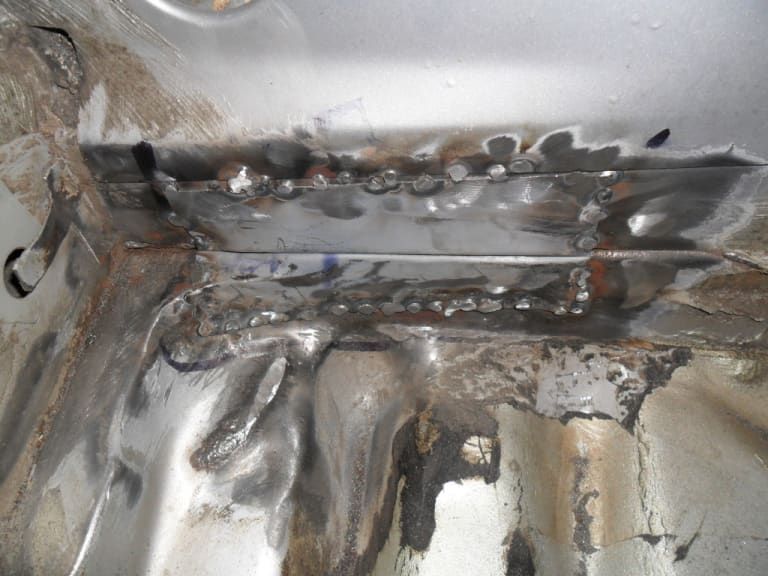
It also meant that a tab of metal that is used to locate the brake pipes across the width of the car had also "dissolved".
I fabricated a new panel "folding" the metal to replicate the original and to provide some strength. I also added a new tab before welding it into position.

1983 Golf GTi Campaign Edition, Diamond Silver
http://vwgolfmk1.org.uk/forum/index.php?page=topicview&id=projects%2Fyour-mk1-golfs_2%2F-tag-1983-campaign&redirected=1#post_1551531
http://vwgolfmk1.org.uk/forum/index.php?page=topicview&id=projects%2Fyour-mk1-golfs_2%2F-tag-1983-campaign&redirected=1#post_1551531
0 guests and 0 members have just viewed this: None.


