


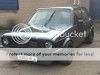
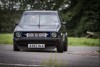
Mexico Beige Mk1 Golf 1.8t 20v smoothed bay - The rebuild !


Settled In

Mexico Beige Mk1 Golf 1.8t 20v smoothed bay - The rebuild !
over the winter months i will get it show ready again as it needs the interior sorting and although the paint looks great its not to my standard
i have loads planned for the coming year with it but to start with il concentrate on the bodywork
ive never done bodywork before so its a new adventure for me i will get it sprayed at a bodyshop though
The spec is as follows
Body
Painted original Mexico Beige
Scuttle panel smoothed
Arches rolled all round
Exhaust recess removed
Chromed bumpers
Chrome side trim
Chrome Flag mirrors
Chrome Porsche door handles
Removed rear wiper and rear badges
All original glass (except front screen changed to laminate)
Chrome audi TT filler cap with trim ring
Engine
1.8T four cylinder 20v (AGU code) - 226 bhp at the wheels (rolling roaded at Regal Southampton)
QPEng MBE Plug and play management with switchable high low boost
Custom downpipe, stainless exhaust (with down turned tail pipe)
Custom engine mounts (engine sits square rather than at the usual slight angle)
Custom boost pipe and water to header hose.
Bailey dump valve
Front mount intercooler
Top fill radiator (removed header tank)
Altenator and MK4 2.0 litre cross flow gearbox painted body colour
G60 Flywheel and VR6 clutch.
Raintray removed with Servo and mechanism
Smoothed bay with removed scuttle panel
Removed heater fan / matrix
Tilton pedal box fitted under dash
Relocated Battery and fuel pump to boot
Suspension
FK Konigsport stainless coilovers
Polybushed throughout
Rear strut brace
Wheels
15" G60 steel wheels (keeping it looking like a total sleeper)
195x45x15 Falken Tyres
20mm spacers on the front, custom made spacers with camber shims on the rear
Brakes
4 pot Wilwood midi lite calipers
Wilwood 280mm discs and pads
Interior
Porsche 944 Tombstones
Gti rear seat
"Euro cluster" series 1 dash
VDO boost gauge fitted to dash window vent
VDO flat fronted Voltage, oil pressure, and oil temp fitted in radio recess
Momo 280mm hand polished steering wheel with Porsche horn push
Mooneyes gear knob
And some photos


The car is an absolute animal traction is the main problem and will be addressed in the future the sound is just amazing its like a gokart only alot faster
Posted

COTM Team


Chris

Posted
Settled In


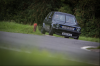
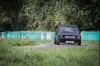
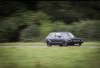
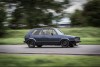
And a couple from a local meet i visited


Posted
Settled In
Heres the process to date
The god aweful aero style fuel cap had to go 1 it didn't fit well and 2 its just not in keeping with the retro feel pics of the bad fitting cap and fuel pipe


so out it was all stripped new filler neck has been bought

Then i attacked the lower rear panel as the corners were suffering from the good old rust


new corner section welded in

then the cut out for the exhaust was filled in as it has a down swept tail pipe

stripped the sill back to bare metal and all is good

next up is the drivers side front wing, its a aftermarket part non genuine and i hate the fit the profile is all wrong so ive bought a new genuine vw wing


also the non genuine wing is missing the little reinforcing tabs -

the genuine wing -

Posted
Settled In

in the process of this i found some rust in the drivers door so ive bought a new genuine door skin


engine out was the next step so i can work on the bulkhead


Posted
Settled In


Posted
Settled In
aircooled1968 said
nice toy bud
thanks buddy
Posted
Settled In
osf genuine wing
os genuine door skin
lower repair panel
filler neck
filler neck gasket
polished fuel cap
2 window regulators
new door seals
new window scraper seals
chrome joiner trims
stainless bolts
check strap sealing gasket
boot seal
carpet
sound proofing kit
filler hose
seat runner clips
sill chrome trims
genuine chrome grille surround trim
toyo tyres
bbs alloys (refurbed so as new)
throttle pedal rubber
im sure theres more and there is loads to go but christmas has taken over and buying has stopped
Settled In


Posted
Settled In
What size are the RM's?
Richard
Posted
Settled In
RICH234GHA said
Nice, one of the best mk1's iv seen and its only getting better, look forward to the progress,
What size are the RM's?
Richard
thanks richard il keep it updated the rm's are 6.5 fronts and 7 rears i dont want to much poke and have to run spacers up front to clear the big calipers
Posted

Moderator
Good luck with the rebuild mate.


Posted
Settled In
smudger1980 said
Wow an amazing MK1 that's going to be even better when it's finished. Looking forward to seeing this at the shows next year.
Good luck with the rebuild mate.
thanks smudger im hoping it will be ready for ultimate dubs the project wont be finished by then as i have lots planned for it but the paintwork should be done
Posted
Settled In
the black part is the new panel

and it welded and ground back

etch primed

started to take the nsr quater panel back to bare metal as i know they suffer from rust around the rear windows

took the scuttle panel back to bare metal as its showed signs of rust im going to replace it at a later date

nsr quarter back to bare metal

started on the ns door and along the drip rail

test fit of the genuine wing

Posted
Settled In

removing the last bits along the windscreen edge

old and new

popped the bonnet on to measure

spotting the new one in place

all welded in place

then work stopped for a weekend as i went with my dad to collect his new project a 1969 mk2 lotus cortina it needs a full resto but its a good base


back on the golf i cut a bit of corrosion out of the bulk head and made a plate to weld in

welded a repair section into the corner of the scuttle

Posted
Settled In

new drivers door skin arrived so i ground the old one off


test fit of the new one

then spotted it in a couple of places before a trial fit on the car

popped it on with the wing for gapping etc and finished spot welding the door skin on

now the scuttle panel was for a LHD its all that was available so i welded the wiper holes up

also welded the aerial hole up on the wing

Posted
Settled In
before standard large return edge


after edge cut back


the bonnet is a complete mess the previous paint prep was bad, the paint just flakes off with a chisel

as you can see the top was just a build up of paint and high build

a close up to show you how thick it was it totally ruined the defining lnes of the bonnet etc

out come the sander

im not running rear arch spats so i welded the holes up


still going on the bonnet lol

started to take the ns door back to

back to bare metal

the bonnet was a nightmare so out came the paint stripper

and it back to bare metal

Posted
Moderator
Posted
Old Timer

 :mrgreen:
Posted
Settled In
smudger1980 said
Would be interested what size rims you go for and if you use any spacers. I am using Wilwood calipers and my current wheels rub on the caliper.
gonna be running 6.5x15 on the fronts et35 with a 12mm spacer
0 guests and 0 members have just viewed this: None.