


Helios Blue Campaign

Posted
Settled In

Helios Blue Campaign
Posted
Settled In
jezzer said
How many of those foam washers are required for the engine mounts? Engine looking good.
Two each side! I'm not. Sure if they are 100% necessary, and have no idea what they are there for, but they were there when I took it out so may aswell put them back in! Ill get some snaps of them later today and post them up.
Maybe someone with a bit more knowledge could explain what their purpose
Is?!
Posted
Settled In
utterly-dubberly said
Mate that engine looks the dogs!!!!!
Thanks! All that cleaning and painting paid off!! 8)
Posted

Moderator


Quick question, is it possible to remove and put back the engine from above? The reason I ask is because I'll be taking my engine out soon and won't have the option to do it the way you have, as I'm confined to a small driveway.
Cheers, Andy.

Posted
Settled In
Melteddrummer said
Car is looking fantastic mate, you've done a cracking job all round!!
Quick question, is it possible to remove and put back the engine from above? The reason I ask is because I'll be taking my engine out soon and won't have the option to do it the way you have, as I'm confined to a small driveway.
Cheers, Andy.
Thanks mate!

Yeah, you can remove/replace engine through the top. I did actually take it out through the top. The only reason I didnt go through the top when I put it back in was that I had fitted a four branch manifold and it would be a right pain in the ass to squeeze it in with the manifold on, im sure it could be done but I thought it easier the other way. Putting the four branch on whilst the engine is in the car after its fitted is also a pain in the ass. It can be done, but again, very awkward!
If you arent using a 4 branch and are just using the standard manifold and downpipe then it would be no problem as you could fit the manifold out of the car, put the engine in and then fit the downpipe to manifold when engine is in place.
Let me know if you need any more help. Good luck!
Posted
Moderator
Andy.
Posted
Old Timer

Given me a lot of help with my engine rebuild (pretty much spraying everything that you are)
pet73r said
How did you get your gearbox so clean and smooth? I'm doing mine now but it's taken me about 5 hours so far..

But after painting its not come out so good lol

Wanted: Front Bumper, DESPERATELY NEED A DRIVERS WING!
MY Build Thread
My Facebook Build Page #Project83
Posted

Settled In
BACK SOON..............
Posted

Old Timer
Posted
Settled In
Alfie said
Amazing build, i'm pretty much doing exactly the same as you at the moment…
Given me a lot of help with my engine rebuild (pretty much spraying everything that you are)
pet73r said

How did you get your gearbox so clean and smooth? I'm doing mine now but it's taken me about 5 hours so far..
But after painting its not come out so good lol
Is that yours painted? If so, something has gone wrong. 8O
From the pic of yours it looks like there was some grease or dirt still left on it! I must admit, I spent hours on mine too, although it looks pretty clean before I painted it, it wasnt completely spotless. There was still some dirt in the small corners which I just couldnt reach, not without a sandblaster anyway, and I didnt have one of those

The main thing is to make sure there is no grease or any other contaminant, such as gearbox oil or degreaser left on the surfaces of the gearbox otherwise your paint will react when you paint it on.
Did you use a brush, spray gun or spray cans? I used a spray gun as it gives the best results, but good quality spray cans are also good. As for brushes, ive never been able to get the paint to lie flat enough or get an even coverage so I tend to stay away from using brushes! But thats just me, I have seen some peoples work where brushes have been used and it looks good. But for best results I would always use a spray gun if you have access to one.
What I did do though was spend about 5 hours with assorted wire/stiff brushes, a pressure washer and about 5 litres of degreaser! Once I had removed all the main grease and dirt using hand held wire brushes of assorted thicknesses/stiffness' and the pressure washer to clean it all off as I went, I then used a wire brush on an angle grinder to really clean off all the dirt and clean up alot of the pitting in the cast.
Make sure you wear gloves and goggles when using wire brushes on angle grinders! The wires have a tendency to fly out at random moments at very high speed, and will stick into anything they can…skin, eyes etc!! Painful :redfaced: They also have a tendency to catch the edges if you are holding them to hard to a corner or tight area causing them to bounce and catch you on a part of your body, well they did with me anyway! Also very painful!! Especially on cold hands :redfaced:
Anyway, now we've discussed the health and safety
the next stage was using assorted wire brush heads to go in the end of a power drill. I used all sorts of small wheels, cups, and bullet type wire heads for the drill to get into the tight corners. after about an hour of this  I had had enough, so I gave it one more hit with the pressure washer to blast off any remaining dirt and then dried the box.
 I then prepared all my paint etc and set up my spray gun, I used POR20 aluminium paint from frosts, it wast cheap but I think it was worth it. And finally BEFORE painting I used a panel wipe, or silicone cleaner to remove any remaining grease or dust on the surface to ensure there was no reaction when I started to apply the paint. A good tack cloth could also be used instead of the panel wipe/silicone cleaner.
I gave it a good few thin coats making sure every part had a good coverage. Using thin coats and drying with a heat gun in-between coats will help to not get runs. Or better still, if your not impatient like me, give it one coat then leave it over night in a warm place, then give it another coat the next day, repeat a few times and she'll be right. But if your like me and like to finish stuff asap :wink: just use a heat gun or paint it in a warm room. Always best to leave it a will to harden off in a warm place for a few days before fitting though, regardless of which technique you use to paint it.
Sorry to waffle on, got a bit carried away there!
To recap….
- Assorted stiff/wire brushes
- Lots of degreaser
- Pressure washer
- Cupped wire brush for angle grinder
- Assorted wire heads for power drill
- Panel wipe/tack cloth
- Paint
Hope I've helped! Let me know if you need anymore info. And post up a link to your build thread if you have one?

Posted
Settled In
mk1_FSI said
pet73r absolutly stunning job there!!
Thanks!

Posted
Settled In
mike_turbo said
Just looked at your build thread job well done.
Cheers Mike, hopefully have a little update soon
Had to take a little holiday from her as things were starting to go slow. I was seeing plugs/nuts/bolts/tools/golfs etc when I shut my eyes!! Had to take a little time off. :wink:
Posted

Old Timer
pet73r said
mike_turbo said
Just looked at your build thread job well done.
Cheers Mike, hopefully have a little update soon
Had to take a little holiday from her as things were starting to go slow. I was seeing plugs/nuts/bolts/tools/golfs etc when I shut my eyes!! Had to take a little time off. :wink:
Iknow that feeling….
Posted
Settling In

 especially when about to paint up a box like I am soon.
Great job
Posted
Old Timer
pet73r said
Is that yours painted? If so, something has gone wrong. 8O
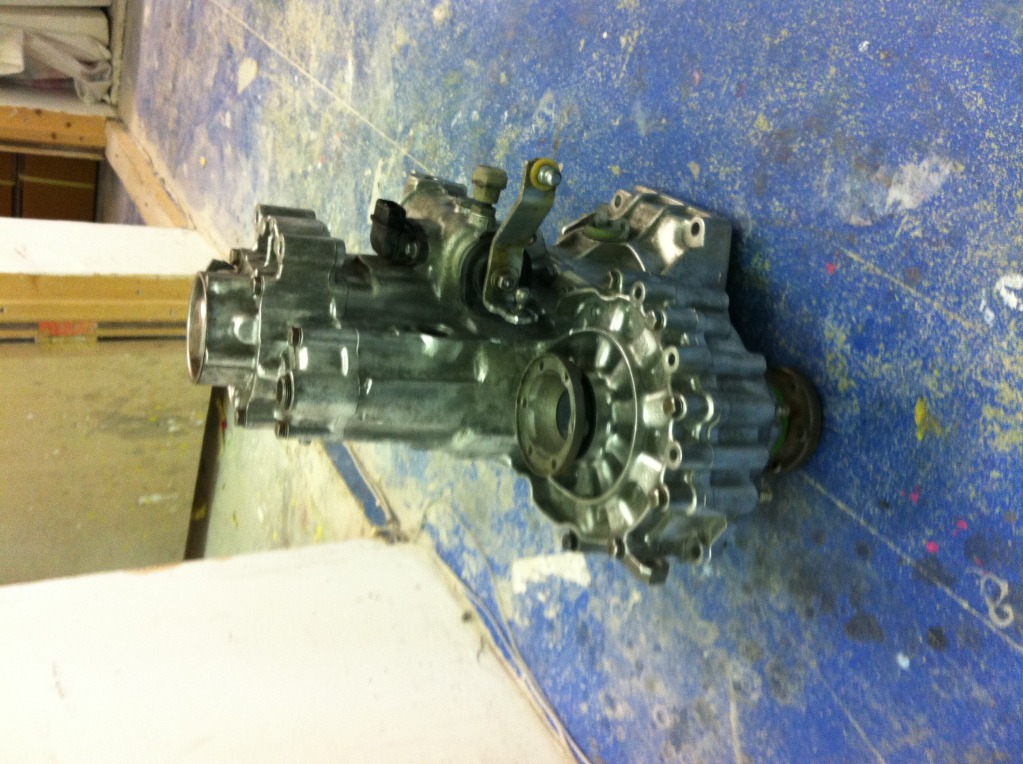
Sorry, forgot to post up a pic of the final version, that pic was after I finished stripping the box down
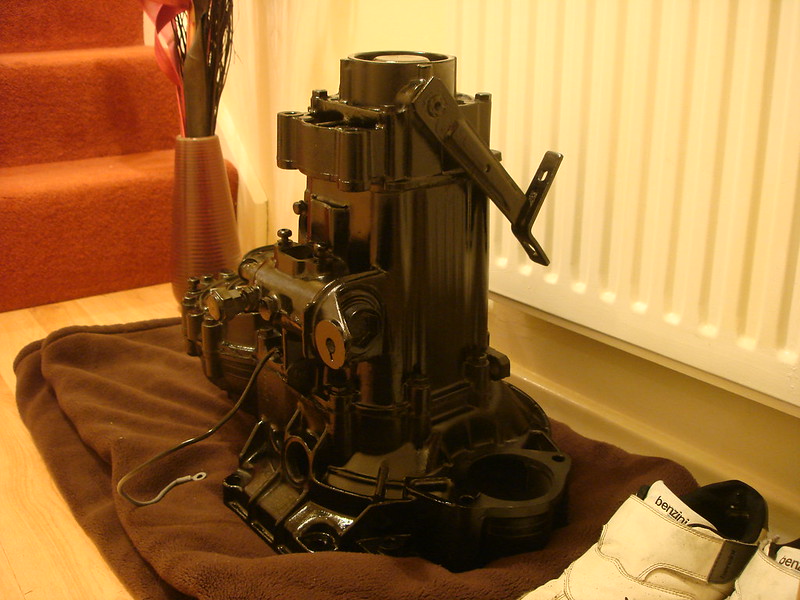
Thanks for the massive writeup, seems like I am slightly more impatient than you lol, My box was originally painted black but after my mate drove it through the winter, salt etc it wasn't looking so good. I ended up spending about 5 hours scraping and sanding (using a screwdriver in the corners) to bring it back to bear metal. The main thing I decided not go as far as smoothing the box with a wire brush and just degreased it heavilly and then jet washed it. It's ok but still has a bit of that metal texture to it instead of being totally smooth. I primed it and then used some Simoniz Tough Black Paint so hopefully it will hold! I grabbed the gearbox and brought it into the house last night to get a good look at it and keep it warm so I can put another coat on it, it seems actually that now it's dried, and despite the fact I missed a few bits, it's not come out too badly.. So quite chuffed about that. Just need to give it a quick rub down with an abrasive pad and give it another good coat in the warm.
DSC01007 by Pixel Horizon, on Flickr
pet73r said
Hope I've helped! Let me know if you need anymore info. And post up a link to your build thread if you have one?
Cheers again, helped me loads, I've taken loads of pics to make sure I know where everything goes (breadcrumbs so to speak) but I've been using your thread to see how you have sprayed all the parts and I'm currently in the process of doing the same with all my parts… I'm having to keep everything in the house with heating on, spray it out in the garage quickly, and then bring it back into the house!!
You can check out my build here …. http://www.vwgolfmk1.org.uk/modules.php?name=Forums&file=viewtopic&t=86527
Cheers again
Wanted: Front Bumper, DESPERATELY NEED A DRIVERS WING!
MY Build Thread
My Facebook Build Page #Project83
Posted

Old Timer


Posted
Settled In
From your pics, your gear box looks lovely, my mate did his all black too, it looked honky! Almost better doing it black than using the aluminium paint like I did because as good as the paint it, it will never look exactly like cast aluminium!To be honest though, if you are going to use the car like I am, then there isnt really any need for a showroom finish, although it is nice just to get the first few drives and photos when shes all finshed and looking new! :wink:
But at the end of the day, these cars are meant to be driven! And thats exactly what I shall be doing with mine! Using it exactly as VW intended
Im glad my thread has been of help! Im no expert though, just like to have a go and learn along the way! And have used, like you, this forum alot for guidance! Its a mk1 golf library, brimming with info. Cant fault it!! 8)
Nothing helps more than checking out other users build threads, which Is where I am off now…..
Posted
Settled In
Alfie
Posted
Settled In
peterg60 said
outstanding love it helios blue all the way love my
Helios blue on mk1's is the best! Atlas grey a close second…. :wink:
Posted
Old Timer
pet73r said
To be honest though, if you are going to use the car like I am, then there isnt really any need for a showroom finish, although it is nice just to get the first few drives and photos when shes all finshed and looking new! :wink:
But at the end of the day, these cars are meant to be driven! And thats exactly what I shall be doing with mine! Using it exactly as VW intended
Thanks for the kind words
Much prefer the black, means I don't have to keep it squeaky clean lol Mine won't be a daily driver but I intend to use it! I'm trying to get it ready for a Nurburgring trip in late April so got my work cut out!! As you say, whilst it's not a 100% smooth as you like showroom finish, I think it's come out pretty well. Will be keeping an eye on your build :wink:
Alfie
Wanted: Front Bumper, DESPERATELY NEED A DRIVERS WING!
MY Build Thread
My Facebook Build Page #Project83
0 guests and 0 members have just viewed this: None.