MFA Operating Guide and Econo Gauge
Posted
#1642428
(In Topic #229573)
Chairman


This document will describe the operating system of the MFA and its associated parts and connections.
The guide is taken from a December 1983 Mk1 Golf GTI 1800i Cabriolet with a DX engine so there will be variations depending on the vehicle spec and year of manufacture.
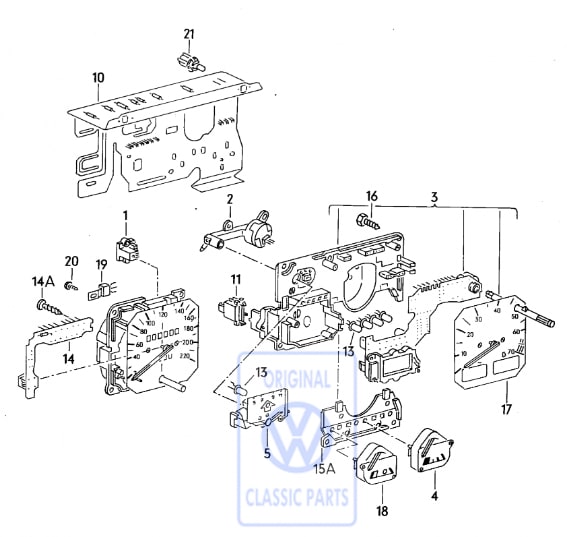
There is an exploded diagram at the end of this post to show the position and part numbers of items involved in this document.
What Is An MFA?
The Multi - Funktion Anzeige in German or Multi-Function Indicator was available as standard or optional equipment on 1780cc models from August 1982 onwards. The unit is a small trip computer consisting of an electronic analyser and a digital display unit capable of showing seven different functions. It is housed within the dashboard of the Mk1 Golf GTI.
There are two types of MFA operating controls,
1. The type with a '1' and '2' toggle switch in the top right of the instrument clocks.
To change between the two displays simply roll the stalk left or right to select.
2. The type with a '1' and '2' sliding switch on the right steering wheel stalk.
To change between the two displays simply slide the switch left and right.
There are seven fields which can be shown on the LCD display housed between the speedometer and rev counter. The start screen is the clock which uses the 24hr display. To scroll through the various displays, press the button on the end of the right-hand stalk until you reach the display that is required.
The fields which can be display are as follows,
1. Driving Time Display
The screen shows the time which has elapsed from when the ignition was switched on, or from when the information was erased from the appropriate memory. The maximum indicated value is 23hrs 59mins.
2. Miles - Distance display
The distance indicated is that which has been travelled since switching on the ignition, or since erasing the information in the memory being used. The maximum distance indicated is 999km (620 miles)
3. MPH - Average speed display
The average speed is indicated, after switching on the ignition or erasing the information in the memory being used, after 10 seconds driving time and a distance of 100 meters. The best possible degree of display accuracy is achieved after 1 minute.
4. MPG - Average fuel consumption display
The average consumption indicated is not the actual consumption at the time of reading. In general, the statement made under "Average speed" applies.
In switch position 2 - the average values attained for speed and consumption over all the journey stages are indicated.
5. Engine oil temperature display
Oil temperature within a range of +50*C and 145*C are shown. When no oil temperature indication is shown, the engine is still not warm and it should not therefore be worked hard. The engine speed should be reduced if the oil temperature rises about 145*C.
6. Ambient temperature display
The range is from -30*C up to +45*C. The temperature display should not be used as an indication of frost because ice on the road can occur at temperatures above 0*C.
Gear Change And Consumption Indicator
The gear change indicator and fuel consumption gauge are combined in the instrument panel.
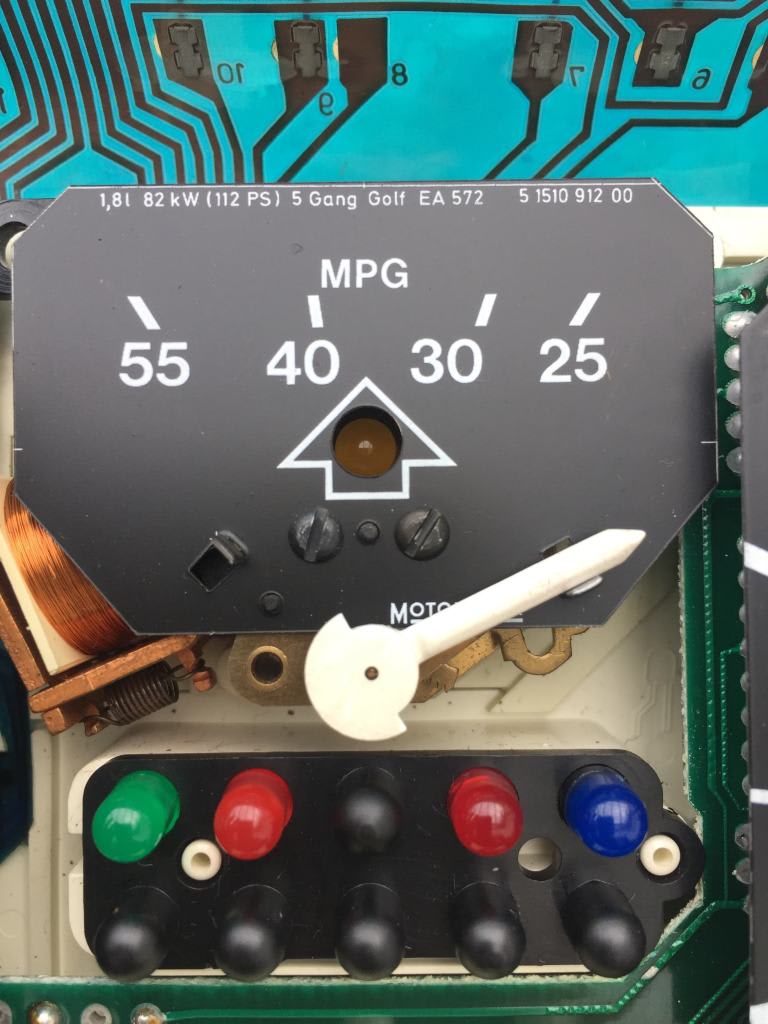
The gear change indicator (item 5 in the exploded diagram below) is indicated by a yellow lamp (171 919 061D) located in the middle of the arrow at the top of the instrument panel. The lamp illuminates in all gears except top gear (5th) when the engine power at that moment is not being obtained economically. In the next higher gear the same power can be obtained with lower fuel consumption. A change up to the next higher gear should be considered depending on road conditions. The gear change indicator does not illuminate under acceleration or deceleration.
A relay (original relay 171 919 091 with a '5' on top, replacement 171 919 091C with an '8' on top, also 321 279 241 with a '5' by TFK also works) is employed in the operation of the gear change indicator at position 4 on the fuse box.

The fuel consumption indicator is indicated by a needle located at the top of the instrument panel. When 5th gear is engaged the needle will rise from right to left along the indicated scale.
The needle will indicate the actual fuel consumption in MPG at any moment when the engine is warm. The needle can be used to obtain the best fuel consumption.
Issues Experienced With The MFA
The yellow gear change indicator fails to illuminate.
The gear change indicator is activated using a vacuum system.
The start of the system is the intake manifold housing. At the rear of the manifold there is an outlet and attached to it should be a braided connection pipe and into that is a plastic tube. The tube should extend down the engine bay towards the distributor.
Attached to the distributor is a vacuum advance. The tube from the rear intake manifold outlet attaches to a circular sensor (171 919 825) which has an inlet & outlet port and also an electrical connection. A small braided connecting tube attaches the circular sensor & vacuum advance attached to the distributor.
The circular sensor converts the vacuum pressure into an electric signal which is transmitted to the yellow gear change indicator. When the throttle is fully shut there is no vacuum in the line so the circular sensor also stops the indicator illuminating when the engine is under high vacuum (over run).
Circular sensor - 171 919 825

If the lamp does not illuminate then the vacuum pipes, circular sensor, electric connection and wiring should be checked.
The vacuum pipes can melt if they touch hot engine parts.
The electrical connection may not be pushed in fully.
The wires may have become detached somewhere in the circuit.
Wire colours to the circular sensor - white/red and brown/red
(ignore the solid red wire attached to the electrical connector, it's a temporary repair)
The fuel consumption indicator fails to activate.
The fuel consumption indicator (needle) is activated when the gear lever is moved into 5th gear.
Under normal operating conditions the needle will appear from right to left across the scale and vary according to driving style.
Wiring connecting the gearbox switch and the circular sensor (171 919 825) next to the vacuum advance on the distributor forms a circuit.
When 5th gear is selected, a switch (191 919 823) known as the "GTI reverse switch with MFA" on top of the gearbox housing is activated by the internal movement of the gearbox components.
The same switch also operates the reversing lamps.
An electrical signal is transmitted to the instrument panel, activating the fuel consumption indicator. At the same time the yellow gear change indicator lamp is disabled.
The wiring from the reverse switch also connects to the circular sensor (171 919 825) where they join together above the gearbox towards the back of the engine bay.
The wiring from the gearbox switch, (white/green and yellow) join with the wiring from the circular sensor (white/red and brown/red) with two white(ish) connecting blocks.
White/green & white/red join and brown/red & yellow join in the blocks on one side of the connecting blocks (we'll call that the engine side).
On the other side of the connecting blocks (we'll call that the loom side) the 4 white/green & white/red wires reduce to just 2 wires. The brown/red & yellow wires are also reduced to a brown/red & a single brown wire.
The vacuum pipe which runs from the inlet manifold to the rear of the instrument panel will affect the needle's operation; if it becomes disconnected then the needle will not rise across the scale when 5th gear is selected.
If the fuel consumption indicator needle fails to activate the gearbox switch should be checked.
Firstly, check if the reversing lamps illuminate. It should be noted that if the gear selector rods are not adjusted properly then the reverse lamps may not illuminate. Make sure the adjustment is correct.
If they are correctly adjusted, remove the switch from the top of the gearbox (its covered by a rubber boot) and bridge the terminals with black/blue and black wires. If the lights work then the switch is faulty.
If the lamps don't work then there could be a problem with the wiring, fuse, bulbs or the connecting blocks described above.
The 99.9 mpg or - - . - Average fuel consumption display error
The MPG reading is generated when the engine is running. The vehicle doesn't have to be moving as a reading will still be produced when idling.
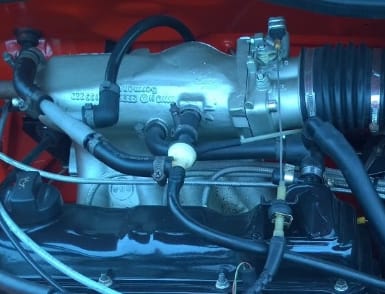
A lot has been written about this issue and it is believed that the reading is generated via vacuum pressure and a tube that runs from the non-return valve located at the front of the intel manifold, through the bulkhead wall to the rear of the instrument panel.
The non-return valve (171 611 931C) is situated at the front of the inlet manifold. There are 2 outlets on the valve. The rear valve has a braided connecting pipe (shortened to 40mm) pushed onto it and the pipe to the instrument panel is inserted into that and run through the bulkhead to connect to the rear of the clocks. A check valve cap (056 129 777) is fastened to the front valve.
The MFA takes the MPG readings from two different sources. A Hall Sensor (321 907 345B) on the back of the speedometer and a Digital Pressure Gauge (191 907 346 VDO or 191 907 346A Motometer which are Mk2 Golf compatible parts), sometimes referred to as Component G55.
The actual way the MFA calculates the MPG reading hasn't been ascertained 100% as far as I can establish and there are workings within the unit that I haven't reached.
Hall Sender 321 907 345B held by 2 screws to the left of the speedo cable attachment.

The Hall Sensor converts the input from a rotating magnet within the speedo housing into an electrical input which is transmitted to the MFA. It is achieved by the 'Hall Effect' that relies upon the effect of magnetism on electrons across a live circuit.
The Hall Sender WAS available (Autumn 2020).
At the rear of the instrument panel is the Digital Pressure Gauge, which converts vacuum pressure into an electrical signal.
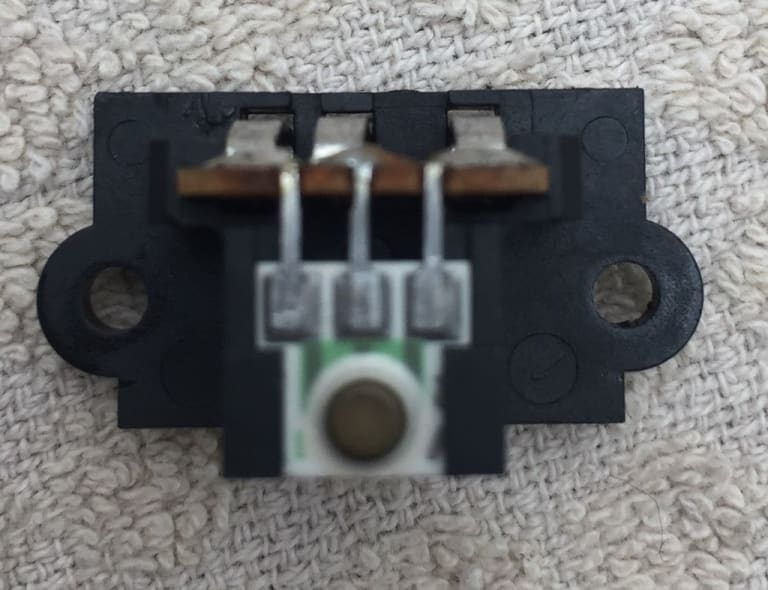
The mechanical component of the Digital Pressure Gauge is a set of bellows that contract with increasing force generated by the inlet manifold vacuum. As the bellows contract it causes a magnet to move away from a force sensing resistor. That in turn generates an electronic signal that is transmitted to the MFA and is used to calculate MPG figures in conjunction with the speed and distance input derived from the Hall Sensor and speedo.
Digital Pressure Gauge aka Component G55 191 907 346 VDO or 191 907 346A Motometer

Rubber seal - essential to ensure a vacuum seal is maintained.

Rear of Digital Vacuum Gauge or Component G55

Digital Pressure Gauge opened up showing the bellows and 3 pins that need to be clean to ensure a good contact.

If the reading 99.9 mpg is being displayed, firstly ensure that the rubber hose hasn't become detached from the rear of the instrument panel. A tell-tale sucking noise can sometimes be heard from the dashboard area. If it is in place, trace the pipe back through the bulkhead to the non-return valve checking that the pipe hasn't come into contact with a hot surface and has melted. It can occur easily!!
Having checked that the pipe is intact the next option is to delve a little deeper and remove the instrument panel and attempt to resolve the issue with a few more tests.
Remove the dashboard so that the clocks are exposed.
Unclip the speedo cable and unscrew the retaining screws that hold the clocks in place.
There is a large multi plug which houses the wiring for the various operations in the instrument panel which needs to be unplugged. Be careful of the blue circuit board, it is brittle and easily damage - resulting in a position which leaves you worse off than when you started.
Once the clocks are out, inspect the blue circuit board for any obvious signs of damage.
If nothing is obvious the parts on the rear of the MFA could be the issue.
The best solution would be to start replacing the various parts such as Digital Pressure Gauge and the Hall Sender. Since the Digital Pressure Gauge is now obsolete, a replacement from known working instruments is the next best option. Failing that careful removal of the part, opening it up and cleaning with a compressed air cleaner may help.
The fuel gauge and/ or water temperature gauge don't work
There could be various reasons why the gauges don't work but as this document relates to the instrument panel, we will stay with the problem associated with it.
The gauges operate via electrical input via the large 14 pin plug on the rear of the instrument panel.
If the gauges don't operate as they should, check that the plug is seated against the blue maylar printed circuit. Make sure the connects are clean too. Sometimes a piece of electrical tape wound round the plastic tongue behind the maylar strip helps with the connection too. (see below).
Assuming that everything is connected correctly, the next thing to check is the 10v voltage stabiliser.
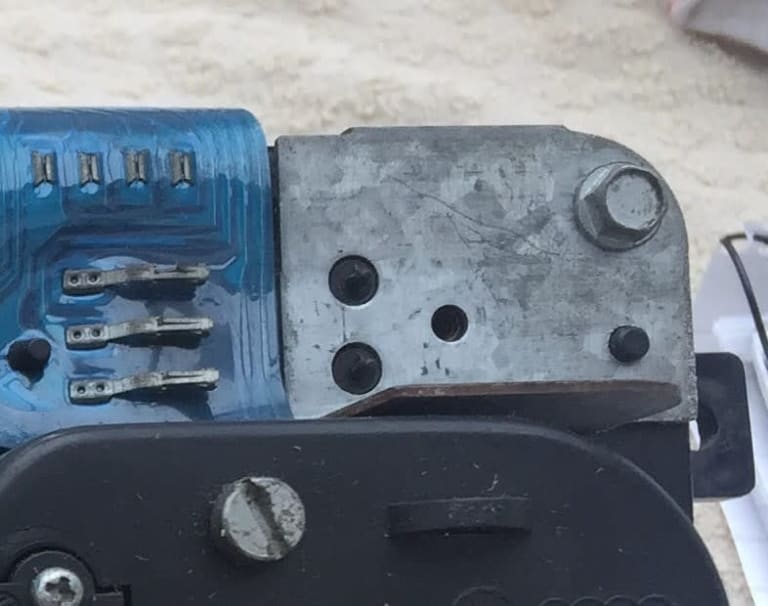
The stabiliser is located on the rear of the instrument panel at the top right of the housing.

The 10v voltage stabiliser (TCA 700 Y) is now obsolete as a replacement part (171 919 803) - unless you are lucky to find one but it may be expensive!
There are potential suitable replacement options such as KA7810A or LM7810 but it will require the 3 pins bending slightly to fit their corresponding sockets as they come in straight form. Having bent the pins, the regulator will need to be inverted and the plastic raised moulding will need to be filed down flat.
Under the stabiliser there is usually a metal heatsink fastened to the plastic housing via the top left bolt (6mm) but on my housing there isn't one and the gauges work correctly without it. The image below has the stabiliser removed.
Large 14-Pin Instrument Panel Plug
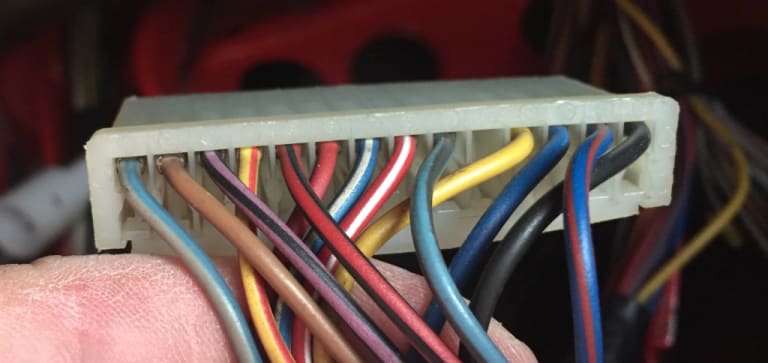
Position of the wires working left to right. The plastic block is numbered accordingly.
1. Blue/grey - Light switch 58b (dash lighting)
2. Brown - Earth
3. Purple/black - Fusebox pin B/3 (fuel level sender)
4. Blue/yellow - Fusebox pin B/7 (coolant temperature sender)
(yellow/red on my cabriolet)
5. Red/black - Fusebox pin B/19 (rev counter)
6. Red - Fusebox pin B/ 12 (permanent live)
7. Blue/ white - Fusebox pin A/28 (high beam warning lamp)
8. Red/white - MFA switch mode button
9. Blue/ black - Fusebox pin A/4 (high oil pressure warning switch)
10. Brown/red - Fusebox pin B/6 (glow plug for diesels)
(Blank on my petrol cabriolet)
11. Yellow - Spade to engine loom behind fusebox on early
fusebox pin B/15 on late
(low oil pressure warning switch)
12. Blue - Fusebox pin A/16 (alternator warning lamp)
13. Blue/ red - Fusebox pin A/17 (indicator warning lamp)
14. Black - Ignition switch fusebox pin 15 (ignition live feed)

If the 14-pin plug and the plastic collar that it fits into are removed you will see that the printed maylar has corresponding numbers and names printed into it to assist in circuit identification and the tracing of wires.
1. - Speedometer lighting (terminal 58)
2. - Ground (terminal 31)
3. - Fuel sender
4. - water temperature
5. - Tachometer (clamp 1)
6. - Permanent plus 12V for clock / MFA (terminal 30)
7. - High beam
8. - Rollmode (switching the MFA)
9. - Oil pressure 1.8 bar
10. - Pre-glow control or lambda (OXS lamps for US speedometers) or free
11. - Oil pressure 0.3 bar
12. - Charge control (terminal 61)
13. - indicator (terminal 43)
14. - Ignition plus 12V (terminal 15)
Small 6- Pin Instrument Panel Plug
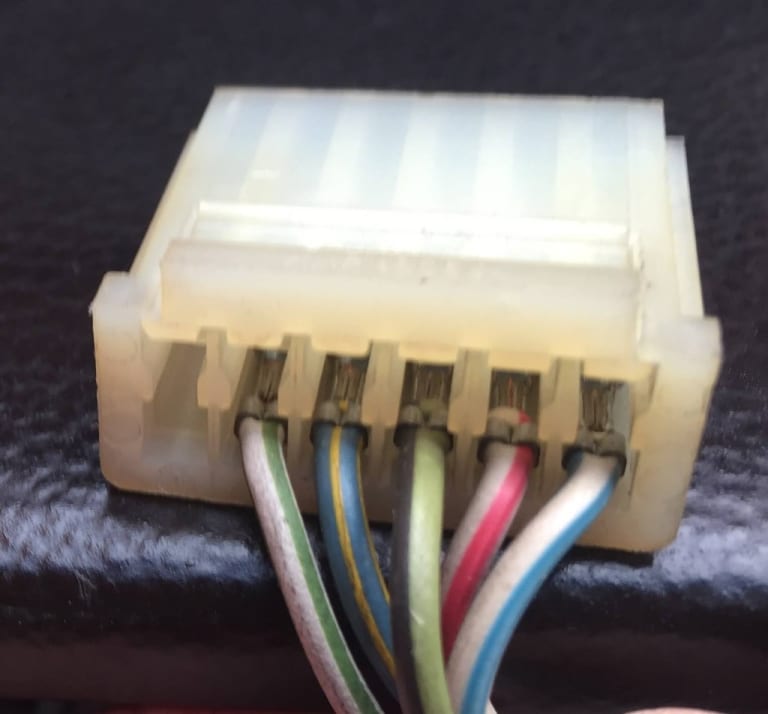
Position of the wires working left to right. The plastic block is numbered accordingly.
1. Blank - VSS output (vehicle speed sensor for radio volume level) Hall sensor signal output (cable colour white-ge, goes to the GALA input of the radio and can also be used for GRA)
2. White/ green - Switching contact 5th gear (only GTI / GLI, with earth contact = current consumption display works) Fusebox pin B/13 (Gearshift control relay pin 5/G)
3. Blue/yellow - Shut-off valve (only GTI / GLI, with ground contact = yellow upshift lamp lights up) (Fusebox pin A/3 Gearshift control replay pin 3/L)
4. Green/black - Oil temperature for MFA. (Fusebox pin B/15 on early models, spade to engine loom behind fusebox on late models)
5. White/red - Outside air temperature sensor (for MFA)
6. White/ blue - Outside air temperature

The ambient temperature display (or outside temperature) in position 6 in the MFA fields is calculated via a sensor positioned at the front right of the car. Originally a bracket (171 919 399A above, now obsolete) was fixed to the bumper which housed the sensor to which an electrical connection was attached.
On a lot of cars, the bracket has been lost during accident repairs, bumper replace-ment or old age! Most are now held in place with a zip tie.
Issues can arise with the outside temperature sensor. The 6-pin plug at the back of the instrument panel can become detached and show an incorrect reading such as '-30'so check its connected before purchasing.
Low oil Pressure Warning Buzzer
The Mk1 Golf GTI has a warning system to alert the driver when the oil PRESSURE drops too low for the engine to operate safely. The system employs a red lamp located in the middle of the dashboard and a buzzer that sounds in the body of the instrument panel at revs above 1800/2000rpm when there is a problem.
The oil pressure is monitored by two oil pressure sensors. When the engine isn't running there is no oil pressure at all. When the ignition system is switched on (but engine isn't started) the red oil pressure lamp comes on. As soon the engine is started and oil pressure builds up the lamp goes out indicating that there is between 2 and 5 PSI.
The system does NOT inform the driver how much oil is in the engine. The engine will run on relatively little oil but as soon as the vehicle is driven round a corner and the oil moves to one side of the engine, air will be introduced to the system, the oil pressure will drop - the light will flash and the buzzer sound. IMMEDIATE action needs to be taken whether that be stop as soon as possible or to reduce revs to below 1800/2000rpm and park up where safe.
There are two oil pressure switches located on the 1800i engine.
1. A low oil pressure switch (white/brown 0.3 bar, 056919081C genuine OE) on the side of the head
2. A high oil pressure switch (blue 1.8 bar, 171919829A genuine OE) near the oil filter
The low-pressure switch (white/brown) is normally closed and opens between 2-5PSI.
The high-pressure switch (blue) is normally open and closed between 11-15PSI.
Besides the input from these two switches (ground signal or open signal), the computer also gets engine speed information from the ignition system. At engine speeds below around 1800 RPM, the computer ignores the high-pressure switch. At engine speeds above 1800 RPM, the system starts to monitor at the high-pressure switch to make sure it closes. If that switch does not close and stays open at elevated engine speeds, the computer knows something is wrong.
The computer will illuminate the red warning lamp and make it flash AND set off the warning buzzer. When operating correctly, it gives a much earlier warning of developing problems. Instead of oil pressure having to be pretty much non-existent for the light to come on, you get a flashing lamp and buzzer if it drops below about 15psi. That should give the driver time to pull over safely before damage is caused to the engine.
If the warning lamp and buzzer are activated the first checks to be completed should be the high and low pressure switches. They are cheap to replace and genuine VW parts should be purchased from a reliable outlet. An oil pressure check should also be completed.
Wiring should be checked to ensure that there are no frayed lengths shorting out on the bodywork/ engine anywhere.
Should the above checks prove to be in order, the next place to check in the instrument panel.
Below is the circuit board which has the oil pressure buzzer mounted on it. Part number 321 919 064 K (item 14 in the exploded diagram below)

The small box which looks like a resistor is the item which making the warning sound.

The 'L' shaped board is located behind the speedo clock. To get to the board, remove all retaining screws that hold the clock in place - don't forget to unclip the hall sender too.
Once the speedo is free, undo the two screws on the rear of the unit so the face comes away from the rear. You will then see the 'L' board and the sensor. There is a single screw (bottom left) which needs removing and there are small plastic tabs, be careful not to break those. Once free, swap to the replacement board and refit.
Test before screwing everything back together. Remember to make sure the speedo face and housing are free from any greasy fingerprints. You don't want to fully refit the whole dash, sit back to admire your work only to see smears on the clocks/ Perspex…. Like I did!!

A replacement of 321 919 064 K was quite expensive 15 years ago (2005/2006), it may no longer be available.
Other models with compatible oil pressure warning control boards:
83 - 92 Caddy
82 - 92 Scirocco
82 - 85 Golf / Jetta
82 - 92 Golf Cabriolet
82 - 84 Passat
82 - 90 Polo
Any attempts to replace the 'L' shaped board should be completed as carefully as possible with the blue maylar PCB having to be moved once again.
With thanks to
for proof reading the text and suggesting changes/ additions.
Sources
Mk1 Golf Owners Club Forum
Volkswagen ETKA
Golf1wiki.de
Dano's Mk1 Golf Cabriolet December 1983 model.
Posted
Chairman


Posted
Chairman


Instrument housing and mounting parts for vehicles with multi function indicator 1.8ltr. GOLF CABRIO. GLI
instrument housing and mounting parts for vehicles with multi function indicator F 15-D-000 001>> 1.8ltr. GOLF CABRIO. GLI
1 321 907 345 B hall sensor 1
2 no longer available VDO 1
(2) 191 907 346 A sender - vacuum MOTOMETER 1
(3) no longer available KM MOTOMETER 1
(3) 161 919 044 A multi-function indicator MPH MOTOMETER 1
3 no longer available KM VDO 1
(3) no longer available MPH VDO 1
4 155 919 045 fuel gauge 1
5 no longer available KM VDO 1
(5) no longer available MPH VDO 1
(5) no longer available KM MOTOMETER 1
(5) no longer available MPH MOTOMETER 1
6 161 919 053 F instrument housing MPH 1
7 N 0154452 speed nut 4,8X16,5X11,5 1
8 N 0116644 washer B4,3X12X1 2
9 N 0139649 oval head panel screw 4,2X16 2
10 no longer available 1
11 161 919 060 binder 6-pin 1
12 321 919 060 binder 14 point 1
(13) 321 919 061 D led, flashing for dynamic oil pressure warning device red 1
(13) 171 919 061 B light-emitting diode red X
(13) 357 919 061 A light-emitting diode green X
13 171 919 061 D light-emitting diode yellow X
(13) 251 919 062 bulb blue X
(14) 321 919 064 K control unit for oil pressure control 1
14A N 0139512 oval head panel screw 2,2X9,5 X
15A no longer available VDO 1
16 321 919 117 hexagon head panel screw B3,5X16 6
17 161 919 253 A revolution counter VDO 1
(17) no longer available MOTOMETER 1
18 155 919 511 A temperature gauge 1
19 171 919 803 voltage regulator 1
20 N 0139541 oval head panel screw 2,9X13 1
(21) 431 919 040 bulb with black base 12V1,2W 1
21 431 919 040 A bulb with white base 12V2W 2
- 191 998 081 retaining plates for leds and fuel gauge . 1
- 861 998 089 1 set fixing parts for temperature and fuel gauge 1
0 guests and 0 members have just viewed this: None.


