


Aux belt replaement

Posted
#1623972
(In Topic #222443)

Settled In


Hi guys - sorry, I know this is probably the wrong place but the other sections didn't give me the option to add topic…
My car has been squealing away this last month or so - I've had a look and the fan/aux/alternator belt is missing quite a few teeth in a few sections, so needs replacing. I've purchased a replacement but unfortunately the allen key holding the alternator bottom pivot bolt it totally rounded off.
Has anyone got any bright ideas on what I can do to loosen it? I've been using a 6mm key, which I believe is the right one, but I can get a good quarter turn before I feel any resistance, then it just eases itself out Any advice greatly appreciated, as I'd hate to have to take it to the garage for something so small. I suppose if I do have to take it, would it be a good idea of getting the CAM belt/water pump changed too (I've no record of having it done)?
Thanks!
My car has been squealing away this last month or so - I've had a look and the fan/aux/alternator belt is missing quite a few teeth in a few sections, so needs replacing. I've purchased a replacement but unfortunately the allen key holding the alternator bottom pivot bolt it totally rounded off.
Has anyone got any bright ideas on what I can do to loosen it? I've been using a 6mm key, which I believe is the right one, but I can get a good quarter turn before I feel any resistance, then it just eases itself out
Any advice greatly appreciated, as I'd hate to have to take it to the garage for something so small. I suppose if I do have to take it, would it be a good idea of getting the CAM belt/water pump changed too (I've no record of having it done)?Thanks!
Posted

Settled In
It should drop enough on the adjuster for you to slip the below off with ease - you got a photo of what part you mean? There are a few ways to get that rounded bolt off bit depends where it is.
I just loosen off the adjuster bolt to drop the alternator.

I just loosen off the adjuster bolt to drop the alternator.

Posted
Settled In
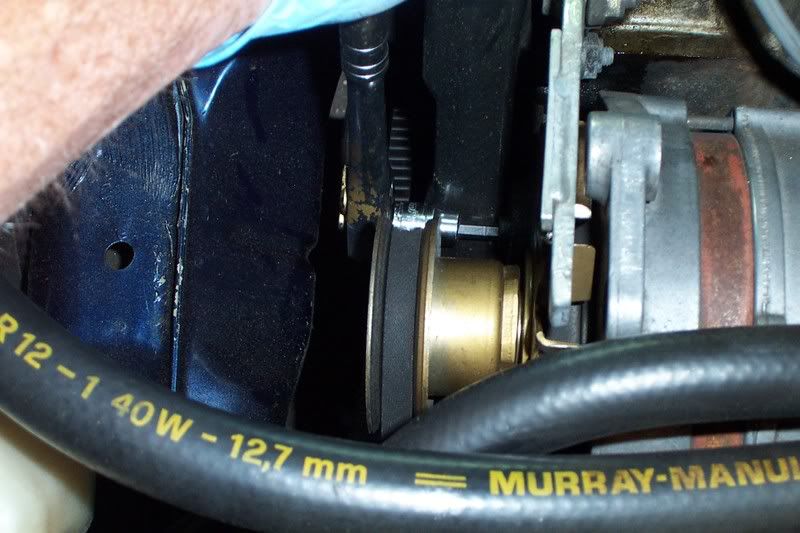
Thanks for the reply. I've loosened the adjuster bolt you've highlighted but there was no movement in the alternator at all (I've highlighted this bolt on my photo below in red). I didn't want to force it but I suppose I could try again in the morning and try a bit harder
The bolt I'm having the issue with is hard to access and will be a pain to drill out (I've highlighted it in blue). You remove a plastic bung and access it through a hole in the cam cover. 6mm allen bolt but unfortunately rounded off
Sorry, it's dark and wet out so not a good pic, plus my engine bay is not as clean as yours!
Posted

Local Hero

If your alternator pinch bolt IIRC 5.5 or 6mm Allen at the bottom is tight it won't move, and will have to be loosened so the alternator can swing freely.

What do Divorces, Great Coffee, and Car Electrics all have in common?
They all start with GOOD Grounds.
Where are my DIY Links?
They all start with GOOD Grounds.
Where are my DIY Links?
Posted
Settled In
 Right, the pivot bolt at the bottom - if you have rounded it that's going to be a right 5h1t show to get out!
To lower it you only need that bottom one slightly loose, you don't need to take it out - I don't even touch mine when messing with the belts I just use the nut in the photo - that's what actually let's it move.
Did you try both bolts/nuts? The small one (red arrow) loosens then you wind the big one (yellow) to move it - like a rack and pinion - it might be quite stiff at the bottom pivot point where that big hex bolt goes - so soak the pivot point in WD40, give it a while and then have a few gentle taps on the alternator with a mallet while trying to loosen the larger nut - if you are lucky it might break free a little and allow you to lower enough to slip it off.
If you have to get that bolt out (don't try if you don't need to) this is what I would try first.
Soak the hex bolt in something like WD40 or GT85 etc -its pretty long to get the other side as well and make sure you have the right size hex in there.
When you put it in next, hammer it home with a hammer to make sure it's seated in well then gently apply pressure.
If that's not working then you could try a stubby screw extractor on a socket wrench - the kind that has the short reverse threads and cross your fingers it bites https://rover.ebay.com/rover/0/0/0?mpre=https%3A%2F%2Fwww.ebay.co.uk%2Fulk%2Fitm%2F233347494988
You could also use a length of wood or similar, through the car and use it to apply force on the socket to act as a leaver to really push it into the head of the hex as you ratchet gently.
I am not sure how much plastic is there - I think you might melt your main belt or cover but if you can get the engine warm then blast the nut with a blow torch to heat it as well that will help as a almost final resort.
If you still have no luck with that then due to where it is the only thing I can think is you would need to get the engine out, although someone else may have a better solution.
 Last edit: by squideatingdough
Posted
Settled In
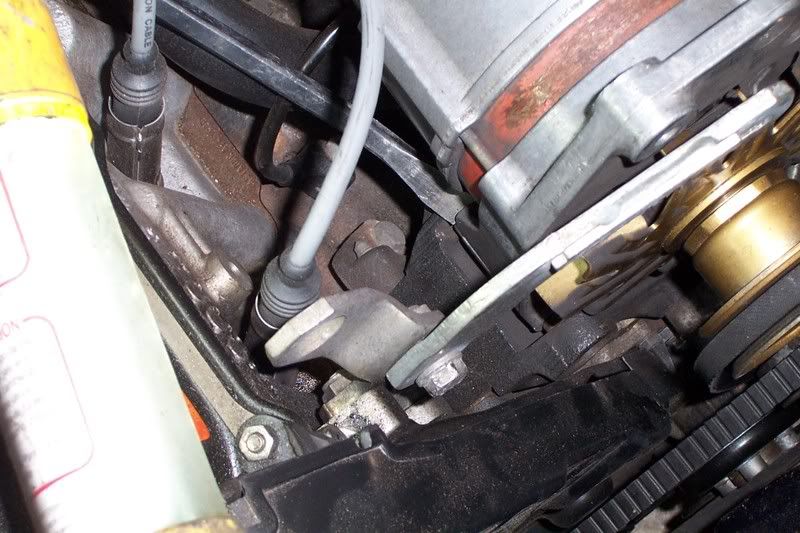
Took a look at mine today - and tried to look at your photo - have you taken the belt cover off? Is it the cover Allen bolt you have rounded and not the swing arm?
My alternator swing arm is a nut not a hex - see photo;
My alternator swing arm is a nut not a hex - see photo;
Posted
Settled In
squideatingdough said
Took a look at mine today - and tried to look at your photo - have you taken the belt cover off? Is it the cover Allen bolt you have rounded and not the swing arm?
My alternator swing arm is a nut not a hex - see photo;
Thanks for the continued support Squid! I think we may have different alternators (I believe that there are two types?). For a start, my adjuster bolt isn't set up in the same way as yours, as it seems to rely on just the one bolt being undone.
I haven't taken the belt cover off, but there is an access hole (usually protected with a plastic bung) on the cover. This seems to be in the same position as your pictured bolt, so another difference. Unfortunately, my bolt is a hex, and rounded off
 . The brown Haynes manual explains it relatively clearly, so I'm pretty sure that I'm in the right place..
The bolt is currently soaking in some plusgas penetrating oil, so I will head on out tonight and see if it helps. I don't like hitting things with a mallet, but I'm hoping that a little tap may free things up a little.
I'll keep you posted…
Posted
Local Hero
On my Diesel Bunny, and on my Cabriolets the Lower Pivot bolt on the alternator was always a Allen.
This allen would force the Bushing in the Alternator mounting Bracket to force the alternator to Square itself and Tighten in place.
See number 29, 0r 20 depending on which you have.
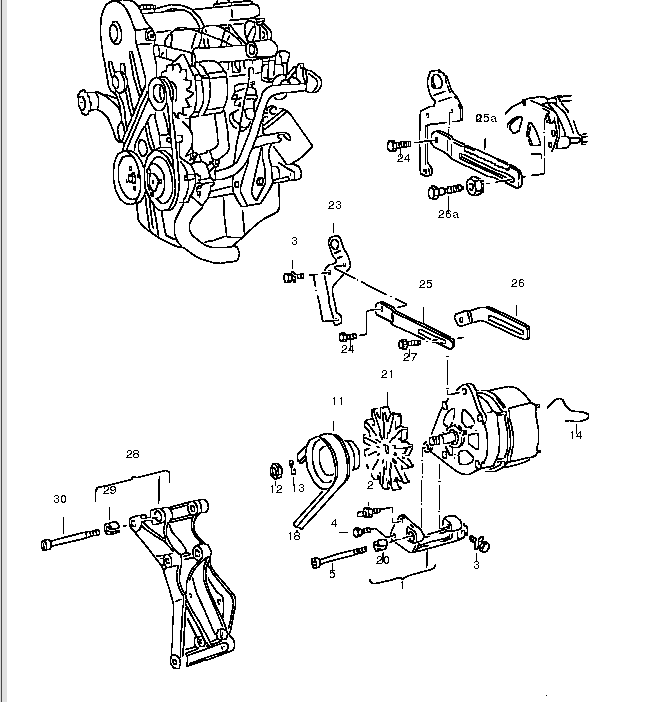
number 3 on ac equipped cars.

After loosing the bolt one usually would have to smack the lower rear of the alternator bracket to loosen the bushing to remove or replace the alternator. If your bolt is Hex headed then that is a replacement and allows the alternator to move about…which would make the belt wobble and not retain perfect alignment for proper tension and rotation….
smacking the back with a pry bar to loosen the alternator.
These bushings can get rusticated and frozen… To prevent this I usually used a carriage bolt and double nut to Push the Bushing totally out of the bracket, clean the inside of the bracket with sand paper, along with sanding the bushing and using never-seize on the bushing re-insert it and then tighten the bolt. This usually was a one time thing and allowed me to smack the alternator from the rear to totally loosen it from the bracket and replace it with no issues…Tightening it back up was usually a lot easier as well as I never rounded the Allen.
This allen would force the Bushing in the Alternator mounting Bracket to force the alternator to Square itself and Tighten in place.
See number 29, 0r 20 depending on which you have.


number 3 on ac equipped cars.

After loosing the bolt one usually would have to smack the lower rear of the alternator bracket to loosen the bushing to remove or replace the alternator. If your bolt is Hex headed then that is a replacement and allows the alternator to move about…which would make the belt wobble and not retain perfect alignment for proper tension and rotation….
smacking the back with a pry bar to loosen the alternator.

These bushings can get rusticated and frozen… To prevent this I usually used a carriage bolt and double nut to Push the Bushing totally out of the bracket, clean the inside of the bracket with sand paper, along with sanding the bushing and using never-seize on the bushing re-insert it and then tighten the bolt. This usually was a one time thing and allowed me to smack the alternator from the rear to totally loosen it from the bracket and replace it with no issues…Tightening it back up was usually a lot easier as well as I never rounded the Allen.
What do Divorces, Great Coffee, and Car Electrics all have in common?
They all start with GOOD Grounds.
Where are my DIY Links?
They all start with GOOD Grounds.
Where are my DIY Links?
Posted
Settled In
Sorry Briano - this is me getting my terminology wrong. The pivot bolt is definitely an allen (a rounded off one at that!)
I didn't try and force the alternator at all when loosening the adjuster - maybe a couple of taps with a rubber mallet will be all it needs to allow me to change the belt. The alternator itself is working well, so as long as I can replace the belt and get it re-tensioned, then that rounded allen bolt can stay where it is!
If it does need loosening however, I'm in a bit of trouble as space is so tight around here
Thanks for all the great info by the way - are the figures from the Bentley manual? I forgot all about that!
Posted
Local Hero
No the pictures are from the ETKA, and my own Photo's of things I have worked on… And my ongoing love/hate affair with the MK1's since 1981 with a 4 year break between early 2000 and 2004…. I have been wrenching on these for quite a few years.
What do Divorces, Great Coffee, and Car Electrics all have in common?
They all start with GOOD Grounds.
Where are my DIY Links?
They all start with GOOD Grounds.
Where are my DIY Links?
Posted

Local Hero
Later cars had the (MK2 Golf?) style toothed adjuster, it is very useful in tensioning the belt compared to the earlier single bolt affair (you've highlighted with a red circle) With the single bolt you need to lever or pull he alternator up, but then you need another pair of hands to nip up the bolt….atothej said
Thanks for the continued support Squid! I think we may have different alternators (I believe that there are two types?). For a start, my adjuster bolt isn't set up in the same way as yours, as it seems to rely on just the one bolt being undone.squideatingdough said
Took a look at mine today - and tried to look at your photo - have you taken the belt cover off? Is it the cover Allen bolt you have rounded and not the swing arm?
My alternator swing arm is a nut not a hex - see photo;
I haven't taken the belt cover off, but there is an access hole (usually protected with a plastic bung) on the cover. This seems to be in the same position as your pictured bolt, so another difference. Unfortunately, my bolt is a hex, and rounded off
The bolt is currently soaking in some plusgas penetrating oil, so I will head on out tonight and see if it helps. I don't like hitting things with a mallet, but I'm hoping that a little tap may free things up a little.
I'll keep you posted…
The Allen headed bolt is the pivot and the single bolt (highlighted) and the bolt holding the adjuster 'bar' to the block are the ones that maintain the belt tension.
Sooooo slacken the two bolts holding the tension and gently (!) try and swing the alternator up and down on the pivot. If this fails I'd remove the cam cover to give abit more room and vision and try and hammer in a larger Allen key or a hi-hex star. You could replace with a standard bolt or source the correct VW (will be maga £… for what it is) Allen bolt. Good luck.
Last edit: by Early-1800
1983 Mars Red 1.8 Golf GTI
1987 Alpine White 1.8 Clipper Cabriolet
The trouble with doing nothing is that you never know when you are finished.
1987 Alpine White 1.8 Clipper Cabriolet
The trouble with doing nothing is that you never know when you are finished.
Posted
Posted
Settled In
Well, I finally managed to go out onto the drive last night (the weather here has been shocking) and have good news and bad news.
Good news - after loosening the adjuster bolts I was able to lower the alternator forwards and downwards enough to remove the old belt and fit a new one. It needed several gentle taps with a rubber mallet to get it there, so I'm hoping the tightness of it will help when getting the tension right (I hear it's a 3 hand job)
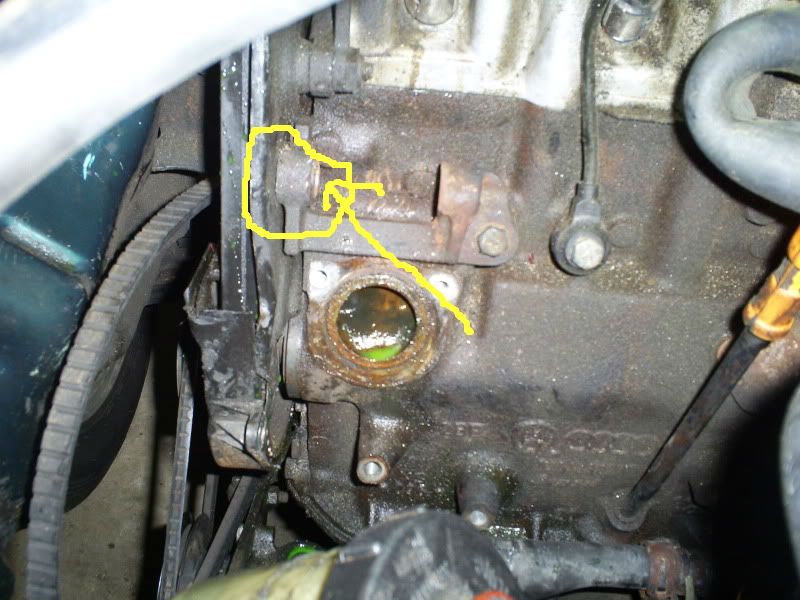
Bad news - the adjuster bolt connected to the bracket was seized solid, and finally snapped when attempting to loosen it off. So although the head of the bolt is off, the square nut on the other side is still in place. I've tried to shock the nut off with a hammer and punch but it doesn't want to go anywhere - the bright area is where I have been attacking it trying to get the bl00dy thing off!
I assume that these square nuts are not welded onto the bracket so will need to think of another way to get it off. A grinder is probably the easiest way if I've got the space, but as you can see from the pic below, a couple of fuel lines are nearby which is making me nervous…

Good news - after loosening the adjuster bolts I was able to lower the alternator forwards and downwards enough to remove the old belt and fit a new one. It needed several gentle taps with a rubber mallet to get it there, so I'm hoping the tightness of it will help when getting the tension right (I hear it's a 3 hand job)
Bad news - the adjuster bolt connected to the bracket was seized solid, and finally snapped when attempting to loosen it off. So although the head of the bolt is off, the square nut on the other side is still in place. I've tried to shock the nut off with a hammer and punch but it doesn't want to go anywhere - the bright area is where I have been attacking it trying to get the bl00dy thing off!
I assume that these square nuts are not welded onto the bracket so will need to think of another way to get it off. A grinder is probably the easiest way if I've got the space, but as you can see from the pic below, a couple of fuel lines are nearby which is making me nervous…
Posted
Settled In
Bad news again I think.
I know now me and you have different engines but on my DX block those square "Nuts" are welded onto the hanger/alternator bracket - that's why it's not budging.
those are not, or should not be fuel lines in that photo - or in that area at all I don't think, in that photo, it looks like you have a yellow vacuum line that should come from your intake? - but i am not sure as it looks quite thick, - if that is your fuel line i am pretty sure that should be behind the engine and up the firewall not that way around the engine? - someone else will know better because i only know the layout on the GTI/DX engine
you still have a bit of the bolt hanging out - try backing it out from behind instead - get a firm grip on it with some new mole grips (new so they have super sharp teeth to bite) - obviously soak it in penetrating oil first.
if that's not working move all the plastic away and blast that bolt with a high-heat torch - if you have one - use a MAP-Gas torch to heat it up as the engine will sink the heat away from those small hobby torches, if not then just use whatever you have to hand
i feel your pain, when i first started on my golf i snapped about 50% of the bolts i tried to take out, now i go super easy, use penetrating oil days in advance and use heat as a last resort and i never heave on them anymore as thy just snap so easy.
every bolt i take out of my car has been wherever possible replaced with stainless so i - or whoever owns it again should have a much easier time!
Last edit: by squideatingdough
Posted
Settled In
Well it certainly wasn't budging, so it could very well have been welded on! Nothing a angle grinder couldn't fix though!
I managed to get the nut off quite easily with a nicely worn-down cutting disc I had, so job done! I've replaced with a standard nut & bolt, with a good splodge of copper grease! Belt tensioned back up and no more squealing coming from the engine. I seem to be getting 13 volts at the battery when the engine is running, so the alternator is still working !
Thanks for your help all - without your input I would have taken this to the garage, which would have easily amounted to £80, so I'm very happy!
Posted
Local Hero
You will find as a new owner, a good penetrating oil, Wire Brushes, 6pt sockets, as well as going back with what you call Copper Grease, which we call Never-Seize.
Brush off all the Garbage with a wire brush (I have some that are iron(steel) and some being brass), all the exposed threads and head.
Spray with PB-Blaster, Kroil, or CRC-FreezeOFF the three oils that I used for Penetrating… LET it Work, If you can do it over days that is a good thing.
Only use 6pt sockets, and do not use a breaker bar on Frame components, as you will torque shear them in half (use a Impact wrench air or electric) for those.
Going back, you need to use a torque wrench as most steel bolts going into aluminum heads use only 87 in/lbs of torque any more and you will break the bolt or strip the heads threads.
If you decide to remove the oil pan you will need a wobble extension on the two bolts that are between the engine and transmission going back be sure to use 87 in/lbs on those two bolts as you are putting them into aluminum seal carriers on the ends front crank and rear.
Do not use the standard torques of the pan in to the block.
Stainless bolts do better, but they too will eventually corrode, as dissimilar metals due to electrolysis will too occur, and the use of Never-seize will provide the necessary prevention to stop that from occurring.
Never-seize or copper grease is going to be your friend as in the future you won't have this happening, and if it does it will be a lot less.
my two bits, plenty of busted knuckles scrapes and broken bolts over the years.
What do Divorces, Great Coffee, and Car Electrics all have in common?
They all start with GOOD Grounds.
Where are my DIY Links?
They all start with GOOD Grounds.
Where are my DIY Links?
0 guests and 0 members have just viewed this: None.