


Dash removal - a guide in pictures


Settled In

Dash removal - a guide in pictures
As mcscrews says, it's a dead simple job and I did mine in under 2 hours, on my own and not really know what I was doing.
I used the following tools: -
A short reach phillips screwdriver
A flat-head screwdriver to prise off clips/trim
An 8 mm socket
Gaffa/duct tape and a marker pen to mark cables and screws as I removed things.
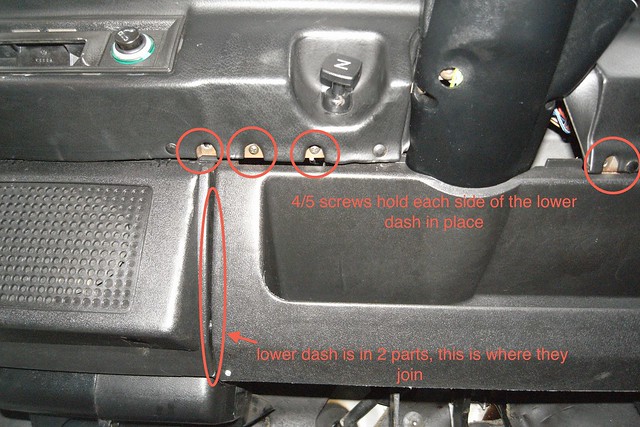
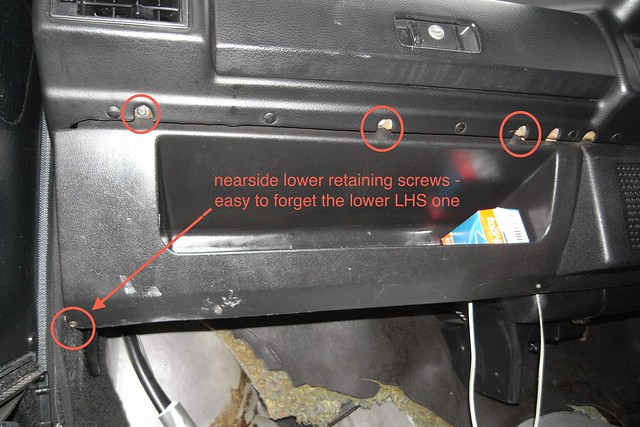
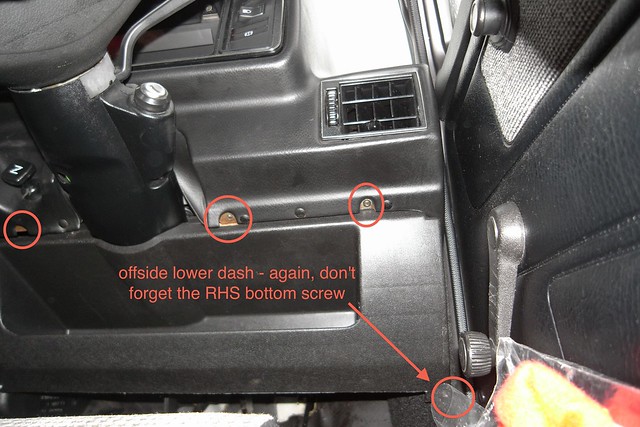
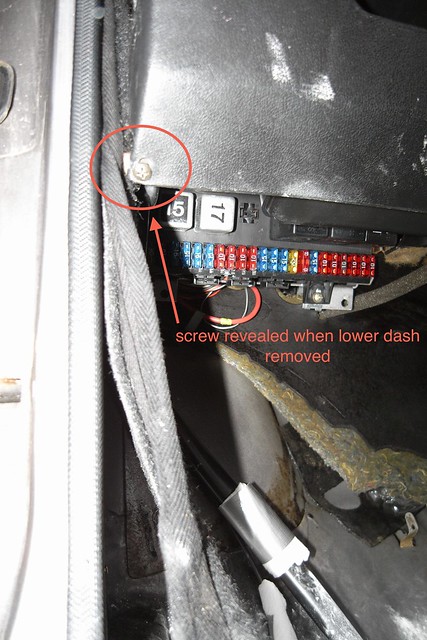
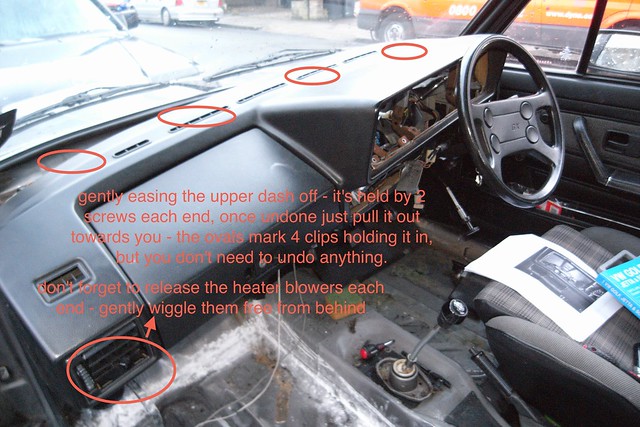
1) Remove both halves of the lower dash - 3 or 4 screws hold each half to the upper dash - I've circled the ones that I found in my GX
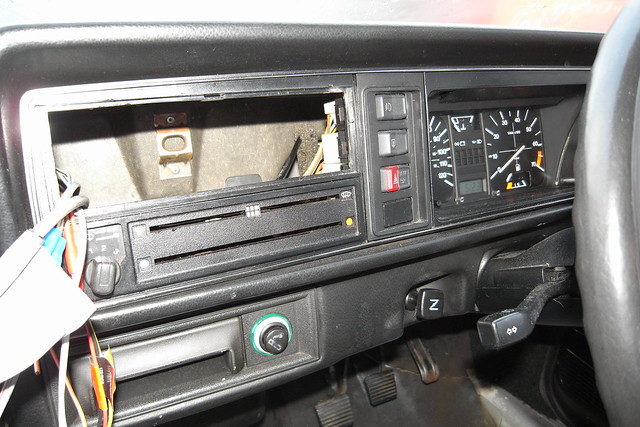
2) Remove the radio.
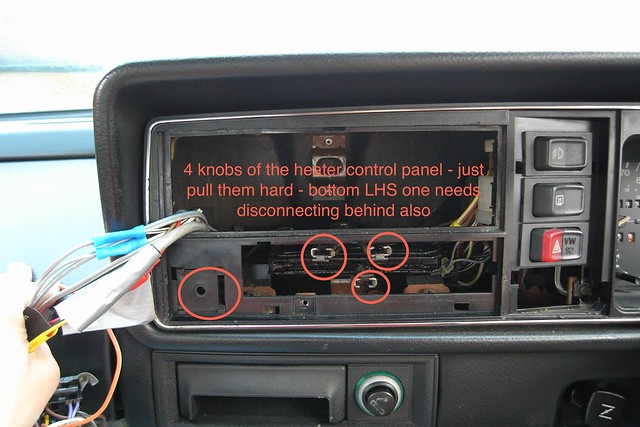
3) remove the heater control knobs (just pull these firmly), and prise off the cover which goes over the heater controls. You will need to disconnect the fan knob on the bottom LHS)
4) Remove the switch surrounds on both sides of the instrument panel - I used a flat-head screwdriver to the underside
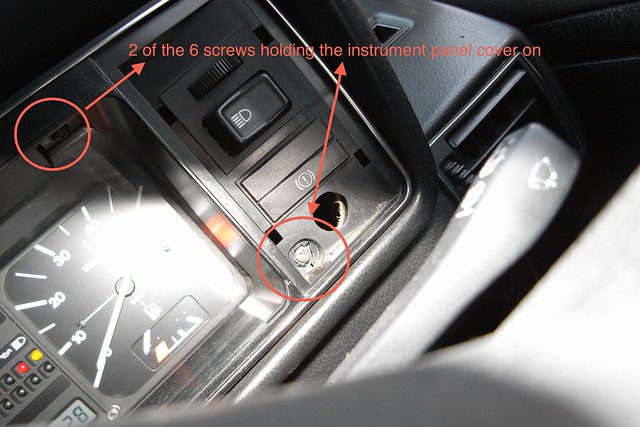
5) This will reveal 6 phillips screws which hold the instrument panel surround on. Remove these and gently ease the surround forward.
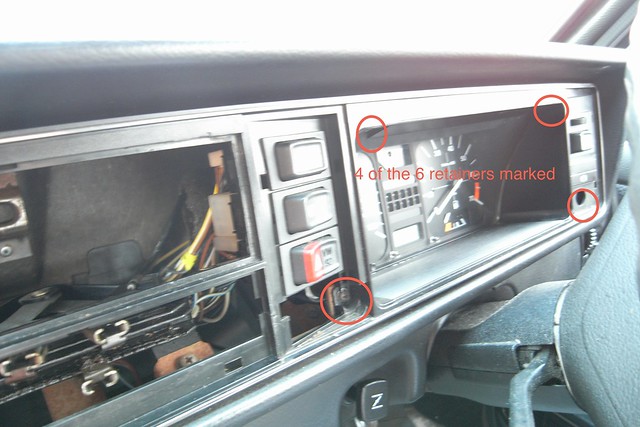
6) For each switch, remove the push-fit connector on the back, ease the switch through the dash, and either reconnect the wires or gaffa them and write on the tape so you don't forget where they go.
NB - the headlight and hazards rocker switches are fragile and if they come apart you're in trouble - mini springs go everywhere!
7) Remove the 2 screws which hold the instrument panel in place
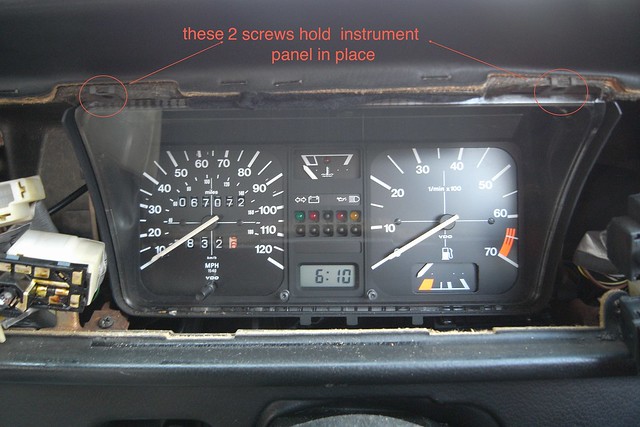
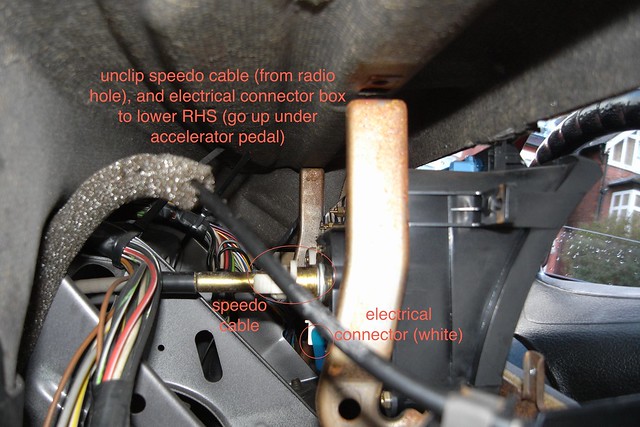
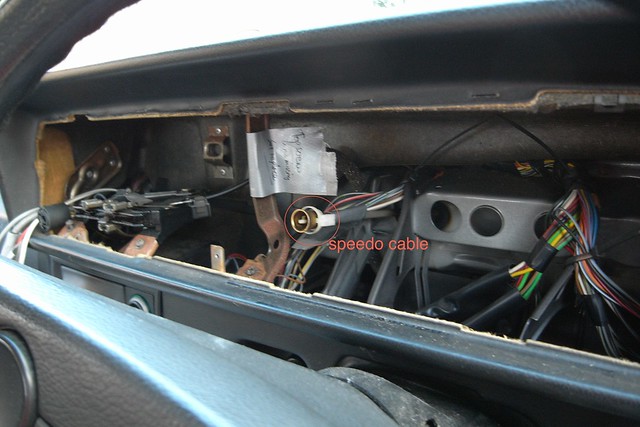
7. Ease the instrument panel forward, you'll need to detach the electrical connector block from the bottom RHS, this is easiest looking up from underneath (lying on your back on the accelerator pedal!). Also reach through the radio hole and unclip the speedo cable - no tools req'd, do this by hand)
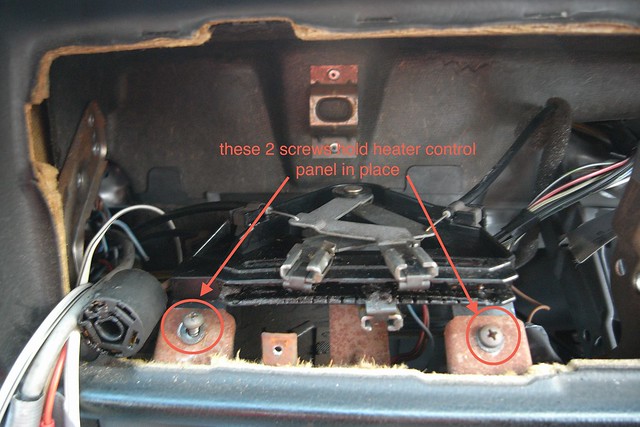
8. Disconnect the heater control panel from the dash.
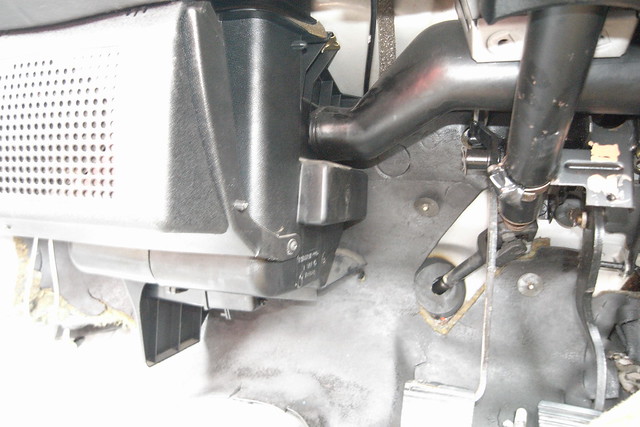
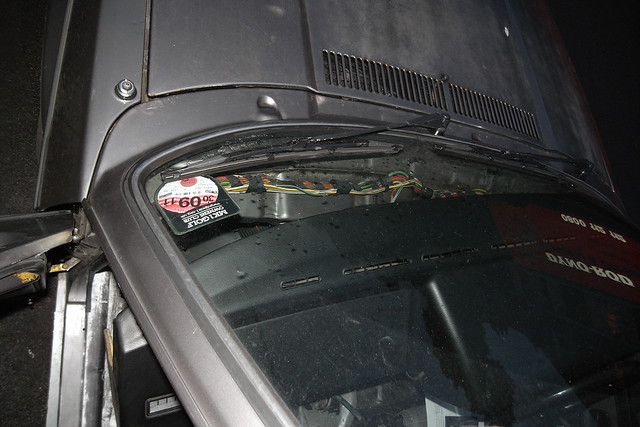
9) While your mind is on heating - reach under the dash blowers to the far right and left of the dash, and wiggle free the heating pipes:
10) Remove the ash-tray & surround by pulling it through the dash. Disconnect the cig lighter and lights.
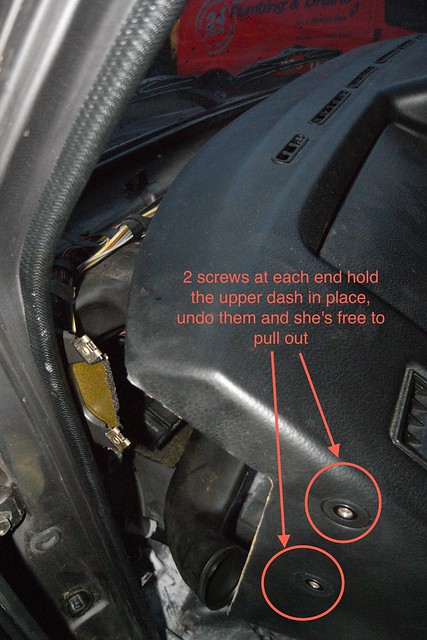
11) Remove the 4 screws (2 at either end) of the dash) - these needed an 8mm socket.
12) If you've a manual choke you'll need to undo the nut and washer and pull the cable through the bulkhead to give you enough slack to pull the dash forward.
12. Gently pull the dash forward and free from the bodywork - it's held in by 4 clips just underneath the windscreen.
13 - Pat yerself on the back for a job well done!!
All these pics, and many more, are available in higher resolution/larger on my Flickr page
'83  Golf 1.5 GX - weekender - in pics: 1983 Mk 1 Golf GX - a set on Flickr
'88 T25 camper 2.1 - in pics: Gina the van's renovation - a set on Flickr
Golf 1.5 GX - weekender - in pics: 1983 Mk 1 Golf GX - a set on Flickr '88 T25 camper 2.1 - in pics: Gina the van's renovation - a set on Flickr
Posted

Old Timer


Posted
Settled In
thanks fella, thought it might be useful to archive maybe… :dontknow:jellybelly said
very nice guide
'83 Golf 1.5 GX - weekender - in pics: 1983 Mk 1 Golf GX - a set on Flickr
'88 T25 camper 2.1 - in pics: Gina the van's renovation - a set on Flickr
Golf 1.5 GX - weekender - in pics: 1983 Mk 1 Golf GX - a set on Flickr '88 T25 camper 2.1 - in pics: Gina the van's renovation - a set on Flickr
Posted
Old Timer
very nice guide, thanks for taking the time to do it mate.
Posted

Local Hero

1983 Mars Red 1.8 Golf GTI
1987 Alpine White 1.8 Clipper Cabriolet
The trouble with doing nothing is that you never know when you are finished.
1987 Alpine White 1.8 Clipper Cabriolet
The trouble with doing nothing is that you never know when you are finished.
Posted
Local Hero
Early-1800 said
Yes good guide. The only thing I would add is that when I removed one even with all he screws etc removed the damn thing wouldn't come out. Eventualy turned out there was a cable tie fastening the dash to either the bulkhead or some cabling that was tied down to the bulk head (can't remember was 10+ years ago now!). Becasue it would only come out a few inches it was difficult to see what the problem was without sticking your head and hands up behind the loose dash.
If you have a centre console with instruments in it, then there will be a couple of extra connectors to unplug, but also the wires that feed these are cable-tied to the dashboard. They're accessible from under the ashtray once its removed. If someone's put extra gauges in, they've probably not done it by fitting connectors to make it easy to unplug and remove the centre console in one.
Posted
Settled In
Cheers

Why did I start this
Posted
Settling In

Have to take mine out soon.
Did one before but it was 6 years ago.
Don't want to break anything important
Jukes
Jellybeans
Posted
Settled In
Posted
Settled In
plurker said
thanks fella, thought it might be useful to archive maybe… :dontknow:jellybelly said
very nice guide
where does it come out into the engine bay?
as my speedometer just stopped working

and i dont know whether it is at the trans end or behind the speedo it self
thoughts?
did here a click as it stopped working
thanks!
Posted

Twitter Manager
Posted
Settling In
MK1 Dash Removal Guide
Your flickr photos are mighty impressive too, hope you are done now and enjoying the GX.
Best, Chris
Posted
Settled In
Great guide though!

Posted

Settling In
Posted
Newbie


Posted
Newbie
Dash removal - a guide in pictures
This is a great guide and really helpful.
Question though - what size bolts are the 2 on either side of the dash (the ones that needed the 8mm socket)
Just bought my cabby and the dash is loose, no bolts in the ends

Sent from my SM-G988B using Tapatalk
Posted
Newbie
Posted

Local Hero
mark.dobsonhill said
Hi
This is a great guide and really helpful.
Question though - what size bolts are the 2 on either side of the dash (the ones that needed the 8mm socket)
Just bought my cabby and the dash is loose, no bolts in the ends
Sent from my SM-G988B using Tapatalk
From the etka:

You will also need 2, 3, and 4.

Number 4 is the Cupped plastic washer that the bolt fits in.
What do Divorces, Great Coffee, and Car Electrics all have in common?
They all start with GOOD Grounds.
Where are my DIY Links?
They all start with GOOD Grounds.
Where are my DIY Links?
There are too many online users to list.