


Bit Of Mirror Polishing PG39

Posted
Settled In

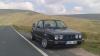
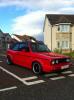
My Rivage Restoration
geestur said
must be a great feeling going in and seeing good progress espically when you get it back all done.
My Misses had a pair like that until she knocked out 2 kids 8O….your sig!
Restored 1961 Mk1 Mini Misses drives a 10 plate bmw mini cooper d sports pack Me drives a 61 plated C220 CDI Restored 1960\'s forecourt petrol pump 1964 P4 Rover 110 resorted by my dad 23 years ago On the look out for LBD 376Y
Posted
Local Hero

Mortz said
A bit here an there 8) …gonna look worse before it gets better….im confident you will be more than pleased with the finished result…you will need to make it clear what you want removing off your car apart from the obvious otherwise they won't do it…looking forward to some updates :wink:
Yeah Mal asked me earlier if I wanted certain things removed and I asked for a few other bits to be done aswell.
Cant wait to go over next week for a look now

Like I said before, if it comes out anywhere near as good as yours ill be a happy man.
Posted
Settled In
Restored 1961 Mk1 Mini Misses drives a 10 plate bmw mini cooper d sports pack Me drives a 61 plated C220 CDI Restored 1960\'s forecourt petrol pump 1964 P4 Rover 110 resorted by my dad 23 years ago On the look out for LBD 376Y
Posted
Local Hero
Correct me if im wrong but did a bloke called Terry Webb spray yours?
Posted
Settled In
Restored 1961 Mk1 Mini Misses drives a 10 plate bmw mini cooper d sports pack Me drives a 61 plated C220 CDI Restored 1960\'s forecourt petrol pump 1964 P4 Rover 110 resorted by my dad 23 years ago On the look out for LBD 376Y
Posted
Local Hero
Was you happy with Terrys work?
Posted
Settled In
Restored 1961 Mk1 Mini Misses drives a 10 plate bmw mini cooper d sports pack Me drives a 61 plated C220 CDI Restored 1960\'s forecourt petrol pump 1964 P4 Rover 110 resorted by my dad 23 years ago On the look out for LBD 376Y
Posted
Local Hero
Hes going to spray mine.
Hes very good friends with my soon to be father in law.
Thats how I come about taking it to Mals.
Posted
Settled In
Restored 1961 Mk1 Mini Misses drives a 10 plate bmw mini cooper d sports pack Me drives a 61 plated C220 CDI Restored 1960\'s forecourt petrol pump 1964 P4 Rover 110 resorted by my dad 23 years ago On the look out for LBD 376Y
Posted
Local Hero
I will proberly respray the front grill badge again as im not 100% happy with it.
Just got the side karmann badges to do now.

 Last edit: by BigNormRivage
Posted
Local Hero
Took longer to do than planned as there quite fidley to get in the right position.
Once each badge was complete I made sure they were firmly in place before applying a few coats of clear laquer. I will give them a few more coats before re-fitting.
If your badges are like mine were then I would highly recommend the kit.

Posted
Local Hero


SOUTHWEST Regional Host. Bristol Meet - 1st Friday of the month - Toby Carvery Bradely Stoke Bristol Bristol Region Facebook Group
1.8T CABBY
TINTOP THREAD (SOLD 2016) SPORTLINE THREAD (SOLD 2015) CLIPPER THREAD (SOLD 2012)
1.8T CABBY
TINTOP THREAD (SOLD 2016) SPORTLINE THREAD (SOLD 2015) CLIPPER THREAD (SOLD 2012)
Posted
Local Hero
richyhill said
look mint mate, top work, isnt it satisfying when you finish applying the kit :-)
Its weird Rich, when the stickers are on the backing they dont jump out at you but they look completly different once fitted.
Not looking forward to doing the karmann ones, they look really fidley.
Posted
Local Hero
My Karmann, Golf GTI and Vw stickers are all still great but the Volkswagen one has dog eared at the corners so I have another kit from Carl to do it this Springtime.
Chris
Posted
Local Hero
Failing that the kits are a reasonable price if they need doing more than once.
Posted
Settled In
cheers, Matt
Posted
Local Hero
All I did was sand them back, gave them a few coats of satin black paint. Left to dry overnight on a warm radiator. Then applied them one at a time using a tweezers as I found it awkward using my fingers. Plus using a tweezers stops any oils from your skin getting in the sticker and making them less sticky.
Dont apply to much pressure incase you dont get it lined up first go.
Once there all on apply a few coats of clear laquer to seal them in.
Posted
Settled In
Posted
Local Hero
Done a few badges in the past without doing it.
Just make sure you give them a good sanding so the paint has something to stick to.
Without primer it will just take more layers of paint to hide the sanding marks.
I hate doing things like this but found using a tweezers much easier.
The first letter I put on was using my fingers and found it really awkward.
Used a tweezers and flew through the rest then.
Just make sure you press the edges down firmly after each one just to help them stick.
Posted
Settled In
0 guests and 0 members have just viewed this: None.