


How to....replace fuel filler pipe!! (beginner friendly)

Posted
#745842
(In Topic #89696)
Old Timer

How to....replace fuel filler pipe!! (beginner friendly)
I am 21 year old, and last week would struggle to point out any 5 major components of a car's engine….therefore consider myself an absolute beginner in car mechanics.
Unfortunately, I didn't take as many pictures as I'd have liked, as at times I got a bit impatient and into it…but I'll be careful to be as descriptive as possible, so that fellow noobs can see pretty much exactly how to do this very necessary job at times.
Without further ado…
+++++HOW TO REPLACE YOUR FUEL FILLER NECK+++++
You will need…
Star screwdiver
6mm & 7mm spanner
WD40(or equivalent)
hacksaw
3 jubilee clips(varying sizes, see step 10).
Axle stand
about 1-2 hours, 3 cups of tea and 4 cigarettes(be careful to smoke far away from where u r pissing aboot with the fuel tank and pipe!!)
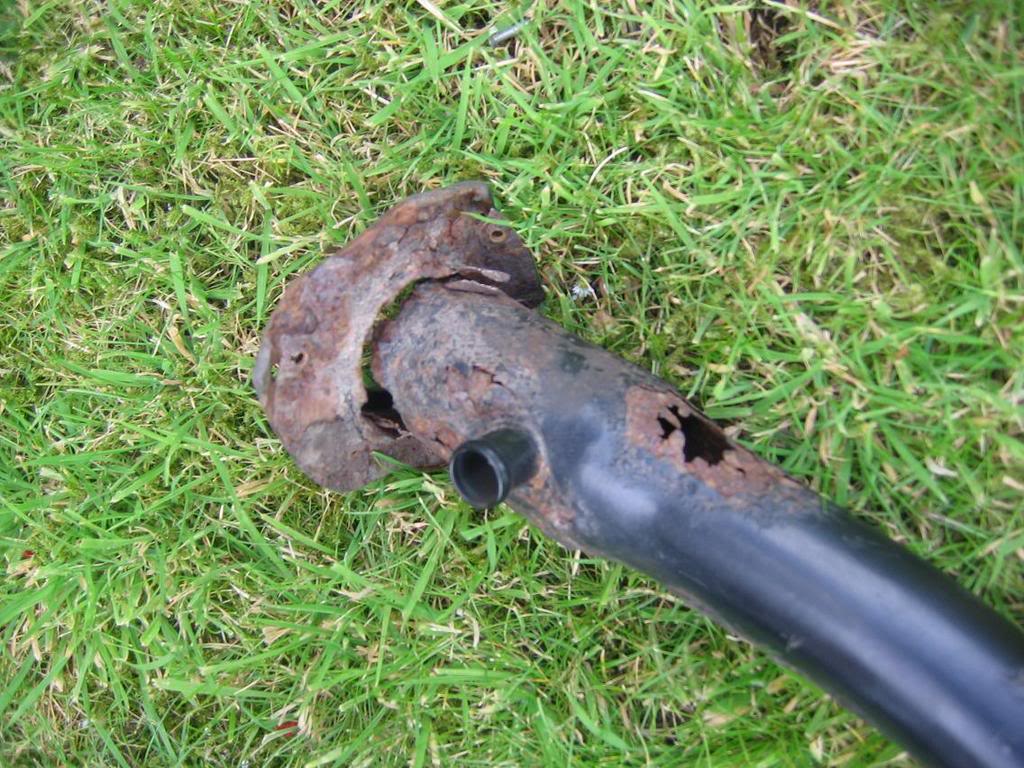
I have an '83 GTI CABRIOLET….and it has a rusty filler neck. How rusty?
This rusty…
I didn't wanna fork out the ?109 for a cabrio filler neck, when the tintop version can apparently be made to fit…let's compare…
tintop pipe is a bit bigger as you'll see…
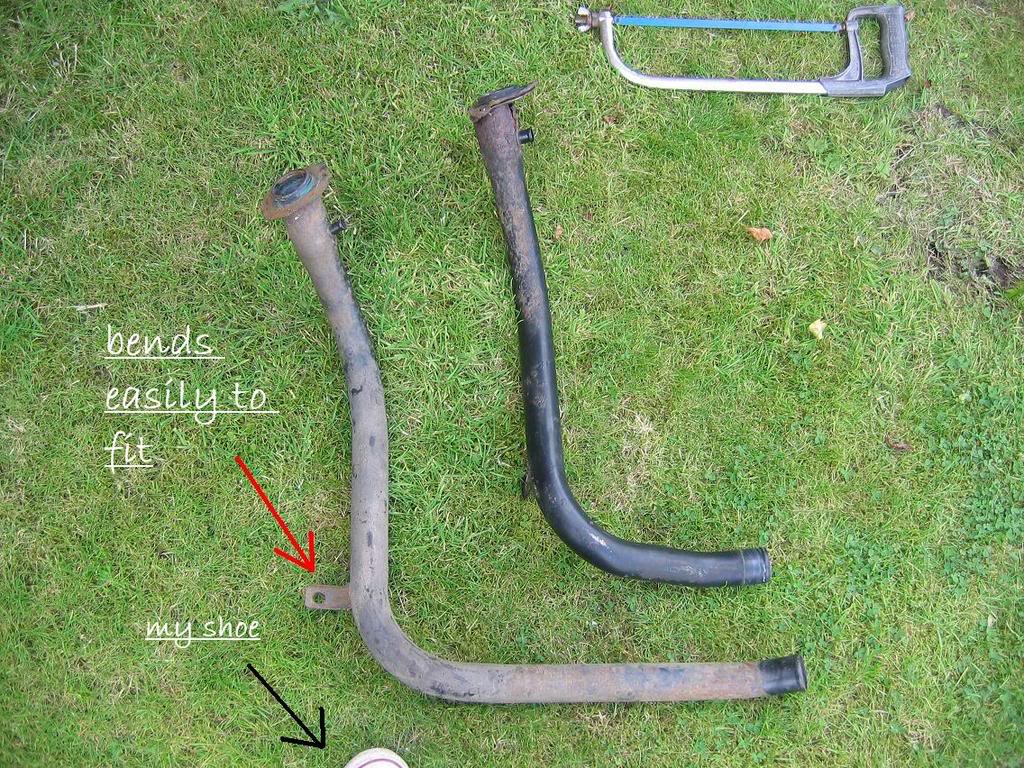
in this photo it looks completely different, but it's infact only a bit longer at the bottom, and requires very slight bending(see later)
First off, let's remove the dud one!
1. Jack up your rear drivers side, and remove the wheel.
2. Place axle stands securely under the rear axle( do this by jacking the car slightly higher than necessary, then lowering onto the stands.)
You're ready to go to work…put the wheel you've taken off under the rear axle as a safety precaution.
3. Remove Petrol Cap…(if you can't do this, call someone for help, like….a doctor)
4. Remove gasket (round sticker) and reveal 3 screws, where shown.
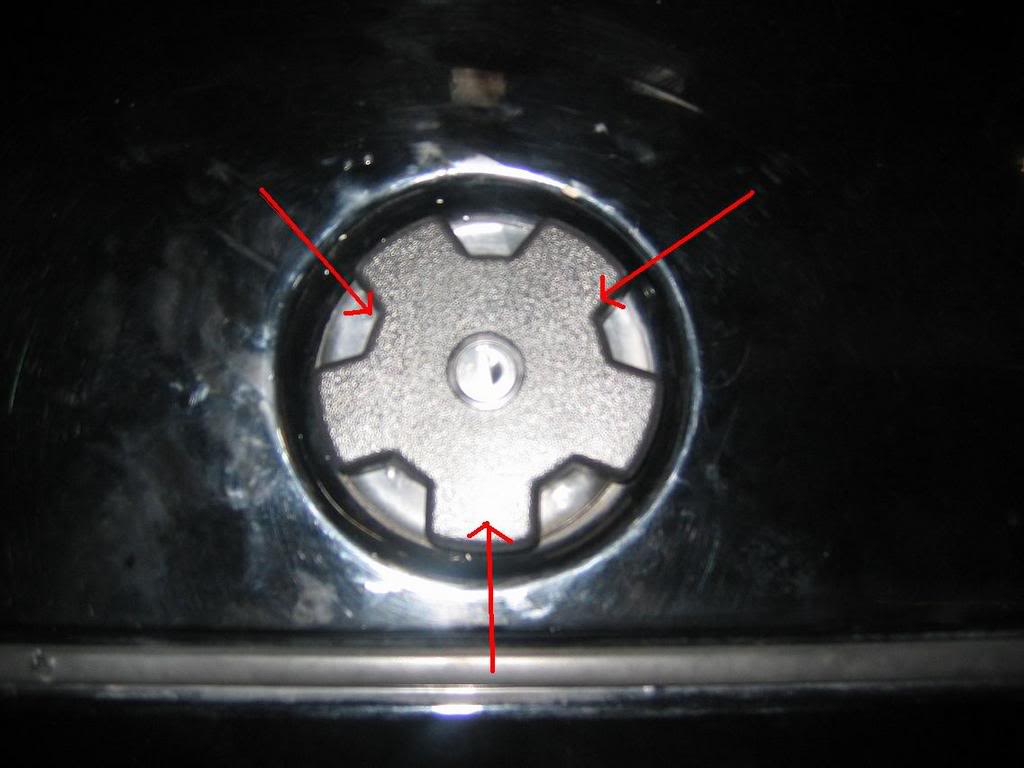
5. unscrew these 3 screws…if any are stuck tight and corroded, unable to be unscrewed, use a drill to drill straight through the screw head and get it out.

6. undo bolt attaching pipe to chassis-behind where the wheel was.

7. get under the car and you will notice a rubber hose with 2 jubilee clips connecting the filler pipe to the tank…
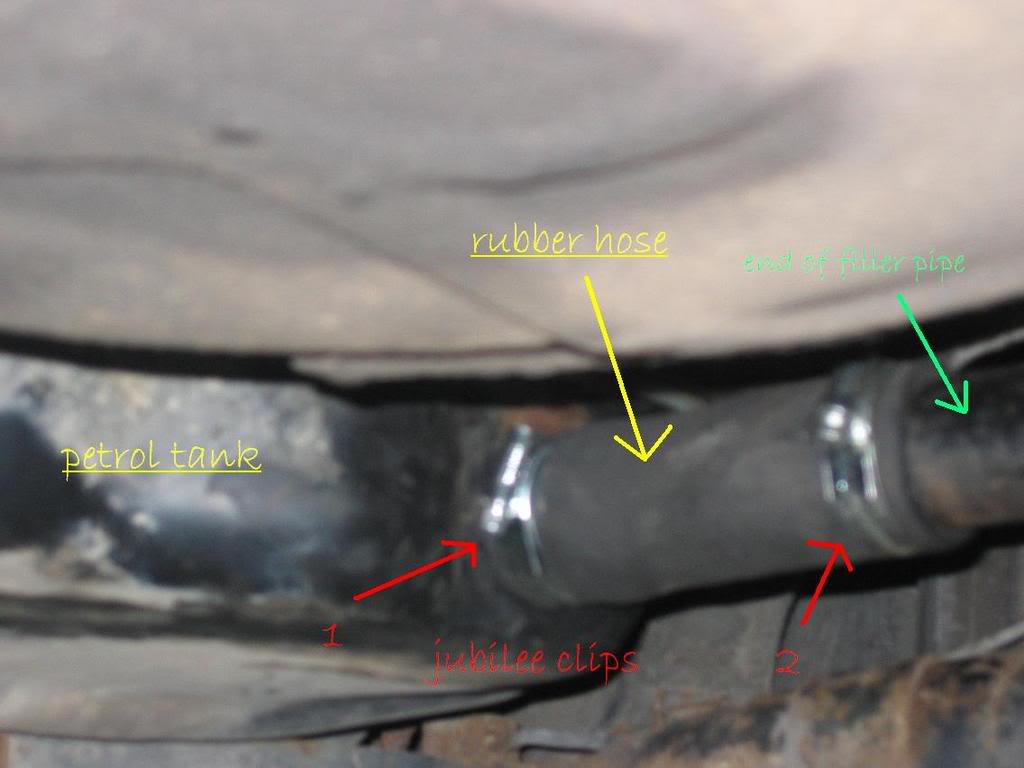
this is mine after the changeover, so expect to find less shiny jubilee clips.
theoretically, you should only have to remove the jubilee clip connecting the rubber hose to the pipe(2), but as I buggered this up as it's so corroded (told you i was a beginner) I removed the whole rubber hose from the tank, using a 7mm hex spanner and a lot of TT lubricant spray (like WD40) on the jubilee clip nearest the tank(1).
**Note: at this point, if you have enough petrol in the tank, it will start to p*ss out so have a bucket at the ready. I used a magnet to shut the petrol tank shutter door.
8. there is one more clip and hose to be removed….this is to the right of the pipe, at the top near the cap, and can be seen by looking under the
arch.
 The clip on this is not a jubilee, and so has to be pulled off using pliers and patience. once the clip is off, simply twist off the hose and the fuel pipe shall be easily freed from it's original position.
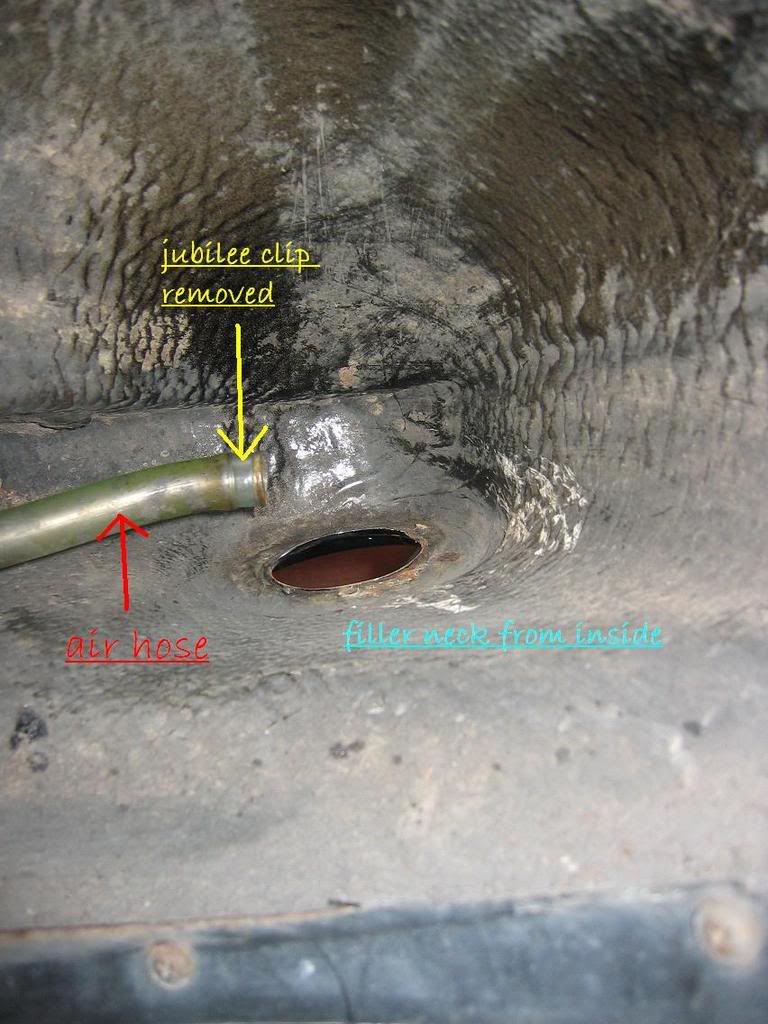
9. Now, if you've done this my way, and the rubber hose is still connected to the pipe……again - patience, pliers and lubricant need to be used to free the hose.
10. Go to your local garage with the rubber hose and ask them for a couple of jubilee clips to fit round it(the rubber hose!), and one to fit your middle finger(for air hose)…and any screws if needed. Charged me ?2 for all of this.
11. Time to modify the new filler neck(if you've saved yourself ?70 and got a tintop one. If you've got hold of a cab one, or infact, are replacing the fillerneck on your tintop, then go to stage 15.
12. Align the removed pipe next to the new one and mark where it ends on the new one…now, get your hacksaw, and cut the pipe deliberately a few inches longer than need be(top tip: you can cut more off, but you can't add bits cut off!)
13. remove the rubber foaming and plastic surround from the old filler neck(behind the body where you unscrew it) and fit it onto the new one(this sits between the filler neck and body and will avoid rattling and gaps).
congratulations, you have a new cabby filler neck, ?76 cheaper than the asking price.
14. If at a later stage you discover it's too long(unlikely, as it should just be a few inches furhter into the hose) then hacksaw another bit off til it's perfec'.
15. now, using plenty of WD40! spray the inside of the hose, and the outside of the end of the pipe and put the pipe into the hose, with the new jubilee clip loosely in place.
16. place the new filler pipe roughly where it's going, with the cap end at the top and the hose end at the tank.
17. check to see if the pipe(now with hose connected) will fit onto the tank pipe. And use a bit of common sense to see what is needing done to make it fit right.( e.g. I had to bend it up slightly at the bend - doing this using just my hands and the garage floor, very slowly, a wee bit at a time!)
18. using the same WD40 all over the place technique(for removal if necessary) attach the pipe and hose to the tank.
19. tighten the jubilee clip (1) at the tank tight, and (2) at the pipe, not so tight, but no longer loose.
20. Get the petrol pipe at the top (cap hole) and make sure it sits nice at the opening.
21. holding it from within the arch, screw in one of the 3 screw around the cap(I did bottom first)
22. screw in other 2 screws, ensuring all are tight. (you will find that when the screws catch, they will pull the filler neck flush to the body)
23. now tighten jubilee clip (2) and make sure both are real tight and there is no shoogliness(these are my mechanical terms) around the pipe and the hose.
24. Bolt the pipe to the chassis, using the bolt earlier removed. You may have to bend the connection on the side of the pipe, just do so slowly.
25. Reconnect air hose up the top and tighten with jubilee clip.
26. recover screws with gasket (preferably a new one)
27. Replace fuel cap
28. Replace wheel
29. Drop it like it's hot.
30. Start her up.
31. Grin
32. Make a donation to this fantastic website.
33. Take care.
Love,
WeeTony
P.S. I will update this post soon(hopefully tomorrow) with photos that I have taken on a friends mobile phone. Anything you think I should change or any easier ways, be sure to let me know!
Hope you all find this useful & Good Luck!
'83 Black GTI Cab on BBS RAs - DreamBoat 3000'
Resto = http://www.vwgolfmk1.org.uk/modules.php?name=Forums&file=viewtopic&t=67552

Resto = http://www.vwgolfmk1.org.uk/modules.php?name=Forums&file=viewtopic&t=67552
Posted
Local Hero

Cheers…………….

Posted
Old Timer
Mk1 GTi White Cab '86
Mk4 TDi
Mk4 TDi
Posted
Old Timer
no pictures mate, but more descriptive: put next to each other, mark how much shorter you need to make the tintop filler pipe, hacksaw.
That is it…other than a bit of muscle into bending it back into place.
'83 Black GTI Cab on BBS RAs - DreamBoat 3000'
Resto = http://www.vwgolfmk1.org.uk/modules.php?name=Forums&file=viewtopic&t=67552
Resto = http://www.vwgolfmk1.org.uk/modules.php?name=Forums&file=viewtopic&t=67552
Posted

Local Hero
You've also helped me suss out that the brand new spare one I inherited when I bought a Cabrio is indeed for a tintop. Thanks ! :wink:
DubPartz
Posted
Settled In


1983 Lhasa Green GTI
Posted
Settling In

1989 1.8 Karmann Clipper
2006 2.0T Seat Leon FR
1990 Suzuki TL 1000R (just Thrown it Down The Road)
2006 2.0T Seat Leon FR
1990 Suzuki TL 1000R (just Thrown it Down The Road)
Posted

Settled In

1993 Cabby Rivage
0 guests and 0 members have just viewed this: None.