


Horrible mechanical "whirring" sound coming from the engine

Posted
#1624853
(In Topic #222689)
Settled In

Help diagnose the sound PLEASE!!!!
it's been a while since I've been on but i'm hoping a mk1 enthusiast can help me diagnose a whirring sound coming form the engine.
i've uploaded a video to youtube to try and assist with the diagnostics, its a 1990 1.8 clipper cabriolet with a JH engine:
Golf MK1 - YouTube
before anyone says alternator / water pump / fan belt. i have removed the fan belt to disable all that and the noise is still there. i'm thinking possibly something ruling on the flywheel or starter staying engaged but i'm not sure how to test any of that.
currently its not running which i think is a fuelling issue that i can work my way through and will report back later today. there are some electrical clips hanging off (one seen in the video) but it looks like they've been hanging off for a while like someone did that deliberately.
Posted

Local Hero


1983 Mars Red 1.8 Golf GTI
1987 Alpine White 1.8 Clipper Cabriolet
The trouble with doing nothing is that you never know when you are finished.
1987 Alpine White 1.8 Clipper Cabriolet
The trouble with doing nothing is that you never know when you are finished.
Posted
Settled In
do you know any specific test for it please?
I guess replacement would be a timing belt change and do the works while I'm at it.
Posted
Local Hero
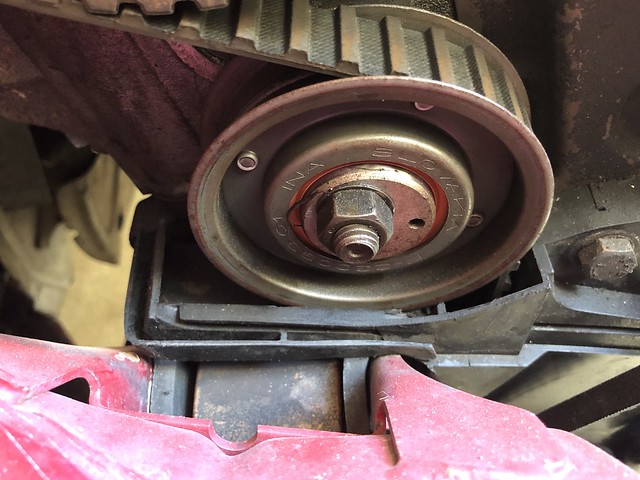
Not sure if you could drip or spray some oil/lube in the bearing of the tensioner? If it goes quieter thats your problem and yes I would then replace the lot. If you're not sure when it was last done and planning on keeping the car, might be a plan to replace the belt and tensioner anyway to eliminate that possibility.
Also make sure the cambelt\water pump belt\tinware are not catching and rubbing anywhere
1983 Mars Red 1.8 Golf GTI
1987 Alpine White 1.8 Clipper Cabriolet
The trouble with doing nothing is that you never know when you are finished.
1987 Alpine White 1.8 Clipper Cabriolet
The trouble with doing nothing is that you never know when you are finished.
Posted

Settled In
depending on how skilled you are it should not take longer than an afternoon if you have the Haynes or Bently to guide your way, and you don't need any special tools.
don't do my trick first time I had mine off and tighten the tensioner the wrong way, it will let you but it then slightly comes into contact with the shell protecting it and makes a hell of a racket - almost like yours is now!

Posted

Local Hero
If you do have to change the mount, it is best to replace the 2 rear allens on the back side with hex bolts same length and grade 10. Easier to get in our out in the future.
For the water pump if yours is still original then you may want to source a housing and pump assembly along with a new t-stat. be sure that you get a metal impeller.
Carefully break the new housing apart one screw at a time and slather them with copper grease then replace and re-torque the bolts, in lew of copper grease you can use Teflon tape.
Figure on about 3 hours to do the belt, and another 2 hours to do the mount, and you will need a press for the mount…. If you can find a mount and bracket assembly together then you cut your time considerable.
Do them together and you don't have to worry about them for a few years. I have a trick on extending the life of the mounts it is in the link in my signature.
What do Divorces, Great Coffee, and Car Electrics all have in common?
They all start with GOOD Grounds.
Where are my DIY Links?
They all start with GOOD Grounds.
Where are my DIY Links?
Posted
Settled In
I did my ones not too long ago when I did my cambelt, it looks more daughnting than it actually is - it's very easy and deffinatly possible to change them on the driveway - there are plenty of guides on here and you can make your own engine support/hanger from some hearty wood or borrow one from a mate.
If you do do them to save getting a press take the mounts out and the new inserts to your local small independent garrage and they will press them in for a couple of quid - it's dead easy if you have a press.
I pressed my ones at home with a cold chisel, blow torch, vice and a couple of lump hammers + few blocks of wood and a hand from my father in-law and it was a NIGHTMARE - it is doable with a heavy duty vice but not worth the effort.


 Last edit: by squideatingdough
Posted
Settled In
 Untitled by Richard Guile, on Flickr
Managed to get the offending mount off and unfortunately the weight of the engine has made the bracket an oval shape. I've taken it to a machine shop to see they can tweak it and press in the new mount.
 Untitled by Richard Guile, on Flickr
I've bought a new INA tensioner and continental timing belt to go back on. Bricking it about setting the timing though as I've never done that before.
 Untitled by Richard Guile, on Flickr
Thanks again everyone!
Last edit: by 6UiLE
Posted
Settled In
Get a water pump as well and change that at the same time as the belt - you are going to have all that side Off anyway and it's best practice - you should be able to pick the pump up for about 25 -30 quid with the housing - https://rover.ebay.com/rover/0/0/0?mpre=https%3A%2F%2Fwww.ebay.co.uk%2Fulk%2Fitm%2F173686734087
You only really need to change the pump and you can get that for 15 - but the bolts that hold the pump the the housing get stuck and I snapped three getting mine separated and spent an hour or two trying to get them out!
Don't worry about the belt - it's dead easy just follow the guide in the books - bently is best - if you are worried I will make a quick video for you showing you how - just send me a message and ask, also I have a bently I can send over if you want.

Old Timer

Last edit: by cedar
Posted
Settled In
thanks mate; really appreciate your encouragement and offer of lending the Haynes but i'm Oz so thinking postage might be a bit excessive.squideatingdough said
Great news you found the problem.
I've been doing a lot of reading regarding timing marks and think i'm relatively comfortable to do the job now.
I'd appreciate your opinion on what i've done so far please if you look at the photos below. Also do you know the best DIY tensioner tool please; i've ordered one as back up but wont be here for a couple of weeks.
https://www.ebay.com.au/itm/Compatible-for-VW-Audi-Engine-Timing-Belt-Tensioning-Adjuster-Pulley-Wrench-Tool/263871464844?hash=item3d6ff7058c:g:pZkAAOSwQFxc580X
Cam timing marks:
 Untitled by Richard Guile, on Flickr
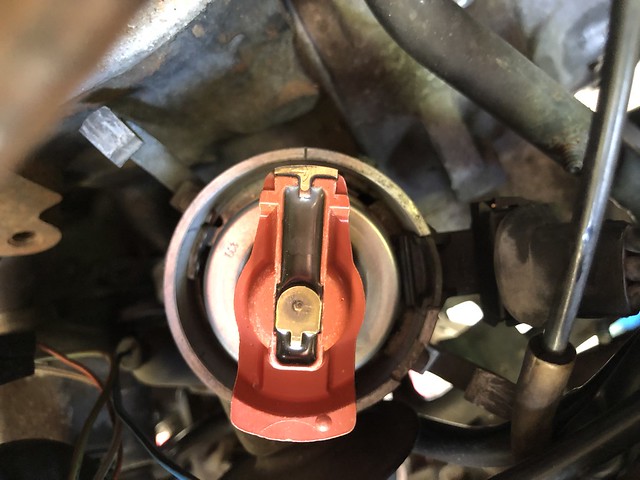
Dizzy timing marks:
 by Richard Guile, on Flickr
this has confused me a bit but i think i've sussed it now:
 by Richard Guile, on Flickr
i'm ignoring the white dot at the bottom and looking at the dimple i have circled in this photo:
 by Richard Guile, on Flickr
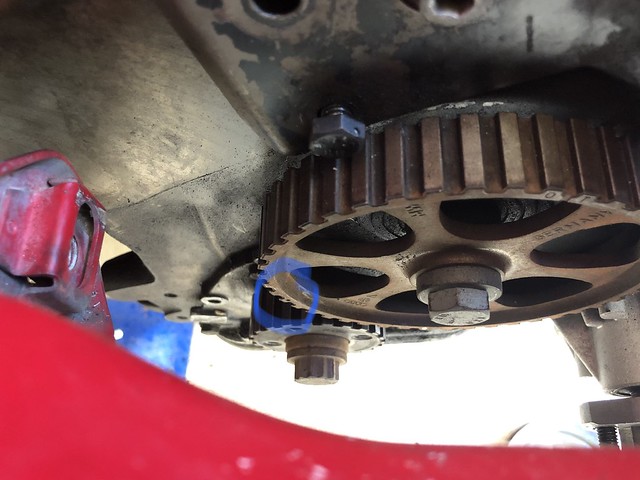
which pretty well lines up with the notch in the crank pulley i have circled in this photo:
 by Richard Guile, on Flickr
and i'm not that happy with the crank position yet; i think i need to rotate the crank pulley a nats clock wise:
 by Richard Guile, on Flickr
thanks again mate
Posted
Settled In
cedar said
I hate to say this but I think all that was wrong was the tensioner had been turned the wrong way when the belt was put on, if it had been turned clockwise it would have cleared, all that was needed was to slacken the nut and turn the tensioner.
thanks mate but i'm not too sure what you mean, is the tensioner on back to front? i'd just like to confirm before i fit the new tensioner.
it looks like the engine mount was rooted to me. it was making the gear changes difficult and and it had "elongated" the steel mounting bracket to an egg shape so i don't think it was in good order.
i'm happy to be changing the mount and get a timing belt and tensioner change at the same time anyway. win win.
Posted
Settled In
The best tensioner I have is two drill bits and a screwdriver !
Did you put the engine to top dead center and check the marks and see where they were before you removed the belt?
BUT I have only worked on a 1.8 DX block - I would wait until someone else confirms that has worked on the block you have.
Here are some photos of the Haynes that covers your car year.
to be super sure - check your flywheel notch as well if that's there, as well as all the other marks you cant, go wrong!


Last edit: by squideatingdough
Posted

MOTY 2013
you can only line up the crank with the timing belt and pulley fitted, or you can check in the hole in top of the gearbox to line up the dimple on flywheel with the arrow on the box (not the larger diamond, thats BTDC mark for ignition timing)
Hello my name is John and I'm a dub addict.
My wiring diagrams and other documents have moved here:
VAG Documents & Downloads
You'll need to sign into google/gmail for the link to work! (its free!)
My wiring diagrams and other documents have moved here:
VAG Documents & Downloads
You'll need to sign into google/gmail for the link to work! (its free!)
Posted
Settled In


Posted
Settled In
 Untitled by Richard Guile, on Flickr
a helpful local suspension shop pressed the engine mount in the housing
 Untitled by Richard Guile, on Flickr
and the car starts (ignoring my cold start problem) and runs; awesome news.
 Untitled by Richard Guile, on Flickr
bad news is the noise is still there; exactly the same. I don't regret doing the work for a second but i must admit its pretty disappointing that the noise is still there.
onwards and upwards…
Posted
Old Timer
Posted
Settled In
Posted
MOTY 2013
Hello my name is John and I'm a dub addict.
My wiring diagrams and other documents have moved here:
VAG Documents & Downloads
You'll need to sign into google/gmail for the link to work! (its free!)
My wiring diagrams and other documents have moved here:
VAG Documents & Downloads
You'll need to sign into google/gmail for the link to work! (its free!)
Posted
Local Hero
You did check to see that your Alternator pulley isn't vibrating……
What do Divorces, Great Coffee, and Car Electrics all have in common?
They all start with GOOD Grounds.
Where are my DIY Links?
They all start with GOOD Grounds.
Where are my DIY Links?
0 guests and 0 members have just viewed this: None.