air condition 2h 1991
Posted
#1538603
(In Topic #205512)
Settling In

sorry for my English
I'm from Lodz center of Poland
forum page golf cabriolet mk1 in Poland http://www.forum.mk1cabrio.pl/
I have a golf 1991 SL
I try to put in side everything what can by in cobby
I have
power 4 windows front org rear fron passat b3
power top
power mirrors
heated seats
cruise control - not work now - problem with instalation and some parts
tilting triangles
central lock
aircondition - I lost some power instalation
please help me
send me sow much foto what you can do
I need photo
instalation from baterry to aircompressor compressor
instalation of cruise control
my mail : jarosikm_xl@wp.pl
thanks for help
if you woil be in Poland please send me a email I will try to meet with you
best regards
jarosz
 Last edit: by jarosz
Posted
Local Hero


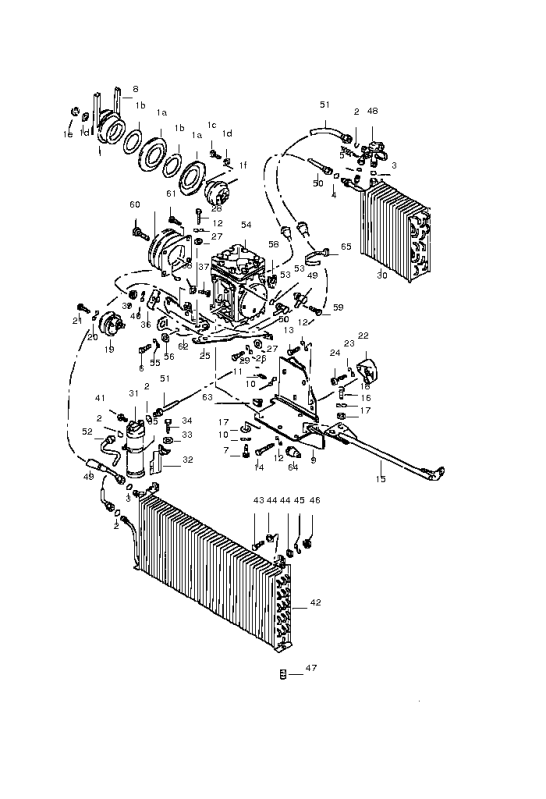
Ignore the compressor but the rest of the hard parts are gonna be it.
I have some pictures in my how to's as:
How I converted from R12 to 134a http://volkswagenownersclub.com/vw/showthread.php/10057-How-I-converted-my-a-c-to-r134a
How I tighten a squealing a/c belt.
http://volkswagenownersclub.com/vw/showthread.php/32219-Cabriolet-Tighten-Squeeling-a-c-Belt
How I change a water pump.
http://volkswagenownersclub.com/vw/showthread.php/21830-How-I-change-out-my-Water-Pump
Here is a how to diagnose your Cruise.
http://forums.vwvortex.com/showthread.php?1065244-Official-Cabrio-Cabriolet-FAQ/page2 Post 34
What do Divorces, Great Coffee, and Car Electrics all have in common?
They all start with GOOD Grounds.
Where are my DIY Links?
They all start with GOOD Grounds.
Where are my DIY Links?
Posted
Local Hero

Briano1234 is the man as he lives in a sunny place.
1988 Mk1 Golf GTi Cabriolet 1.8cc DX, K-jet. Daily drive. 317,000 miles and counting
1978 Mk1 Scirocco GLS 1.6cc FR, Webber carb. Weekend toy.
1978 Mk1 Scirocco GLS 1.6cc FR, Webber carb. Weekend toy.
Posted
Local Hero

sorry for my English
Your english is better than mine, and I have to remember that LHD is Different than RHD so have to remember which side is the drivers side and which is the passenger, as well as a Tire is Tyre, Hood is Bonnet and Trunk is a boot, as well as Ground is Earth.... :)
But I am adjusting my American, Bad Southern Drawl , to the Queens English.
The Irish writer George Bernard Shaw once said: 'England and America are two countries divided by a common language'

It is in the back of the Bentley or Haynes manual after the regular schematics.
You kind of have to look at the 91-93 Schematics then jump to the A/C ones….
What do Divorces, Great Coffee, and Car Electrics all have in common?
They all start with GOOD Grounds.
Where are my DIY Links?
They all start with GOOD Grounds.
Where are my DIY Links?
Posted
Settling In

Posted
Local Hero

As far as the dash goes, I will not take that apart, but I think I can show you where the wires go to the heater controls.
as there are only a couple of things on it that are for the a/c. I will not drop the Fuse panel either, as I had it all apart a couple of weeks back as I was redoing the Knee-Bar, but I think I have photos of it.
It will have to be a little later in the day as I have appointments to get to.
What do Divorces, Great Coffee, and Car Electrics all have in common?
They all start with GOOD Grounds.
Where are my DIY Links?
They all start with GOOD Grounds.
Where are my DIY Links?
Posted
Settling In

stand in front of car see engine
1. photo neer front lamp and baterry (dice two red wires)
2. photo fan (dice few wires)
3. photo compressor (dice 2 wires(
4. photo pipe "S" two sensor wires
Inside of car I have installed ok
thanks for help
Posted
Local Hero

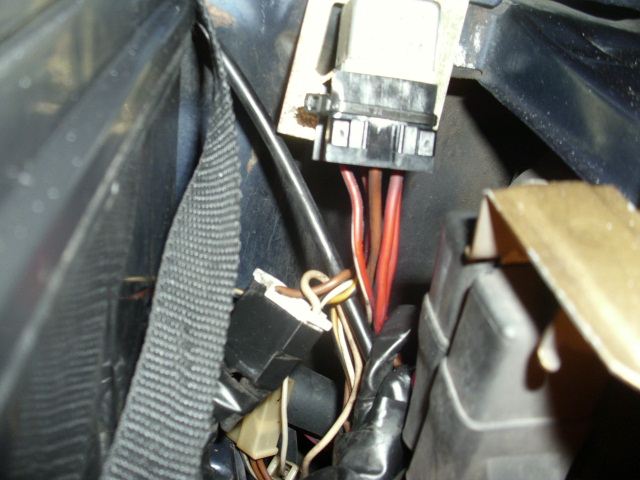
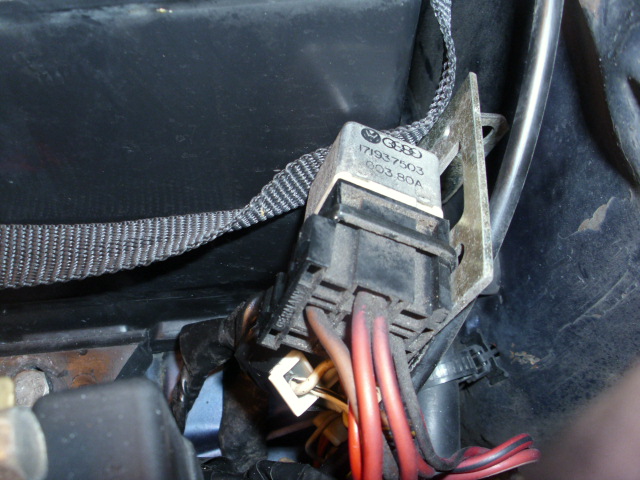
under side of fan run relay:

2 Speed Fan wires.

Compressor connection:
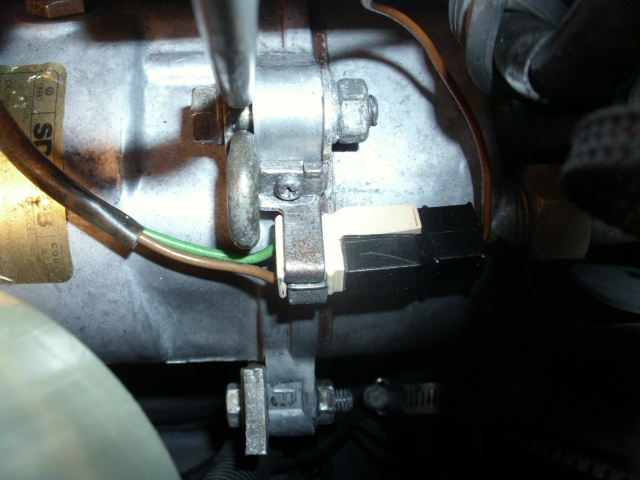
The black wire runs over to the pressure switches, and the Ground is tied to the Alternator case.
Pressure switches.
Black should be low pressure cut out
Green Should be high pressure cut out
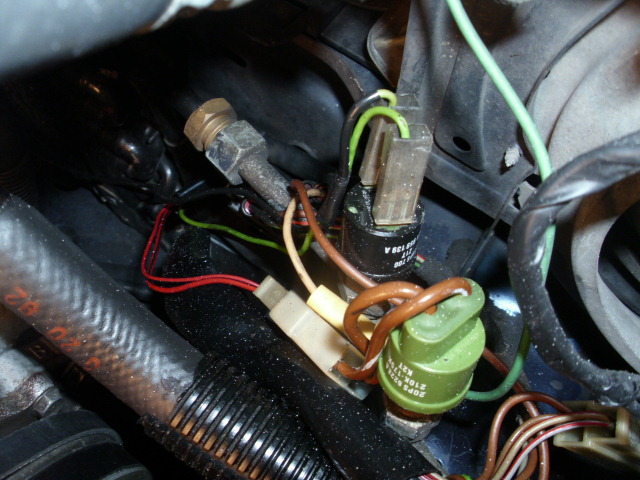
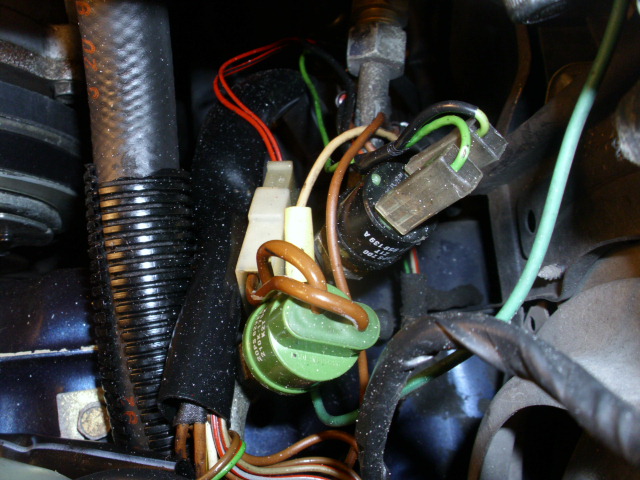

I think this is what you are after.
What do Divorces, Great Coffee, and Car Electrics all have in common?
They all start with GOOD Grounds.
Where are my DIY Links?
They all start with GOOD Grounds.
Where are my DIY Links?
Posted
Settling In

I will try to build new one installation from your photo
please wrote me nr of fan run relay
can you see the road wires from photo 1 to 2
Now I know
how the installation is end
how the installation is in black sensor
how the installation is compressor
how the installation is in fan
I understand installation from grin sensor go to fan run relay but I don't know where
I don't everything in second photo
Thanks for help
you are my master
Posted
Local Hero

One side of the High (green) pressure switch runs to pin 86 of the Radiator Fan Relay.
The other side of the High Pressure Switch (green) Junctions or meets with the Red/White, Red/black wire on the Radiator Fan Motor Pin 2 red/black wire.
What do Divorces, Great Coffee, and Car Electrics all have in common?
They all start with GOOD Grounds.
Where are my DIY Links?
They all start with GOOD Grounds.
Where are my DIY Links?
Posted
Settling In

witch your help I connect black and green pressure switch .
I take new wire from black switch to compressor (+) and from compressor to alternator case, what you show me on photo
Posted
Settling In

Existing installation ends white ankle near battery where are 3 wires
2 junctions thin wire red/black and thicker wire red/white
1 thin wire red/black
of the first 3 photo I see that fan relay is connected some like that
85 braun (-) ground - comes from ?
86 red/black - from green switch [from white ankle]
87 red/white - from [white ankle]
30 two reds (+) - comes from
photo nr 4 I have the same
photo nr 5,6,7,8 nowe I have the same
sow now I have problem only witch cables near battery
wires comes from and where go
of course cables starts form white ankle
It's almost finish - I think
Thank you for your patience and for your help
 Last edit: by jarosz
Posted
Local Hero

Getting an understanding of them is only going to help you.
Start at the Basics.
In the VW Schematics ground is at the bottom of the page B+(12v) is at the top. Fuses are always labeled S and a number.
Radiator Fan Relay wiring
Brown is ground From Pin 3 of the Radiator Fan to pin 6/86 of the radiator fan relay
Red/black is pin 87 of the radiator fan relay to the Radiator Fan PIN1
Red/black from the Radiator fan thermo switch(in Radiator)pin 1 and red/black From the High pressure switch are on pin 86 of the Radiator fan relay
RED is from the Radiator fan thermo switch(in radiator) pin3 and from Fuse S1 to pin 30 of the radiator fan relay.
Red/White is from the a/c relay in the fuse box pin 5 to Pin 2 Of the Radiator Fan Thermo switch(in radiator) and is tied to Pin 86 of the Radiator Fan Relays red/black wire
 Last edit: by Briano1234
What do Divorces, Great Coffee, and Car Electrics all have in common?
They all start with GOOD Grounds.
Where are my DIY Links?
They all start with GOOD Grounds.
Where are my DIY Links?
Posted
Settling In

Either I'm too stupid and I'm doing something wrong or something is wrong in your schematic and description (no offense)
cube of the fan with the number of wires and ch is the same color
1 red black
2 red-white
3 brown
cube of the same thermostat
1 red black
2 red-white
3 red
I'm still on the road two black cubes that connect the wires from the fan and thermostat further installation
first
1 red-white split into two the same color
second
1 red
2 brown
as described in scheme and
ac relay have the number 18 is the same description
I still have a white cube with three wires not connected anywhere
1. A thick red-white and thin black red
2 thin black czaerono
both the small red-black wire to reach the high pressure sensor
red-white not know where to go (he goes somewhere towards the fuse)
the colors in the photo of you
30 red
85 brown
86 red black
87 red-white
I connected
30 black cube red + S1
85 to the black cube brown
86 to 1 fan red black and red black with white cubes combined with red white who continue to let go of the thermostat 2
87 to 1 fan red black - the same wire goes to the thermostat 1
I made a few photos as mine looks installation without that missing piece I can send him a mail
how can I ask you explain it to me as a child because he no longer knead or how you can would convene me in his own way what goes where
Regards
Posted
Settling In

 fan
fan
 white cube
 black 2 cube
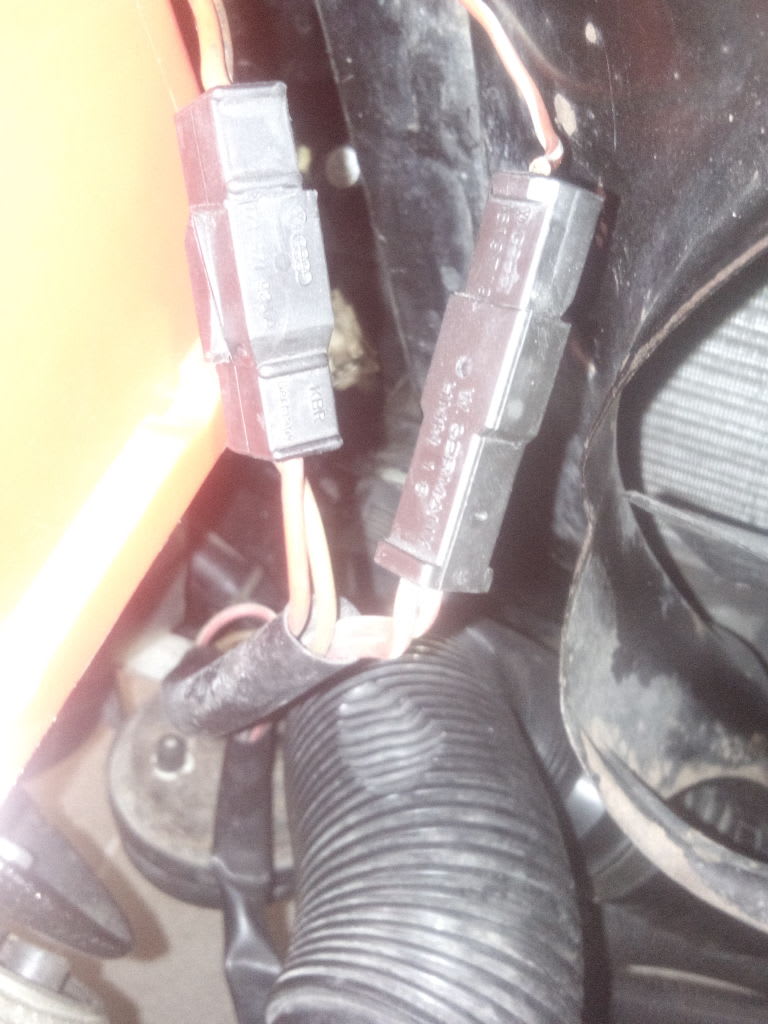 again black cube
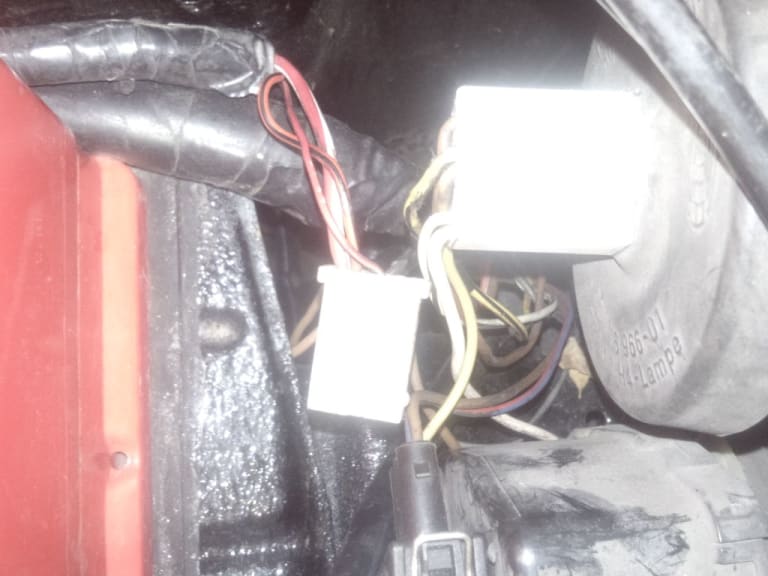 white cube
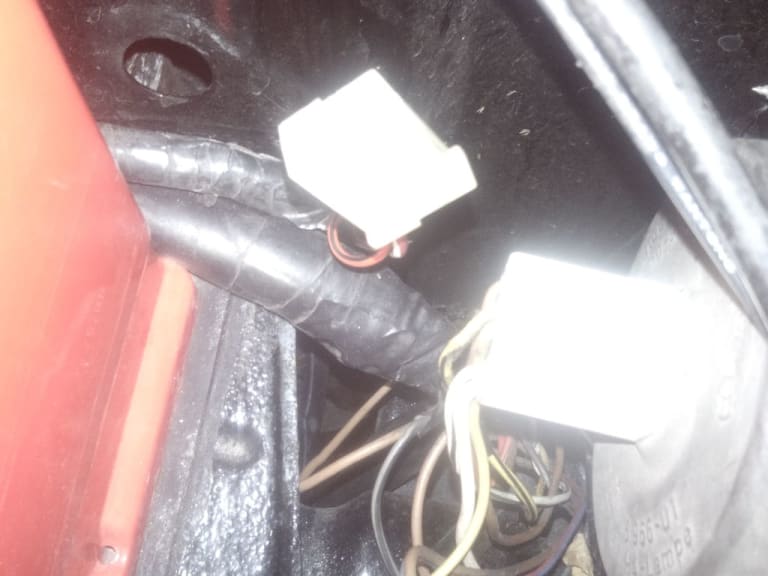 white cube again
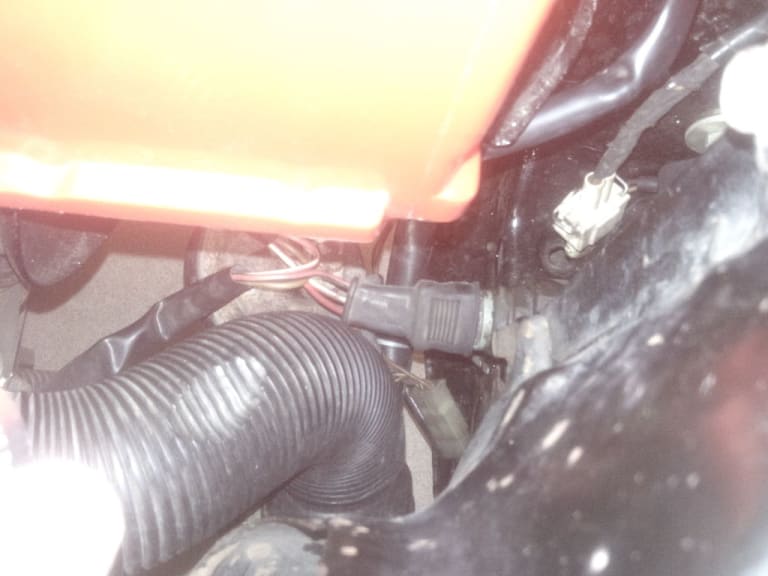 termostat
 Last edit: by jarosz
Posted
Local Hero

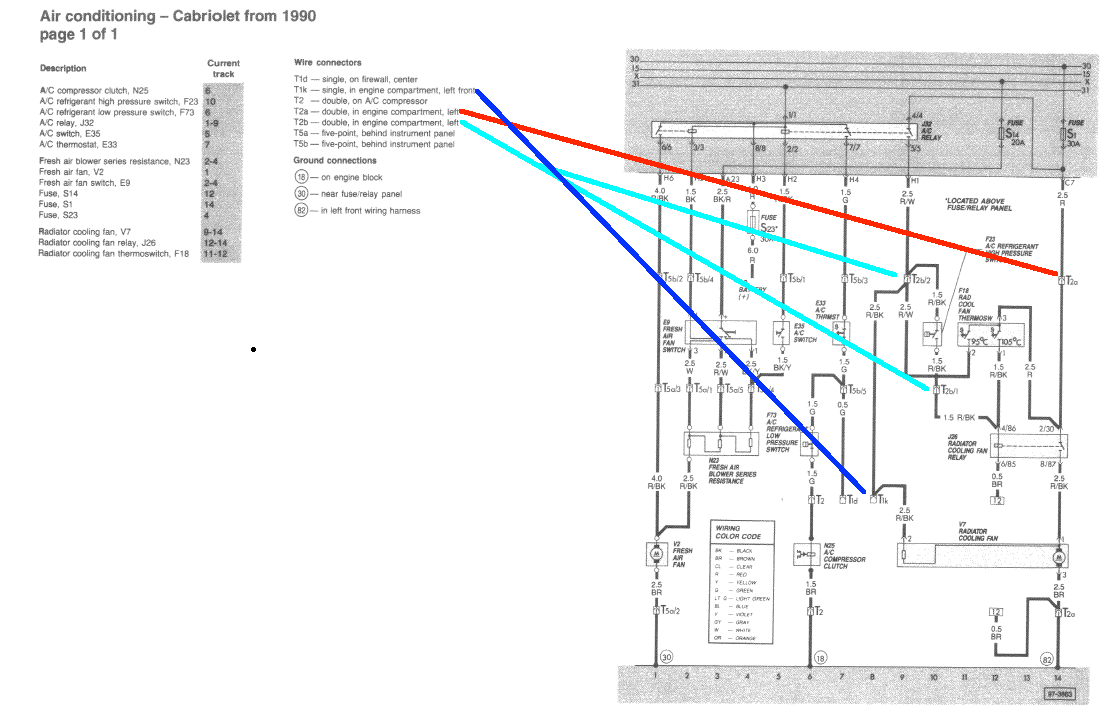
cube of the fan with the number of wires and ch is the same color
1 red black
2 red-white
3 brown
Cubes are connectors, each connector is labeled on the Electric Drawing with it's position in the engine bay To the left of the index on the drawing.
The Fan connection has 3 connectors.
1 on the fan itself 3 wires 2 red/black and 1 brown on one side and one red/white that goes back to the a/c relay in the fuse box.
1 red black wire goes to to connector t1K and back to another connector t2b/2 from there it splits to 4 wires 2 red/black and one red/white
The red/white goes to the radiator fan switch pin 2
The red/black one wire goes to the high pressure switch and back out of the high pressure switch to the radiator fan cooling relay pin 4 or pin 86 on the coil side of the radiator fan cooling relay.
How can I ask you explain it to me as a child because he no longer knead or how you can would convene me in his own way what goes where
Sorry that my english doesn't translate correctly to you.
I know that you don't understand the wiring diagrams, but it would be a better service to you to "get to know them". The entire problem that I see is that you are trying to do something that is getting lost in the translation.
Everything starts at 2 places, then breaks off into different things.
Ground for the system comes up in 2 places, one at the a/c compressor
and the other to the Motor for the FAN and splits to the Cooling fan relay pin 6/85
The Radiator FAN has 3 wires 2 are red/black 1 is brown.
The red/black on pin 2 goes to a connector T1k and to a connector T2b/2
connector T2b/2 is a 4 wire connector, Two are red/white, and two are Red/black one side goes back to the Radiator Fan, and the other red/white to the Radiator Fan Thermo switch pin 2
The other side of connector T2b/2 goes to the red/white from the a/c relay to the fuse box and to a red/black that is to the high pressure switch through the switch to connector Pin 4/86 of the Radiator cooling fan relay.
From Pin 1 of the Radiator Cooling Fan Motor you have a RED/Black wire to the connector pin 8/87 of the Radiator Fan cooling relay.
From pin 2/30 of the Radiator fan cooling relay you have 2 Red Wires one to Pin 3 of the Radiator Fan ThemoSwitch (in radiator). The other RED wire goes back to the fuse panel Fuse S1.
That is the Radiator Fan Circuit,
The Compressor has a ground on it at T2 and a Green wire on T2 that goes to the Low Pressure switch FROM the low pressure switch to CONNECTOR T5B/5 BACK IN TO THE DASH. This is part of the a/c relay.
It take a while to understand the drawings, and more time to understand that the switches are all shown at rest.
With no r12 or 134a in the system, the low pressure switch is open to the 12V that the compressor fan clutch needs to pick.
The High pressure switch is or connected allowing current to flow through the circuit.
The Whole A/C circuit is Activated when the Slider switch is in the Defrost, or Blue areas of the Console, and the FAN switch is at position 1-4
With the a/c lines Charged with Freon or R134a and sufficient pressure to close the Low Pressure Switch.
Key in and in the RUN position engine not running.
When you place the slider in the blue area, and turn on the blower fan.
The Clutch on the compressor will pick, and the Radiator fan will turn on (usually high speed).
Because the a/c relay in the Fuse Panel closes and applies power to the RED/White wire on the diagram wire of the Radiator FAN to energize the Radiator Fan Relay and allow the RED wire to power the fan.
The a/c system can by-pass the Radiator fan thermo switch in the radiator.
I hope this helps you.
Reading the Wiring diagrams and a DVOM (Digital Volt Ohm Meter) are going to be your best bet at getting it right…..
I will try to assist as I can.
Cubes are actually Connectors, and some connectors have 2 wires, one on each side, and Some have 2 wires or more on one side or the other. Knowing which side you are on determines where the wires are coming from and going to. A DVOM on resistance can tell you things as if there is continuity in the circuit, or an open.
I have been reading these Diagrams for 40 years, and they are second nature to me. I also have Electrical Engineering Background…so it is all very clear to me, and I can have trouble explaining things at a BASIC level
so I apologize in advance.
Briano
What do Divorces, Great Coffee, and Car Electrics all have in common?
They all start with GOOD Grounds.
Where are my DIY Links?
They all start with GOOD Grounds.
Where are my DIY Links?
Posted
Settling In

Sorry for so long did not say anything , I was on vacation
the installation of the relays, work well done
I have one more problem
the entire installation out of the missing section is complete and original
and goes from the fuse box to the engine and to adjust the vents
I checked - I have a problem because I have operated on the fuse of hv / ac
Connector T-shaped plugged in only fits in the fuse box
I suspect the lack of power at the fuse does not have the fan 4 and handled exclusively the AC on all gears
As I connected to the Shortly + to fuse directly to the battery is handled exclusively to the ignition as I turned the ignition switch
You are able to do to help me in this topic
Regards
Posted
Local Hero

The fan should work off the fuse for the heater on speeds 1,2,3. The 4th speed works off the a/c relay.
Fuse f14 powers the blower fan on speeds 1,2,3.
Fuse f23 powers the Fans 4th speed via the relay.
What do Divorces, Great Coffee, and Car Electrics all have in common?
They all start with GOOD Grounds.
Where are my DIY Links?
They all start with GOOD Grounds.
Where are my DIY Links?
Posted
Settling In

The fan work off the fuse for the heater on speeds 1,2,3.
Fuse f14 powers the blower fan on speeds 1,2,3. - is ok
Fuse f23 powers the Fans 4th speed via the relay. - is above fouse box - and is ok but is now power on it
Posted
Local Hero

Fuse f23 powers the Fans 4th speed via the relay. - is above fouse box - and is ok but is now power on it
F23 gets is power directly from the battery, not via the fuse panel. On the back of your socket h3 or pin 8 of the relay has 12V on it from the battery.
So you probably need to get a sourced of unswitched B+ to that pin as without it I don't think your a/c will ever work.
What do Divorces, Great Coffee, and Car Electrics all have in common?
They all start with GOOD Grounds.
Where are my DIY Links?
They all start with GOOD Grounds.
Where are my DIY Links?
0 guests and 0 members have just viewed this: None.


