


My mk1 beginners engine rebuild - WILL IT START?!?!?

Posted
#924662
(In Topic #109188)

Local Hero


My mk1 beginners engine rebuild - WILL IT START?!?!?
Hopefully some of the problems I come up against can help others
Here's how it's going to far:-
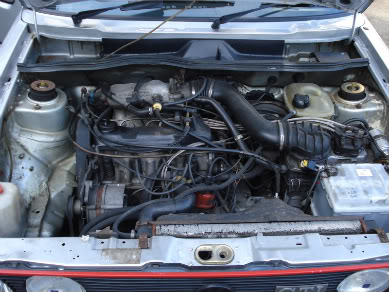
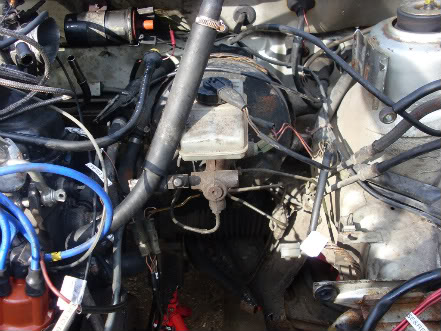
Engine bay before labelling and removal starts:-
labbled nearly all wires in the engine bay:-
Metering head and oil cooler removed and placed on the engine:-
I tied these pair up as petrol came out if they were moved. I ended up cable tie-ing them to the bonnet support with a rag underneath:-
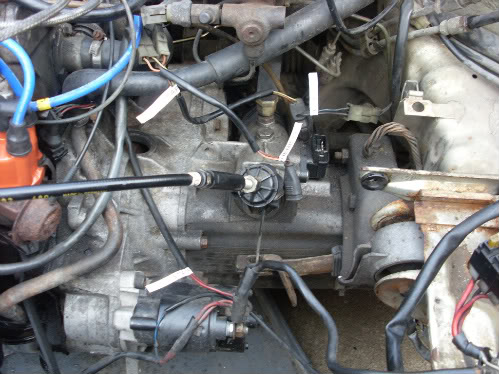
Gearbox was removed from underneath using axle stands and jacks:-
Engine-less and gearbox-less bay:-
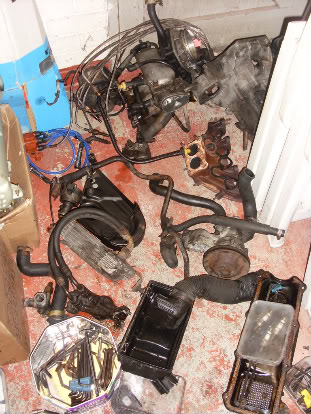
Engine Parts removed and laid out with the bolts they came with (must be easier putting them back.. we'll see :? :-
Partially bare Engine:-
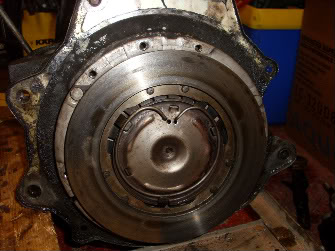
Flywheel removed:-
Pulleys removed. This is difficult if you don't have the right tools.. found this out the hard way :roll: :-
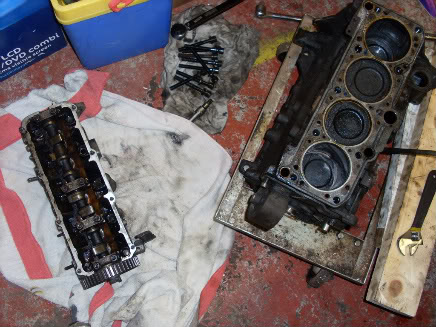
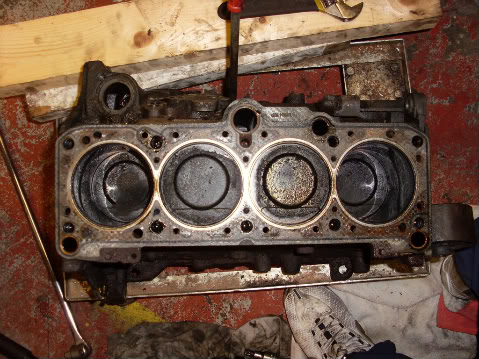
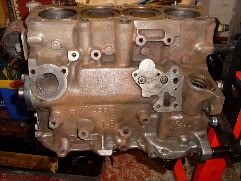
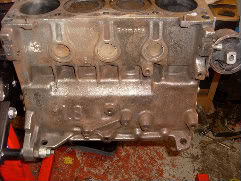
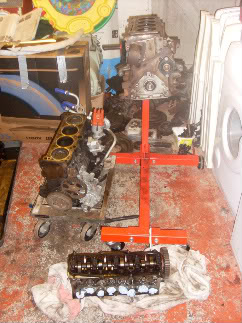
Head and block detached seperated:-
Serious amount of carbon build up on the pistons:-
Block on Seally 450Kg stand:-
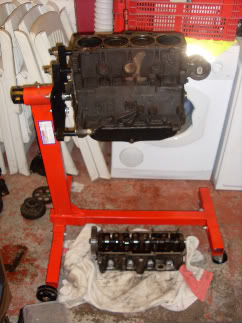
How do you put it on the stand? I used some of the old head bolts and they worked fine to be honest:-
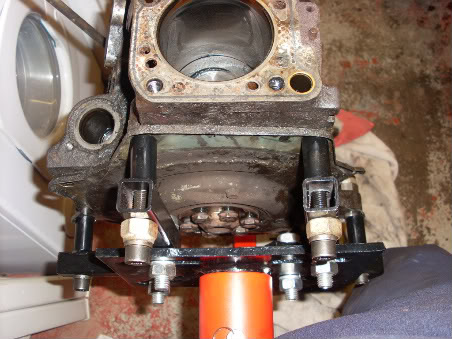
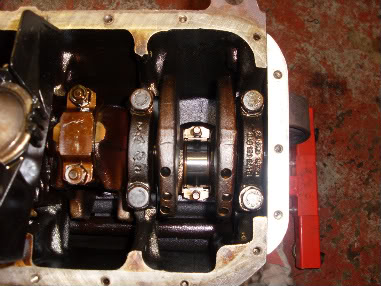
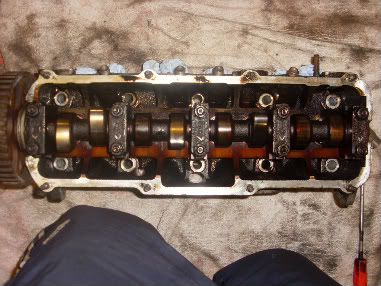
If you have a look at this particular head, it appears to have the bearing cap number 4 missing. I thought this was a problem but Bert stepped in and said it is meant to be this way. It has a little jet underneath it to spray oil and is known as a lifter :dontknow: … I'm just glad it's not broken :roll:
You can see it on the right here:-
Well I only managed to scrape gunk off of the block today and put a few coats of engine cleaner on. I'm going to try and wire brush the block tomorrow to finish it off then I'll start replacing parts in the head and block :?
Wish me luck :pray:

Posted
Local Hero
good work so far give it a good rinse with gunk then power wash the crap of the engine :wink:

Posted
Local Hero
Bert
Thats not a rod knockin,its a diesel stupid! floppy top and 1 tin top 
Posted
Local Hero
bens_cab said
that bearing cap is missing for a reason vw never intended it to have one there hence its not there
good work so far give it a good rinse with gunk then power wash the crap of the engine :wink:
They miss out number 4 on the caps… scared the crap out of me… 1, 2, 3, 5… 8O aye…. where the hell is 4… why not label them 1,2,3,4 to save me from having to change my pants through sheer shock!!! lol
Thought I can't get anything in the piston pots even if I am removing them to do the rings and seals!?!? :dontknow: Can I clean everything except the cylinders themselves bud?
Thanks for the encouragement Ben.. not half as hard as your conversion but I'll get there :wink:
Posted
Local Hero
Bert said
nice to see your having a go,if you strip the bottom end,always use new big end cap bolts etc :wink: change all the oil seals whilst your there,petrol is good for cleaning oil off the head by the way,but dont smoke whilst your in the process :roll:
Bert
Thanks for the info on the bearing cap earlier Bert. Good to know people are there if/when you need them on here. It's the biggest reason I'm trying this myself… hopefully when finished, I can help others out… I can see a lot more learning coming my way from this before I'm done :?
Posted
Settled In

 ops: so make sure you continue as you are :y:
Good luck

Rich

Posted

Local Hero
Posted
Local Hero
whatalotafun said
nice one spud, i'll be doing mine what the car is done, only be changing the complete gasket set, i won't bother cleaning it so it looks shiney! i keep an eye on this thread too.
Snap will do mine also when done. Will be watching this.
Posted
Settled In
Posted
Settled In

Good luck, i'll be watching this one!
'78 Golf LS 20vt
‘08 Mk5 Edition 30 DSG
‘08 Mk5 Edition 30 DSG
Posted

Old Timer


are your going to respray the engine bay or just clean it up??
good work

Posted
Local Hero
Got up early and took a look at the engine block:-
But I didn't start any wire brushing until taking Lawsy's common sense approach of using…. these…
taaaadaaaa no dirty hands:-
I was motivated today but didn't do any more than buy another engine for the seriously pant wetting price of….. ?5.50… for a whole engine and some accessories 8O … here's the link in case people find it as much of a shock as me. It pays to put your clocks forward on time 8O :-
http://cgi.ebay.co.uk/…5233840%26_fvi%3D1&_rdc=1
The guy was a mk1 nut so gave him a club card.. felt guilty for handing him ?5.50 but it does mean more money for my engine rebuild. He also wanted shot of it so didn't seem too fussed.
Here is my new arrival…. worth the delay in progress me thinks :dance:

For ?5.50 !!!! 8O
WELL CHUFFED!!!
probably rebuild this one at some point too!!!
Posted
Life Member

Posted
Local Hero
dubboy said
Bargain there mate! If you are painting the block, degrease, wire bush, degrease, hot water, Metal Ready, cold water and 2 coats of POR15 black engine enamel. :wink:
Thanks Rajan… where do I get Metal Ready and POR15 black engine enamel… do they also do grey? Was wondering how to prep it… you're like mystic Meg :wink: … only in web format lol … it was my next question for the morning!!!
Posted
Life Member
Metal Ready (only showing stock of the US gallon at the moment)
http://www.frost.co.uk/item_Detail.asp?productID=8229&frostProductName=Metal%20Ready%20(946ml,%20US%20Quart)&catID=24&frostCat=Painting&frostSubCat=POR-15&subCatID=37
Engine enamel (do a few colours though not grey)
http://www.frost.co.uk/item_Detail.asp?productID=8765&frostProductName=Chevrolet%20Orange%20Engine%20Enamel%20(473ml)&catID=24&frostCat=Painting&frostSubCat=POR-15&subCatID=37
POR15 instructions
http://www.frost.co.uk/how_do_i_explained.asp?hdID=4
Posted
Local Hero
Bert
Thats not a rod knockin,its a diesel stupid! floppy top and 1 tin top
Posted
Local Hero
Here goes:-
I finished off some wire brushing from yesterday:-
front before and after

Back after (didn't take a pic of before) :roll:
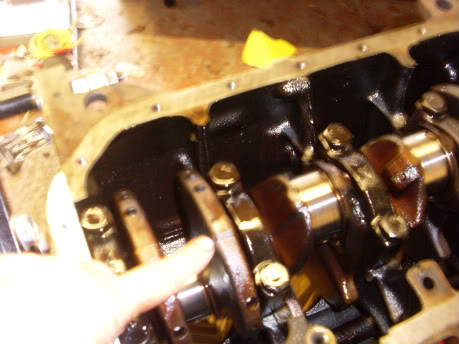
I then moved on to tackling the big ends. I flipped the engine over on the Sealey engine stand
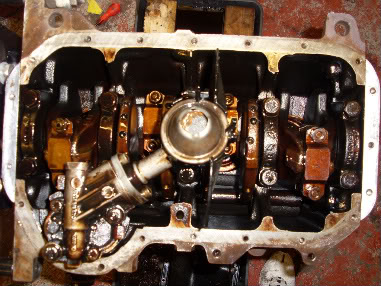
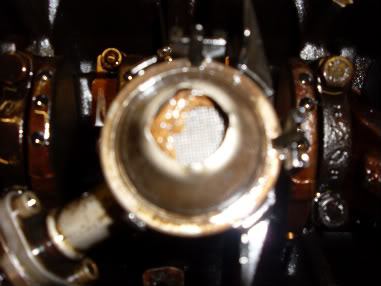
and look carefully…. a bloody leaf stuck in the lifter :? that couldn't have been good!!!
Anyways… I started removing the caps…
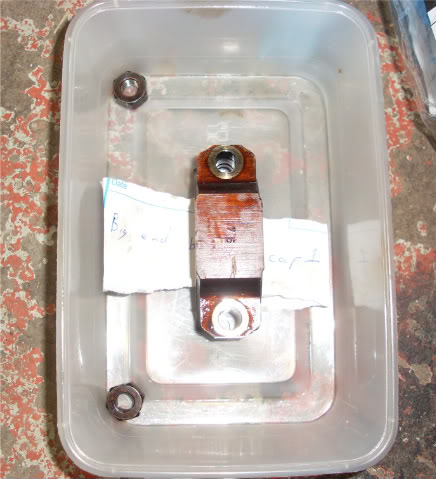
I placed each one in it's own tray and marked which way was the front of the engine (you can see the groove etched in it with the point of a screw driver… hopefully won't put it in the wrong way now when refitting.
If anyone is going to attempt this then I used this to move the pistons to the top of the block.
I then pushed the two threaded studs at the ends of the pistons from above and caught them as they came out.
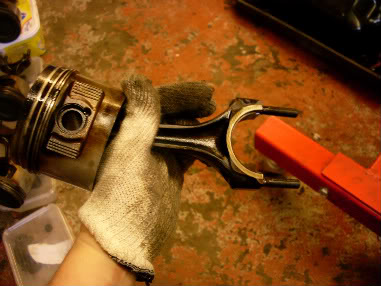
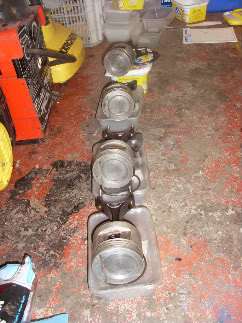
As you can see the pistons were not in a very happy state.
Not sure if I was meant to do this but I scraped the heavy carbon off with a stanley and then used a fine pad to remove the rest.
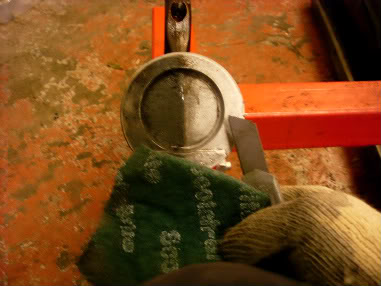
A bit of elbow grease and it came up like this
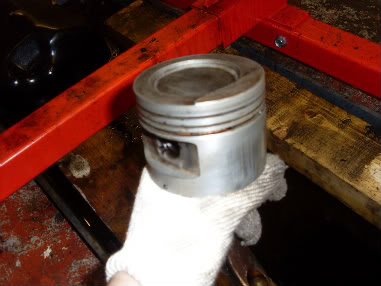
Against the others you really notice the difference
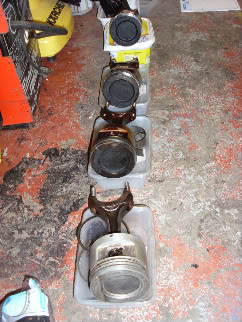
So… few hours later and all of them had a new lease of life (note they're sitting on a box containing their bearing caps (again so I don't forget what goes where!!)
Before and after
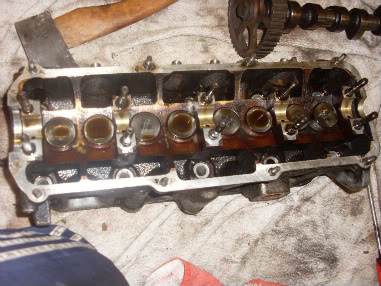
Decided that the head I got on the engine I bought yesterday is better than the one I originally had… so… a few red faced minutes on the rachet and the head was remove (no rude comments please :wink: )… so.. two seperate heads and two blocks now
Just wanted to do that little bit more tonight so…
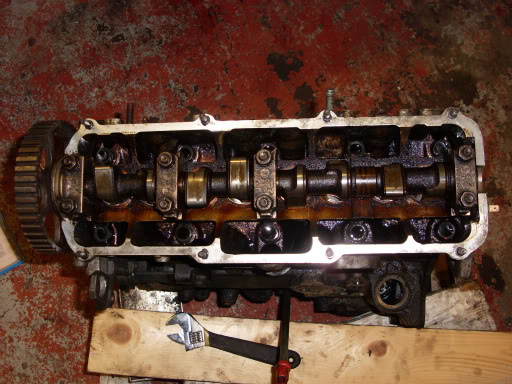
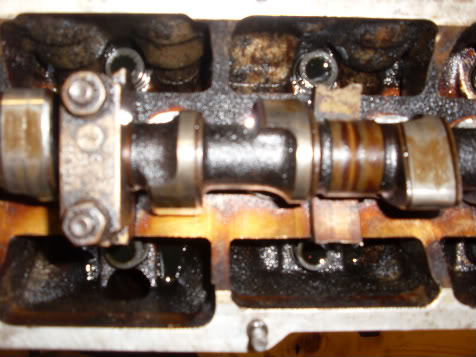
Took the head bearing caps off one by one in order 5,1,3,top nut on 2, bottom nut on 4, bottom nut on 2, top nut on 4… (you'll notice this head has all 5 caps) :wink:
After this the cam shaft came off easily to reveal the buckets…
You can remove these by placing a small screw driver in the slots either side of the bucket… then pull up… they will lift out… note that they spin around to give you better access to the slots…
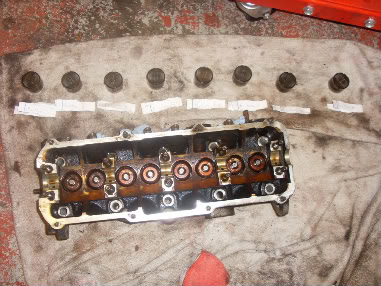
Once they were out I wrote which valve number they relate to… I then put the bucket in a bin liner with the bit of paper too…
got this excellent tool to remove the valve springs (don't try this job without this)
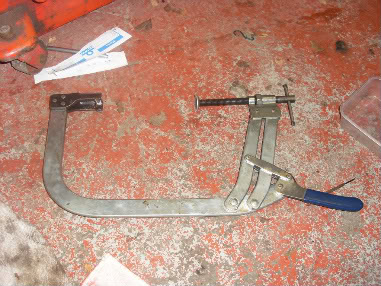
and away I went.. I found it easy to just push the spring down a bit and then turn the threaded part of the clamp to tighten it all down… this pushed the spring right in… I then used a screwdriver to seperate the collets and a magnet to pick one half out at a time….collets removed.. and out came two springs too… lovely!!

You can also remove the valve at this point too… mine look a bit worse for wear :?
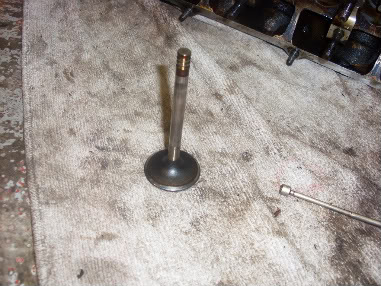
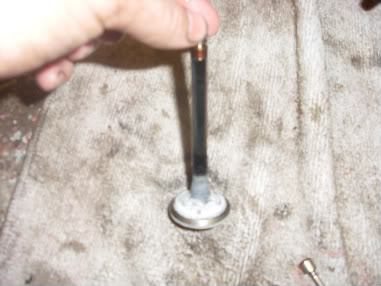
So just to keep things in order, I put the bucket, collets, springs and valve for each one in their own bags with a bit of paper saying the valve number (number 1 is on the left as you look at the front of the engine etc…) should stop me getting confussed… which is easily done :wink:
I hope to make a rough guide from all of this in order to help others like me. Is this something the site would want in the technical section? Maybe I can do the basics and the techy's can add to/alter it before putting it as a guide?
Posted
Local Hero
are you working from a haynes manual? or just stuff you have picked up through ownership? you are doing a fantastic job.
at this rate you'll have the engine back togetherby friday.
and i presume your "special tool" is a vavle spring compressor?
Posted
Local Hero
whatalotafun said
presume you have the necessary things to reseat the valves on insertion?
Errr… I hope so… got my uncles torque wrench thing… sure I'll fine them all… and I'll put it in this guide if I do :wink:
whatalotafun said
are you working from a haynes manual? or just stuff you have picked up through ownership?
Bit of both really… got the Haynes for torque settings, feeler settings and which order to remove bolts etc… find this place easier though
whatalotafun said
at this rate you'll have the engine back togetherby friday.
Doubt it buddy… I'm off tomorrow but babysitting from 15:30Hrs onwards… then funeral on Wednesday… then back to work Thursday :cry:
whatalotafun said
and i presume your "special tool" is a vavle spring compressor?
Ahhhhh that's the one :wink:
Posted
Local Hero
There are too many online users to list.