


RUSTY'S BECOMES "ROXY" - FINISHED AND FINAL PICS 9/12/13 - SOLD

Posted
Settling In


Posted

Old Timer


eezylife said
Dude you are one grafter nice work this will look so sweet
I try to be, but things that are out of my control hold me up. thanks mate.
Posted
Old Timer
pazwaa said
Just read the full thread, amazing work. Looked great in primer, wish my was primered! Paint finish looks spot on. Matt.
thanks mate.
Posted
Settled In

Sticker Pig
Posted
Old Timer
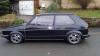
Car is now renamed ROXY - the misses (who hates the car) "you can't call her Rusty now she all shiny & new……how about Roxy?"….
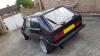
so the car is back in my workshop, minus the drivers door as this needed alittle more work. The car will return back to the bodyshop in a few weeks time for refit of the door, engine bay to be painted, fine tweeting and final mopping/ polishing.
until then, there loads to get on with….
New side strips:

Grill:
washed, cleaned and then treated with Mers Plastic restorer

New Grill Badge:

Headlights:
VGC, although the rear rings had over respray on then, so clean these up too, even though these don't get seen…i wasn't happy to leave them like that.


New Arches:


Refurb the Grill Trim
These were flatted, primered, flatted again, ready for paint (i didn't seem to have take photos of this) sorry


Grill fitted up and ready to go:


Quick preview on the car


Shipment for power coating:
Fan cowling


Number plate holder:


Front door, window divider:

Dreadful cam cover:

Dreadful Rocker cover:

Wiper arms (front and rear)

Radiator brackets, Armour arm plates, fuel sender cover, horn bracket, ignition amplifier cover and rover cover strips.

few more pics of the car:


New side strip clips…and sneak preview


all for now….more to come….
Posted
Old Timer
Posted
Old Timer
watson said
Looking good - really like this transformation and attention to detail. Recon you'll want to keep this one.
thanks mate, no i don't want it …..lol i cant keep all of them
Posted

Old Timer
Paint looks lovely to.
Posted

Moderator


Posted
Old Timer
It's all shits and giggles until someone giggles and shits
Posted

Old Timer
Posted
Settling In
Posted
Old Timer

Mk1 Golf Gti Abf conversion Project
Mk2 Golf Gti 16v
Mini Cooper S R53 (Daily)
Posted
Old Timer
Posted
Settled In
Can't wait to see some more updates.
THAT COLOUR!!!

Posted
Settled In

Posted
Settling In
Posted
Old Timer
It's all shits and giggles until someone giggles and shits
Posted
Old Timer
So the time had come for my to replace the roof lining in the car……my first protocol was to make sure the tailgate was bolt/ adjusted to the right position as the bolts are underneath the roof lining. Then i had to nick my misses washing ling pegs
 and order some high temperature head ling glue. heres some pics…
As i started adjusting the tailgate i realised some had pull all the cables through the tailgate out…..(heaters element, jet washer pipe & wiper mechanism) so i had to replace this, luckily i have so old original heater element spades covers, but i did replace the old copper spade.


Once this was done, i was ready for the roof lining …..photos are not very good for some reason. (please note i have used proper leather match material and not thin vinyl)


Sunroof
First wrap the edges with cloth tape…then tapping the seal into place….and re-glue the material to the sunroof panel (missing pic) then re fit it…


mask over the roof, good and proper!!! lol


check to see it works and to get the mechanism timing right


Stainless steel screws and refurbed sunroof fixings


wind deflector also refurbed


finished


Little video of the sunroof working (music courtesy of the local radio LOL)
Few small job while the headlining sets
Replacement boot strut …..feed of the tailgate hitting me in the head lol

New / replacement rear number plate bulb holders…

Refit of the fuel sender cap, with new seal and bolts….not original…..but detailed i guess?


Paint the line back into the middle of the rear lights as over time, this fades. Then a good clean and polish….
love these lights

once the roofing was dry i fitted all the glass apart from the rear tailgate screen due to the surround sticker……all seals were washed out, the the apertures greased for protection against rust and lube. Glass was also scraped clean..


Front door glass divider had come back form the power coaters, so that was pop riveted back into place.

without showing every piece of glass, you get the general ideal of the glass fitting and procedures i used……

Returned power coating…


fan rebuilt: new bolts and washers


Door rebuild, hinges re greased, oringial door pin and cap,


JUST FOR A JOKE….and to round up this update..

Posted
Moderator
0 guests and 0 members have just viewed this: None.