


mk1 project - shell up custom rebuild- sheet metal work time

Posted
Settled In

mk1 project - shell up custom rebuild- sheet metal work time
plan is to get the floor pan ready for colour and then seal it and carry on with the rest of the car
anybody got suggestions for what to aply paint wise - i want it smooooooth - but has to last
was thinking etch prime
any filler work
primer
smooth stone chip - flat it back
high build primer + flat it back
sealer
- then colour in about 3 years when the rest of the work is done
Posted
Old Timer

re the floor pan
i would go for epoxy mastic on top of some zinc rich primer - such as zinga
you will need a tough coating for the floor and some normal primers don't protect against rust
stone chip would be difficult to flat back given it comes out as a ripply finish to start with…
epoxy mastic from rustbuster is great stuff and is sprayable - you can then just leave it black till your ready to spray colour on the car…
Posted

Settling In

ANY ADVISE?

Heres mine the daay i bought her…

Mind the Dubhead in the way :mrgreen:

ANY HELP WOULD BE GREAT GUYS!!!

Posted
Settled In
Carbs4ever said
Good work Mike.
re the floor pan
i would go for epoxy mastic on top of some zinc rich primer - such as zinga
you will need a tough coating for the floor and some normal primers don't protect against rust
stone chip would be difficult to flat back given it comes out as a ripply finish to start with…
epoxy mastic from rustbuster is great stuff and is sprayable - you can then just leave it black till your ready to spray colour on the car…
i was hoping you'd reply
is the epoxy mastic acting as the stone chip? i take it i could then prime and paint over the top of it as normal?
is zinc a better option than etch prime?
have used zinc primer for some of the wleded sections - doesn't seem to grab the metal as much as the etch primer
any help much apprected
i was planning to etch prime the lot - rub back any areas to fill - then fill and seal with primer
then epoxy the lot ?
its a mine field this painting game
Posted
Local Hero


keep up the good mate 8)
Posted
Old Timer
on each inner arch i sprayed zinga on (98% zinc) as a base coat to bare steel then two coats of epoxy (brushed thick) over the top then a light coating of stone chip to minus the brush marks and reduce chipping. On the floor pan where chipping isn't much of an issue i didn't use stonechip or zinga as the floor pan had zero rust and epoxy forms an air tight barrier - no rust can form under it
In terms of stonechip its gonna be a toss up between mirror finish flat paint on the floor and arches - like X5PEA for example or a little texture.
IMO your gonna need the texture of stonechip to absorb stone hits and avoid paint chip especially under the arches…
maybe that makes no sense - let me know if it doesn't and i will hone it down a bit
Posted
Settled In
i think the arches could do with the stone chip as you say and the floor pan should be fine without .
i think so long as i stick to all 2k products i should limit the chance of any problems down the line.
i think the etch / zinc is a good idea under the epoxy as if it should chip there is something underneath to protect it.
cheers for the advice - much appreciated
8)
Posted

Settled In
Great stuff well worth the money.
I used mine onto bare steel as they recommend that it sticks best to bare steel .
Then coated the underside with dinitrol ,maximum rust protection for a daily driver .
76 ?
78 gls
83 gti 5v
78 gls
83 gti 5v
Posted
Old Timer
Thats how my inners were after two of mastic - a light'ish coat of stone chip some colour and laquer…
I think the stonechip gives it a nice texture - though not as coarse as factory sealer - a good in between imo
even if you get some chips - not hard to touch in again where needs be…
Posted

Local Hero


Andy
LINCOLNSHIRE REGION -�https://www.facebook.com/groups/467122313360002/
1983 MK1 Golf GTI Campaign Model - Under (looooong) resto!
1962 Rover P4 80
2002 BMW 745i
2008 BMW Z4 2.5Si
LINCOLNSHIRE REGION -�https://www.facebook.com/groups/467122313360002/
1983 MK1 Golf GTI Campaign Model - Under (looooong) resto!
1962 Rover P4 80
2002 BMW 745i
2008 BMW Z4 2.5Si
Posted
Old Timer
sorry mike are we highjacking?
 ops:
ops:
Posted

Old Timer

Posted
Settled In
Carbs4ever said
no - just key up the surface a little if needs be… some 180 grit would do it..
sorry mike are we highjacking?
nah don't worry hijack away - no probs with the build thread having some good discussion points on about certain areas etc etc - might help some other people out along the way
zenders aren't going on the mk1 - no way they would come close to fitting ( 8x15 et 0) and not special enough for the end result i have in mind
i have some plans

Posted
Settled In
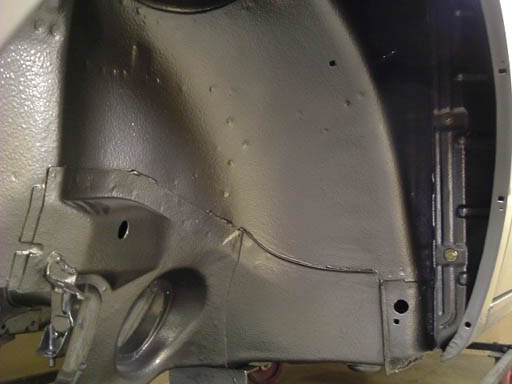
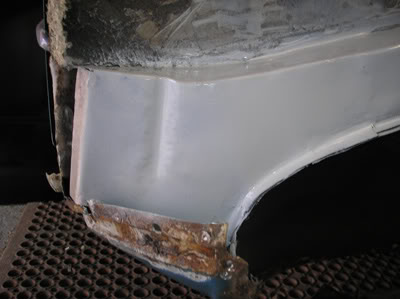
started to get most of the fab work done before the floor is blasted
floor is really solid except the two sections at the alignment bosses
chopped em out and hand formed my own repair panel
added the original swage mark back in with a hammer and dolly to keep it looking standard - took about an hour but i couldn't leave it out - would have driven me mad 8O
anyway heres some pics - onwards and upwards

Posted
Local Hero
Andy
LINCOLNSHIRE REGION -�https://www.facebook.com/groups/467122313360002/
1983 MK1 Golf GTI Campaign Model - Under (looooong) resto!
1962 Rover P4 80
2002 BMW 745i
2008 BMW Z4 2.5Si
LINCOLNSHIRE REGION -�https://www.facebook.com/groups/467122313360002/
1983 MK1 Golf GTI Campaign Model - Under (looooong) resto!
1962 Rover P4 80
2002 BMW 745i
2008 BMW Z4 2.5Si
Posted
Settled In
I love keeping an eye out for updates.
Would someone pls post links up for the zinga, stonechip etc etc.
You have inspired me to get my bay welded up, had it done over the weekend, pick it up 2moz then on with the grinding and filling.
happy days.
top work as always Mike, a pleasure to watch this transformation.
Posted
Settled In
good luck with the grinding and filling - its going to take a while
any way change of plan and the 20v engine is up for sale !
have bigger and better plans for the car and not sure the 20v was going to make the most of them
all will be revealed in good time - need to shft this engine first though 8)
Posted
Settling In
 great work pal
Posted
Settled In
engine will allow me to do alot more of the custom machining work i wanted to do
all will be revealed in good time
Posted

Settled In

love the custom fabbing.
where is this k33ts rear panel guide i cant find it??
0 guests and 0 members have just viewed this: None.