


Baz's '83 Golf Driver - Complete Restoration Thread

Posted
#663999
(In Topic #79953)
Settled In

Baz's '83 Golf Driver - Complete Restoration Thread
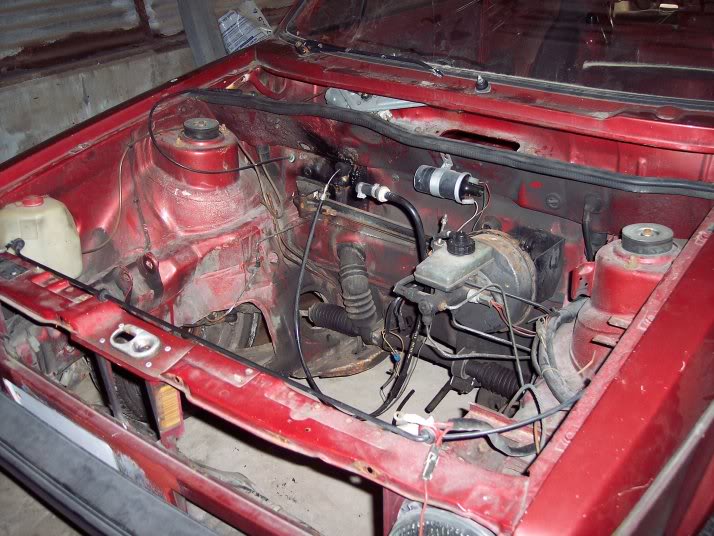
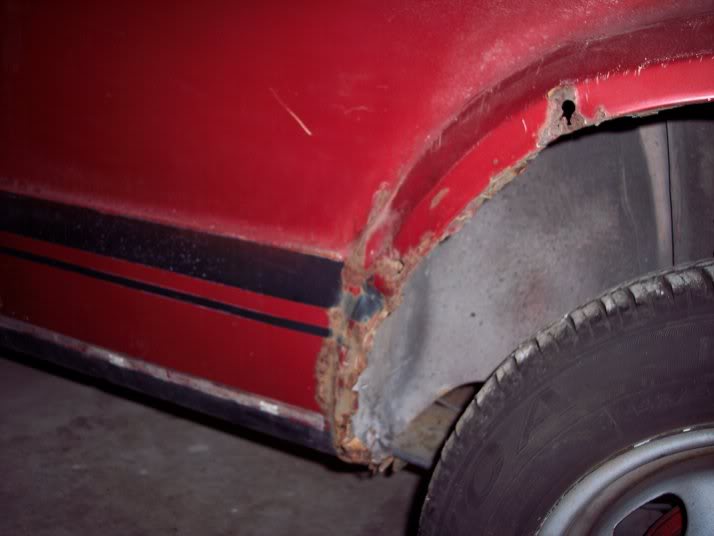
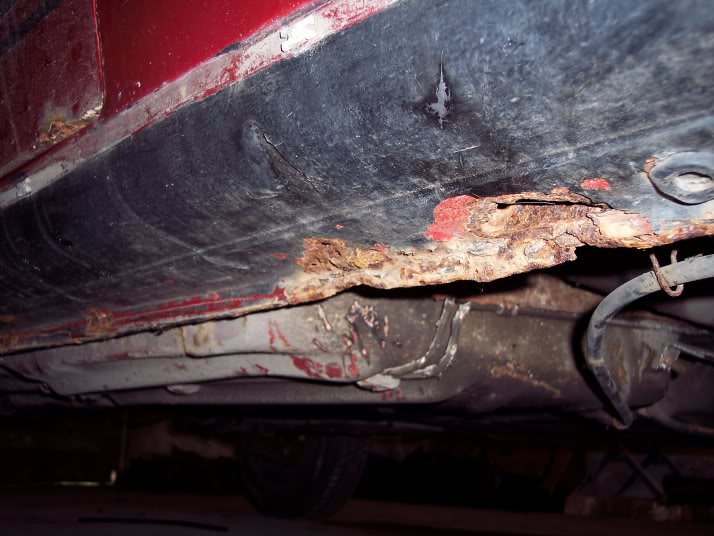
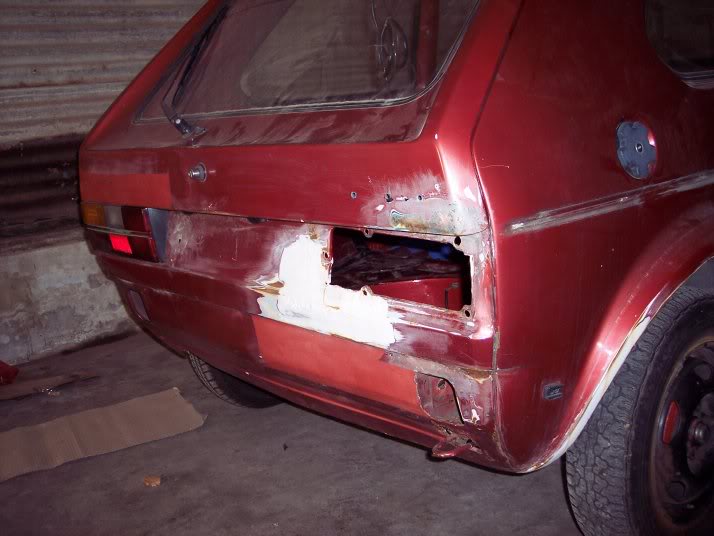
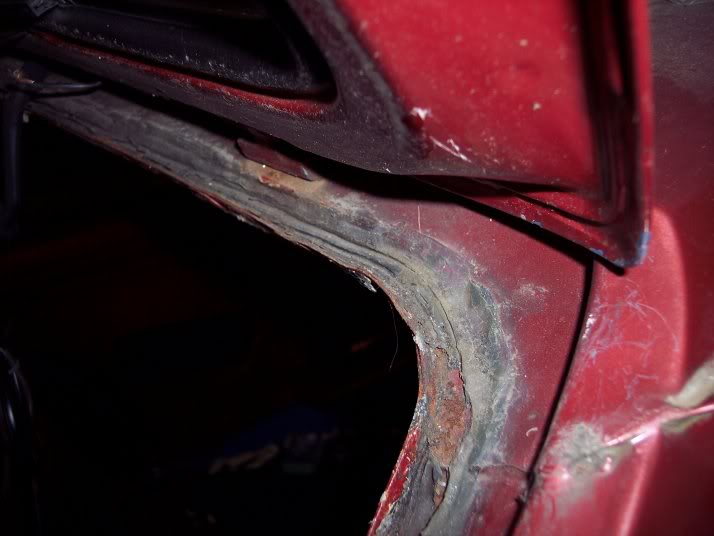
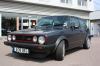
I'm fairly new to the forums and thought I'd post a few pics of my little project. I'm keeping a diary and will add it as I go along but first I thought I'd post a few pics. I'm going for a complete restoration of every nut, bolt and panel to try and recover this car's little lost soul.
Here's a few pictures which were taken halfway through it's stripdown.
Any advice and help would be much appreciated.
More pics to come as well.
Baz


WORK DIARY
Car was bought on 25th of May 2006 for a total of ?380. Transportation costs were about ?30 for ?20 trailer from Mc Carrolls and about ?10 of diesel.
Day 1: Friday 26th May
Car is cleared out and engine and extras all taken out of the back and car is push into the garage. Garage gets tidied and set up ready for work to start. Car gets it?s first general inspection.
Removed:
Rear Lights
Rear Seats
Rub Strips
Day 2: Saturday 27th May
Removed:
Door Cards
Front Seats
Headliner
Rear Trim
Seat Belts
Pillar Trim
Day 3: Tuesday 30th May
Removed:
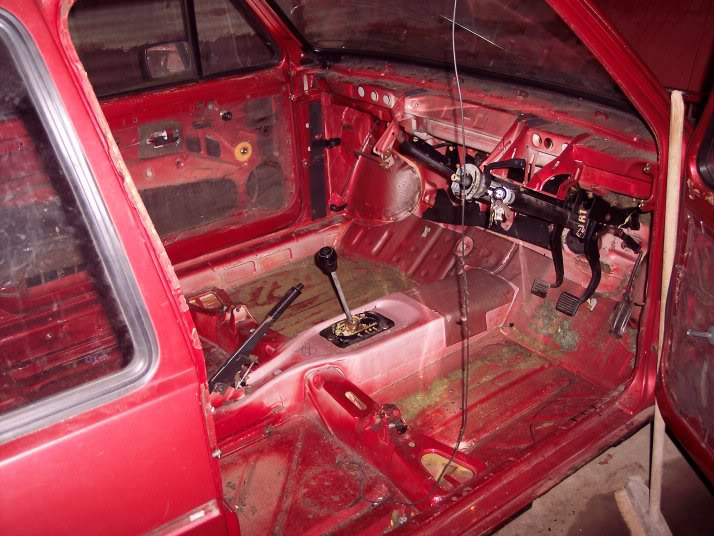
Dash
Steering Wheel
Front Carpet
Soundproofing
Air Ducting
Fan
Instrument Cluster
Day 4: Wednesday 31st May
Wiring was removed and fully labelled. Dents and rust were also marked on bodywork with permanent marker.
Day 5: Thursday 1st June
Removed:
Gear Linkage
Door Locks
Side Windows and seals
Headlights
Rear Wiper Motor
Front Bumper
Wing Mirrors
Bonnet Prop
Day 6: Sunday 4th June
Removed:
Tailgate
Doors
Day 7: Monday 5th June
To Do list made:
Remove:
Petrol Tank and Filler Neck
Fuel Lines
Rear Axel
Rear Wheels
Suspension
Brakes
Handbrake
Pedals
Steering
Front Window
Front Engine Mount
Clean Engine Bay
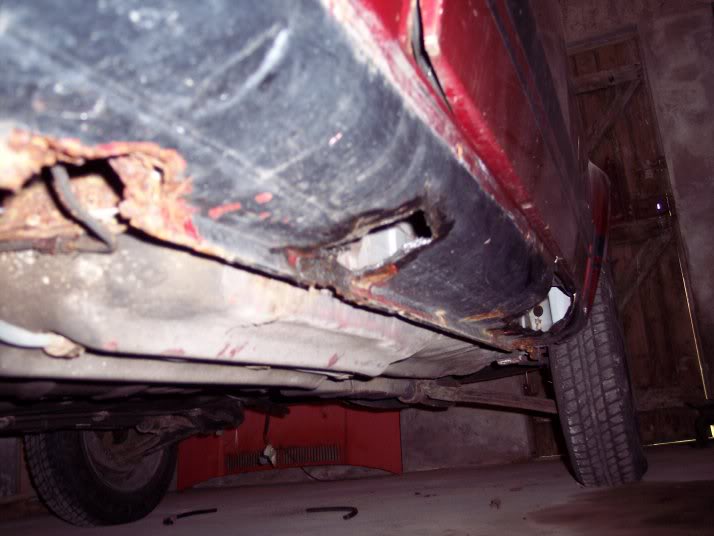
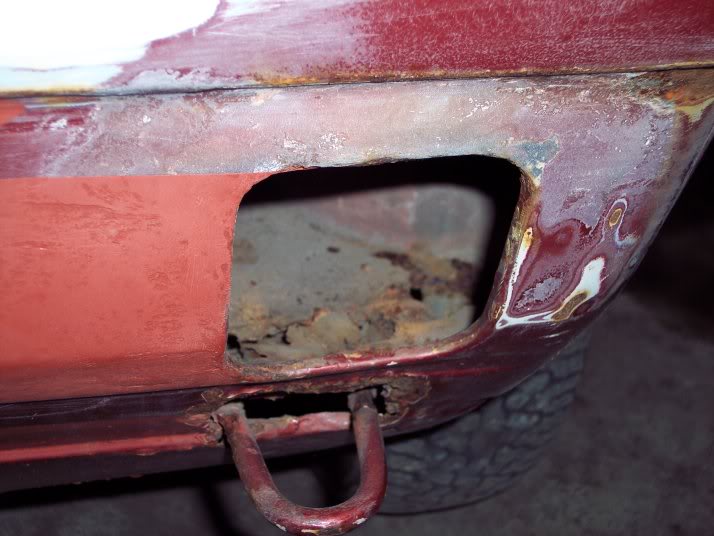
Cut Out:
Sills
Rear Panel
Passengers Quarter panel
Hole in driver?s floor
Hole in spare wheel well
Patch behind pedals
Day 8: Saturday 10th June
Removed:
Rear axel (3 bolts out of 4 snapped off)
Petrol tank disconnected
Filler neck removed (drilled out due to corrosion)
Breather pipes all cut due to corrosion
Day 9: Tuesday 13th June
Removed:
Petrol Tank
Rear Brake Lines
Soundproofing on passengers floor
Dents hammered out of passenger?s floor. Dents on rear strut towers hammered out. Rear hatch, upper seal groove sanded down.
Day 10: Thursday 15th June
Removed:
Fuel and brake lines
Bolts from front wings
Front Window
Day 11: Friday 23rd June
Removed:
Go faster stripes (stickers)
Sanded and primed rear hatch upper seal groove.
Day 12: Saturday 24th June
Removed:
Front Wings
Engine bay cleaning started with degreaser.
Day 13: Wednesday 28th June
Removed:
Fuel gauge sender unit from fuel tank
Continued cleaning engine bay and began removing sealer from inside front wings.
Day 14: Monday 3rd July
Sanded rusted parts of front wings. Removed more glue from inside front wings. Began stripping sealer from inner front wings.
Day 15: Thursday 6th July
Removed:
Drivers side suspension, wishbone, brakes, hub, wheel.
Stripped back more of drivers side inner wing.
Day 16: Saturday 8th July
Removed:
Passenger?s side suspension, brakes, wheel, hub, wishbone
Began stripping back passenger?s side inner wing. Sanded down driver?s front wing rub-strip recess. Filled recess.
Day 17: Monday 10th July
Stripped and primed drivers front inner wing. Smoothed recess in drivers wing. Cut out hole in spare wheel well. Cut out hole in driver?s foot well, cut out rust in drivers side rear strut tower. Filled small hole with p40. Filled dents in rear passengers strut tower.
Day 18: Tuesday 11th July
Removed:
Bonnet latch
Soundproofing from behind dash on firewall
All grommets from plenum chamber and firewall
Throttle cable
Accelerator pedal
Clutch cable and pedal
Ignition barrel
Steering lock and stalks
Steering rack
Handbrake cables
Rear suspension
Rear axel and hubs
Sanded down front part of driver?s wing. Filled and smoothed driver?s wing. Primed rub-strip recess after smoothing. Cut out driver?s outer sill. Cut out back of driver?s sill at inner rear arch.
Day 19: Wednesday 12th July
Removed:
Brake mechanism and cylinder
Rear hubs taken off rear axel
Cleaned more of engine bay. Filled more dents in rear strut towers. Primed part of drivers wing. Filled dents in rear upper hatch seal recess. Sanded and primed drivers side of rear hatch seal recess.
Day 20: Thursday 13th July
Removed:
Rear panel
Front Engine mount
Driver?s side wiper arm
Wiper motor and mechanism
Various dents and scratches filled and primed. Car set up on blocks. Undercoating around spare wheel well removed.
New To Do list Made:
Clean and prime passengers inner wing.
Cut all rust and prepare hole at driver?s floor for repairing
Clean rest of engine bay
Day 21: Saturday 29th July
Cleaned more of passenger?s front inner wing. Sanded and primed patch at corner of passenger front window. Rust at back right side all cut out. Tow hook cut out. Finished and primed drivers rear strut tower. Cleaned more of engine bay.
Monday 31st July
HAND OPERATION
Monday 7th August
Ordered outer sills and rear outer arches. Ophir Motors Dundrod ? Hadrian panel distributor. Collected on Thursday 10th.
Day 22: Friday 29th September
Sanded and smoothed drivers wing ? also added a coat of primer.
Day 23: Wednesday 4th October
Sanded front window surround and primed. Tidied Shed. Filled and smoothed hole in bottom of passenger?s wing.
Mother in hospital
Wednesday 8th November ? Rear panel arrived from crazy quiff.
Day 24: Wednesday 15th November
Sanded and primed front half of passenger?s inner wing. Cut out badly welded patch on firewall behind clutch. Cut out driver?s side of rain tray.
Day 25: Thursday 16th November
Removed rest of rain tray.
Day 26: Sunday 31st December (New Years Eve)
Cut out both rotten arches. Cut out passenger?s sill.
Posted
Old Timer

GTI Campaign Helios Blue, Going back Standard
GTI Campaign Schwartz Black shouldn't have sold
GTI Mk7 Performance pack Daily drive
Polo 1.4sel�Sunset Orange The Wife's
Triumph Tiger
GTI Campaign Schwartz Black shouldn't have sold
GTI Mk7 Performance pack Daily drive
Polo 1.4sel�Sunset Orange The Wife's
Triumph Tiger
Posted
Old Timer

Posted
Settled In
here's my first barrage of easy questions for you.
I've been looking around www.eurocarparts.com and although they seem to have very little in stock, they do seem to have a couple of the parts i'm looking for. But they don't have any pictures. Are they any good?
1. On eurocarparts on the side body parts section is part number 815440111 and 815440121 the entire outer sills? because i think I'd probably replace those as well.
2. Is the arch repair panels what i'm looking for also (they're ?7.15 each at the bottom)? From the state of my outer arches you'll know what i mean. Someone else tried to fix mine but they just need to be cut out now.
3. Is Crazyquiff the best person to get an entire rear panel from? (as you can see, i really need one).
Thanks in advance for any help
Baz
Posted
Old Timer
keep the pics coming too!
Posted

Local Hero

Crazyquiff is the best person for the rear panel's, but think he sold his last one? :dontknow: hopefully he'll order some more up :wink:
Posted
Old Timer
Posted

Settled In
PhillTMK1GTI said
Crazyquiff is the best person for the rear panel's, but think he sold his last one? :dontknow: hopefully he'll order some more up :wink:
Hes a good man for anything VW :wink:
Had to say VW as i know what some of ya are like

Keep up the good/hard work, it will all pay off 8)
cheers
Tucker
Posted
Settled In
I'm at the stage where a lot of the major welding is ready to be done so it should be a slightly faster moving project now. If i can keep the other work to my bora out of the way for a while and get a few loose ends tidied up it'll be full steam ahead.
Keep an eye out for the updates and i'll have these pics sorted out as soon as I can. And a LOT has changed since the first pics.
Cheers
Baz
Posted
Old Timer
Posted
Settled In
Baz
Posted
Old Timer
Posted
Settled In
Carbs4ever said
im in Co. Armagh - must meet up for a yarn
No problem - i'll get some stuff cleared up and a few jobs finished off and we'll sort it out. Got any doors?
Baz
Posted
Old Timer
Posted
Settled In
Carbs4ever said
yes.
OK well I need 2 doors for this tin top bucket.
What sort of condition are they in?
how much?
Baz
Posted
Old Timer
?50 for the pair.
Posted
Settled In
Bazmcc@hotmail.com
I'd like to see them. I have a couple of doors here but the damage will take a lot of work on one and the other needs the top half straightened and I couldn't be bothered at the minute. I'll probably repair them and reskin one after a while but at the minute I'd like to get a couple of decent clean and tidy doors to have when I'm ready for them.
Cheers
Baz
Posted
Old Timer
Posted
Settled In
These aren't bad for ?15 delivered. there is a crack in one but my plan was always to find a set of clear lights and tint the bottom half anyway for the black and white strip look. These will be a pretty good canidate because when they are tinted and the laquer drys, the crack won't been seen. I'll have a look when they arrive and i'll possibly pop out the coloured reflectors and use coloured bulbs instead.
http://cgi.ebay.co.uk/…em=150079111578&rd=1&rd=1
But aesthetic aspects aside I have a lot more important welding, grinding, sanding etc to be getting on with.
And today I got a 130 amp Turbo MIG welder for ?110 because it had adent in the side. It's been a fairly good day so far. I need to get some major work done now.
Baz
Posted
Old Timer
0 guests and 0 members have just viewed this: None.