


Louie's 83 GTI Build


Settled In


Raptor was given another layer of base coat for good luck then lacquered. Pictures don't do it justice!


.jpg")
Sneak peak of the engine bay in colour. Will upload pictures of that after a polish.

Posted
Moderator


Sent by a smartphone and not a smartperson!
Play Guess the Asking Price 'SEASON 4' as of Sunday the 29th of October 2017.
https://vwgolfmk1.org.uk/forum/index.php?page=topicview&id=chat%2Fmk1-golf-chat_2%2Fguess-the-asking-price_2
OLD.
https://vwgolfmk1.org.uk/forum/index.php?page=topicview&id=chat%2Fmk1-golf-chat_2%2Fold-guess-the-asking
Ever wondered who's behind the scenes of this forum?
https://vwgolfmk1.org.uk/index.php?page=committee
Mike
There's me building mine 28 years ago, almost finished!

Be proud of your VW Golf Mk1, it's very special!
Play Guess the Asking Price 'SEASON 4' as of Sunday the 29th of October 2017.
https://vwgolfmk1.org.uk/forum/index.php?page=topicview&id=chat%2Fmk1-golf-chat_2%2Fguess-the-asking-price_2
OLD.
https://vwgolfmk1.org.uk/forum/index.php?page=topicview&id=chat%2Fmk1-golf-chat_2%2Fold-guess-the-asking
Ever wondered who's behind the scenes of this forum?
https://vwgolfmk1.org.uk/index.php?page=committee
Mike
There's me building mine 28 years ago, almost finished!
Be proud of your VW Golf Mk1, it's very special!
Settled In

Posted

Settled In
Posted
Settled In
chrisL
- Hi mate, phone lost all my pics but matey had a few on his phone (Bit lower picture quality).Back when the engine bay's high build was rubbed down.

New genuine bonnet from VW Heritage, being put into 2pac high build primer.


Interior was bare metaled entirely, rubbed down with 180 before filler work, etch priming and being put into high build primer.


Rubbed down ready for paint.


Posted
Settled In

Front arches were rolled and inner wings Raptor'd & lacquered.

Inside of the doors and tailgate were put into high build, lost these pictures but have this 1 of a door after high build was rubbed down.

Guide coat applied.


Posted
Settled In

Settled In

Had months of problems with metal finishing with parts not being up to standard. Eventually found somewhere which convinced me on their Zinc Nickel plating with the salt spray testing over 1000 hours so couldn't complain. The larger yellow parts at the top were a bit too green, so sent them back them to get that original golden finish.

Top guys they sorted it out in no time, I understand colour matching with different pieces/material can be a right pain but they've done a top job!

Started laying out a few parts to get it rolling. Every nut, bolt, bush and bearing replaced with new and metal finished.


Posted

Settled In
One hell of a restoration!

Posted
Settled In
Louie's 83 GTI Build
Gesendet von iPhone mit Tapatalk
Posted
Settled In
The zinc plating looks superb and will go great against the fresh paint.
Is the rear beam powder coated?
What Coilovers have you gone for?

Local Hero


Andy
LINCOLNSHIRE REGION -�https://www.facebook.com/groups/467122313360002/
1983 MK1 Golf GTI Campaign Model - Under (looooong) resto!
1962 Rover P4 80
2002 BMW 745i
2008 BMW Z4 2.5Si
LINCOLNSHIRE REGION -�https://www.facebook.com/groups/467122313360002/
1983 MK1 Golf GTI Campaign Model - Under (looooong) resto!
1962 Rover P4 80
2002 BMW 745i
2008 BMW Z4 2.5Si
Posted
Settled In
Superb attention to detail, this is amazing and I cant wait to see the next stage updates, more over the finished car…!!
Credit to you, a MK1 owners dream a rebuild such as this.
WOW….
Posted
Old Timer

Matt
Posted
Settled In
�are those all original fixings that you have had zinc'd? Who did them for you?
Posted
Settled In
Baggins
- �I used AG in Birmingham for mine, they're top guys, Alan is really knowledgeable and helpful so if you go with them make sure you're clear with them as to what you want as normally Yellow finishes show more green. But they do a good price on Zinc Nickel and it's a much more lasting finishing than standard zinc.
chrisL
- I had the beam powdercoated mate but it didn't go inside at all really so will use a rust treatment on that to protect it internally. Coilovers are H&R twin tube, got them from Germany a couple years back the the Euro was a good rate luckily!
Posted
Settled In
Posted
Settled In
Anti roll bar is only cable tied on as stainless clamps are being blacked and haven't had them back yet.
.jpg")
Fuel tank was new then powdercoated black, 2 pipes were rubbed down by the powdercoaters and rusted in storage but they were cleaned up before fitting new hoses. Also new sender unit and Neoprene tape applied. Had to buy thinner neoprene tape for the new tank straps to get them to fit, but all together now.


A bit dusty but all clean up front with all new and metal finished nuts, bolts and washers. Everything but the hub itself is brand new, Hub was powdercoated satin black
.jpg")
Posted
Settled In


Finally!


Next up the shell itself.


Posted
Settled In


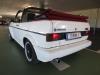
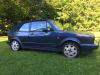
Finally it's home!

All flatted back and polished on the exterior, tried on the NOS Frankani tail lights I picked up on here a while ago. Tailgate will be worked into position again soon will make the lights line up better.

Only had 2 BBS built up to see how they fit, reckon I can get another 1/2 inch under the rear arch for the other 2.

0 guests and 0 members have just viewed this: None.