Rev counter drops to zero and clock display goes off when I switch on my headlights.....
Posted
Settled In


86 gti cabby
Is there a way to check with a multimeter if that thin white/brown cable is intact? It seems fine all the way to where it goes into the loom but no idea where it goes from there and how to access it.
Any other next steps that might be worth pursuing? Thanks a lot
Posted
Local Hero

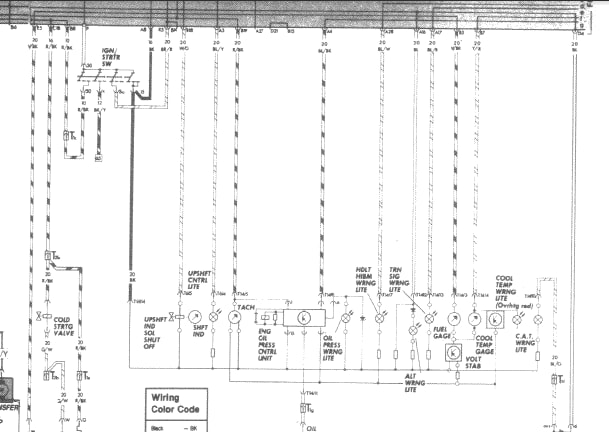
Here is the Diagram from the Bentley for a 86 Cabriolet

If you notice the Tach has 3 inputs one from the Coil which is the main input for the tach that is red/black
on pin 5 of your main cluster connector.
It gets ground from Brown Pin 2 of the main connector and 12V+ Black wire on pin 14.
You lamps get their voltage from the gray/blue wire on pin 1, and the ground from pin2 as well, it is on the lower "h" line that goes to the previous page saying t14/2 or the brown wire.
Since the grounds in the cluster all feed from Pin 2, but your tach bias is pin14 in relation to the feed off of pin5
The only common part is Grounds.
If you take your cluster out, there are things you can do to clean up the main connector and padd the tongue of it to "plump" it up, as well as as the cluster is out of the way, you drill a small pilot hole behind the cluster into the frame, scrape the pain off to bare metal and use a ring connector and about a 10" piece of wire and use a sheet metal screw to add this new ground path to the wire side of your main connector pin 2 brown with a scotch-lock quick splice.
Plumping the connector and adding the new ground is probably going to fix your issue. that is if you also take the time to measure from frame ground to the middle pin on your voltage stabilizer for 0 ohms. if you get 0 to the pin cool, if not add the wire. If your circuit trace from the pad side of the main connector to the middle pin of your voltage stabilizer isn't 0 ohms then your ground trace to the voltage stabilizer is broken and you will need to add a Ground to it.
If your water temp and fuel gauge are good then your 10V stabilizer is usually good, and your ground witre is sufficient.
Funny things about Current, and Voltage to ground in electrics is that ground always tries to seek a power source through any and all means getting good grounds on your car is paramount to ending flaky electrics.
Have you checked your battery for voltage drop on the Battery-frame-engine ground wire?
in my how-tos in the archive section I cover this to no end. Cabby-info.com has the major ground points for the early 80-89, whereas my how to is based on a 90ish cabriolet.
What do Divorces, Great Coffee, and Car Electrics all have in common?
They all start with GOOD Grounds.
Where are my DIY Links?
They all start with GOOD Grounds.
Where are my DIY Links?
Posted
Settled In


So, here's what I'll be doing if I understood correctly
1) Remove cluster
2) check the 14 pin plug and clean it - how do I go about that - is it just about buffing those pins up with a bit of steel wool? Guessing I should also check for loose or corroded connectors?
3) Drill a hole into the frame behind the cluster, scrape to bare metal and attached a piece of cable that then gets spliced into the brown wire from pin 2. Basically creating a new earth point.
Guessing I can't then just quickly check if that's done the trick at this point? I remember reading that the battery should be disconnected when the cluster is out?
So then it gets a bit trickier. I measure from the new earth that I've pit in to the voltage stabilizer middle pin - where is the voltage stabilizer located?
Then if I get 0 on that connection = good, if not add the wire - but what wire? From the newly created earth on the frame to the voltage stabilizer?
I've checked the earth to the rocker cover plate is good using a multimeter - I get the same reading as when testing +/- ports directly on the battery. And I checked this for both engine off and engine running.
Thanks for bearing with me!!
Ben
Briano1234 said
OK,
Here is the Diagram from the Bentley for a 86 Cabriolet

If you notice the Tach has 3 inputs one from the Coil which is the main input for the tach that is red/black
on pin 5 of your main cluster connector.
It gets ground from Brown Pin 2 of the main connector and 12V+ Black wire on pin 14.
You lamps get their voltage from the gray/blue wire on pin 1, and the ground from pin2 as well, it is on the lower "h" line that goes to the previous page saying t14/2 or the brown wire.
Since the grounds in the cluster all feed from Pin 2, but your tach bias is pin14 in relation to the feed off of pin5
The only common part is Grounds.
If you take your cluster out, there are things you can do to clean up the main connector and padd the tongue of it to "plump" it up, as well as as the cluster is out of the way, you drill a small pilot hole behind the cluster into the frame, scrape the pain off to bare metal and use a ring connector and about a 10" piece of wire and use a sheet metal screw to add this new ground path to the wire side of your main connector pin 2 brown with a scotch-lock quick splice.
Plumping the connector and adding the new ground is probably going to fix your issue. that is if you also take the time to measure from frame ground to the middle pin on your voltage stabilizer for 0 ohms. if you get 0 to the pin cool, if not add the wire. If your circuit trace from the pad side of the main connector to the middle pin of your voltage stabilizer isn't 0 ohms then your ground trace to the voltage stabilizer is broken and you will need to add a Ground to it.
If your water temp and fuel gauge are good then your 10V stabilizer is usually good, and your ground witre is sufficient.
Funny things about Current, and Voltage to ground in electrics is that ground always tries to seek a power source through any and all means getting good grounds on your car is paramount to ending flaky electrics.
Have you checked your battery for voltage drop on the Battery-frame-engine ground wire?
in my how-tos in the archive section I cover this to no end. Cabby-info.com has the major ground points for the early 80-89, whereas my how to is based on a 90ish cabriolet.
Posted
Local Hero

in my how-tos in the archive section I cover this to no end. Cabby-info.com has the major ground points for the early 80-89, whereas my how to is based on a 90ish cabriolet.
View topic: My DIY list of things for a 90ish Cabriolet (digifant2) part 1 - The Mk1 Golf Owners Club
Ground effects and the repair of your car. | VW Vortex - Volkswagen Forum
Improving your Cluster Connections and ground. | Volkswagen Owners Club Forum
90ish Cabriolet Mylar repair for 10v stabilizer. | Volkswagen Owners Club Forum
What do Divorces, Great Coffee, and Car Electrics all have in common?
They all start with GOOD Grounds.
Where are my DIY Links?
They all start with GOOD Grounds.
Where are my DIY Links?
Posted
MOTY 2013

on that note, make sure the gearbox earth is good. its often poor due to corrosion building up between the bracket and engine block, but usually this will stop the starter from working as well.
to rule it out simply put a jump lead from battery to a bit of bare metal on engine/gearbox
going back to your issue, 1st step is find the brown/white coloured wire to the head it usually goes to a double stud on the side coolant flange but bracket top of head there is also fine so long as the bracket is clean and it also has clean metal contact to head surface.
next check is the spade connection near the fusebox between the dash loom and the engine loom. on the dash harness side it has 2 wires in it one for the MFA stalk the other for the cluster. you can just run an earth direct to this spade plug to rule out any issues with the wire in your engine harness.
finally go to the cluster and do the checks as above
 Last edit: by rubjonny
Hello my name is John and I'm a dub addict.
My wiring diagrams and other documents have moved here:
VAG Documents & Downloads
You'll need to sign into google/gmail for the link to work! (its free!)
My wiring diagrams and other documents have moved here:
VAG Documents & Downloads
You'll need to sign into google/gmail for the link to work! (its free!)
Posted
Settled In


Rev counter drops to zero and clock display goes off when I switch on my headlights.....
Thanks

Posted
MOTY 2013

Hello my name is John and I'm a dub addict.
My wiring diagrams and other documents have moved here:
VAG Documents & Downloads
You'll need to sign into google/gmail for the link to work! (its free!)
My wiring diagrams and other documents have moved here:
VAG Documents & Downloads
You'll need to sign into google/gmail for the link to work! (its free!)
Posted
Settled In


Briano1234 said
View topic: My DIY list of things for a 90ish Cabriolet (digifant2) part 1 - The Mk1 Golf Owners Clubin my how-tos in the archive section I cover this to no end. Cabby-info.com has the major ground points for the early 80-89, whereas my how to is based on a 90ish cabriolet.
Ground effects and the repair of your car. | VW Vortex - Volkswagen Forum
Improving your Cluster Connections and ground. | Volkswagen Owners Club Forum
90ish Cabriolet Mylar repair for 10v stabilizer. | Volkswagen Owners Club Forum

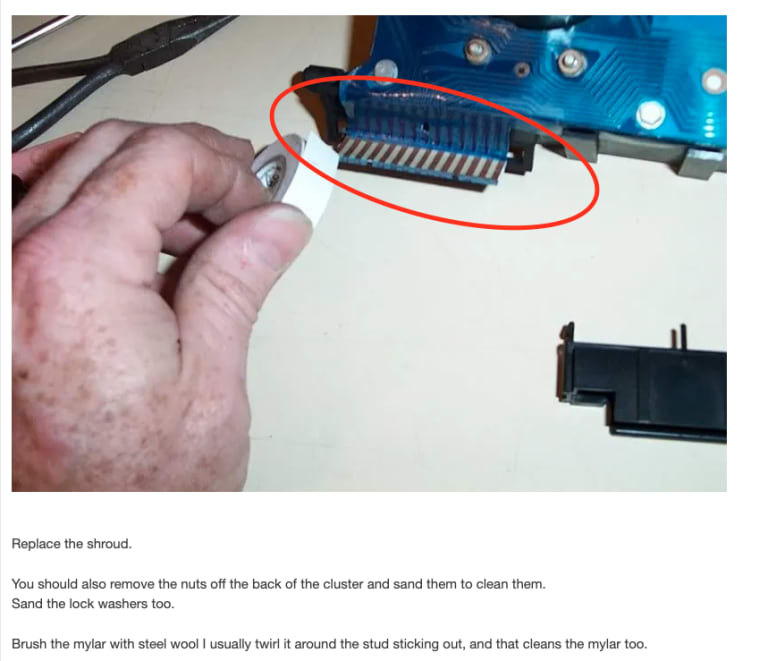
In your guide you say brush the mylar - is that basically the area I've circled on this screengrab? In your guide you say replace the shroud and after you say brush the mylar so I'm just getting confused as to how to clean if the housing is back on? Sorry if I'm being thick here.
Also not 100% on where the electrical tape is supposed to go…
Think I'll need to replace the dash bulbs whilst doing this also as they don't seem to be working. Same goes for the illumination of the light switch which seems to be the only switch that isn't illuminated.
Thanks
Posted
Settled In


rubjonny said
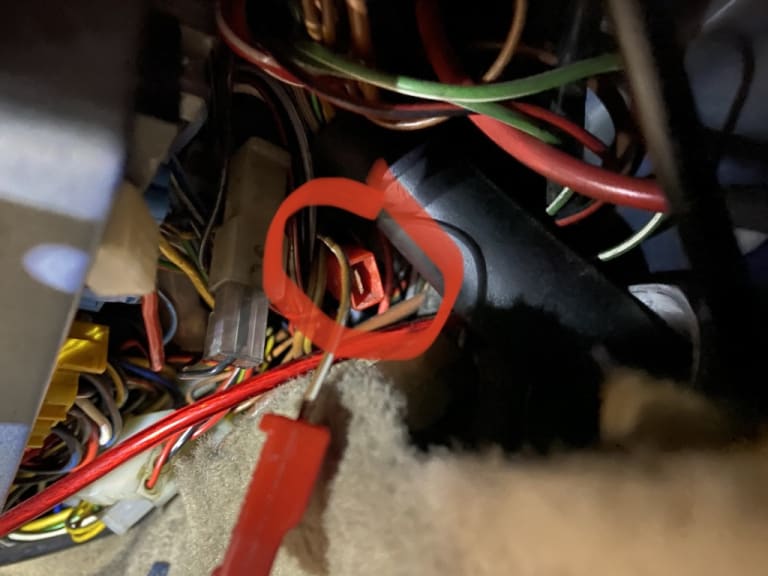
thats the main earth claw where the various mics earths go to, the one for the cluster is brown/white I cant see it in your piccy so drop fusebox down and have a closer look
This one then?

Posted
MOTY 2013

if that fixes it, you have an issue with the wire in the engine harness somewhere, rather than mess about trying to chase it you can run an earthed wire straight to the spade housing from the inside (the side with 2 wires in is the dash side, this is what needs to be earthed)
Hello my name is John and I'm a dub addict.
My wiring diagrams and other documents have moved here:
VAG Documents & Downloads
You'll need to sign into google/gmail for the link to work! (its free!)
My wiring diagrams and other documents have moved here:
VAG Documents & Downloads
You'll need to sign into google/gmail for the link to work! (its free!)
Posted
Settled In


rubjonny said
thats the very one. if you have a multimeter you can poke it in the back of that plug and check to see if you have continuity to ground. or just get a wire, earth it to the claw/chassis and poke the other end into the back of that so it makes contact with the spade inside and see if your dash starts working.
if that fixes it, you have an issue with the wire in the engine harness somewhere, rather than mess about trying to chase it you can run an earthed wire straight to the spade housing from the inside (the side with 2 wires in is the dash side, this is what needs to be earthed)
Right, so I've got a little multimeter, just not 100% sure on how to check the continuity to ground. New to this so bear with me.
So with that connector, the side with the single wire is the brown/white one that's running to the plate on my rocker cover. And the other side has two wires for MFA & Cluster?
So with the multimeter I'd need one pin to touch the brown/white single wire inside the plug (can I disconnect the plug to get to it? And then touch an earth with the other pin? And that should read 0 Ohms if there's continuity?
Alternatively I run a wire from the main earth claw to the spade connector for the MFA & Cluster inside the plug (again, is it easier to disconnect the connector to get to it?) and see if that fixes the problem?
Sorry about the questions - I've just never really dealt with the wiring in a car before!
Thanks,
Ben
Posted
MOTY 2013

you can disconnect the plug if its easier, you probe the female spade side with the single wire to do your ground test.
or just run an earth from claw to the spade plug, you can leave it connected and just stuff a bare wire into the back of it for testing so it touches either side of the contact inside. or unplug it and run an earth to the male spade with the 2 wires and see if that helps
Hello my name is John and I'm a dub addict.
My wiring diagrams and other documents have moved here:
VAG Documents & Downloads
You'll need to sign into google/gmail for the link to work! (its free!)
My wiring diagrams and other documents have moved here:
VAG Documents & Downloads
You'll need to sign into google/gmail for the link to work! (its free!)
Posted
Settled In


Posted
Settled In


So I took a piece of wire and stuck it in the connector and ran to the Earth claw. As a result the clock seemed to stay on when I turned on the lights (when engine isn't running it also won't reset now when I turn on the lights which it did previously) and the rev counter went from dead to lazy, dropping from around 10 to 5.
So do you reckon if I run a proper Earth to that connector (where's the best place to attach down there by the fuse board?) it could fully resolve it?
Thanks for all that so far - feels like a tiny victory already!
Posted
Settled In


Cheers
Posted
Local Hero

You should then pad the tongue of your main connector and you should be good to go.
As you also need to test your 10V stabilizer, and the main power to the cluster which is the black wire usually on pin 14.
What do Divorces, Great Coffee, and Car Electrics all have in common?
They all start with GOOD Grounds.
Where are my DIY Links?
They all start with GOOD Grounds.
Where are my DIY Links?
Posted
MOTY 2013

alternatively go back to the bay side and check that brown/white wire, see if you can see where the damage/corrosion is repair it there.
whatever works for ya
Hello my name is John and I'm a dub addict.
My wiring diagrams and other documents have moved here:
VAG Documents & Downloads
You'll need to sign into google/gmail for the link to work! (its free!)
My wiring diagrams and other documents have moved here:
VAG Documents & Downloads
You'll need to sign into google/gmail for the link to work! (its free!)
Posted
Settled In


Rev counter drops to zero and clock display goes off when I switch on my headlights.....
Was hoping to avoid taking out the cluster but I think will need to go down the route Briano suggested in the first place and run a new Earth by splicing into the Earth coming directly out of the main cluster 14-pin connector.
Posted
Local Hero

How to remove instrument cluster and replace illumination bulbs - The Mk1 Golf Owners Club
1988 Mk1 Golf GTi Cabriolet 1.8cc DX, K-jet. Daily drive. 317,000 miles and counting
1978 Mk1 Scirocco GLS 1.6cc FR, Webber carb. Weekend toy.
1978 Mk1 Scirocco GLS 1.6cc FR, Webber carb. Weekend toy.
Posted
Settled In


Rev counter drops to zero and clock display goes off when I switch on my headlights.....
However, I don’t really know how I’m supposed to measure from the new Earth to the 10v stabiliser, given that I’ve had to disconnect the battery to do all this…
0 guests and 0 members have just viewed this: None.


