


Lhasa Green 1.8 GTI engine fire repair

Posted
#1385779
(In Topic #181887)

Settling In


Was toast but getting better


Posted

Local Hero


Andy
LINCOLNSHIRE REGION -�https://www.facebook.com/groups/467122313360002/
1983 MK1 Golf GTI Campaign Model - Under (looooong) resto!
1962 Rover P4 80
2002 BMW 745i
2008 BMW Z4 2.5Si
LINCOLNSHIRE REGION -�https://www.facebook.com/groups/467122313360002/
1983 MK1 Golf GTI Campaign Model - Under (looooong) resto!
1962 Rover P4 80
2002 BMW 745i
2008 BMW Z4 2.5Si
Posted

Settling In
I love it. I don't care what you think
Posted
Settling In


Posted

Old Timer


"Mk1 Golf Gti...all things to all men"
Posted
Settling In


Posted
Local Hero
Andy
LINCOLNSHIRE REGION -�https://www.facebook.com/groups/467122313360002/
1983 MK1 Golf GTI Campaign Model - Under (looooong) resto!
1962 Rover P4 80
2002 BMW 745i
2008 BMW Z4 2.5Si
LINCOLNSHIRE REGION -�https://www.facebook.com/groups/467122313360002/
1983 MK1 Golf GTI Campaign Model - Under (looooong) resto!
1962 Rover P4 80
2002 BMW 745i
2008 BMW Z4 2.5Si
Posted

Moderator

Posted
Old Timer

I'll have the trim in the post before the end of the week�
Matt
Posted
Settling In

Posted
Settling In

Posted
Local Hero
http://www.vehicle-wiring-products.eu/VWP-onlinestore/home/homepage.php
or here;
Auto Electrical Components, Parts and Accessories for Trade and DIY: Polevolt Ltd
Andy
LINCOLNSHIRE REGION -�https://www.facebook.com/groups/467122313360002/
1983 MK1 Golf GTI Campaign Model - Under (looooong) resto!
1962 Rover P4 80
2002 BMW 745i
2008 BMW Z4 2.5Si
LINCOLNSHIRE REGION -�https://www.facebook.com/groups/467122313360002/
1983 MK1 Golf GTI Campaign Model - Under (looooong) resto!
1962 Rover P4 80
2002 BMW 745i
2008 BMW Z4 2.5Si
Posted
Settling In
Posted
Settling In

Posted
Old Timer
Matt
Posted
Settling In
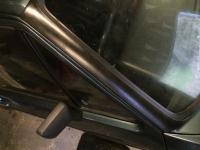
The A Pillar deflectors are looking great but there was much swearing trying to fit them until I used the �parachute cord method, remembered from fitting my Camper windows. All looks good but the dear thing won't start, turns over but no blue spark fron coil to dizzy as per Haynes test. It's time to seek expert help I think.
Posted
Old Timer
)
Posted
Settling In
<input class="ocp_keep_ui_controlled" readonly="readonly" size="45" title="
"C:\fakepath\image.jpg"
<div>
Hello, this is the method I used, adapted from putting windows into my '63 split.<br /></div>
<div>
1. Place a length of electrical tape along the outer guttering, prevents scratches.<br /></div>
<div>
2. Wrap same type of tape around the end of a medium flat blade screwdriver, prevents massive scratches!<br /></div>
<div>
3. Find a long piece of parachute cord or nick the guy rope off your sons tent.<br /></div>
<div>
4. Ease the screwdriver blade under the ouster edge of the window seal.<br /></div>
<div>
5. Place the cord into the gap created by the screwdriver all the way down the seal.<br /></div>
<div>
6. Take the deflector and place the leading inner edge under the seal.<br /></div>
<div>
7. Apply some gentle pressure to keep this edge under the seal as you pull the cord down the windscreen seal.<br /></div>
<div>
8. Your aiming to insert the plastic leading edge into the space vacated by the cord.<br /></div>
<div>
9. When leading edge is well seated, spring the back edge over the electrical tape bad into the gutter.<br /></div>
<div>
10. The deflector should now be wedged between the gutter and windscreen seal.<br /></div>
<div>
11. Remove the electrical tape</div>
<input class="ocp_keep_ui_controlled" contenteditable="true" readonly="readonly" size="45" title="" type="text" value="attachment tag (dbl-click to edit/delete)" />
Posted
Local Hero
Andy
LINCOLNSHIRE REGION -�https://www.facebook.com/groups/467122313360002/
1983 MK1 Golf GTI Campaign Model - Under (looooong) resto!
1962 Rover P4 80
2002 BMW 745i
2008 BMW Z4 2.5Si
LINCOLNSHIRE REGION -�https://www.facebook.com/groups/467122313360002/
1983 MK1 Golf GTI Campaign Model - Under (looooong) resto!
1962 Rover P4 80
2002 BMW 745i
2008 BMW Z4 2.5Si
Posted
Settling In

0 guests and 0 members have just viewed this: None.