


Project "little monster"

Posted
Local Hero


Posted

Local Hero


Andy
LINCOLNSHIRE REGION -�https://www.facebook.com/groups/467122313360002/
1983 MK1 Golf GTI Campaign Model - Under (looooong) resto!
1962 Rover P4 80
2002 BMW 745i
2008 BMW Z4 2.5Si
LINCOLNSHIRE REGION -�https://www.facebook.com/groups/467122313360002/
1983 MK1 Golf GTI Campaign Model - Under (looooong) resto!
1962 Rover P4 80
2002 BMW 745i
2008 BMW Z4 2.5Si
Posted
Local Hero


Also, I pulled the engine out again (nothing much was connected, apart from the engine mounts and driveshafts), I'm getting good at this, it must be the 7th or 8th time now! Tasks ahead include painting the new cable shifter's tray from underneath, making the radiator custom mounts in the front panel, then its painting the engine bay.
Then I can clean everything up and assemble it all and drive it.
��������������������������������
Posted

Local Hero

welding skills would be useful aswell :roll:
1983 Golf 1.3 Driver:

Posted
Local Hero
paul move down south ill give you a job


Posted
Local Hero
1983 Polo CL - daily
1984 Golf G60 Syncro - sold
1989 Rallye Golf - sold
1992 Corrado G60 - crushed
1989 Polo C - chopped and crushed
1991 309 Style - crushed
1984 Golf G60 Syncro - sold
1989 Rallye Golf - sold
1992 Corrado G60 - crushed
1989 Polo C - chopped and crushed
1991 309 Style - crushed
Posted
Local Hero
mk1john said
i'm interested in seeing this shifter tray in action- a similar idea (not so deep) may allow me to use the CAE shifter i'm after, and keep the gti console.
Well, the centre console mounts in place (the shifter's box needs a slight trimming to fit, its physically a tiny bit longer than the hole in the console) and I've done a height check and it sits at the proper height. John, its a case of choosing a datum for vertical and horizontal and taking accurate measurements. For example I measured how high the shifter was from base to trim securing nuts at the top; and I knew how much the centre console lip sat above the datum; so I could work out the required depth to accommodate it. Your CAE shifter might well be a different height so the tray depth will be slightly different, but the principle (and probably the shape of the tray?) will be exactly the same.
Can you weld John????
��������������������������������
Posted
Local Hero

Boring but required stuff. These are the holes for the cable change shifter. To the right are the holes (which swing the cables in a curve) and the plate covers the first hole I did.

These little tabs hold the radiator in place

One each side
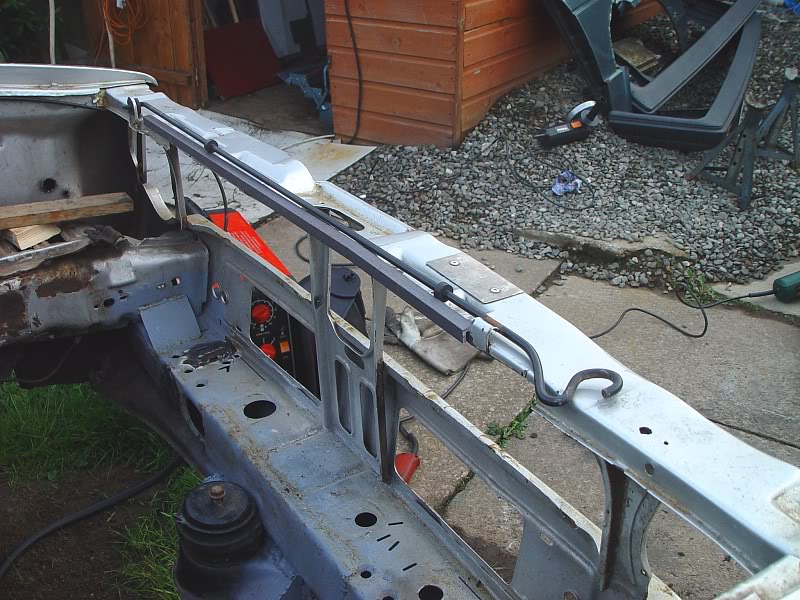
This is a strengthening piece along the top (not yet welded in place), needed because I'd cut away the lower lip of the top of the front panel.

Because the front panel isn't quite flat, I needed to make a 'bump' or curve in the strengthening bar. You can just about make out the bend

Cleaned up ready for welding

Welded, then ground down and wire brushed to clean.
��������������������������������
Posted
Old Timer

quicky for you now that box is in place won't the exhaust sit quite low as it normally bends around the rod shift ?
83 MK1 GTI G60 85 MK2 GTI 20VT 2004 SEAT ALTEA 2.0 TDI SPORT
Posted
Local Hero
Today's stuff:

Shifter, with all the trim in place

Gear lever gaiter removed

Centre console removed

From above

Front panel strengthening

Painted
��������������������������������
Posted
Local Hero
1983 Golf 1.3 Driver:
Posted
Local Hero
X said
i might be being dumb, but why does the front panel need strengthening? :dontknow:
Because I chopped the rear lip out, so I can fit the radiator further forwards.
��������������������������������
Posted
Settled In

Is it not going to be tempting to strip all of that trim and extra weight back out when this project is finished to see just how fast you can get it down a strip?
Posted

Old Timer
Posted

Chairman


What rad are you using out of curiosity, the twin fan vr6?
1986 Cabriolet (long resto!)
1983 Cabriolet (daily pain in the bum)
1983 T25 (weekend pain in the bum)
Follow us on:
Facebook: https://www.facebook.com/vwgolfmk1oc/
Twitter: https://www.facebook.com/vwgolfmk1oc/
Instagram: https://www.facebook.com/vwgolfmk1oc/

1983 Cabriolet (daily pain in the bum)
1983 T25 (weekend pain in the bum)
Follow us on:
Facebook: https://www.facebook.com/vwgolfmk1oc/
Twitter: https://www.facebook.com/vwgolfmk1oc/
Instagram: https://www.facebook.com/vwgolfmk1oc/
Posted
Local Hero
The radiator is a Passat Turbo Diesel rad - its the same width as the VR6 one but its slightly less tall. If I have overheating problems, I can fit an oil cooler - this will take a little work off the main radiator.
Since the last update, I have given the car a good clean out. Also I had to turn it round so I could jack up the rear, so I could plan on where to put the fuel filter. It will carry the stock VR6 filter at the rear, which sits in a cradle which will be bolted to the underside.
Also, still on the area of fuelling, I've cut the fuel lines in the engine compartment ready to connect up to the engine:


The fuel lines now come directly updards from the wishbone support area, like a carburettor car. Luckily VW have already provided clips on the bodywork. Once the engine is out again, I'll bend the fuel lines neater, maybe using P clips.
Its now booked into a specialist exhaust fabrication place, who will be making a custom 6 branch manifold and system, its going on a trailer on Tuesday so I'll need to winch it on and off and jiggle the car round to do this!
��������������������������������
Posted

Old Timer
cheers
Posted
Old Timer

83 MK1 GTI G60 85 MK2 GTI 20VT 2004 SEAT ALTEA 2.0 TDI SPORT
Posted
Local Hero
Cero said
Paul, what was your reasoning for taking the cables through the bulkhead and not under it as per the rod shift? Also will the gearchange not fit below or is it a case that fouls the exhaust. I've seen corrado shifts fitted to Mk1's in this fashion but never inspected that that closely.
cheers
Leave loads of space for a big exhaust.
��������������������������������
Posted
Local Hero

All screwed together and ready to go

Not the easiest place to load stuff, with the curved road around the garage, slopes and rough surface!

Onto the trailer
��������������������������������
There are too many online users to list.