


My mk1 beginners engine rebuild - WILL IT START?!?!?

Posted

Local Hero


My mk1 beginners engine rebuild - WILL IT START?!?!?
gundel said
yea its easy for you to get the circlips back in with 3 hand us normal folk only have two :mrgreen::mrgreen:
LMAO…I actually have 4…. how do you think i took the picture :wink:
Thanks again for the comments. Rain has head me off repainting the head and detailing the block :cry: … Maybe more progress tomorrow… need to do as much as I can as move house at the weekend 8O

Posted
Settled In

'78 Golf LS 20vt
‘08 Mk5 Edition 30 DSG
‘08 Mk5 Edition 30 DSG
Posted
Local Hero
Block & Head Painted
OK so I'm no Van Gough but thought I'd put a couple of details on the block and head before it all goes back together.


Intermediate Shaft Install
Pretty strainght forward this one… pop the shaft back in:-


I had to tap out the seal in the intermediate flange:-
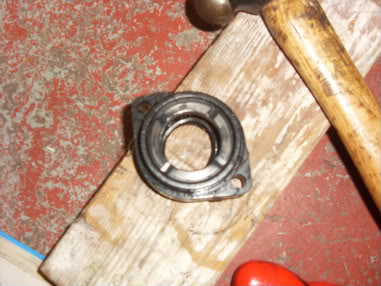
It's easy really. Just position a big screwdriver onto the metal and hammer away until its out:-


Then put a new one on and tap it in.

Then button up the flange yeah?… wrong.. this happened:-
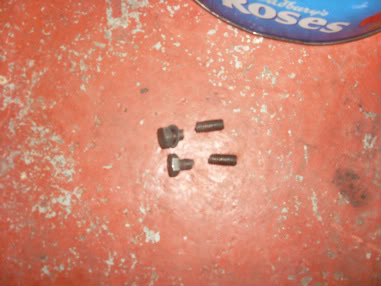
Not sure why they were past it but found some more in an old tin and buttoned up the flange to 18Lb Ft as listed. I put a bit of copper easy on the so that they wont snap if I have to take them off again at some point.

Crankshaft Install
When I first got the block on the stand it looks so bear :cry: ..

You can see that the bearing need to be put in place. So after lightly oiling one

I set about putting them back in

Once that was done, it was time to place the third bearing cap spacers on.. you can just make out an edge of one at the top left here.. then put the crankshaft back in.


Then it was a case of getting the first bearing cap ad remove the old shell (just tap it very lightly with a screwdriver and hammer)


Once that was done I lined it up and installed it a few turn on each side. I didn't want to damage anything by tightening one whole side at a time
then it's time to put them all on and button them up.

Also bare in mind that number 3 cap has funny spacers to go on

I put them in to a setting of 47 Lb Ft as per the Haynes :wink:
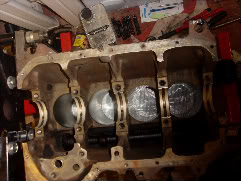
Piston Install
I have a piston ring compressor so set about using it. I also put the conrod bearing shell on too…


However… no matter what I do I can't get the piston rings in to the cylinder… it's as if the piston ring compressor I have is guff or the cylinder is a fraction too small…
I'll happily take sugestions :cry: .. not down hearted though as I'll geve it to my dads mechanic mate if I really get stumped..so… getting there… any ideas? :dontknow:
Posted
Local Hero
One thing I did when I stripped mine was to note which way the main bearing caps went when I took them off so I could put them on the same way when I re-installed them. Did you do this?
And one thing I forgot to do was to do the same thing with the pistons! Is there any way you can tell which way you should put them back? Or maybe it doesn't matter?
Thanks
Rich
Posted
Local Hero
I marked all of the piston bearing caps with an arrow on mine too :wink:
Thanks for the kind words buddy :wink:
Posted
Guest user
I don't know if you did this, but have you weighted the pistons (complete) on a set of digital scales? The balance of the engine can be effected if the pistons are out. Just curious really…

Posted
Local Hero
8O 8O No…. what issues will occur if they are out?emm said
Slightly off topic
I don't know if you did this, but have you weighted the pistons (complete) on a set of digital scales? The balance of the engine can be effected if the pistons are out. Just curious really…
Posted
Guest user
"if you bought new pistons, check again that the weight class number stamped on the top of your old pistons corresponds with the number on the new ones. The numbers and letter designate size as well as weight class. If you had to buy four pistons they should weight the same,. If you bought just one new piston use a gram scale to check that your new one weighs the same as the other three.
There shouldn?t be more than 2.5 grams between the heaviest and the lightest piston. That?ll help to maintain the internal stability we wall crave.?
The connecting rods "as they are called in the book" should be no more than 5 grams from lightest to heaviest (it was too much to write out)
I'm sure no one ever does it unless they are balancing and blueprinting anyway
Posted
Local Hero
 ops: … going to get my dads mechanic mate to either lend me a piston ring compressor (if it's easy) or do the pistons for me. I'd like to do things myself from a learning point of view but… if I need help then I need help :dontknow:
Posted
Newbie

wouldn't the circlips been easier with a set of circlip pliers.
Posted
Local Hero
sly_gti said
nice build - and good guide
wouldn't the circlips been easier with a set of circlip pliers.
They haven't got any holes for the circlip pliers to go into bud… have you done them yourself and if so, it'd be good to hear a better way as a few people may read this for ideas and ideas are welcome on this guide/thread :wink: .
Posted
Local Hero
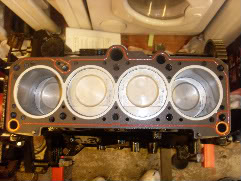
So…. quick trip to my parents to watch my team Arsenal get beat… I took my frustration out on the pistons.
The piston ring compressor that my old man got was the key. That and REALLY tightening it up… putting oil inside the compressor and the cylinder also helped.. :wink:
I've sliced my knuckles a bit on it mind so be careful.
It was then time to install the remaining pistons (and the con rod end shells)… flip the block over and install all the caps with the shells. It's essential not to get any dirt on the cap shells or crankshaft cams.
I'll take some pics and upload them over the weekend. I plan on now making a big push this weekend to get a lot done.
To recap on this section:-
1). Have a jubilee type piston ring compressor do not use a ratchet type as my experience is that they are useless
2). Oil the inside of the piston ring compressor and the cylinder
3). Tap around the compressor to make sure it is completely flat against the block
4). Use force to push the cylinder home but watch your knuckles on the compressor as the edges are sharp.
Hope this helps and an update to follow soon.
Posted
Settled In
Spudfingers said
I marked all of the piston bearing caps with an arrow on mine too :wink:
mcscrew:
I did this too, think there are some photos in the thread, i also lightly center punched each big end cap to make sure they went on in the correct orientation.
Good luck with your rebuild!
And good work Mr. Spudfingers!
'78 Golf LS 20vt
‘08 Mk5 Edition 30 DSG
‘08 Mk5 Edition 30 DSG
Posted
Local Hero
white_78 said
mcscrew:
I did this too, think there are some photos in the thread, i also lightly center punched each big end cap to make sure they went on in the correct orientation.
Good luck with your rebuild!
Thanks! We'll see what happens

Rich
Posted
Local Hero
Both oil seals replaced and ready to rock!!
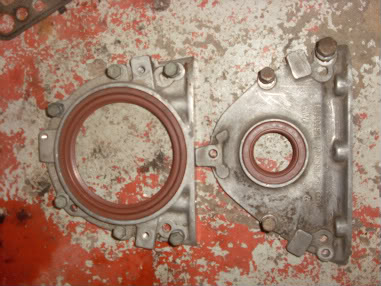
So… the paint was scraped back, the gaskets were added and the plates put back on on both sides:-


Spot the cuppa in the back ground?!?… needed a load of them :wink:
So on went the head gasket:-

Then on went the intermediate sprocket with the help of a screwdriver:-

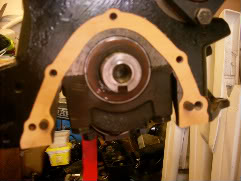
Lined up the line on the crankshaft pulley with the punch mark on the intermediate shaft:-

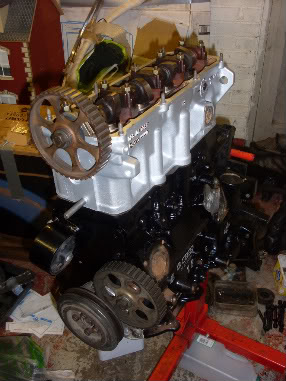
The front and back now look like this:-


Time to change the oil seal on the camshaft sprocket…:-


Tapped the injectors in then laid the camshaft back on:-

Then came the bearing caps… laid out with the arrow I scrapped on previously…

All tightened down :wink:
Quick flip over to get the oil lifter on:-

Then button the sump up. I had two bolt (both in this pic) which just spun when tightening. I put a bigger threaded bolt in each… hope they hold 8O

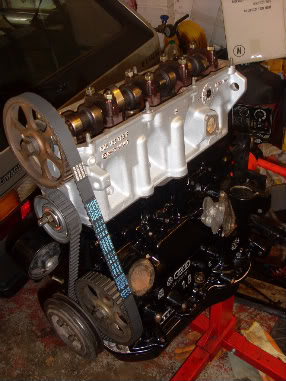
The timing belt is wrapped round the crankshaft, intermediate sprocket, the timming belt tensioner and finally the camshaft sprocket.
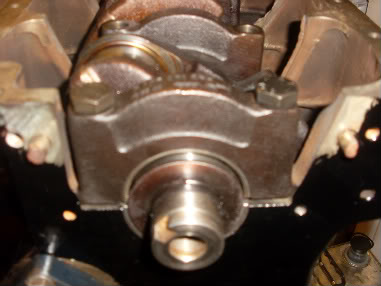
While I'm doing all of this I may as well overhaul the water pump…


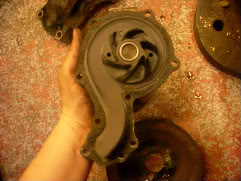
I've got a new section for the actual pump so I'll be using that upon install.

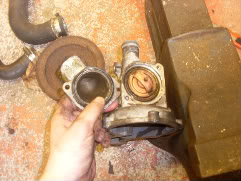
Wanted to clear the gunk from the altenator and warm up regulater so stripped the altenator and took the warm up regulator away for cleaning.

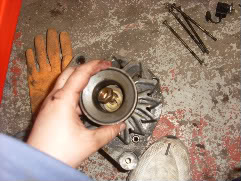
There's a weird semi circle key thing… dont lose this :wink:


That's it really. Cleaning and painting a few bits ready to fit to the car hopefully next weekend.
Posted

Old Timer


Posted

Local Hero
Posted
Settled In
Just one thing, it's not a dig at your workmanship in any way, just when i rebuilt mine, i cleaned and re-fitted the oil pump, which i thought would be fine, but when i spoke to the lads at the engine shop and read a couple of restoration guides, they both said that it would be highly advisable to replace the oil pump in any engine re-build, as it is essentially the heart of any engine…..no oil = knackered engine = tears!!!Even though i thought mine was ok, i thought it best to get a new one.
Like i say i ain't doubting your abilities in any way! Just thought i'd mention that dude.
Hope the rest of it goes well, looking forward the seeing the finished item, Keep up the good work!
P.s: That weird semi-circle thing you said you don't wanna lose is called a woodruff key if your interested! lol!
'78 Golf LS 20vt
‘08 Mk5 Edition 30 DSG
‘08 Mk5 Edition 30 DSG
Posted
Local Hero
The oil pump… is that the lifter in the sump or the actual part at the front of the block that the oil filter plugs up onto? Where can you source a new one?… just my normal spares place or are they hard to get hold of?
Thanks buddy :y:
Posted
Local Hero
whatalotafun said
this is real good work spud, why do you work in an office?
for the same reason that i do i'd imagine, nice and chilled out, no manual labour, and then working on cars can be enjoyable.
spend 35-40+ hours a week working on cars and you won't want to even pick up a spanner on your day(s) off.
1983 Polo CL - daily
1984 Golf G60 Syncro - sold
1989 Rallye Golf - sold
1992 Corrado G60 - crushed
1989 Polo C - chopped and crushed
1991 309 Style - crushed
1984 Golf G60 Syncro - sold
1989 Rallye Golf - sold
1992 Corrado G60 - crushed
1989 Polo C - chopped and crushed
1991 309 Style - crushed
0 guests and 0 members have just viewed this: None.