


My mk1 beginners engine rebuild - WILL IT START?!?!?

Posted

Old Timer

My mk1 beginners engine rebuild - WILL IT START?!?!?

Mat
Posted

Local Hero


Anyone know of anywhere? Either that or I'll be stripping my other engine :roll:

Posted
Old Timer
If you can't take up the difference with piston rings, surely new pistons will be much more expensive in the long run?
Mat
Posted
Local Hero
tyeness said
It might be better to strip your other block?
If you can't take up the difference with piston rings, surely new pistons will be much more expensive in the long run?
Mat
Going to rebuild both anyway fella. Might as well get this one out of the way as it's stripped and cleaned already :dontknow:
Posted
Old Timer

Posted
Local Hero
tyeness said
Aaaah right I see! Cool, that scoring is a good excuse for a little bit of extra grunt then
lol…. you already know me too well fella lol :wink:
Posted

Local Hero


Andy
Andy
LINCOLNSHIRE REGION -�https://www.facebook.com/groups/467122313360002/
1983 MK1 Golf GTI Campaign Model - Under (looooong) resto!
1962 Rover P4 80
2002 BMW 745i
2008 BMW Z4 2.5Si
LINCOLNSHIRE REGION -�https://www.facebook.com/groups/467122313360002/
1983 MK1 Golf GTI Campaign Model - Under (looooong) resto!
1962 Rover P4 80
2002 BMW 745i
2008 BMW Z4 2.5Si
Posted
Local Hero
Hairyarse said
I work on Corby, where are AVP? What else do they do? Might be worth a visit!
Andy
They are in a little industrial unit near ASDA… just off of Geddington Road (same road as Hilton Hotel). The street is called "The Grove" postcode NN18 8EW.
They are a chain and Corby is only a branch of All Vehicle Parts (AVP) but my old man always uses them and they seem good to me…. friendly bunch. Yet to see the quality of the products for the mk1 though which is why I'm holding off recommendations just now.
Posted
Local Hero
AVP could get me them but would be 3 week wait…. only others I found were in the states and with the ? so bad, they weren't cheap and quite a delay in delivery.
So….. after help from people here I decided to call TSR performance before ordering from an American site…. was expecting ?400…. TSR came back with ?271 and ?12 delivery… here by Monday (two working days)…. I was so happy I nearly wet my pants!!!!…. out came the card and they were promptly ordered…..
I'm sure he said it includes VAT but if not it's another ?40… let you know on that bit… I'd happily pay that just because they'll be here Monday…..
SOOOOOO CHUFFED
I'll let you know how the pistons and overbore goes and the price… then it's back to a "normal" rebuild process hopefully by the end of next week… and back on track!!! :wink:
Posted
Local Hero
Andy
LINCOLNSHIRE REGION -�https://www.facebook.com/groups/467122313360002/
1983 MK1 Golf GTI Campaign Model - Under (looooong) resto!
1962 Rover P4 80
2002 BMW 745i
2008 BMW Z4 2.5Si
LINCOLNSHIRE REGION -�https://www.facebook.com/groups/467122313360002/
1983 MK1 Golf GTI Campaign Model - Under (looooong) resto!
1962 Rover P4 80
2002 BMW 745i
2008 BMW Z4 2.5Si
Posted
Local Hero


…. alot of packaging…


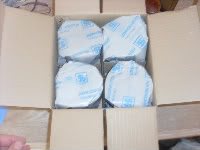
…………

YEAH… MY OVERSIZED PISTONS!!!
Need to give these to the engineer tomorrow and hope he doesn't take too long fitting the new pistons and pins onto the old con rods!!!
got my black high temp paint but still waiting on the silver!!!! He sent me an airfreshener instead (someone elses order) so have to wait until tomorow to see if it comes before chasing again :roll:
Slow progress but progress none the less!!
Posted

Old Timer
i need your help. you said at the begining of the thread that the gearbox can out the bottom with jack with the car on axle stands….!
in what order did you take it out
did you do in one big lump as in engine and gear box out the bottom??
or
did you seperate the engine and box engine went up and gearbox went down???
:dontknow:
does this make any sense :dontknow:

Posted
Local Hero
jellybelly said
spud……!!!!
i need your help. you said at the begining of the thread that the gearbox can out the bottom with jack with the car on axle stands….!
in what order did you take it out
did you do in one big lump as in engine and gear box out the bottom??
or
did you seperate the engine and box engine went up and gearbox went down???
:dontknow:
does this make any sense :dontknow:
Makes sense mate.
are you taking both out bud?
I jacked the car up and put it on axle stands, disconnected the drive shafts then all the bolts holding the gearbox to the engine…. then tapped around it with a hammer…. took the gearbox out underneath…Make sure the weight of the engine is supported by an engine lift as you have now removed the passenger side gerbox mount…
To take the engine out… lower the car back onto the floor (remember to also lower the engine lift arm in tandem)… raise the engine with the lift and remove the engine from the top (make sure all cables are disconnected - I forgot the accelerator cable at this point :roll: ).
I had to sit on the front of the car because it goes seriously high without an engine in it…
Does that help mate?
Posted
Old Timer
box down!
engine up!
Simple!! :wink:
Posted
Local Hero
Posted
Local Hero
Cleaning the Inlet & Exhaust Ports
I removed all the springs, valves, buckets etc again.

I then used a dremel to lightly take all the crud off of the ports.. you can see one done here and one not done

Probably should have done this in the first place but… you live and learn… cleaned it all out again and put it all back together.
Painting the Block
Whilst painting I also put the new pistons on the old conrods (next part).
Here is the old block pic:-

And the block partially painted (doing detail on the circle bits… basically silver :roll: ):-
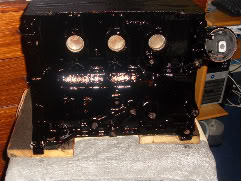
Had three coats on it so should be nearly there. Want to get the head finished tomorrow.
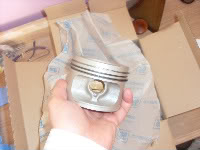
New Pistons onto Old Conrods
The engineer didn't actually put the new pistons on. He did however do a good job and give me "running in oil" which I have to run for the first 500 miles.
So…. I know why he didn't change them… they can be quite tricky….

You have your old piston and circlips at the side holding the gudgeon pins in. You need to put a small screwdriver down the hole and prize the circlip up.

You then need more purchase on it so either wedge the little screwdriver in and flick the circlip out (put your hand over the top or it'll ping off somewhere - maybe your eye!!) or swap to a bigger screwdriver if your little one struggles.

There is one on each side so make sure you remove both.
Next is to tap the gudgeon pin out. I used an 11mm socket and a hammer
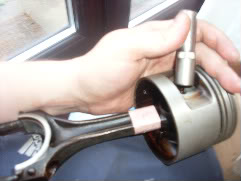

Now… lay the piston, and gudgeon pin on a table. Not how the old piston head was sitting and make sure the new piston goes on the same way.

Put some oil on the gudgeon pin just to help it go in

Now simply push the pin in… you may have to lightly tap them if they're a bit stiff

Once the pin is in you'll need to secure it with the circlips. The first one took me about an hour.. then the rest took 5 mins each (probably a minute towards the end..)


Put the circlip so that one end is just past the hole you used to remove the old one. Now press the circlip down at the groved part near the piston head.

If you do this quite quick, half of the clip will be in place. Now leaver the other end into the hole and make sure it sits in the grove.
Now repeat the process for the other and they're all done.

I didn't want them getting damaged after all this work so wrapped them in the reust proof paper they came in then some kitchen roll.

Hopefully no scores or dinks on these while I paint and rebuild the block and head
Posted

Local Hero
Posted
Old Timer

Posted
Settled In

Keep it up! I'm watching this one…

'82 Mk1 GTI
'86 Mk2 GTI
'06 Mk5 GTI
~What can I say? I'm just a GTI lover….~
My '82 Mk1 GTI Project
http://www.vwgolfmk1.org.uk/modules.php?name=Forums&file=viewtopic&t=60383
'86 Mk2 GTI
'06 Mk5 GTI
~What can I say? I'm just a GTI lover….~
My '82 Mk1 GTI Project
http://www.vwgolfmk1.org.uk/modules.php?name=Forums&file=viewtopic&t=60383
Posted

Settled In
:mrgreen:
he who dares rodders
There are too many online users to list.