


BMW 2002 Touring '74 Full restoration project


Old Timer

Yesterday
I got the front calipers back together. I first sandblasted the inside of the old pistons and spray painted them with heat resistant paint.
Afterwards I let the paint cure in the oven. Same thing with the calipers halves since I clear coated these after the cad plating.
New parts laid out, rebuild kit is from Walloth Nesch
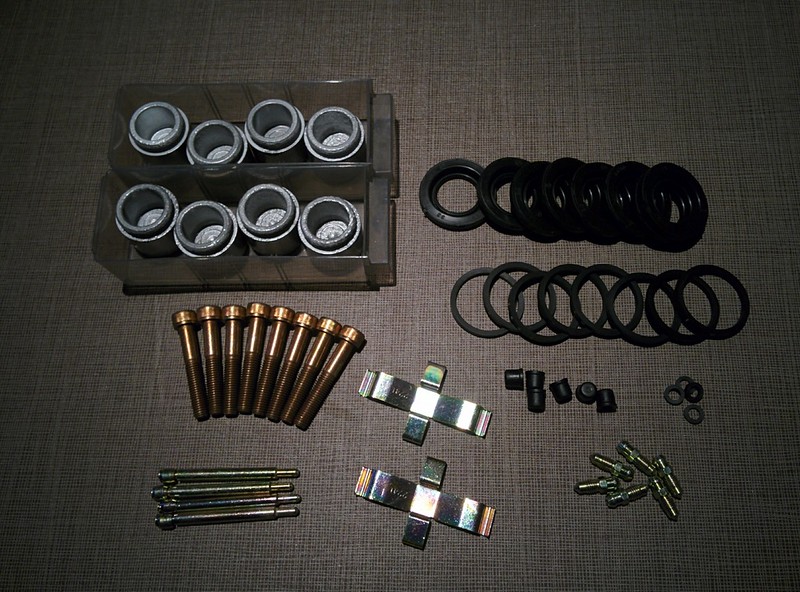
And back together!

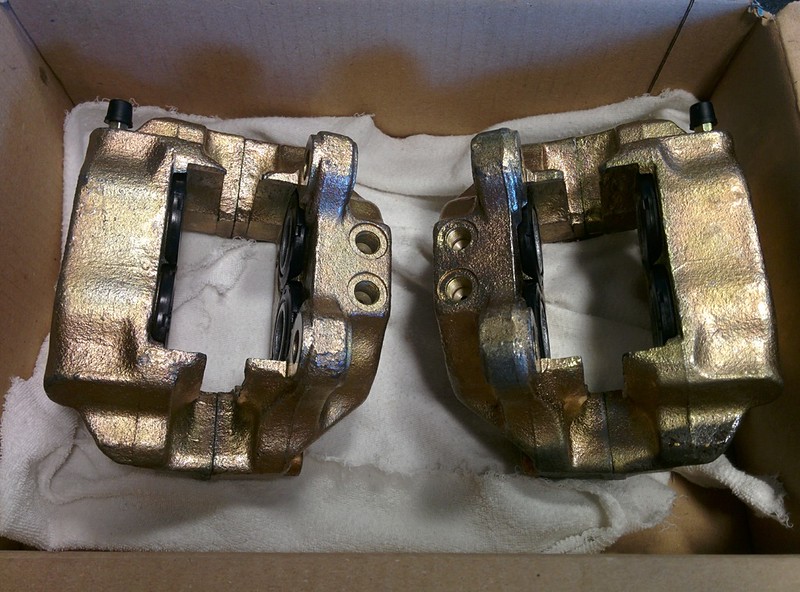
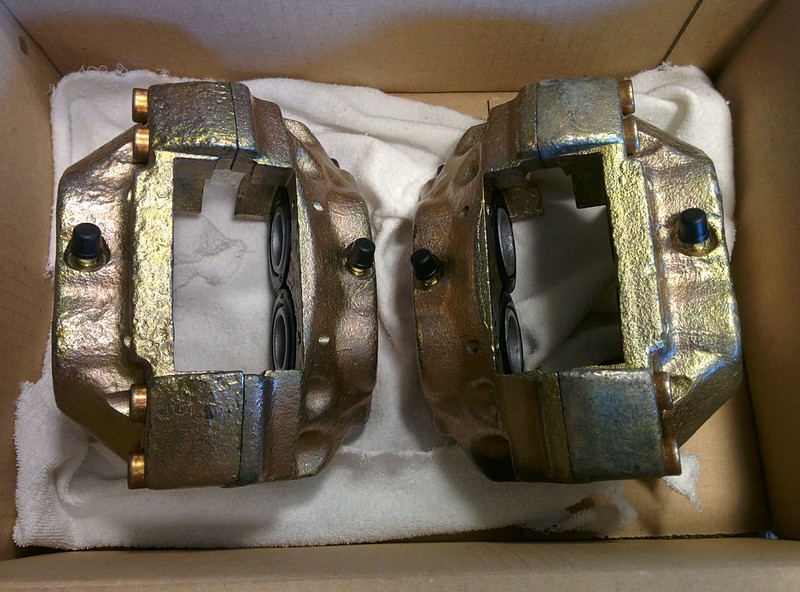

Very happy with the outcome, definitely a good choose to get these cad plated as well

 Last edit: by D_Martijn
Old Timer
After making sure I had all of the new bushes, bolts, and parts, I took it all home and got started with assembling.
Still need to torque everything down and bolt the master cylinder against the box as I forgot to take those bolts with me.
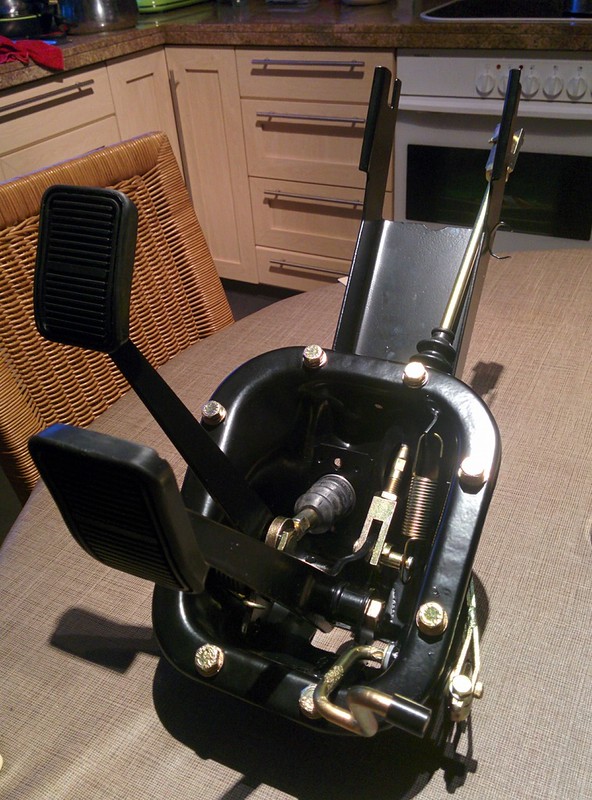
Close up of the pedal box


Last edit: by D_Martijn

Local Hero


Andy
LINCOLNSHIRE REGION -�https://www.facebook.com/groups/467122313360002/
1983 MK1 Golf GTI Campaign Model - Under (looooong) resto!
1962 Rover P4 80
2002 BMW 745i
2008 BMW Z4 2.5Si
LINCOLNSHIRE REGION -�https://www.facebook.com/groups/467122313360002/
1983 MK1 Golf GTI Campaign Model - Under (looooong) resto!
1962 Rover P4 80
2002 BMW 745i
2008 BMW Z4 2.5Si
Moderator
Sent by a smartphone and not a smartperson!
Play Guess the Asking Price 'SEASON 4' as of Sunday the 29th of October 2017.
https://vwgolfmk1.org.uk/forum/index.php?page=topicview&id=chat%2Fmk1-golf-chat_2%2Fguess-the-asking-price_2
OLD.
https://vwgolfmk1.org.uk/forum/index.php?page=topicview&id=chat%2Fmk1-golf-chat_2%2Fold-guess-the-asking
Ever wondered who's behind the scenes of this forum?
https://vwgolfmk1.org.uk/index.php?page=committee
Mike
There's me building mine 28 years ago, almost finished!

Be proud of your VW Golf Mk1, it's very special!
Play Guess the Asking Price 'SEASON 4' as of Sunday the 29th of October 2017.
https://vwgolfmk1.org.uk/forum/index.php?page=topicview&id=chat%2Fmk1-golf-chat_2%2Fguess-the-asking-price_2
OLD.
https://vwgolfmk1.org.uk/forum/index.php?page=topicview&id=chat%2Fmk1-golf-chat_2%2Fold-guess-the-asking
Ever wondered who's behind the scenes of this forum?
https://vwgolfmk1.org.uk/index.php?page=committee
Mike
There's me building mine 28 years ago, almost finished!
Be proud of your VW Golf Mk1, it's very special!
Old Timer
Hairyarse said
I think the BMW museum will be interested in this one by the time you've finished Martijn
Thank you Andy! Haven't done much welding as of lately, still welding/doing rust repairs on the E30..
Golf Cabrio said
Simply mind blowing Gentlemen! 👍 😀
Thanks, Mike!
Old Timer
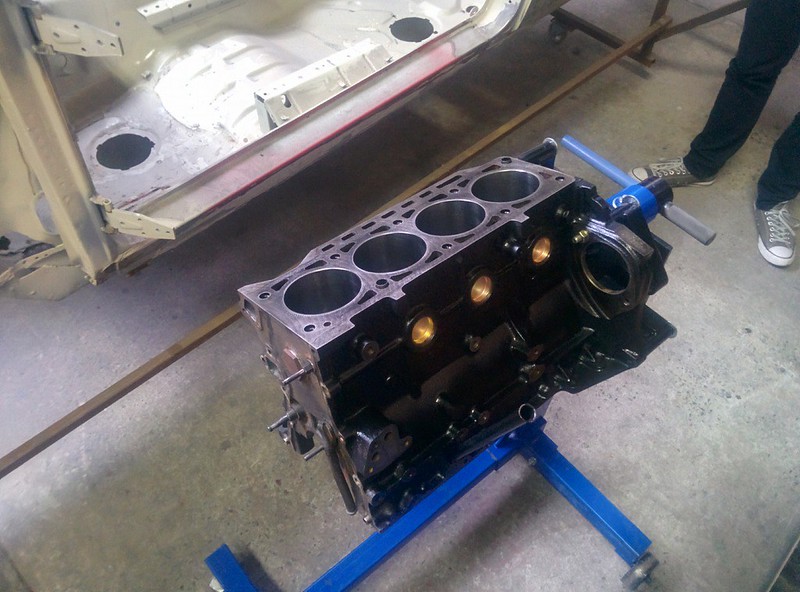
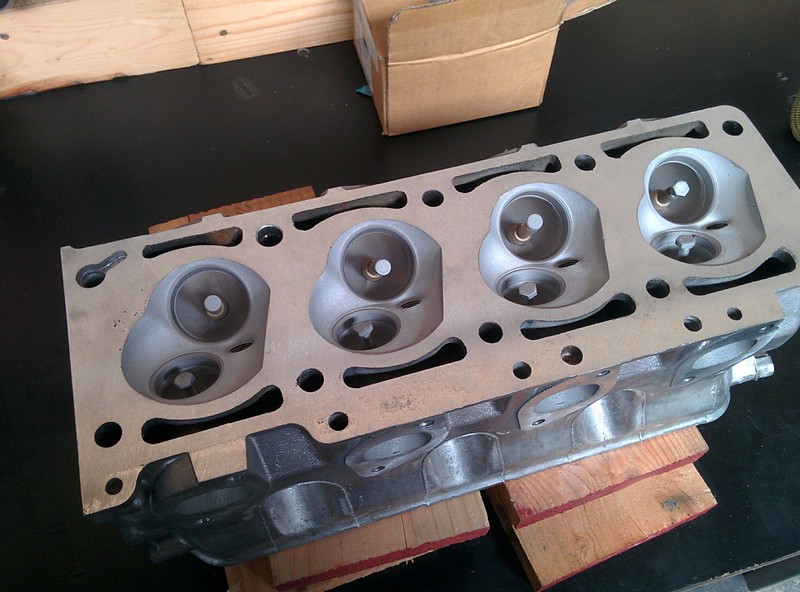
He pressure tested the cylinder head, resurfaced it together with the chain cover and�gave it a clean.The engine got first measured up, which told us that one piston had worn down the cylinder over the first oversize.He bored the engine to the 2nd oversize after I found some new Mahle pistons,�gave it a hone + new freeze plugs and wash. The engine didn't have to be resurfaced as it was still good. The flywheel also got�ground down so we have a nice flat surface for the new clutch disc. I still need to get new bearings for the crankshaft and connecting rods before I can start putting it back together. I'll go with Kolbenschmidt bearings as I can't seem to find the Glyco's. For now I put some more oil on the freshly cleaned and machined surfaces so they won't rust.

Last edit: by D_Martijn
Old Timer
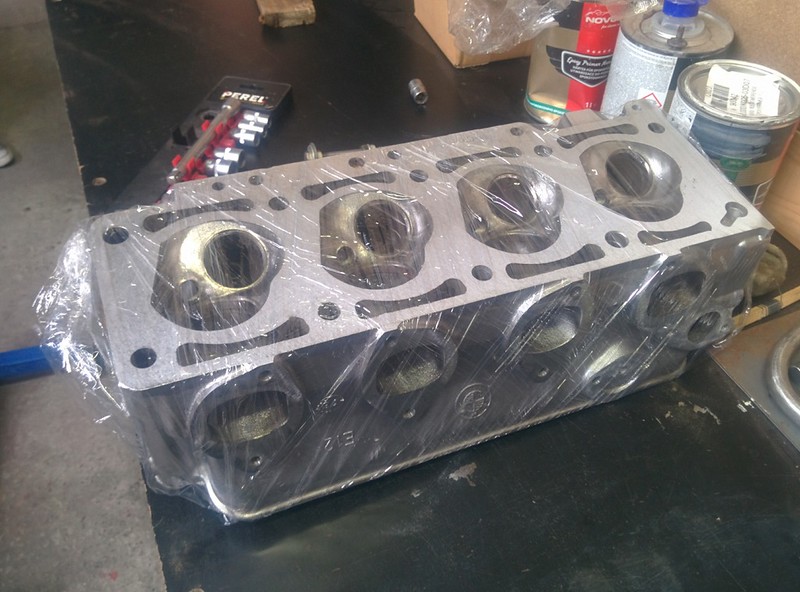
Pressing rubber tubes into the valve guide made sure these wouldn't get damaged. I also tape the whole head in duct tape to protect it from glass beads entering the oil/coolant passages. I will still clean the head with some water to be 100% sure there aren't any beads left inside.
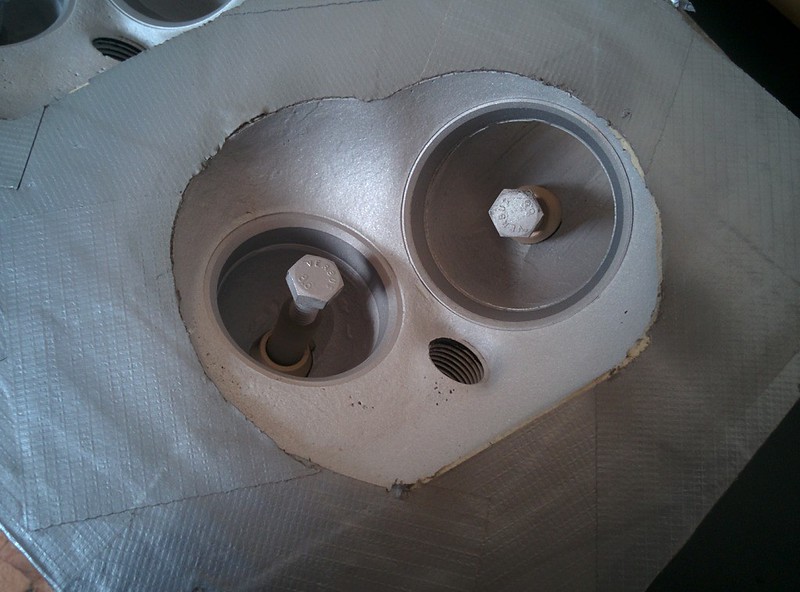
Last edit: by D_Martijn
Posted

Settling In

 Some top work being done there mate, keep it up!
Posted
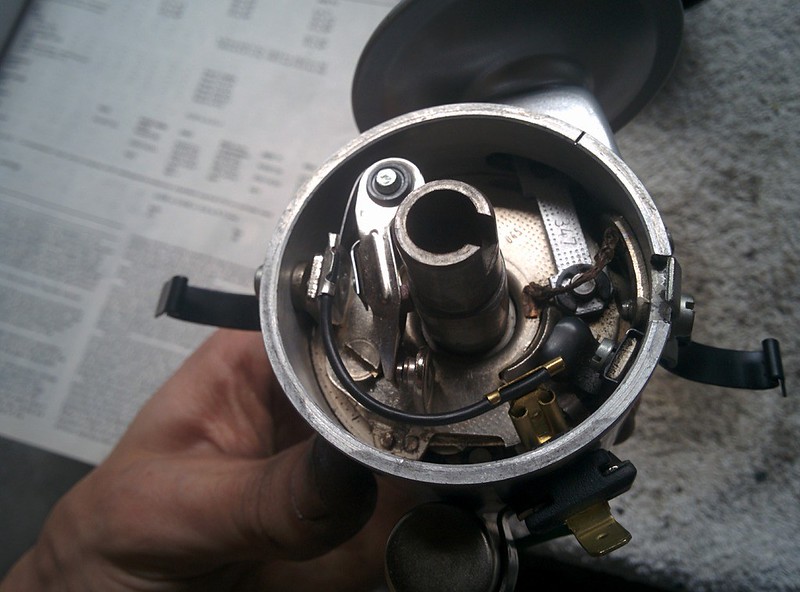
Old Timer
Slow & Low said
is that the B20 head?
Thank you for the compliment!
It's a E12 type head, M10 engine.
The B20 head was used in the M10 E30's if I'm not mistaken.
Posted
Old Timer


Turned out great!

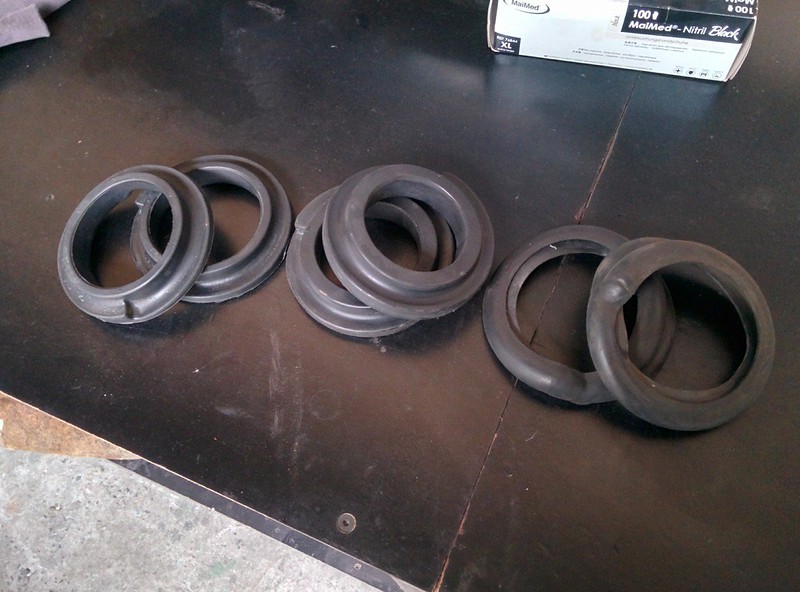
Being that the blasting cabinet was now full of glass beads instead of glass grit I decided to�blast the rubber bushings for the rear and front springs as they were quite dirty and had some rust particles on them.
This gave it a nice finish. I might treat them with some kind of product so the pores will be sealed.

Also gave the newly purchased coil for the alternator a coat of primer. Still need to find some kind of red/orange paint like original.


Last edit: by D_Martijn
Posted
Old Timer
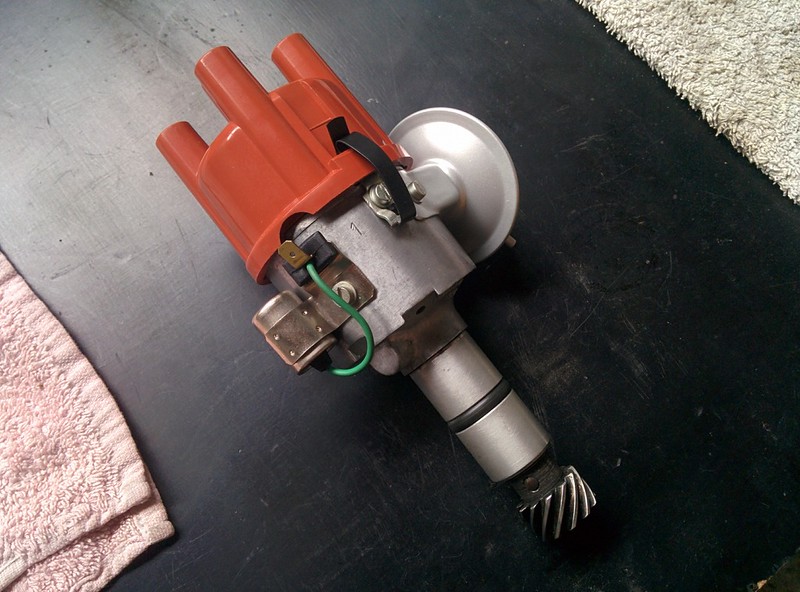
I started with cleaning the outside and lightly go over it with some scotchbrite. I also cleaned the inner mechanism as it was quite dirty/greasy.
When we plated the nuts and bolts, I took the hardware from a one of the spare distributors that was already missing a few pieces to also get plated.
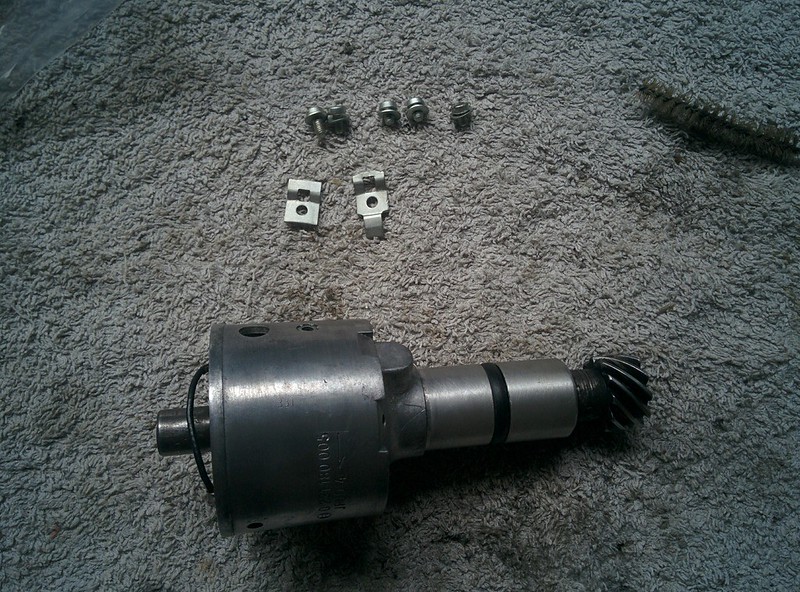

I then installed the new breaker points and set the correct gap (0,4mm)

I also tried getting the vacuum chamber plated but it did not turn out all that great so I decided to bead blast the one fitted on ours and paint it with some RAL 9006 aluminium color. Aso got the little clips blasted and painted black. I'm pleased with the result.

Last edit: by D_Martijn
Posted
Old Timer
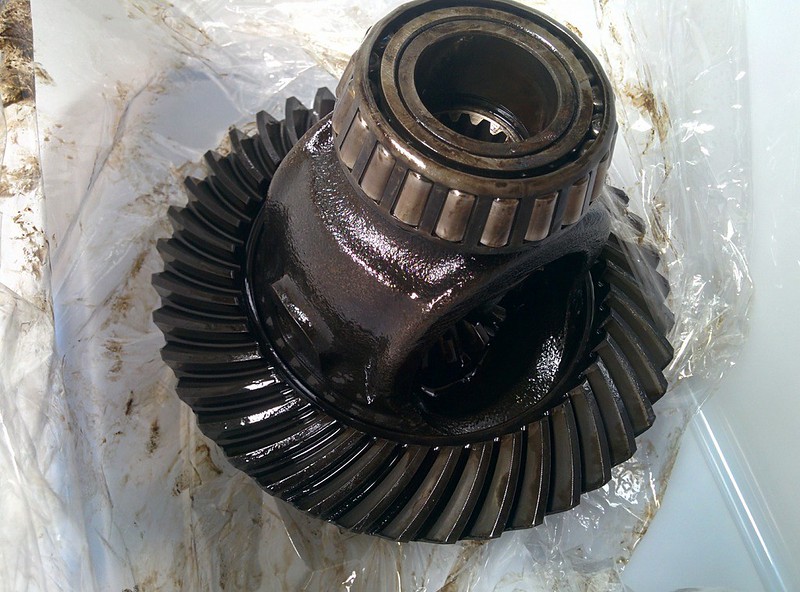
Since the differential is still assembled, we started on disassembling it. With the help of some brackets and a long breaker bar we were able to brake the big nut on the input shaft loose.
Also the 2 bolts on the output shafts got removed.
Everything disassembled and also removed the old seals.

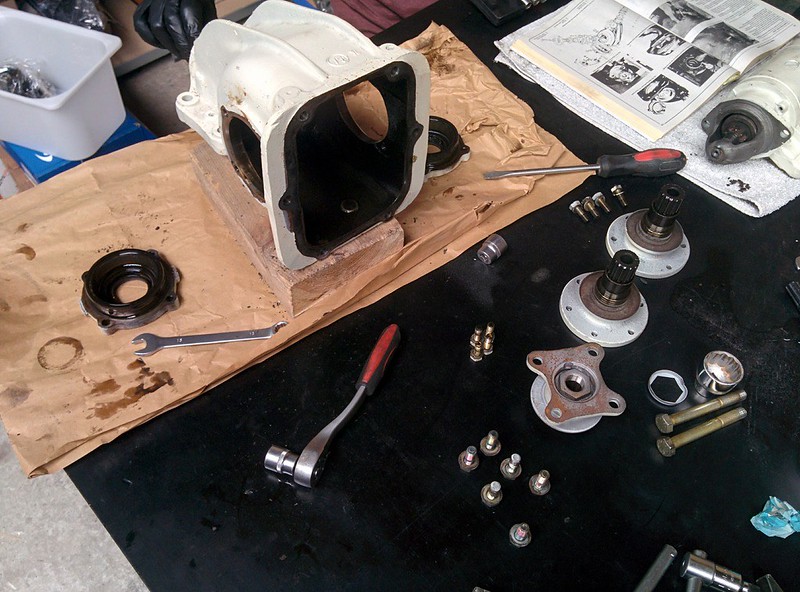
Teeth on the ring gear, little spiders and input shaft still look great. I don't think we'll replace the bearings as these also look good.
Next thing is to get the hardware plated with a kit to do it yourself. And also cleaning up the housing and bearing housings with the sandblaster and some wirewheels.
Then on to painting!
Last edit: by D_Martijn
Posted
Old Timer

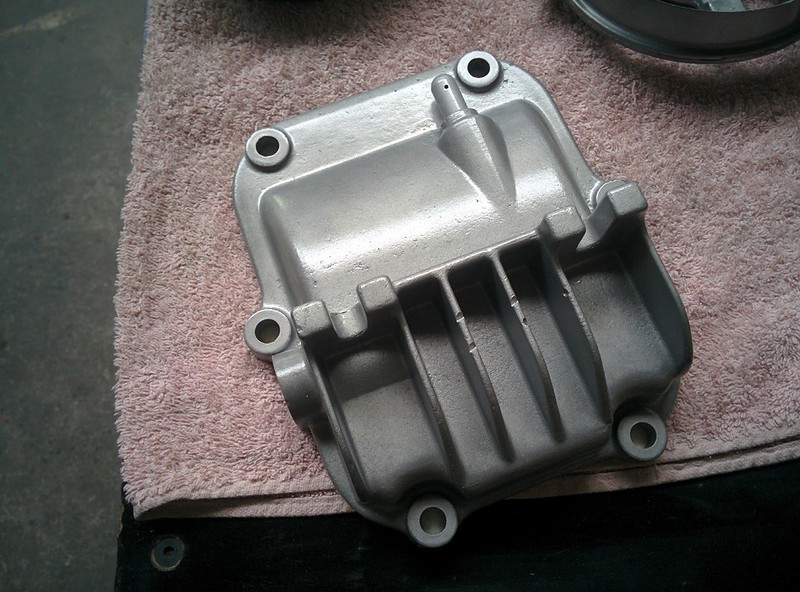
After degreasing the inside of the diff so there wasn't any oil left I wire wheeled the outside so remove some of the small rust spots.
I then taped it all up and gave the bare metal spots a coat of primer. The housing is now ready to be painted black. I still need to blast the bearing housings and input flange but ran out of primer.

Last edit: by D_Martijn
Posted
Local Hero
Andy
LINCOLNSHIRE REGION -�https://www.facebook.com/groups/467122313360002/
1983 MK1 Golf GTI Campaign Model - Under (looooong) resto!
1962 Rover P4 80
2002 BMW 745i
2008 BMW Z4 2.5Si
LINCOLNSHIRE REGION -�https://www.facebook.com/groups/467122313360002/
1983 MK1 Golf GTI Campaign Model - Under (looooong) resto!
1962 Rover P4 80
2002 BMW 745i
2008 BMW Z4 2.5Si
Posted
Old Timer
Hairyarse said
Looks like Photobucket have hidden your pics? Seems to be a common thing at the mo, I guess they've changed their policies??
Jup.. it sucks.
 My golf mk1 thread is also effected by it..
Not sure what I'm going to do.. It'll take so long to rehost all of these pictures..

Old Timer
I decided to already update my build post with some new pictures.
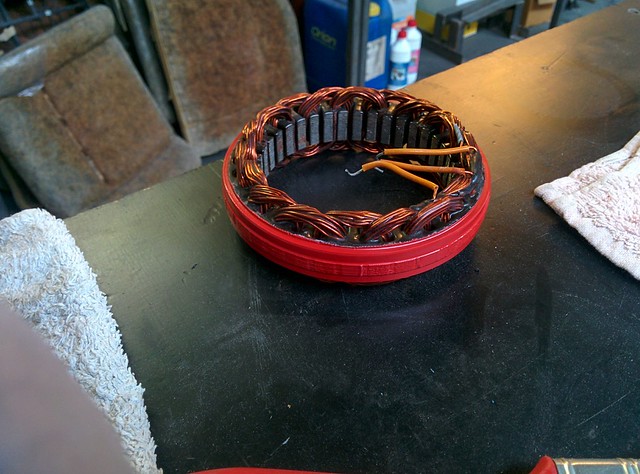
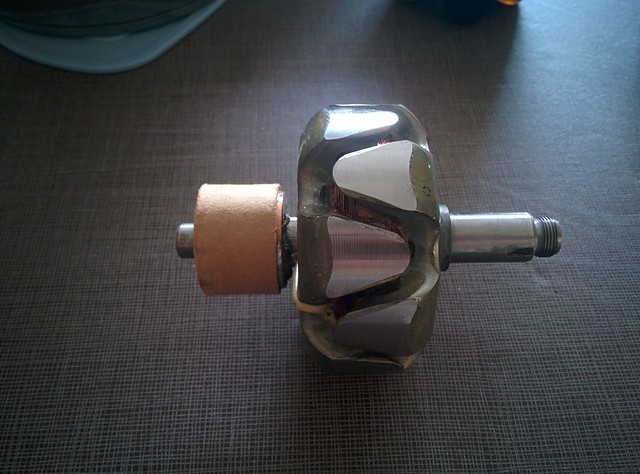
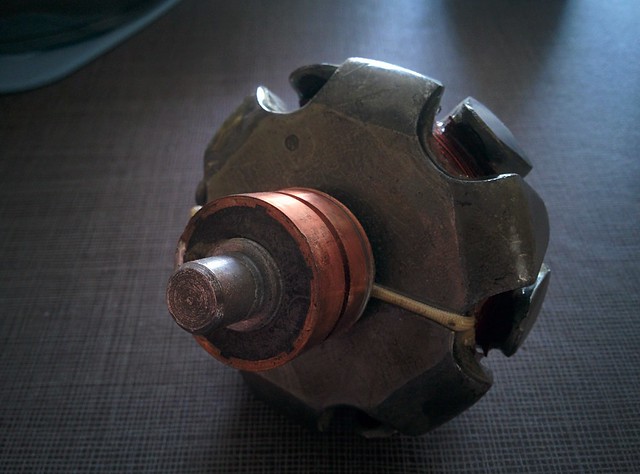
I got the alternator stator sandbasted, primed and painted red. I also received my new rotor. The guy from my local electro workshop told me it was the last one that was available from their warehouse. I got lucky and got the last one
Last week I got the epoxy primed parts fully sanded smooth and primers the bare metal spots again. Fully ready to get painted with2k black satin paint.
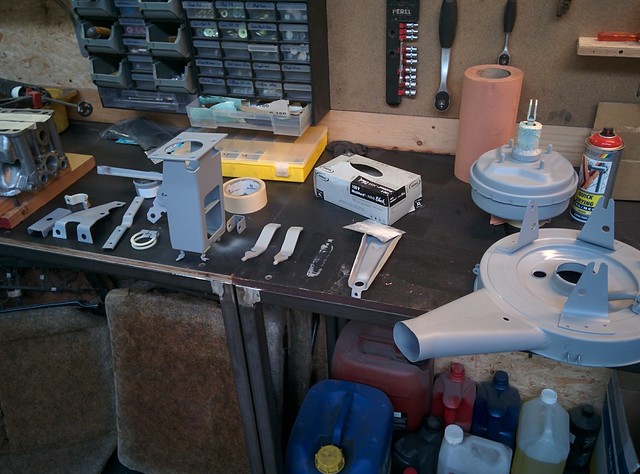
Old Timer
I'll probably give it a second coat when it's all dry as I laid it not too tick to avoid runners + there are�a few small spots that I didn't quite fully cover with paint.

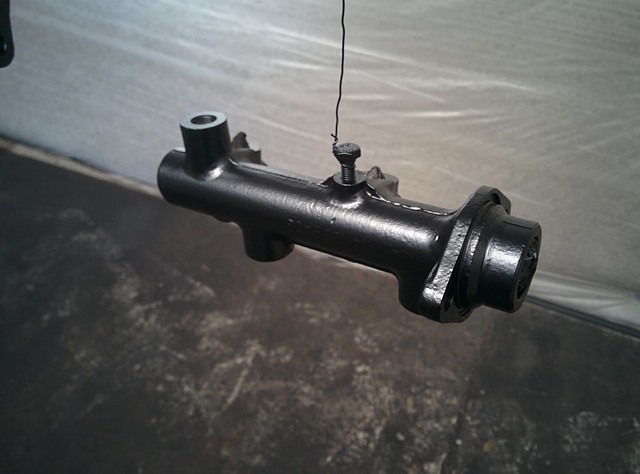
Radiator, I did not paint the little cooling fins as I still need to bend some of them back into shape. I'll spray these with some heat resistant black paint later on.

Air filter housing lid

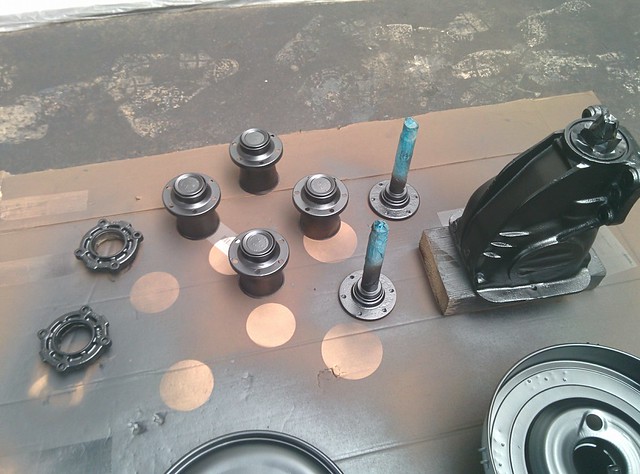
Diff + driveshaft parts
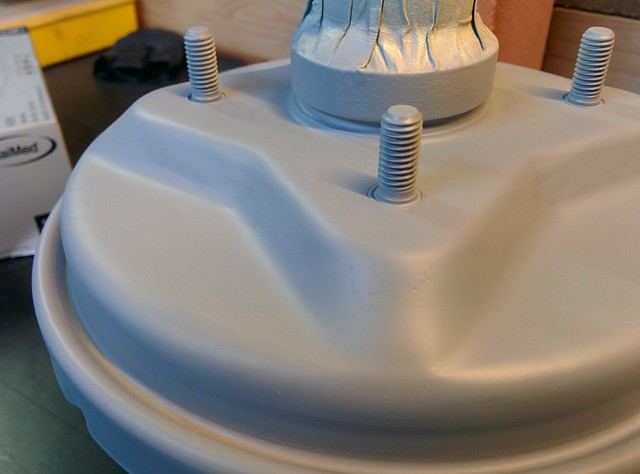
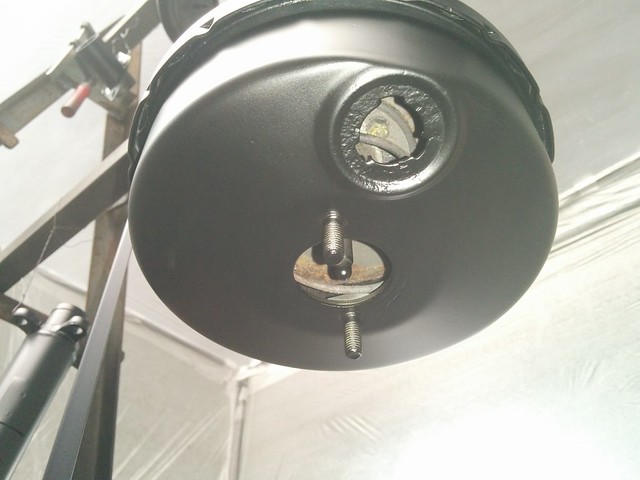
Brake booster

Posted
Local Hero
I like your spray booth too
Andy
LINCOLNSHIRE REGION -�https://www.facebook.com/groups/467122313360002/
1983 MK1 Golf GTI Campaign Model - Under (looooong) resto!
1962 Rover P4 80
2002 BMW 745i
2008 BMW Z4 2.5Si
LINCOLNSHIRE REGION -�https://www.facebook.com/groups/467122313360002/
1983 MK1 Golf GTI Campaign Model - Under (looooong) resto!
1962 Rover P4 80
2002 BMW 745i
2008 BMW Z4 2.5Si
Old Timer
Hairyarse said
Great work as always!
I like your spray booth too
Thanks Andy!
It came out pretty good for only some steel tubing and cheap plastic foil. the painting rack is also very handy because of the 2 horizontal tubes.
Old Timer
There were a few spots that had some overspray so I decided to lightly sand these parts first so I could get a smooth finish when applying the second coat.
As far as I can tell it came out very good, especially for only using a (cheap) spray gun for the third time.
my brother and I also started disassembling the startmotor for the engine. We'll probably give this only one coat when doing the underside of the air filter housing and lid as I haven't painted those yet.
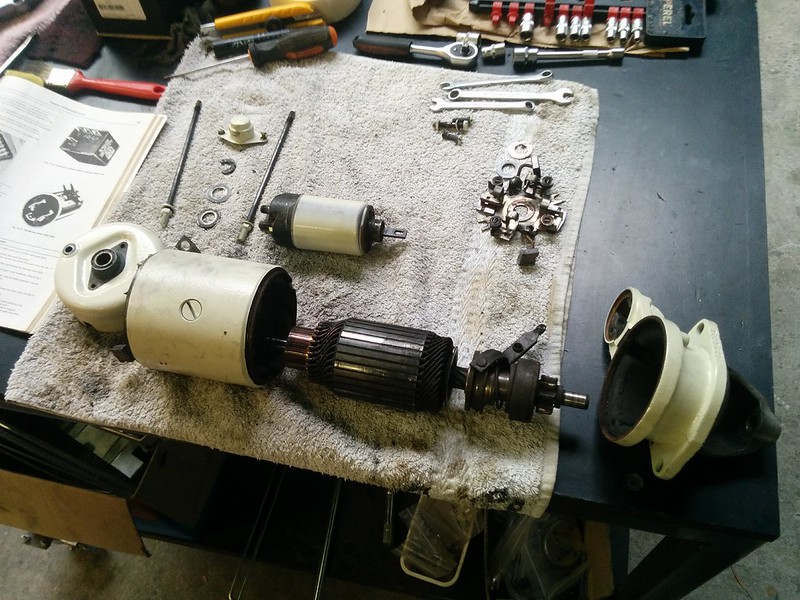
The stator still looked good as does the stator, we'll just give them a clean an reassemble them back after painting the housing.
There are too many online users to list.