


vw golf cabriolet 85 US Spec restore - 3279A

Posted
Old Timer

I've managed to fix that issue (write up of that coming soon) but discovered another issue!!!!
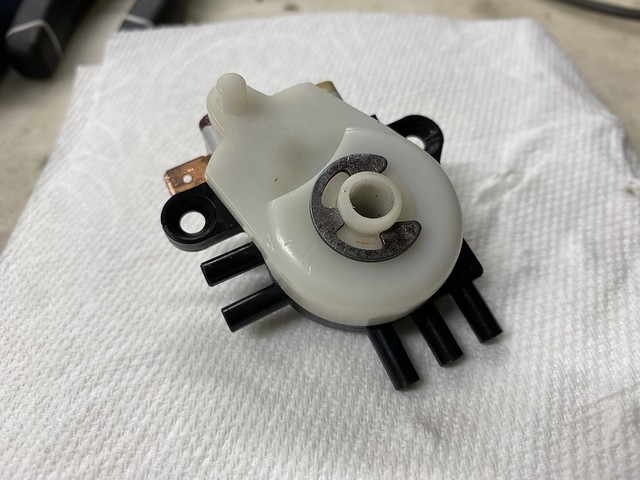
Then I tested out the complete system on all the settings and noticed the Vacuum servo for air recirulation flap was not opening or closing, so I followed this amazing PDF - http://www.cabby-info.com/Files/HVACTesting.pdf and everything was working just perfect until I tested the vacuum distributor and bingo we have a leak.
Part #161820293B - another expensive part, not available from VW!
So some research and looks like there is alot of good info on on various online forums - the best thread on how this unit works was found:
How That Darned Vacuum Distributor Really Operates (a detailed analysis) | VW Vortex - Volkswagen Forum
How That Darned Vacuum Distributor Really Operates
and
https://www.vwvortex.com/threads/vacuum-distributor-on-the-heater-controls-not-the-same-as-the-manual.2860977/
Vacuum distributor on the heater controls…
Next steps!
����Managed to find replacement part (waiting on that)
����try and fix my one, I noticed a few people have tried a few tricks and got it to stop leaking, but I am guessing I will have to get a replacement part.
Be interested to hear from others who has tried to fix this part or where people are buying these new from?
All this issues ended up taking out the complete dashboard which actually will allow me to do some other work without breaking my back!

�
 Last edit: by madone_si
Madone with the two Cabs 82 (UK RHD) and 85 (US LHD) (92 sold)
�
�
Posted
Old Timer

Tested out each of the cooling/heating positions and everything is working as needed, I come to test out the MAX A/C positions as seen in this http://www.cabby-info.com/Files/HVACTesting.pdf and in photo below, this is the only option that allows your under the passenger dashboard recirculation vent flap to Close and its not closing. About 3 minutes later it really really slowly started to close - which to me is not right.(Tested the pipes to make sure the retracting the diaphragm, forcing the recirculation vent flap closed and that worked just fine so we know that is not the problem)

I then noticed that the new vacuum pipe junction is not moving all the way down into the slot.

and I very gently moved it to as far as it could go into the slot

and as soon as I did that recirculation vent flap closed within 2 seconds - its working as it should!

I repeated this process using the levers and again the top lever just doesn't move the vacuum pipe junction far enough down to get the MAX A/C position to work as required and thus the recirculation vent flap would not close. Moved the vacuum pipe junction down gently again and recirculation vent flap closed within 2 seconds.
So the big question is the new unit broken, the top lever bent, the unit it all connects to out of alignment, at this point I have no idea. Anyone got any ideas?
I took a pic of the vacuum unit apart to give everyone good idea what these look like apart

Madone with the two Cabs 82 (UK RHD) and 85 (US LHD) (92 sold)
�
�

Old Timer
Had really nice warm weather the last few days, so that helped this work.
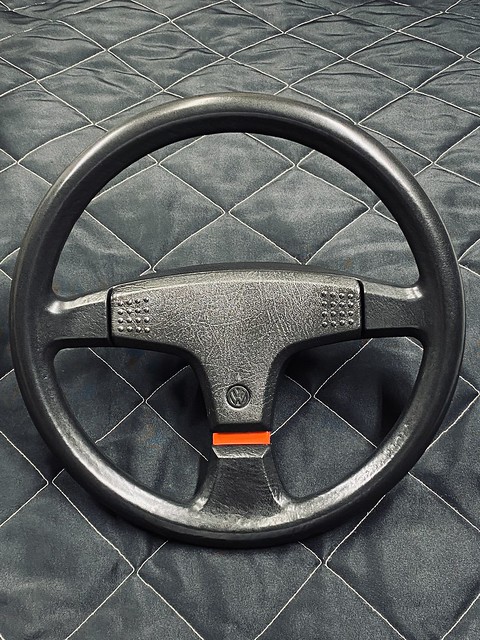
Wheel as I got it


Up close you can see little damage on surface

Part details for future reference

Time to prep for sanding and painting

primer, had to do this a few times as primer to get it to point of smooth for red paint.

Few coats of red

Sanded down ready for final red paint

2 coats of Red and 2 coats of clear finish

dryed for 24 hours and then all ready
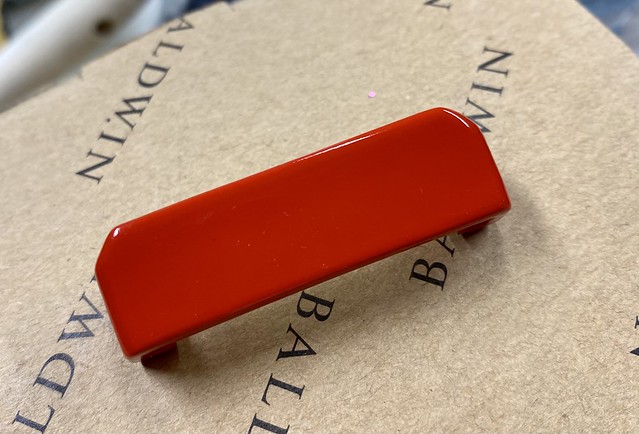
and installing on wheel!


and all ready for installing in the vw cab again!
Madone with the two Cabs 82 (UK RHD) and 85 (US LHD) (92 sold)
�
�
Old Timer
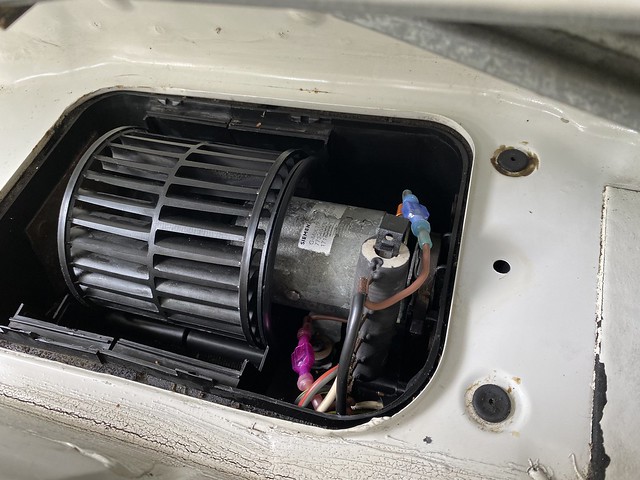
After fixing my main heater unit controller, I finally was able to test out my heating/cooling system. If became clear that my fan/blower motor was not turning on, as I could not hear the fan turning.
I used this great document to get to my fan/blower motor out of my mk1.
http://cabby-info.com/Files/ReplacingTheBlowerMotor.pdf
Spec of my fan/blower motor:
vw blower fan # 171-820-015 or 021
Carbon Bushes measure 8mm x 9mm x 22mm
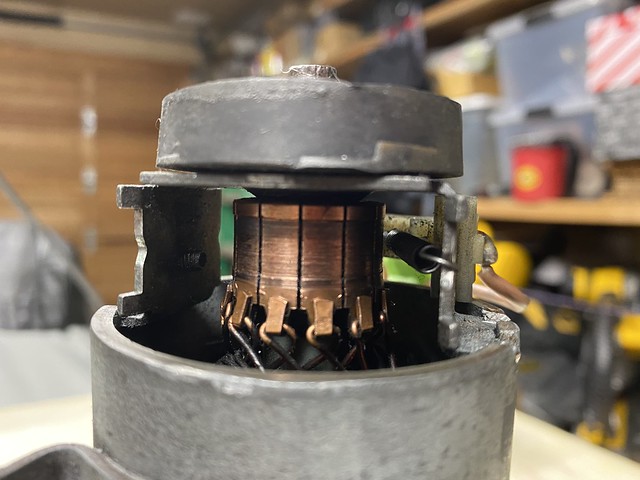
Now that I have the fan/blower motor out of the car, it become clear what my problem was very quickly.
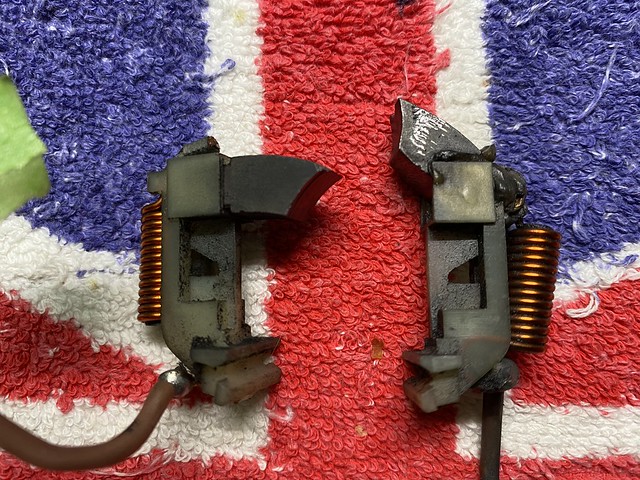
As you can see one of my carbon bushes is been pushed and melted the holder itself, thus the carbon bush is not pressing up against the motor properly and thus not working.
After some research (not much found the w.w.w) I managed to find solution to my problem.
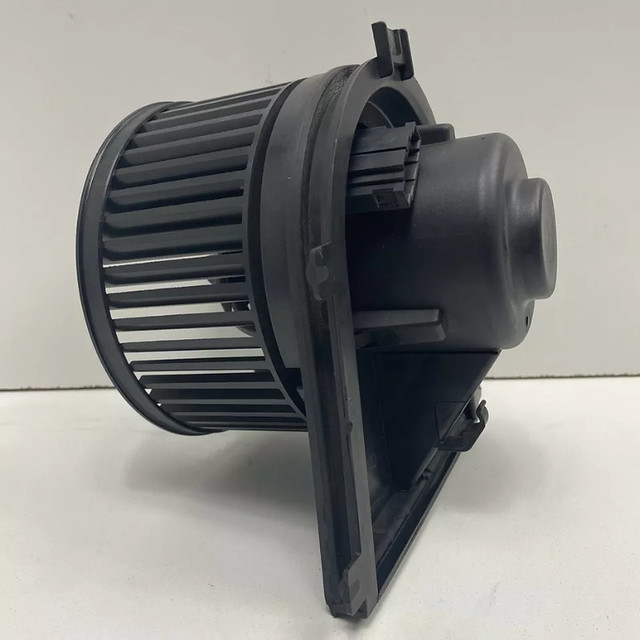
As you can see from my other thread I brought this up in https://www.vwvortex.com/threads/blower-fan-motor-carbon-bushes-and-holder.9470480/#post-115093383 no many people have had this issue, usually they replace the whole fan/blower unit and as you can below with cost being $$$ I was not happy to spend some time to find a cheaper fix. Plus its actually harder now to find a replacement unit.

My fix:
1. I found new carbon bushes.
2. The carbon bushes holders from later blower fan motor from VW golf mk3/4 are the same setup and fit perfectly so using set from vw golf 4 gave me the holder I needed. Part # 1J1819021
3. I added disconnects on cables so it's easier to service blower motor in the future, so no more disconnecting cable from inside the car.
4. I gave the motor a really good clean too.
I ordered another later model blower fan motor as additional spares for the future.
Here is how I fixed my fan/blower motor.
Once you have the motor out of your vehicle and on a table, you can start to take apart the fan blower motor.


As I planned to add quick connects to my cables, I cut the two cables to be able to remove the cabling to one side. FYI: To replace the cable is also expensive so be careful with that.

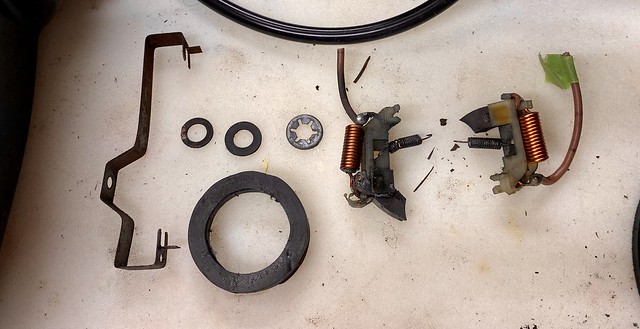
Next up is to remove the carbon bushes holders. Both holders are held in place with springs, carefully remove these with precision pliers and not let the spring go from your pliers or it will spring out of sight into your room!
With the spring removed you can now pull the holder outwards and pull forward to remove from motor. Repeat this for both holders
Here you can see springs
Now you have carbon bushes holder on table you can see clearly the problem I have with one of my broken holders and carbon bush bent.

So with sourcing new parts from later vw mk4 fan motor, you can see below the later holders in the unit before I took them off.
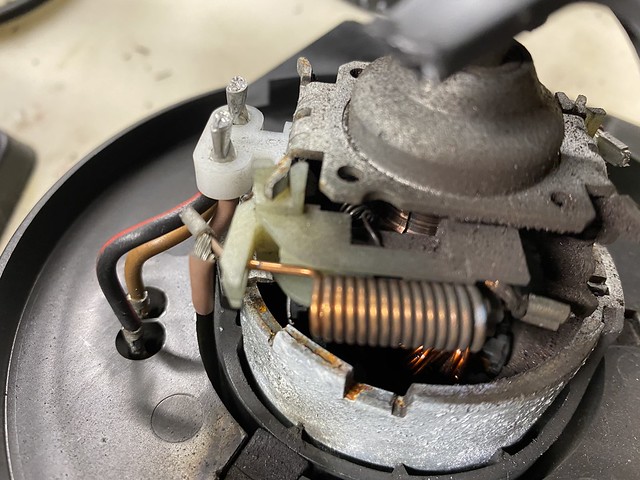
Mk4 unit looks like

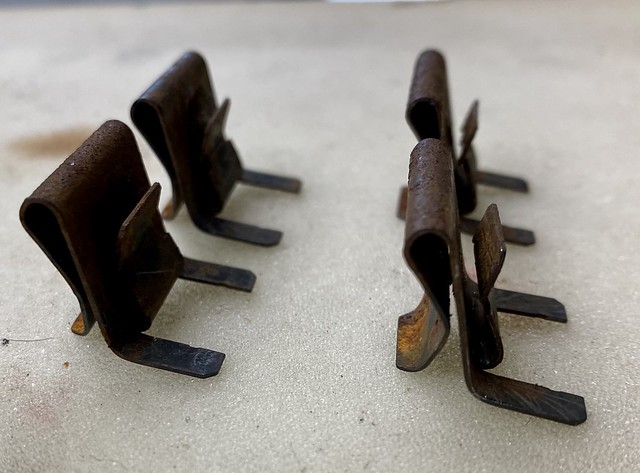
And now compare the original holders with carbon bushes to the ones from mk4 golf motor. The later model holders have a nice cable holder, so I plan to use both mk4 holders once cleaned up a little.

Also going to use later mk4 spring too.. My originals seen better days!

So after some cleaning up of holders, I removed the original carbon bushes from my unit compared to mk4 and placed beside the holders so you can see

Carbon bushes
Top - from mk4
Middle - from mk1
Bottom - new carbon bushes.

Made sure my original carbon bushes fitted the mk4 holder and they do - happy days!

New carbon bushes

Using the mk1 original carbon bushes as template, I used 80grit sand paper on wheel in power drill to get the shape I need

And placed into the mk4 holder

Placed the carbon bushes holder back onto the motor, with mk4 springs. Using again my pliers to pull spring from inside to the other side to secure in place and then twisted cable end with carbon bushes copper together

Now using a new cable tube, placed over and crimped to secure cables together


Repeated on the other side

At this point I wanted to check the motor worked
Click to watch the short video!
https://live.staticflickr.com/video/51166717673/12fd235b7c/1080p.mp4?s=eyJpIjo1MTE2NjcxNzY3MywiZSI6MTYyNDA4MzE0NSwicyI6IjkxNzMwYWVmOWQ2Y2M1MmEwNGY2ZjIxNTAzYTVlMjIzNjI5MzE4Y2UiLCJ2IjoxfQ
I then added quick connects onto the end of the cables


Now time to reinstall into the mk1 again.
Ran the cabling back through into hole and connected cable up inside


Then installed the fan blower motor

With the fan blower motor working and in the car, now time to test out my complete heating/cooling system.
Tested out the complete system on all the settings and noticed the Vacuum servo for air recirculation flap was not opening or closing, so I followed this amazing PDF - http://www.cabby-info.com/Files/HVACTesting.pdf and everything was working just perfect until I tested the vacuum distributor and bingo we have a leak.
Part #161820293B - another expensive part, not available from VW!
So some research and looks like there is a lot of good info on vwvortex - the best thread on how this unit works was found here:
How That Darned Vacuum Distributor Really Operates (a detailed analysis) | VW Vortex - Volkswagen Forum
And
https://www.vwvortex.com/threads/vacuum-distributor-on-the-heater-controls-not-the-same-as-the-manual.2860977/
so as outlined in earlier update recently waiting for parts to arrive, once they arrive I will update here with full details on fixing this part and actually test out system on all settings and then get actually get onto doing A/C servicing and coolant flush and refill.
Madone with the two Cabs 82 (UK RHD) and 85 (US LHD) (92 sold)
�
�
Posted
Old Timer
Will Fiberglass work or something else? I don't see thread of this when using search.
how it should look

the damage!

and the clip!

thanks
Madone with the two Cabs 82 (UK RHD) and 85 (US LHD) (92 sold)
�
�
Posted
Old Timer

Posted
Old Timer
paceman said
I had to repair some similar damage caused by one of the clips at the front of the dash. I used fibreglass, and it worked rather well. Things I learnt…you might not need fibreglass, just the resin. Tha dashboard as you know is fibre based and it soaks up the resin quite well, so you might want to ty that first. If you do need fibreglass, use the tissue as I found that the normal mat was quite thick which makes it much harder to get the clip back on (and off!).
Thanks Paceman, that makes sense. I will try the resin first and worse case then fiberglass.
Madone with the two Cabs 82 (UK RHD) and 85 (US LHD) (92 sold)
�
�
Posted
Old Timer
So while I've been waiting for parts to turn up to finish up my HVAC system, I started to work on fixing few problems I have with the Dashboard.
Since I took the dashboard out to fix my HVAC issues I noticed the following issues on the dashboard. I believe most mk1's cab dashboard will have this issue, so thought I would write this up for others.
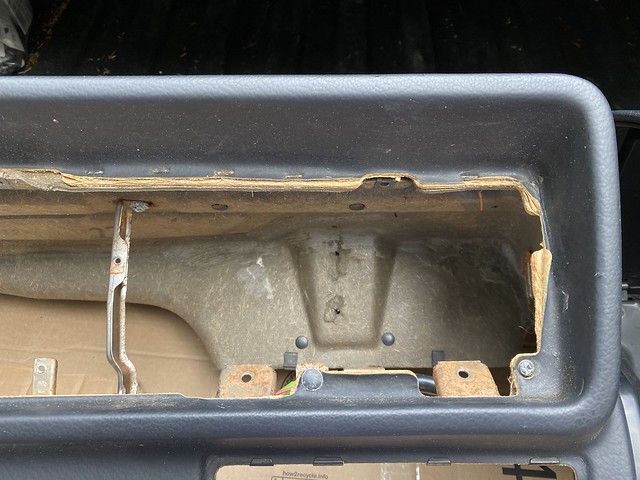
Overall the dashboard is in great condition on the visual side when in the car. When you flip it over and start looking at the underside its another matter.
Problems seen - most of the clips and metal structure have rush all over them. The four main clips that hold the dashboard to the main part of the cab body near the wind screen are usually like welded to the dashboard under structure "fiberboard". When you try to pull these off to clean up or remove, they will properly 99% of time rip the fiberboard too. In my case 3 of the 4 did this very thing, so I will show you how to fix that.
The main structure metal of underside of dashboard will over time just rust, most of it will be surface rust but the only way I found to protect that metal is to POR15 it. Its super painful to remove it from dashboard outer skin.
The inside area of fiberboard where the stereo of car goes, always ends up being damaged and in my case it too has screw holes and ripped, so will have to fix that and maybe add more structure in place to help support and secure stereo to dashboard.
The last area I can see being a common problem is the edging of the dashboard and in a lot of the areas of the edge of my dashboard you see parts of the outer cover of dashboard coming away from fiberboard, so will have to protect the edging and glue back the areas coming away.
Dashboard

Clips

Clip off dashboard with part of fiberboard


I added some liquid glue to the area clips come off from, to protect the area but also to see clearly the damaged area.

Once I got all four main clips off, I put them in a small bucket and used this product to help remove the rust.
LOCTITE - Rust Dissolver

Leave for 24 hours

After 24 hours

Now onto cleaning the clips up and removing the old fiberboard in the smaller clip side area.
Tools used to clean clips…
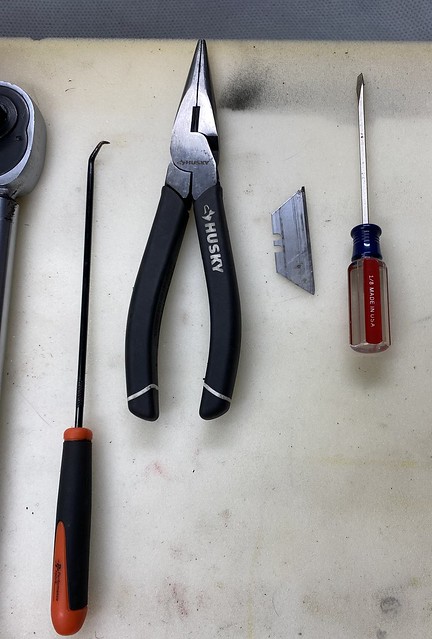
Each clip too about 10-15 minutes using pick and razor blade to get all fiberboard out.
What I did was put small screwdriver in the bigger clip part and then pulled and pushed using pick and razor blade to get parts out.

And after doing that to all four… end results.
I then used the wire wheel on each of them to get all surface mess of them and spray painted them with POR 15.
You will see the results on clips after I explain how I fixed the clip areas on underside of dashboard next.
Fixing the fiberboard on underside of mk1 Golf dashboard
As stated above I put glue on the 3 of 4 clip areas of fiberboard that was damaged by removing the clips.
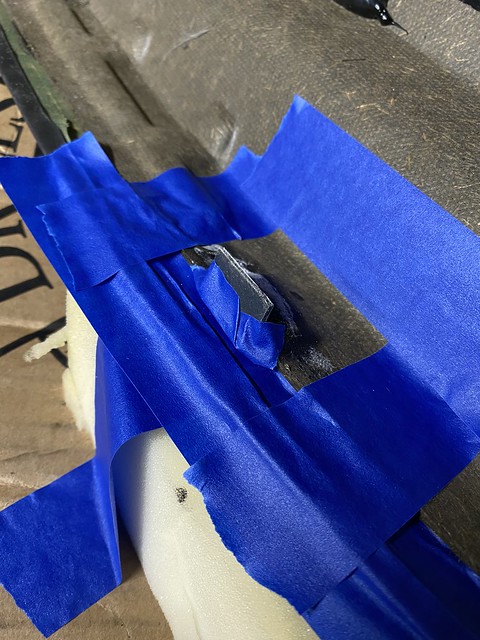
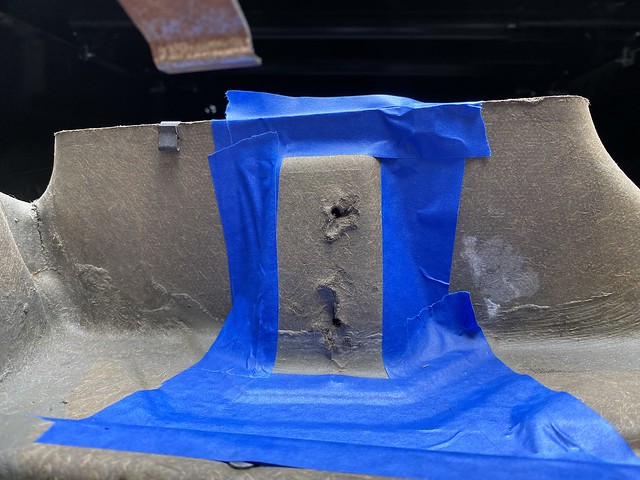
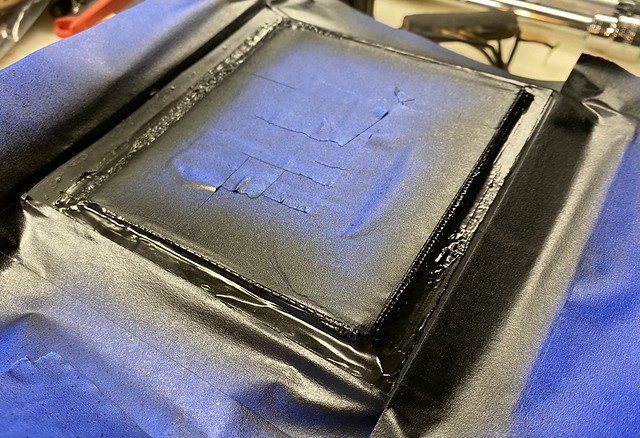
First thing I did was go along and tape around each area of the dashboard, so any repair work I do is limited to that area only. I used blue painters tape, If I did this again I would use green painters tape, as some of the repair work bleed underneath the tape.

Using the free sample flooring you get from like Home-depot, I cut and glues together a 90 degree angle and place under the area broken until its cannot go any further inwards. This will give me a good base to fill in the whole broken area.

I then made sure I tapes this in place and made sure the underside was tapes well too
I repeated this for the other three areas and then it was time fix these areas.
So asking others in this forum and other places… it seems most people have used Fiberglass to fix these areas in the past and it worked well. So I ordered a kit from online and here is what I did.
� �1. I used just the fiberglass resin first. Let that set 1 hour and moved onto step 2.
� �2. I removed my custom 90 degree supports
� �3. I then fiber glassed over the clip areas on top and underside. (this was messy!! Is an understatement - always, always work in area with fresh air and use gloves when working with fiber glass and always wear a mask)
� �4. Let fiber glass dry out for several hours, in my case I left overnight.
� �5. Sanded down the fiber glass to shape I needed
� �6. Added POR15 paint over the area.
� �7. Add to clips back onto the underside of dashboard!
Here are some photos of above steps.
No.1 & 2 step

No.3 Step

No.4 step

No.5 Step

No.6 step
Actually re-taped the area and then painted

No.7 step
All clips back on underside of dashboard

The second to left clip was the one that was not damaged, but I ended up painting each area.
Close up of repaired area and clip on. Clips perfected went on and holding in place. You can see where paint bleed under the taped up area, this is why I recommend using green tape over blue tape. Yes I have OCD issues haha..

Fixing the dashboard edging
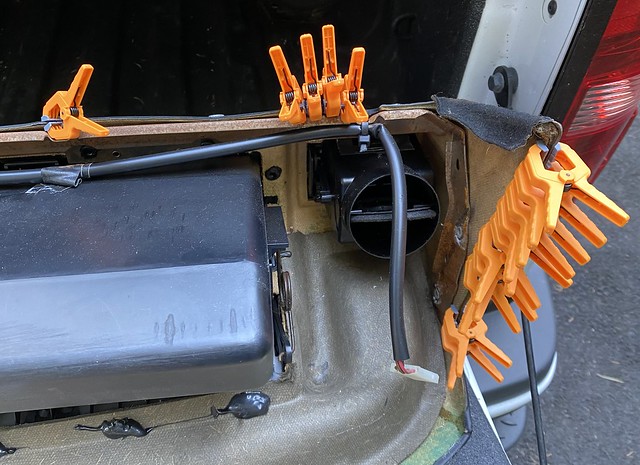
If you have not noticed in some of the photos, a lot of the dashboard edging is lifting up, so went ahead and repaired those areas.
Using 3M Scotch-Weld Super fast Instant Adhesive SF100, I add that to the edging and underneath areas of dashboard lifting and then using super small clamps to hold edging down this fixed all the areas on edging perfectly.
Waiting time on gluing is 5-10 minutes which is perfect.


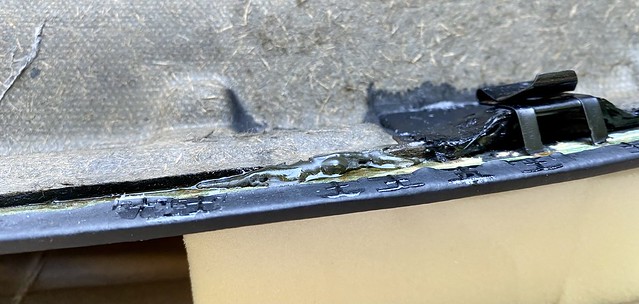
Idea of edging before and after
Before

After (adhesive you see on top, wipes off nicely with hot water on cloth.
Fixing the area of fiberboard where stereo secures too.
The inside area of fiberboard where the stereo of car goes, always ends up being damaged and in my case it too has screw holes and ripped, so will have to fix that and maybe add more structure in place to help support and secure stereo to dashboard.
Fixed this area with fiber glass and I think later on I will secure a metal bracket in there too so stereo can slot into it. Will provide that update on that solution later on.
Just noticed another area I need to fix in this photo - see more edging of dash cover coming away!
Fiberboard damaged

Taped up ready for fiber glassed applied
Applying fiber glass - I added 3 layers.

All done!

Next fix updates will cover;
Final stage of fixing dashboard - POR15 all metal structure and any last minute edge fixing!
Fixing my rear boot lock
Fixes to HVAC issues and service AC
Draining of engine coolant and service!
Little teaser…

Last edit: by madone_si
Madone with the two Cabs 82 (UK RHD) and 85 (US LHD) (92 sold)
�
�
Posted
Old Timer
When I bought the cabriolet one of the areas not working was the rear boot lock. I was lucky that it was in the unlocked position so I could open and close it, but I wanted to find out why it was not working with original key.
The outside lock and seal cover was broken and missing so had to order new parts for that too.
Here is what I found.
Here was the situation of rear lock

So time to remove the lock, this has to be done from inside the back side of boot.
Most will have a cover in this area, mine was already off, the cover is only held In place with 6 clips, just pull them out.

Then un-screw the two screws holding the lock in place. Notice there is metal bar attached to lock. Once you have screwed removed and can move lock backwards you can then turn and pull that metal bar out of the plastic clip. Note nearly 99% of time that small plastic clip will break so you will need to order a replacement for that.

See plastic clip on the back of lock in this photo. I actually managed to get the metal� bar out without breaking my clip and then placed it down and clip broke! Typical….

So now you have the lock off the vw, time to take the lock apart and see what is wrong.
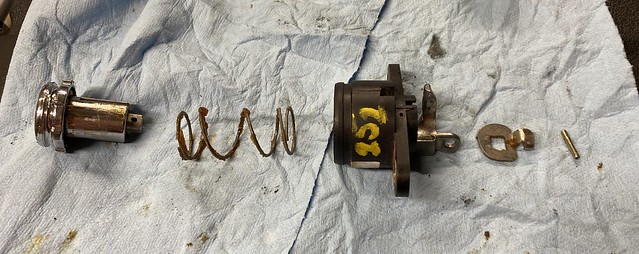
There is metal pin at the back of lock - you need to pull out. The best way I did this was put the lock in a vise and then using vice grips pulled on pin. Took at few goes and it come out. Be careful not to lose the pin!!
As you can see in photo the grease was more like jelly…
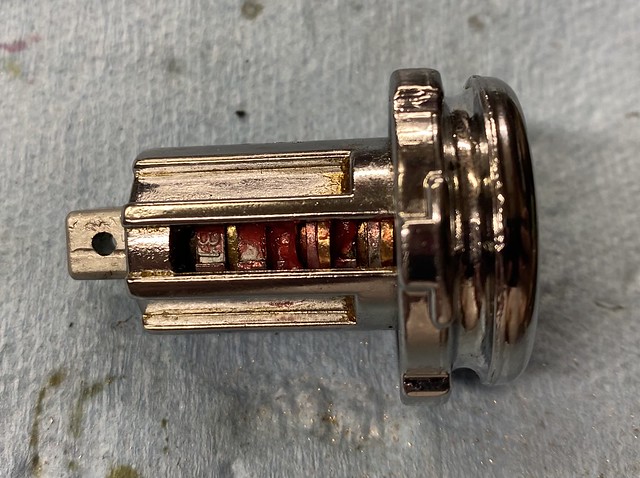
Now to take the barrel of lock out of its cylinder, do this nice and easy as you don't want to have the lock pins spring out..

Place the key back into the lock. This pulls or you hope all the lock pins down, I had to push down a few with small screw driver before the lock came out.


And lock out! You might not see it in photo but a few of pins are not properly sitting down and this is problem for lock to not work properly.. Time to investigate further

Now remove the key slowly, again making sure no pins spring out and get lost… I actually did this in a small plastic see through bag just in case. As you can see the grease is like jelly - the pins are clearly not moving up and down properly.

Next I took each pin out of the lock and placed on clean piece of paper and mark against the lock positions, I knew where to put the pins back.
I then cleaned the lock thoroughly with WD-40 and then using air compressor, cleaned out all WD-40. I did this 3 or times leaving soaking times of about 15 minutes each time and the amount of dried up grease that came out was not good.
Sadly my photos of this part was lost on my camera, but I have another lock I am doing for someone else and will update this part of my thread with photos from that one soon ( I promise)
I managed to recover one photo of pins out of the lock cylinder after clean up.

With the lock clean and pins cleaned too, I greased up the lock and put all pins back and then put the key back into the lock cylinder and guess what? All the pins now are flush with cylinder. Time to test..
See grease applied to lock
And the original key now works in the lock! (video!)
https://www.youtube.com/shorts/IlxiJ8T6sOI
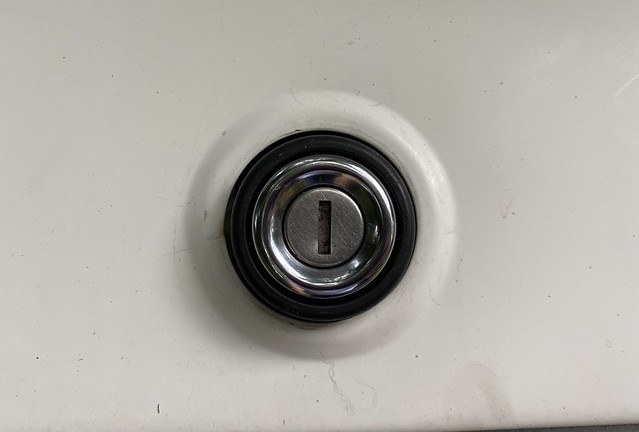
So now installed new lock cover and seal
Part 161827527 - this is the hatch lock seal ring - you have to install this first before you can put the lock back onto the car. This was completely missing on my car.

Before installing!

Installed! Trick for install.. Add little water to inside lip, makes it easier to install

Next installed the lock seal and cover� (I actually had these as spares from another lock, so not sure if you can buy these individually)

And installed! I also installed a new small clip on the back of the lock for the metal bar to lock into

Now I just installed the lock back into the vw, place the metal bar into the clip on back of lock and then placed into position slowly - not to push out the new hatch seal in place and then install the two screws and place the cover back in place.
And another item fixed
 Teaser on next update.. rebuilding of air vent unit!
Last edit: by madone_si
Madone with the two Cabs 82 (UK RHD) and 85 (US LHD) (92 sold)
�
�
Posted
Old Timer
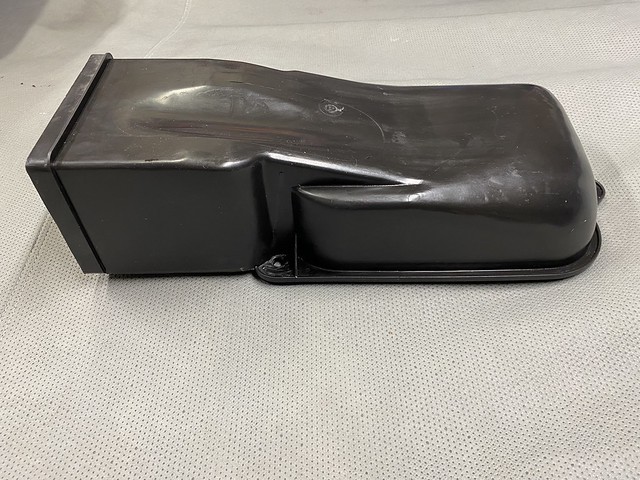
I am sure most of our cabs HVAC venting system has a lot of old broken foam, allowing leaks in the system and so this update is refurbing the two main covers that allows the fan motor to push the air from engine bay area into the cabriolet on the passenger side (US spec cars).
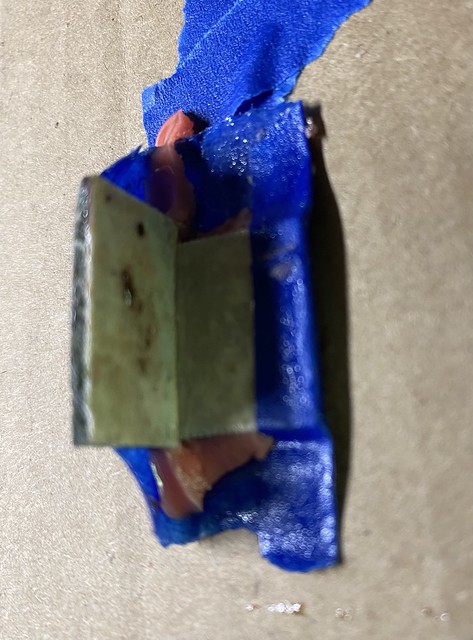
Here is diagram of those two covers;
Red box = (4) is the flap box (171-820-551-A)
Blue Box = (5) is the big main cover (171-820-565)
New foam OEM: Seal 321 820 061 D (1)

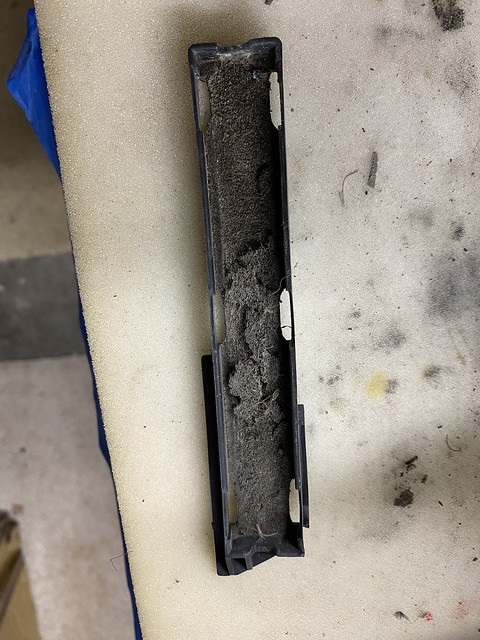
Started with the Flap box refurb.
Started to remove the old foam, using few tools (primary a big screw driver and Stanley knife)

Few minutes later all old foam is off

Old foam, was very hard

Moved onto dismantling the unit. Removed the middle foam. This was actually was in great condition, just very dirty. Will be able to reuse this one.

Popped out the end cap, so can remove the flap inside the box.
Disconnect the vacuum unit from the flap box side arm and pulled out of the unit (4 plastic clips holding in.)

I then disconnected the inside bar to the center flap pin and pulled the flap out. All parts now apart!

Moved onto the flap itself. It has thin layer of foam on both sides. Foam is actually worn away on both sides not sealing when in closed or open position.

I used a small scrapper to remove the old foam.

Cleaned up the plastic with little car wash and water and then buying new foam, cut the foam to size
(foam size is Foam seal tape, 1/2" Wide x 1/16" thick high density)

Foam installed on both sides.


I noticed that the flap moves around when in place, so did a little mod, you can see the clamp is spread out a little

To secure that clamp more, I drilled out a hole and added a split pin to bring the clamp inwards again. Nice easy fix.
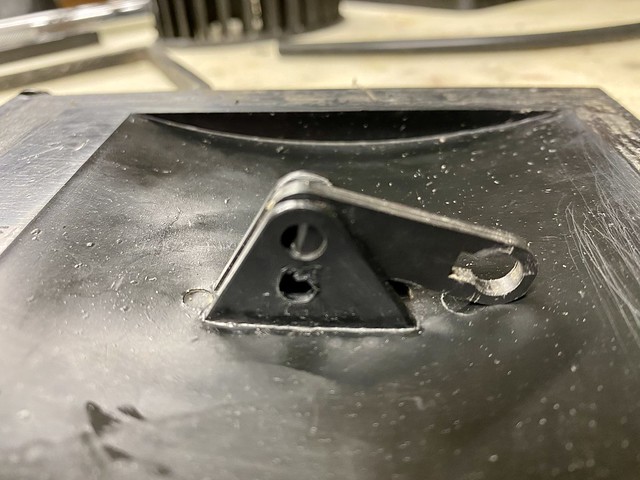
Add split pin through new hole


And on the other side of the split pin opened up the end of pins to bring in the clamp.

Compare before and after.

Now moved onto protecting the vacuum unit. I actually tested it before I metal prepped, taped up and painted this unit. (I will show you how to test these units later in this update)

Sprayed the metal with POR15 prep and the painted with POR15.

Add back onto the flap box

The flap end cover actually is in great shape but the foam has seen better days.
Stripped off the old foam and add new on.
(foam size is Foam seal tape, 1/2" Wide x 1/16" thick high density)

I then installed the flap back into the flap box and put the end cap back on. I moved onto testing the vacuum unit just to make sure it works like before I painted it.
Using a pressure/vacuum meter, connected up pipe to the vacuum unit and set to pull vacuum
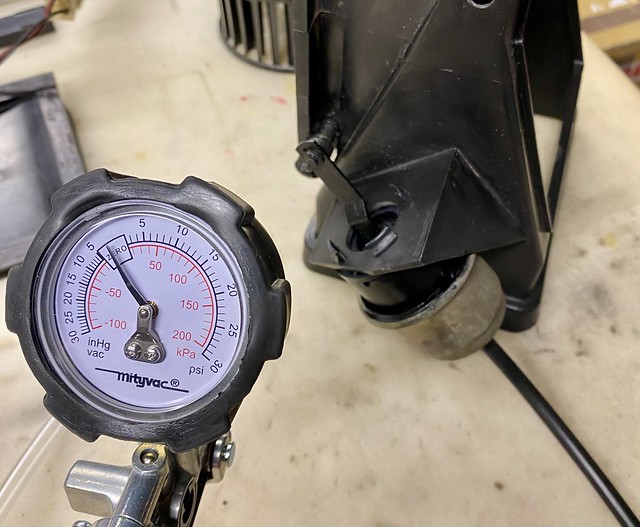
Set the pressure to 15in Hg.
If gauge holds steady at 15, then the servo is good, if not servo is faulty. I tested pressure for 5 minutes and it held vacuum.
Useful link for testing each vacuum units here: http://www.cabby-info.com/Files/HVACTesting.pdf

One more mod to add to the Flap box. I noticed that the top side of the unit has big hole and that can allow any small animals or leaves get into the covers, so I add a mesh cover to mine.

Trimmed down the mesh to size
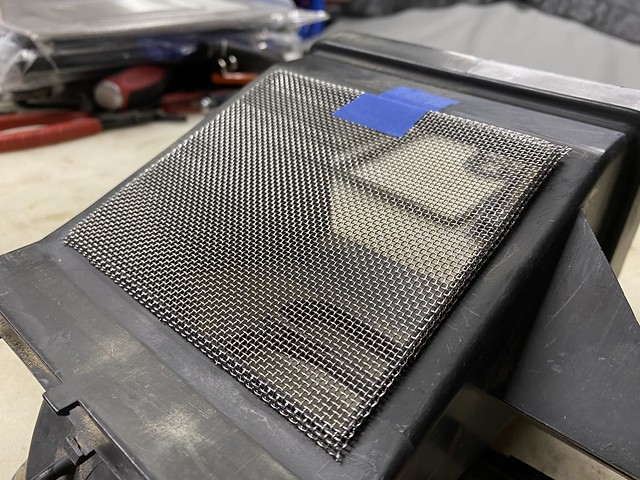
Taped up around the mesh, so I can add instant 3M liquid glue.

To hold the mesh down, I used one of my old power tool batteries to put pressure on mesh

I then taped up the middle part of mesh too, so I can add some water sealant to really hold mesh in place.

Few minutes after applying the sealant I removed all the tape. Let the sealant dry out overnight.

Then re-taped up the flap box where I did not want any paint to be exposed too and put Plastic Black paint on the edge of mesh.
And the finished product!

I added all new air pipes to the flap unit and then add the main underside new foam too.
(Foam size 1/2"W x 1/4"D)

Finished flap box refurbed ready to put back into the cabriolet.


Fan Motor big cover refurb
The cover itself was just fine, just required a good clean inside and out and then remove the old foam and apply new foam, which foam size is 1/2" W x 1/4"D)


Both units all done and ready to go back into the Cabriolet

Next up the unseen rust that prevents me from putting all my HVAC setup back in and dashboard!
Madone with the two Cabs 82 (UK RHD) and 85 (US LHD) (92 sold)
�
�
Posted
Old Timer
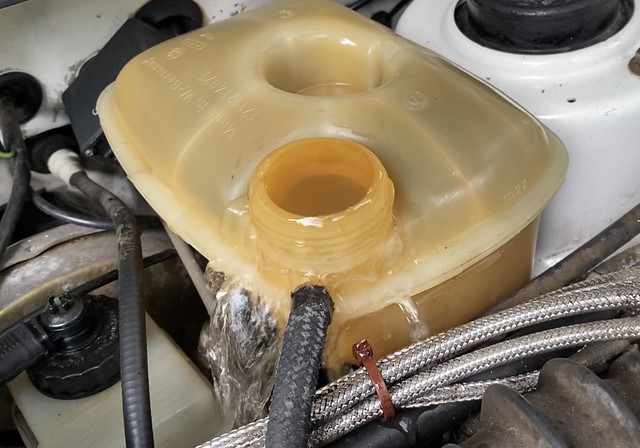
Finally got around to doing the Coolant flush on cabriolet.
So few reasons I am doing this. 1. No idea previous owner last did this, 2. all the time I've had the car it's had a bad smell from the expansion tank area, 3. the coolant color is just pure black which cannot be good. So here we go.
� �- My plan is to take out the radiator completely and flush and clean it inside and outside.
� �- Inspect all hoses to see if require to be replaced.
� �- Inspect thermostat and replace
� �- Take out expansion tank and flush and clean.
� �- Flush the system until clear water is appearing out of lower radiator, engine block hose and expansion tank.
Found all my part numbers here: https://volkswagen.7zap.com/en/rdw/golf+cabriolet/goc/1985-44/1/121-19000 (good diagram and what is what for cab)
There seems to be many great summaries and videos available, so please do your own research, but this is what I did.
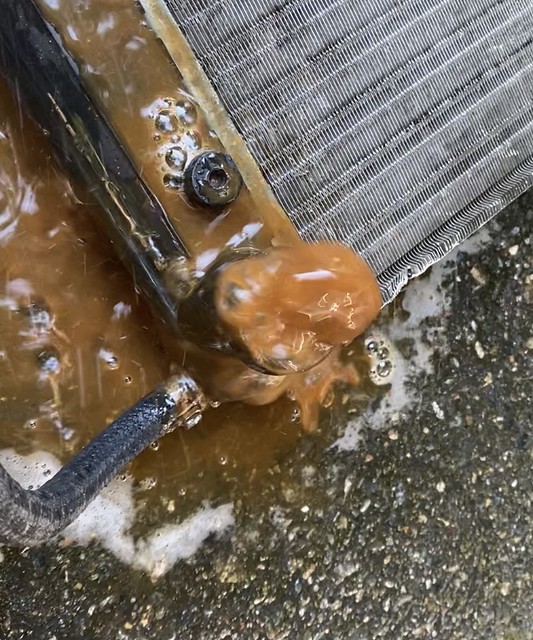
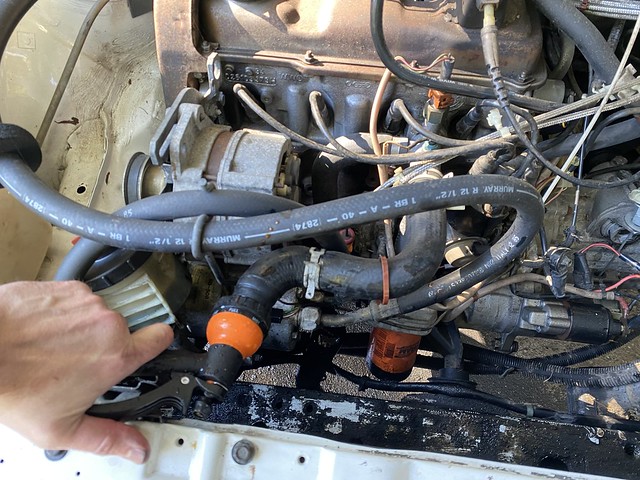
Due to I have power steering and AC on my VW cabriolet the easy way for me to get lower and upper pipes off easily from radiator is to remove the fan shroud first. There is 4 screw bolts (2 on each side) to remove this, you will also need to disconnect fan cable and side clamp that holds fan cable securely. With fan shroud out of the way, you can then open the spring clips from hose with vice grips and pull hoses off top/bottom radiator. Undo the two top screws �bolts and you should be able to remove radiator. You can then flush the radiator thoroughly until clean. My radiator was full of black coolant god knows what else.. It was actually really bad. Took a good 20 minutes to flush out, starting with black color, then yellow until it was clear water.
The outside of the radiator had a lot of dirt and other things on it, so using a copper brush, cleaned both front and back sides of outside of radiator. Cleaned up well and saw no damaged to radiator and no leaks.
Moved on to checking all hoses, most of the smaller hoses looked to be replaced from original, but the upper and lower main hose to radiator need replacing, so put order in for them.
I actually found that I don't have thermostat installed, which makes for flushing a lot easier and less work as you have to undo the power steering pulley to get to the thermostat housing.
I spent a good 30 minutes flushing the old coolant out of the engine and hoses, using hose pipe method starting at top radiator hose into the engine block. I blocked up the lower hose. Lovely hard yellow stuff came out of the expansion tank, until turned clear. Then did the reserve with flushing through the expansion tank until clear water was coming out of upper and lower radiator hoses.
Next was to remove the expansion tank and clean it. This to me is the one place I feel a lot of mess just stays in the tank and then gets pushed around the whole coolant system. I was amazed at how much mess had stuck to the sides of the expansion tank. After few flushes and using flexi wire brush I actually managed to get 99% of all internal mess out. Of course the tank is not like new (has that yellow color to the plastic), but I've got a new one on order.
After cleaning everything individually, I put all back in place and filled up system with just water and then ran the engine and let the coolant system get up to temperature. Once the fan kicked in and off few times I then shut off the engine. I then disconnected the lower radiator hose, still coolant system was light yellow. Flushed the system again and again about 3-4 times. Each time the coolant system getting cleaner and cleaner until last time coolant was clear and then this was when I actually installed new OEM coolant.
As most know adding fresh coolant will add air into the system, so I have bleeding funnel that you add to the expansion tank so you can always have enough coolant and when systems gets up to temperature (remember to set heater to HOT and turn air on so blows into the car) the air will force it way to the highest point which will be expansion tank and in the funnel. I actually had a lot of air bubble up with-in the first 5 minutes and then about 30 minutes later smaller bubbles.
I took off the funnel and sealed the system with the expansion tank cap and took the VW for drive about 20 minutes. I then inspected whole system, no leaks, color is nice OEM Coolant color now and steady temp showing through the dash cluster. The Fan kicks perfectly.
The only thing I have to do now, is installed the new higher and lower pipes, new expansion tank, (maybe a new thermostat) once they arrive. In long term I will treat and paint the fan shroud with POR15, when I do most of the rest of the engine clean up and painting.
So here is coolant in the system.


Made little video of steps I did and you can see the mess that comes out of radiator, expansion tank and system Vw Mk1 coolant flush
Undo screws bolts for Radiator shroud


Fan cable disconnect

Fan shroud removed

Un-clip upper and lower hoses and remove radiator screw bolts


Radiator out!

Cleaning of radiator


What came off radiator on outside.

Then Flushed out radiator and this is the mess coming out of it first of all (Black!) and then rust color and did this several times before clear water came out

After black mess, this is what came out of radiator after filling up with water and moving radiator up, down, back and forward to try and loosen up anything inside.
Expansion tank


Cleaning


Cleaned

Flushing system with hose method, force water through top upper hole and then through expansion tank
Look at the mess coming out of expansion tank

Clean water now coming out of the expansion tank, after several flushing.
Now showing clear water in bleeding funnel.


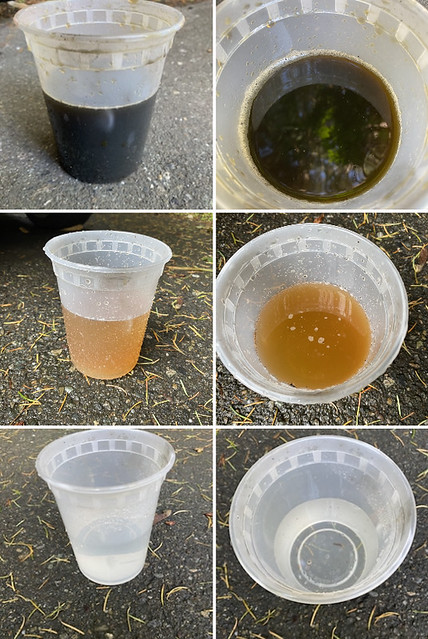
The evidence of before, during and after flushing
Adding new coolant (make sure for these older vw's its G11 (Blue) coolant. This one I am using as I have this (primary for later vw's 96+, but when you fully flush system like I have, you can add different coolant to your system, but you need to only then refill with that coolant. I highly advise you always use G11 (Blue) for mk1's vw's.


Coolant temperature just perfect

And the before and after coolant color

We be found rust!
And onto the area that is now stopping me from putting back in the dashboard and all the HVAC setup, I saw some paint bubbled up near front windscreen, dug a little at it and bingo load of rust and its gone all the way through and checked underneath and it needs fixing, so I am planning on pulling out the windscreen, getting this fixed, primed and painted and then new window rubber and window back. Update on that soon.

From underneath, you can see a line of rust, this runs along the bottom of where the front windscreen is and is very common rust area over time on vw mk1's.

Last edit: by madone_si
Madone with the two Cabs 82 (UK RHD) and 85 (US LHD) (92 sold)
�
�
Posted
Old Timer
Well few change of plans for 2022, was planning on updating about upgrading engine to 20v from Audi TT 225HP, but that is going to be stored for now for another project and managed to get a complete setup of 16v engine, manual gearbox, with powering steering and AC setup, brakes, loom - so I can keep all that setup in cab as part of engine conversion.
Happy days… I think long term this is much better engine for this kind of car anyhow.
Engine pic for excitement

Start the dismantle of engine and rebuild in coming weeks…. question now is do I go OEM or mod engine?
Madone with the two Cabs 82 (UK RHD) and 85 (US LHD) (92 sold)
�
�
There are too many online users to list.