


Chortles Project Green Rivage. New roof time....

Posted
Local Hero

Chortles Project Green Rivage. New roof time.....
got the kit back on, and straightened the hood up properly as the tonnaeu tabs were in the wrong place, eventually got the Rivage decals on and the anti stone chip foils too.
The tabs were sideways on.

so moved them back

Once adjusted the20 odd year old roof decide to give up and split, so had to patch it GRRRR. Won't have time to put a new one on before the AGM though.
Not pretty but should help a bit till I can sort her out.

New Rivage Decals

"Making Cabbies More Beautiful One Roof at a Time"�
Posted

Moderator


Posted
Settled In

Posted
Local Hero
"Making Cabbies More Beautiful One Roof at a Time"�
Posted

Settled In
.Just noticed the needles on your speedo and rev counter are red. They may have been changed, as it was only the Sportline needles that were red !.
The catalogues I have all show the needles to be white in the green rivage lth versions, and mine are white.
I know they are easy to change, and some folk who are not bothered about originality have changed
 .
.I spoke to a lad up here who also has a rivage in blue, and his needles are white.
Just a thought.
Good luck with the resto.
I'm taking mine off the road this year for a while to preserve the very low mileage and to address the minor blemishes/stone chips that I have picked up since purchase. I'm also thinking about restoring it, but won't be painting it. Got other ideas for the paint.
Cheers
David
1991 Golf GTi Rivage - Show Car 1983 Golf driver - Restoration Project
Posted
Settled In
will be in touch about the leather repaint you did

Posted

Settled In

Posted

Local Hero
Posted
Settled In
chortle said
Not pretty but should help a bit till I can sort her out.
dude.. where are you 'popper' points?

Local Hero
Last year managed to get a new top in the material I wanted. It was new but never fitted so dropped lucky when it came up. The only issue was there were no boot tabs. I had the suppliers details so gave them a call and they said they would send out some replacements. so that was a bonus.
Here is what arrived.

They looked a bit flimsy so I had some spare fabric left over from some fitting jobs so made these up instead.
much nicer.


Much better when you compare them

So on a dry warm day I cracked on with it.
Pull heater wires off and remove the black covers. Feed the wires out from the seal.


Next with cloth on foot press the rear window out starting in the corner. Helps if you have someone else the other side.

looking sad.

Now your'e faced with removing al those lovely staples lol

remove the rivet and washer just under the eccentric, on old hoods these straps tend to of snapped ages ago which gives that baggy effect of your hood flopping out he back instead of concertina folding. You'll need to re rivet the new hood straps here anyway.

Next job undo the tonneau cover trims.

Then remove the seals, start in the centre and slide inwards so you don't snap the end clips off.
On the rear seals winding the rear window down makes life so much easier.


Next was the screws that hold the retainer in place, I've had these screws rust out before so using my water pump pliers I managed to get a good grip to unscrew them.


I removed the retainers from the front and rear frame arms. You can do the centres as you will need to replace the foam gasket seals anyway.
On the fronts later cabbies have the screw through the front like this.

I use a trim tool to push under the seal to get them off.

Showing the remnants of the old sealant you must replace the sealant when you refit the seal.

So with the roof folded half way down I looked at the side tension cables which were snapped. I removed the remnants from the front nipple and the rear springs. The springs are located into pockets and looped over the cut out tab on the rear frame. Use the end of your screwdriver and tap the tabs open, you can reach in behind to un hook them.


Next job was top out those plastic clips that are through the fabric. You don't need to pop the others.

On the rear and front there may be a rivet here so use tap it off with your screw driver and hammer or you could drill it out. I refit new rivets as I go.

With roof down I undid the clamping strip and corner plates from the header and pulled the roof from the front of the frame. It revealed some small rust areas that were easily dealt with.


The old hood didn't need any persuading to come off the frame arms.. lol

Next was to undo the C Pillar cap screws and the seals them selves. If the tail is still intact you can just let them dangle for the moment.

This gives you acsess to the Rear cable nuts, so a flexi 10mm ratchet spanner did the trick.

One undone I pulled the rear of the hood from the channel and worked the old cable out. There's no point in reusing these cables as they stretch over the years.
The old top was now gone and I was time to inspect the frame and treat any rust areas and paint. Luckily apart from the front but there wasn't any. But I made sure that I cleaned all the old frame surfaces where the new top was going on and lubricated all the hinge/pivot points.
I faced with the usual interliner damage, so I made up some new cover sheets and set about making some repairs.


once all the capping was in place I trimmed the material flush with the front header and in line with the fold of the headliner at the rear.

I'd laid the hood out earlier to get warm and then fitted the side tension cables, using some stiff wire trough the pockets as a pull through. I attach loops of string either of the cables in case they creep inside the pocket when your fitting them, nothing worse than having to re do these fiddly things.


Next job place the roof on top of the car with the frame closed, make sure the hood is upside down. Sounds odd but you need to locate inline where the Straps are going to go through the padding and this is the easiest way. Once you've marked out make a cut with your blade.
You could find the original cut from underneath but make sure that the new straps are in line. The slit is in line with the rivet hole when the frame is down for reference.

Flip the hood right way up place the front header pocket over the front of the frame and feed the straps through

Using a bradawl make your holes and refasten with rivet and back washer remembering to fasten the headliner strap too.


Now with the roof half open I attached the front loops of the side cables over the nipples. You can tap the flange inwards so the cable doesn't slip off the nipple.

Then sliding the hood up the cable I fed the cable through the rear frame arm and attached spring and pocket cover re hooked over the tab and tapped the tab back into place holding the spring end.
That completes the side cables.


Next up was to trim the excess material from the bottom edge. You don't need the double layer here as it fouls the cable channel.


Time to feed one end of the new cable into the opening of the hood. Remember to pop the tabs on the other end before you feed that through.


Locate the stud ends into the brackets in the body and just pop the nuts on couple of turns will do.
Now we glue the side flaps onto the frame, making sure they are just right, not too high or to low.


Once your happy take your sharp knife and cut the square holes for those clips and refit the seal retainers once you've applied a new foam gasket.

Now centralise the hood and cable at the rear and drift them into position, pulling the corners over the ends and tightening the cable nuts alternately till the cable is seated.
Make sure you don't let the hood go sideways or the tabs go out of position.


Keep the corners lined up.

should look like this

Moving to the front fold the roof down and pull the front back off the frame apply glue and re fit.
You need to fit the clamping strip across the front start off with a couple of fixings and close the roof to see what the angle of the front edge is like, remember this needs to fit flush with the header seal, so this can take a couple of attempts to get it right, once your happy re apply all the screws and corner plates making sure you mould the corners of the hood over the frame corners so they point downwards.
The side flaps can be glued and the plastic clips replaced and the retainers screwed down.
Replace your rubber seals and the C pillar cap seal.
�Re-fix the tonnaue side trims making sure the screw pierces through the hood material at the main hinge fold.
Make sure the roof is up and latched shut.
Next is the window cut out.
Press the material against the frame underneath and mark the corners with Tailors chalk. Measure away from the the mark by 30 cm.
Make an X shaped cut to the marks. Then make smaller cuts the the corners. Do not go beyond those marks or you run the risk of the cut spreading beyond the frame area.
Now with your staple gun start stapling. I like to work from the top centre to the corners, pulling on the material to keep the tension.
Make sure you use plenty of staples in the corners. Again working from the sides downwards to the corners.
On the bottom section once the tension has gone it will be necessary to pull hard on the material to bring the tension back to that section otherwise it will go baggy.
Once it's stapled in run your sharp knife against the inside of the frame edge to remove the excess fabric
On refitting the window loop a length of paracord around the inner seal flange, I apply silicone lubricant here to help with process. cross the cord at the top.
Apply silicone sealant to the frame opening, lower bottom section of seal and window and push the paracord tails to inside the car.
Slide the window and seal down and using a trim tool work the seal over the inside edge of the frame from inside the car.
This really needs 2 people. Have one gently press and tap the seal down from the outside, whilst the person inside pulls the cord this should unfurl the seal back around the frame.
I use the trim tool to follow on behind to make sure the seal is seated correctly.
Now rethread your heater wires back into the openings in the seal and make sure they are pushed inwards so they don't foul the seal.
On the outside place masking tape around the seal edges and using a trim tool lift the seal edge now apply silicone sealant following from behind the tool.
One applied clean up remove and Tape.
Unfortunately the photos I had of this process are corrupt so when I do anther top I will re photo the process and edit here.
�
 Last edit: by chortle
"Making Cabbies More Beautiful One Roof at a Time"�
Local Hero

Thats why I had to sell it

Good work oh Chortley one
Posted

Local Hero

Golf GTI Campaign 1983 Mars Red, Ford S-Max 2015, Audi TT 180 quattro 2003, Fiat 500C 2013, Golf GTE MK7.5

�
�
Posted
Local Hero
window cut out semi stapled.

"Making Cabbies More Beautiful One Roof at a Time"�
Posted
Local Hero
Golf GTI Campaign 1983 Mars Red, Ford S-Max 2015, Audi TT 180 quattro 2003, Fiat 500C 2013, Golf GTE MK7.5
�
�
Posted
Local Hero
Looks like I'm missing a load of piccies doh!
"Making Cabbies More Beautiful One Roof at a Time"�
Posted

Local Hero

Andy
LINCOLNSHIRE REGION -�https://www.facebook.com/groups/467122313360002/
1983 MK1 Golf GTI Campaign Model - Under (looooong) resto!
1962 Rover P4 80
2002 BMW 745i
2008 BMW Z4 2.5Si
LINCOLNSHIRE REGION -�https://www.facebook.com/groups/467122313360002/
1983 MK1 Golf GTI Campaign Model - Under (looooong) resto!
1962 Rover P4 80
2002 BMW 745i
2008 BMW Z4 2.5Si
Local Hero
Been meaning to do it for ages now.
There's stuff I can add to make the roof fitting easier.
Looks like some of the pics are corrupted can't recover them.
I will add what I have got not sure if any of them taken at yours when doing the Blue Cabby roof would be ok. Did you take any Andy? If so could you send them me please.
Cheers
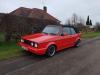
Heres one taken this morning

Last edit: by chortle
"Making Cabbies More Beautiful One Roof at a Time"�
Posted
Local Hero
"Making Cabbies More Beautiful One Roof at a Time"�
Local Hero
On the drive
T25 Diesel…sameoldblueshi� (currently under resto)
Rocco gt2….1990 secret 2…(currently under resto)
Mk4 99 1.8t indigo blue Gti with 43k miles
Caster 93 clipper JH Green cabby
Snowy 91 GTi White cabby( sat waiting for inspiration)
Myvalver 89 GTi Grey mk2 16v
Yuppy Flu 91 GTi Flash Red Sportline
�Golf mk1 owner's club on Spotify
Mk1 golf owners club playlist: Golf mk1 owner's club playlist - YouTube
Posted
Local Hero
We will have your two sorted mate. When you are ready.
"Making Cabbies More Beautiful One Roof at a Time"�
0 guests and 0 members have just viewed this: None.