


AL's (not so) mini build... August 2015 - Paint!

Posted

Local Hero


AL's "Mini Build" *04/12 - 6 months later...*

Andy
LINCOLNSHIRE REGION - https://www.facebook.com/groups/467122313360002/
1983 MK1 Golf GTI Campaign Model - Under (looooong) resto!
1962 Rover P4 80
2002 BMW 745i
2008 BMW Z4 2.5Si
LINCOLNSHIRE REGION - https://www.facebook.com/groups/467122313360002/
1983 MK1 Golf GTI Campaign Model - Under (looooong) resto!
1962 Rover P4 80
2002 BMW 745i
2008 BMW Z4 2.5Si
Posted
Local Hero
Made up a bit of a shelter to try and stop stuff falling on the paint…
 IMG_20150810_184427069 by www.pix-al.co.uk, on Flickr
 IMG_20150810_184438526_HDR by www.pix-al.co.uk, on Flickr
 IMG_20150810_190449613 by www.pix-al.co.uk, on Flickr
 IMG_20150810_190459422 by www.pix-al.co.uk, on Flickr
 IMG_20150810_195715050 by www.pix-al.co.uk, on Flickr
 IMG_20150810_195701772 by www.pix-al.co.uk, on Flickr
 IMG_20150810_195801168_HDR by www.pix-al.co.uk, on Flickr
I don't think this one came out quite as well as the other side, though again, for a rattle can on the drive, it looks ok.
Need to do the top half on this side too as you may recall the car sustained a little damage after an incident with the garage door frame. Just needs a tiny bit of filler to take out the wrinkles and should be ok.
At this rate, it shouldn't be long before it is all one colour again!
I have been looking at DA polishers to give the whole car a once over but didn't realise they were so expensive - thought I'd pick one up for about £30!
Anyone have any recommendations?
My Build Thread
All My Build Photos - https://www.flickr.com/photos/pix-al/albums/72157622794406840
My other hobby - www.pix-al.co.uk
All My Build Photos - https://www.flickr.com/photos/pix-al/albums/72157622794406840
My other hobby - www.pix-al.co.uk

Local Hero
On the rear panel just below the rear lights, I had "blended" the new paint into the old where I had to do a small filler repair on the driver side corner.
Once the paint had dried properly, you could see and feel this where the overspray from the new block of colour had faded over the older paint.
To rectify this, I had a go at wet sanding this area with some 2000 grit wet-n-dry then polishing it up using some T-Cut that I had.
I didn't manage to get a shot of the "before" that clearly showed the issue, though I took a couple of shots comparing the old paint, after a bit of a polish with the new paint after a polish…
This is the older paint from when the car was professionally done back in 2004. You can see the reflection details are quite clear:
 IMG_20150811_194829210 by www.pix-al.co.uk, on Flickr
And this is my new rattle can paint after a quick wet sand and t-cut:
 IMG_20150811_194743733 by www.pix-al.co.uk, on Flickr
Not too shabby eh! I am pleased with that! It is not too far away from the original finish!
It does mean that I need to wet sand and polish both lower rear quarters now though which will take a fair amount of elbow grease!
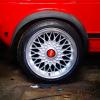
I have also started having a go at cleaning up one of the wheels.
When I acquired them about 12 years ago, they were new old stock from a motorsports company who were having a clear out.
They where in good shape, but given their age, the lacquer started lifting on them around the rim not long after they saw the British roads, so they need a little TLC.
I have decided to try and change them up a little and go with a black centre, but keeping the cut/polished spoke faces. I cleaned the first one down and keyed the surfaces of the silver paint and gave the centre a dose of black wheel paint:
 IMG_20150810_202027312 by www.pix-al.co.uk, on Flickr
 IMG_20150811_195535413 by www.pix-al.co.uk, on Flickr
After letting it dry I got to work with a knife blade and a sanding block:
 IMG_20150811_202748006 by www.pix-al.co.uk, on Flickr
 IMG_20150811_203838648 by www.pix-al.co.uk, on Flickr
It needs a little more work to get the aluminium surfaces a little smoother and shinier, but they will then get a good coating of lacquer to prevent them oxidising.
I don't want the polished to death look, just a nice clean alloy wheel.
A teaser against the car…
 IMG_20150811_203934427_HDR by www.pix-al.co.uk, on Flickr
With the black bumpers and the black side stripes applied, I think these will look spot-on!
That's all for now…
AL.
My Build Thread
All My Build Photos - https://www.flickr.com/photos/pix-al/albums/72157622794406840
My other hobby - www.pix-al.co.uk
All My Build Photos - https://www.flickr.com/photos/pix-al/albums/72157622794406840
My other hobby - www.pix-al.co.uk
Local Hero
Finished with the wet'n'dry and then went round all the bare alloy bits with a bit of autosol to bring up the shine.
Gave it a nice wash and dry:
 IMG_20150813_132826188 by www.pix-al.co.uk, on Flickr
Then after a bit of panel wipe, I started applying the lacquer:
 IMG_20150813_153202279 by www.pix-al.co.uk, on Flickr
It started going a bit cloudy, but I didn't panic and left it to dry.
After a couple of coats and some drying time (still sticky, but I think it will be for a good 12 hours), it looked OK.
Difficult to really see the finish in the pic, but it looks good in the flesh:
 IMG_20150813_165058650 by www.pix-al.co.uk, on Flickr
Started on the centre cap, though don't know if they will be going on as I quite like the raw look without them.
I think I'll do them all anyway but get some nice new shiny black wheel bolts to match the rims in case I want to remove them.
Once the lacquer is properly dry, I'll dress the tyre and get it on the car for a photo.

My Build Thread
All My Build Photos - https://www.flickr.com/photos/pix-al/albums/72157622794406840
My other hobby - www.pix-al.co.uk
All My Build Photos - https://www.flickr.com/photos/pix-al/albums/72157622794406840
My other hobby - www.pix-al.co.uk
Local Hero

My Build Thread
All My Build Photos - https://www.flickr.com/photos/pix-al/albums/72157622794406840
My other hobby - www.pix-al.co.uk
All My Build Photos - https://www.flickr.com/photos/pix-al/albums/72157622794406840
My other hobby - www.pix-al.co.uk
Posted
Old Timer

Posted
Local Hero
Local Hero
My Build Thread
All My Build Photos - https://www.flickr.com/photos/pix-al/albums/72157622794406840
My other hobby - www.pix-al.co.uk
All My Build Photos - https://www.flickr.com/photos/pix-al/albums/72157622794406840
My other hobby - www.pix-al.co.uk
Posted
Local Hero
 IMG_20150814_151101759 by www.pix-al.co.uk, on Flickr
Also touched up the rear lights.
A subtle little mod which only a handful of people have noticed over the years, but I like the way it looks and I like to be different:
 IMG_20150814_154512316_HDR by www.pix-al.co.uk, on Flickr
My Build Thread
All My Build Photos - https://www.flickr.com/photos/pix-al/albums/72157622794406840
My other hobby - www.pix-al.co.uk
All My Build Photos - https://www.flickr.com/photos/pix-al/albums/72157622794406840
My other hobby - www.pix-al.co.uk
Posted
Local Hero
I've not seen the red stripe done on the rear lights before, it will be interesting to see the end result

Andy
LINCOLNSHIRE REGION - https://www.facebook.com/groups/467122313360002/
1983 MK1 Golf GTI Campaign Model - Under (looooong) resto!
1962 Rover P4 80
2002 BMW 745i
2008 BMW Z4 2.5Si
LINCOLNSHIRE REGION - https://www.facebook.com/groups/467122313360002/
1983 MK1 Golf GTI Campaign Model - Under (looooong) resto!
1962 Rover P4 80
2002 BMW 745i
2008 BMW Z4 2.5Si
Posted
Local Hero
I had some other bits I needed to paint on the drivers side. The lower door section, sill plus the arch where I had to do a bit of work on the lip:
 IMG_20150816_151039669 by www.pix-al.co.uk, on Flickr
Masked up to the lower swage line and around the arch and unleashed can #3:
 IMG_20150816_174220292_HDR by www.pix-al.co.uk, on Flickr
I was going to try and feather the edge around the arch and blend the paint, but it just didn't look right. I could not get the old vs new to blend into one another without seeing some sort of line, so I flatted the front wing back again, and painted the whole lower section of the panel as I did the rear quarter:
 IMG_20150818_192019214 by www.pix-al.co.uk, on Flickr
now that the drivers rear quarter has had a week or so to harden off, I gave it a bit of a wet sand (2000 grit) and polish today.
It actually made quite a difference. The paint is much smoother and flatter. Not going to go overboard though as I don't want to go through the new top layer.
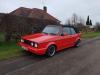
Also, couldn't resist fitting the finished wheel, rear bumper and rear lights for a quick pic.
 IMG_20150818_202316079 by www.pix-al.co.uk, on Flickr
Really starting to look like a car again now!
Oh - and a sneaky little arty shot that is now my mobile desktop wallpaper… IMG_20150818_205556 by www.pix-al.co.uk, on Flickr
 Last edit: by AL_Mk1
My Build Thread
All My Build Photos - https://www.flickr.com/photos/pix-al/albums/72157622794406840
My other hobby - www.pix-al.co.uk
All My Build Photos - https://www.flickr.com/photos/pix-al/albums/72157622794406840
My other hobby - www.pix-al.co.uk
Posted
Local Hero
 When will it be back on the road?
Andy
LINCOLNSHIRE REGION - https://www.facebook.com/groups/467122313360002/
1983 MK1 Golf GTI Campaign Model - Under (looooong) resto!
1962 Rover P4 80
2002 BMW 745i
2008 BMW Z4 2.5Si
LINCOLNSHIRE REGION - https://www.facebook.com/groups/467122313360002/
1983 MK1 Golf GTI Campaign Model - Under (looooong) resto!
1962 Rover P4 80
2002 BMW 745i
2008 BMW Z4 2.5Si
Local Hero
Hairyarse said
This is coming along nicely Al
Well…
It's been over 5 years so far. I'm nearly there, but winter is fast approaching.
I'd like to think it could be taxed and mot'd this year so it is ready to go come spring time, but we'll have to see…
My Build Thread
All My Build Photos - https://www.flickr.com/photos/pix-al/albums/72157622794406840
My other hobby - www.pix-al.co.uk
All My Build Photos - https://www.flickr.com/photos/pix-al/albums/72157622794406840
My other hobby - www.pix-al.co.uk
Posted
Old Timer
Posted
Local Hero
Rubbadubdub said
nice build so far mate, awesome job on the spraying too
Cheers man…
Just checked out your flickr stream - Some nice photography work in there.
I can't wait to get mine back into a suitable state to get out with the camera…

My Build Thread
All My Build Photos - https://www.flickr.com/photos/pix-al/albums/72157622794406840
My other hobby - www.pix-al.co.uk
All My Build Photos - https://www.flickr.com/photos/pix-al/albums/72157622794406840
My other hobby - www.pix-al.co.uk
Posted
Local Hero
I really want the deep duckbill spoiler to go on, though I know it is not going to survive the lumps and bumps of the roads around here as it will be very close to the road. For the time being, I thought I'd stick the small spoiler back on, though it needed a bit of repair as one of the ends was broken.
Broken end with a piece of PVC plastic shaped and glued in to place:
 IMG_20150830_181918990 by www.pix-al.co.uk, on Flickr
 IMG_20150830_182141555_HDR by www.pix-al.co.uk, on Flickr
Apply a bit of filler and shape:
 2015-09-08_06-39-58 by www.pix-al.co.uk, on Flickr
Can't see the end result too clearly, but I painted it up with some primer and black satin and stuck it back on the car:
 IMG_20150831_184313851_HDR by www.pix-al.co.uk, on Flickr
(Painted the red grille surround too…)
Also started wiring up the Polo clocks. Got some of the warning lamps and dash lights going. Bit hard to see in the flesh, partly due to it being day time and partly due to a flat battery struggling to power main beams and these leds! Managed to snap a pic though…
 2015-09-07_07-43-58 by www.pix-al.co.uk, on Flickr
Also found out that the clocks are showing a mileage reading of over 133k. Probably not too far off what the car has actually done!

My Build Thread
All My Build Photos - https://www.flickr.com/photos/pix-al/albums/72157622794406840
My other hobby - www.pix-al.co.uk
All My Build Photos - https://www.flickr.com/photos/pix-al/albums/72157622794406840
My other hobby - www.pix-al.co.uk
Posted

Old Timer
come on along way

Posted
Old Timer
Go to love the repair on the lower wing
Posted
Local Hero
On the drive
T25 Diesel…sameoldblueshi£ (currently under resto)
Rocco gt2….1990 secret 2…(currently under resto)
Mk4 99 1.8t indigo blue Gti with 43k miles
Caster 93 clipper JH Green cabby
Snowy 91 GTi White cabby( sat waiting for inspiration)
Myvalver 89 GTi Grey mk2 16v
Yuppy Flu 91 GTi Flash Red Sportline
Golf mk1 owner's club on Spotify
Mk1 golf owners club playlist: Golf mk1 owner's club playlist - YouTube
Posted
Settling In

Nice to see how you tackled the rear arches as I'll be doing mine soon.
0 guests and 0 members have just viewed this: None.