


16v engine in a MK1 by paul-c

Posted
Local Hero

16v engine in a MK1 by paul-c
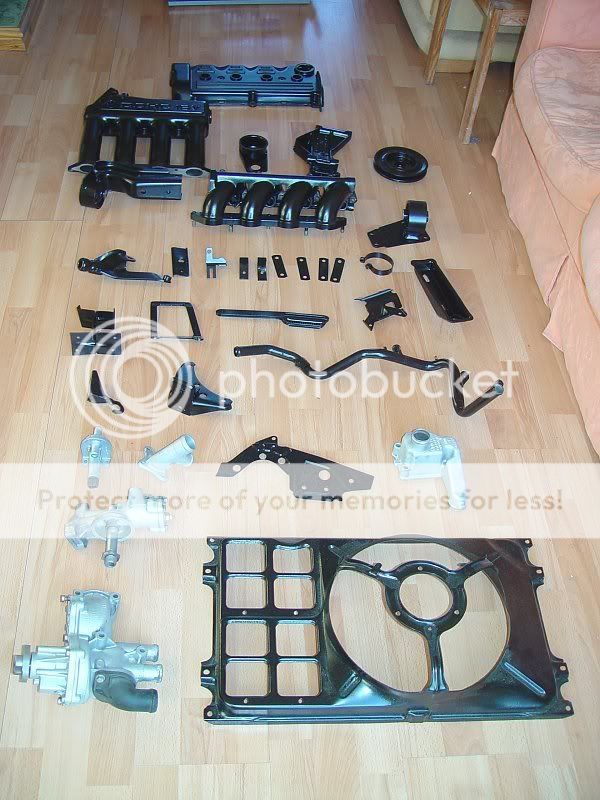
The parts have arrived back from being blasted and powder-coated, the quality of the finish is really good and should make the engine bay look smart:
All 16 valves have now been lapped in and the head cleaned up, ready for reassembly. Also, the stonechip within the engine bay has all been done, and I've done some 'corrections' using grey primer, after smoothing some of the runs in the stonechip paint. So its all ready for topcoat, which will be done in stages again:
So now, I have all the parts I need to bolt it back together (I think!), the only real concerns are the distributor cap (but I've heard using the 16V master cylinder, I should be okay with this). There's a bit of rewiring but I'm not too worried about that.
��������������������������������
Posted
Old Timer

This is going to look really smart :y:.
Slap an ABF cap on there as well as 16V M/C and reversed 16V fluid tank :y:.
Slap an ABF cap on there as well as 16V M/C and reversed 16V fluid tank :y:.
Mk1 Golf 16V Conversion FAQ Zip, now located at in the Forum WIKI section:�http://vwgolfmk1.org.uk/index.php?page=cedi&type=misc&id=42%2F26%2F3
Posted
Old Timer
lookin good - like the black on the engine parts will look sharp 8)
Posted
Local Hero
Those engine bits look really nice in black…
Would you mind telling me how much you paid to have them all sand blasted and powder coated?
Thanks
Rich
Would you mind telling me how much you paid to have them all sand blasted and powder coated?
Thanks
Rich
Posted
Local Hero
mcscrew said
Those engine bits look really nice in black…
Would you mind telling me how much you paid to have them all sand blasted and powder coated?
Thanks
Rich
?110 for what you see in the pic. Most of the stuff was powder coated, the smaller aluminium items were left as-is, though.
��������������������������������
Posted
Old Timer
The powder coating looks great… Pretty good price too. Did you just send the parts as is or did you have to clean them up first? I'm guessing they shotblast them for you before powder coating?
<edit> Nevermind… Just read your post again! <edit>
<edit> Nevermind… Just read your post again! <edit>
Posted
Local Hero
paul_c said
?110 for what you see in the pic. Most of the stuff was powder coated, the smaller aluminium items were left as-is, though.
Wow - that's a lot less than I was expecting… I may do the same for my new project…
Thanks
Rich
Posted
Local Hero
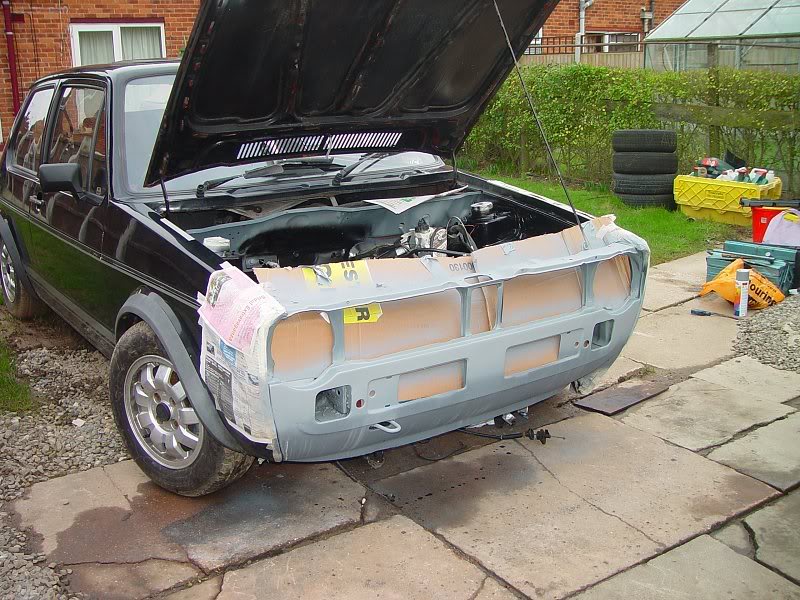
The engine bay is nearly done, most of the paint is on. I just need to make neat the front panel with a skim of knifing putty (applied and waiting for it to dry out) then I can apply the rest of the black paint. Pics to follow.
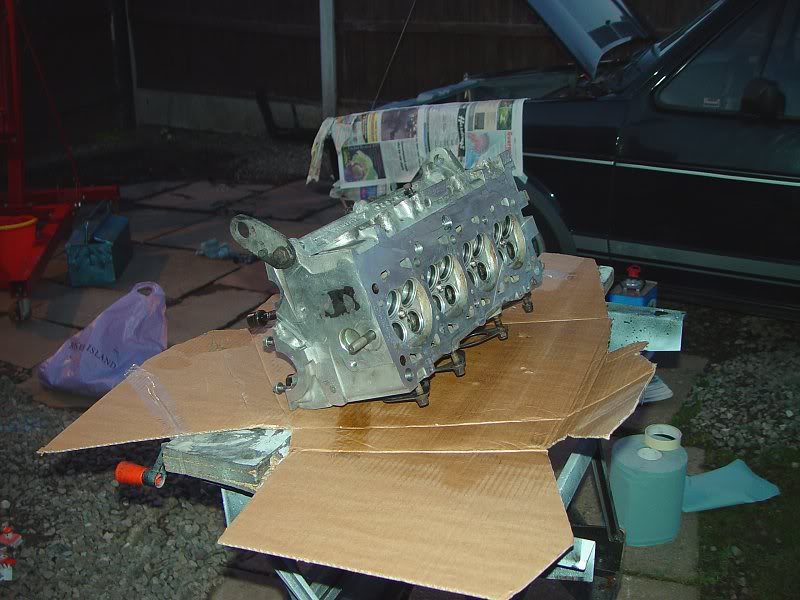
The cylinder head is nearly rebuilt, all I have to do is refit the cams then attach it to the engine again. I tried to take pics of the reassembly but the flash didn't go off, so the pics didn't come out great and I've tried to enhance them in Photoshop. Anyway….
Laying out the parts ready for cleaning and refitting. Note the dish with oil in it, smothering the valve stem seal in oil.
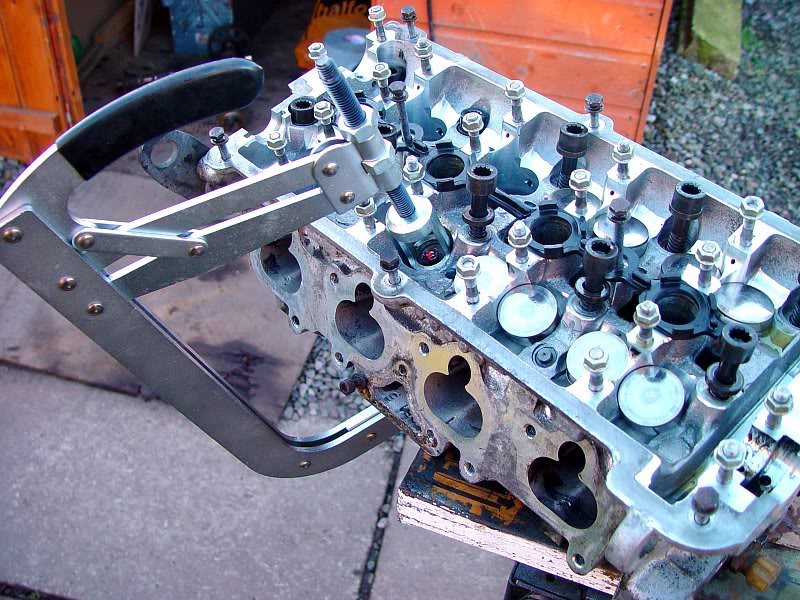
The middle valves are most awkward, I needed to dangle the head on the edge of the workbench. Valve stem seal is pushed in with an 8mm x 3/8" drive socket.
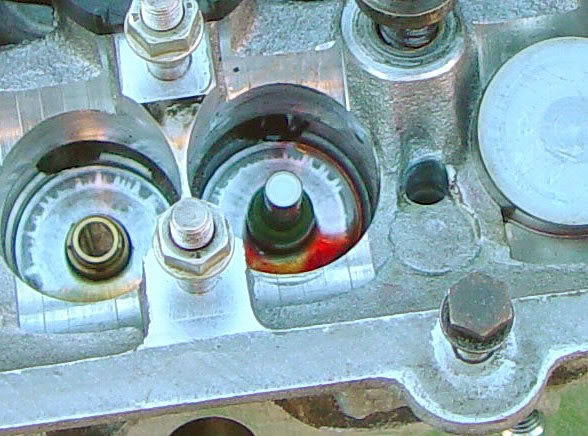
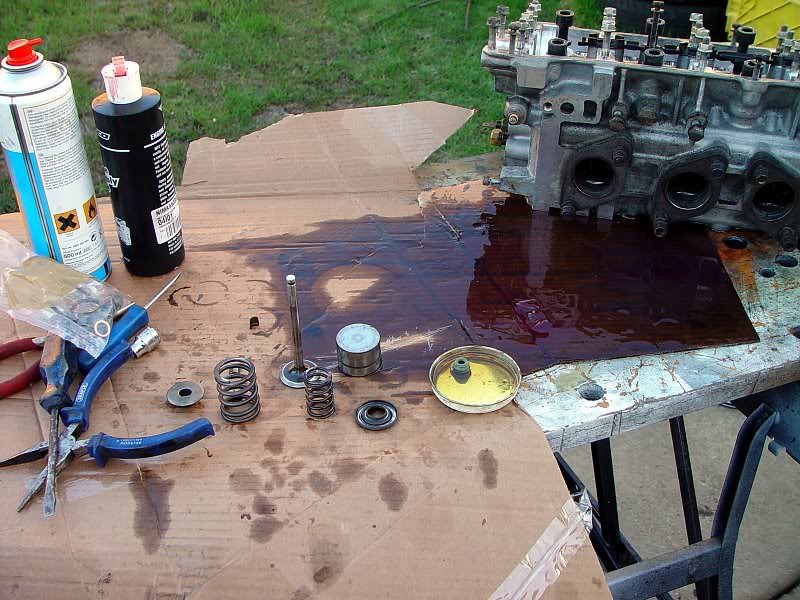
Close-up showing the valve stem seal in place. Note the red stuff, which is engine assembly lube, a thick and sticky lubricant

This is the trick I found works best. I put the bottom spring cup in, then both springs, then the top spring cover, then the collets, before fitting the valve spring compressor tool over it all
The tool is fitted and very gradually I wound down the spring, during which I ensured the tiny collets were more or less in place. Once wound down enough, I could push one collet onto the recess and the assembly lube held it there; then a wound down a little further and I could push the other one in. Then wound it all up again.
After this, a test 'press' on the valve is done, to make sure everything stays in place (but you can see the collets going on properly), then dousing the valve in engine oil, followed by a blob of assembly lube which would stay in place even if the oil drains away between now and startup. Finally, the tappet is cleaned up and popped over the top.
The cylinder head is nearly rebuilt, all I have to do is refit the cams then attach it to the engine again. I tried to take pics of the reassembly but the flash didn't go off, so the pics didn't come out great and I've tried to enhance them in Photoshop. Anyway….
Laying out the parts ready for cleaning and refitting. Note the dish with oil in it, smothering the valve stem seal in oil.
The middle valves are most awkward, I needed to dangle the head on the edge of the workbench. Valve stem seal is pushed in with an 8mm x 3/8" drive socket.
Close-up showing the valve stem seal in place. Note the red stuff, which is engine assembly lube, a thick and sticky lubricant
This is the trick I found works best. I put the bottom spring cup in, then both springs, then the top spring cover, then the collets, before fitting the valve spring compressor tool over it all
The tool is fitted and very gradually I wound down the spring, during which I ensured the tiny collets were more or less in place. Once wound down enough, I could push one collet onto the recess and the assembly lube held it there; then a wound down a little further and I could push the other one in. Then wound it all up again.
After this, a test 'press' on the valve is done, to make sure everything stays in place (but you can see the collets going on properly), then dousing the valve in engine oil, followed by a blob of assembly lube which would stay in place even if the oil drains away between now and startup. Finally, the tappet is cleaned up and popped over the top.
��������������������������������
Posted
Local Hero
Nice work 
This will definitely come in handy for me as I refurb my spare head, especially the method of putting it all back together…
Cheers
Rich
This will definitely come in handy for me as I refurb my spare head, especially the method of putting it all back together…
Cheers
Rich
Posted
Old Timer
Have valve compressors if you wanna borrow them Rich :y:
Mk1 Golf 16V Conversion FAQ Zip, now located at in the Forum WIKI section:�http://vwgolfmk1.org.uk/index.php?page=cedi&type=misc&id=42%2F26%2F3
Posted
Local Hero
That would be cool! I'll be in touch…
Rich
Rich
Posted
Guest user
WOW im loving this thread
i have just bought a complete passat 2.0 16v
what gearbox are you putting on to the engine? i think i might have missed it as the gearbox/clutch/flywheel conversation really lost me.
i was thinking of putting my 1.6 8v gearbox on to it? or would a 1.816v gearbox suit it better?
i have just bought a complete passat 2.0 16v
what gearbox are you putting on to the engine? i think i might have missed it as the gearbox/clutch/flywheel conversation really lost me.
i was thinking of putting my 1.6 8v gearbox on to it? or would a 1.816v gearbox suit it better?
Posted
Local Hero
One thing I'm unsure of is which gearbox to use. So initially I'm keeping the same 8V (code 9Y) 020 gearbox, its on its way out anyway…. By the way, there's so much conflicting stuff about gear ratios out there anyway, its difficult to wade through the rubbish and get to the real facts.
Basically, 1.6 Mk1 GTI is a lower ratio, 8V and 16V GTI are all the same ratios, some later ones had a higher 2nd to reach 0-60mph in 2nd (better time on paper, not actually a real-world advantage??) or you could go for a non-GTI 5 speed which will be non-close-ratio; or a diesel box for higher gearing.
Basically, 1.6 Mk1 GTI is a lower ratio, 8V and 16V GTI are all the same ratios, some later ones had a higher 2nd to reach 0-60mph in 2nd (better time on paper, not actually a real-world advantage??) or you could go for a non-GTI 5 speed which will be non-close-ratio; or a diesel box for higher gearing.
��������������������������������
Posted
Local Hero
Bit of a slow weekend, but here's an update. Some of this stuff is nothing to do with the engine conversion, but since the car's in pieces and I have no time pressures, it makes sense to do them now.
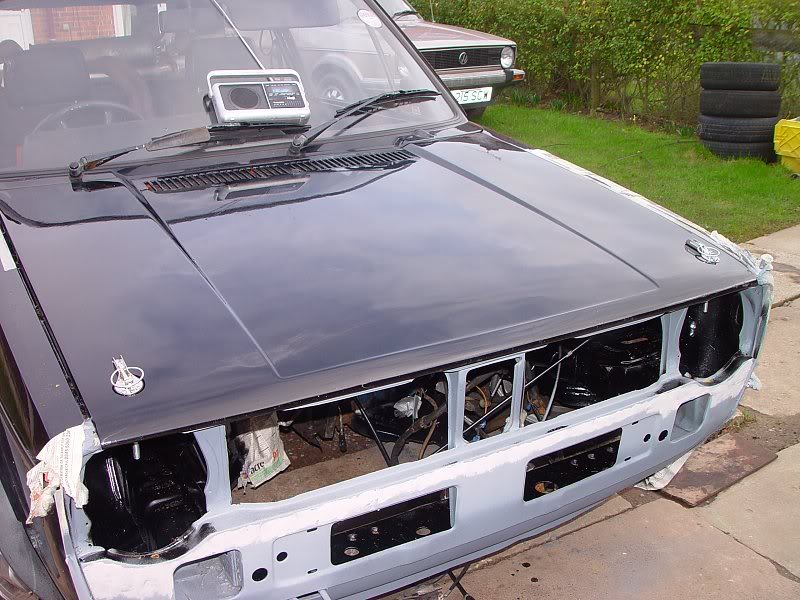
Since having the inconvenience of the bonnet flipping up when I went over the rumble strip at Snetterton, I've decided to fit bonnet pins.
The front panel had poor paintwork, so I'm seeing to this also. Here it is in primer, almost ready for top coat.
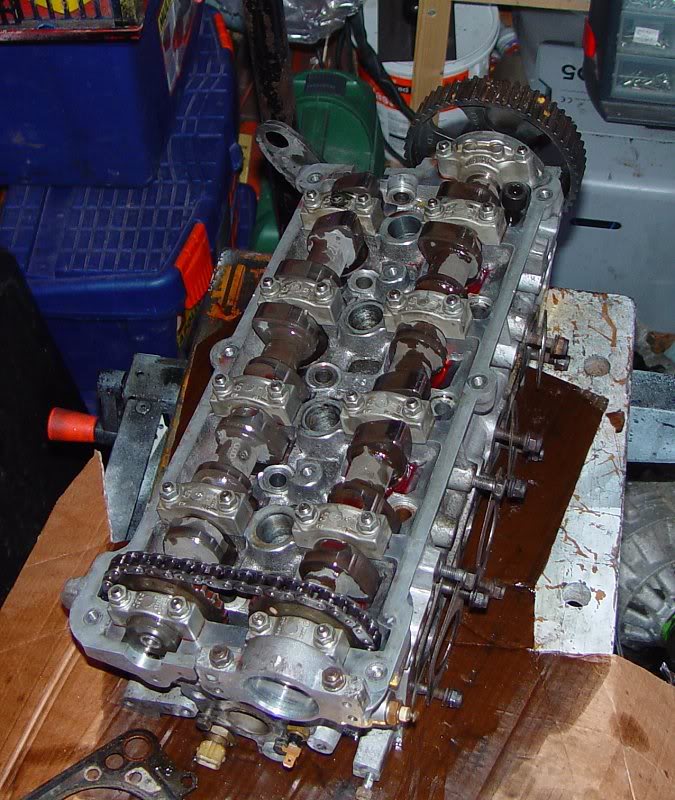
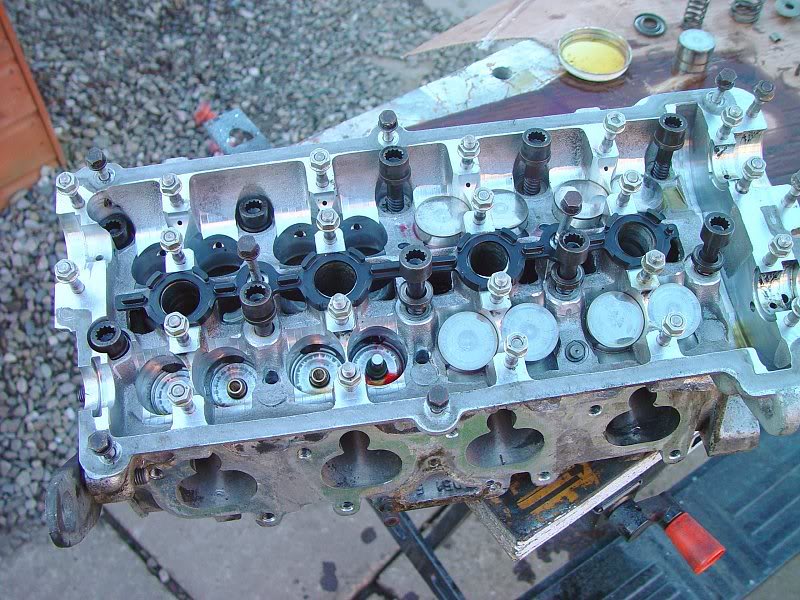
The head is all screwed together and bearing caps torqued up.
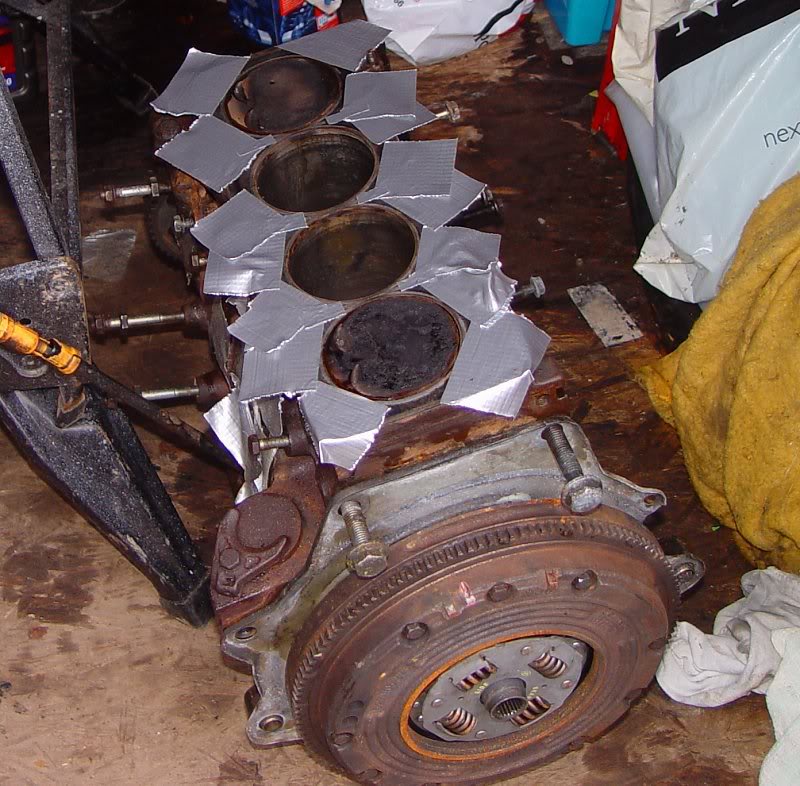
The tops of the pistons are very grubby with carbon build-up over the years. Duct tape is used to cover the holes and a ring of grease is put around the top edge of the bore, before a pair of pistons is brought up to TDC. Then the piston is very carefully wire brushed clean, dirt wiped away (the grease helps catch it all), the piston put down again and the bore given a wipe.
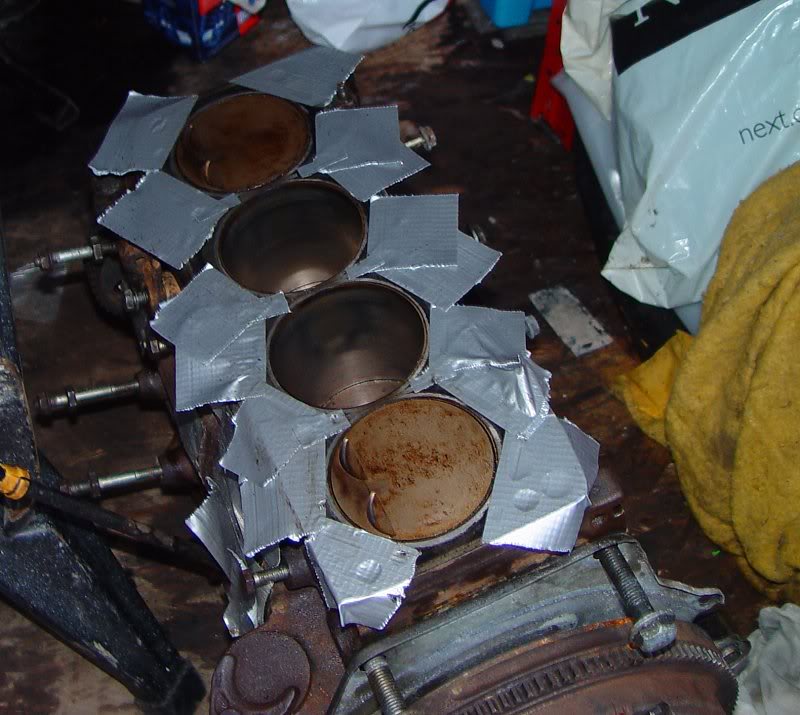
Here's the finished result, free of serious carbon deposits.
Since having the inconvenience of the bonnet flipping up when I went over the rumble strip at Snetterton, I've decided to fit bonnet pins.
The front panel had poor paintwork, so I'm seeing to this also. Here it is in primer, almost ready for top coat.
The head is all screwed together and bearing caps torqued up.
The tops of the pistons are very grubby with carbon build-up over the years. Duct tape is used to cover the holes and a ring of grease is put around the top edge of the bore, before a pair of pistons is brought up to TDC. Then the piston is very carefully wire brushed clean, dirt wiped away (the grease helps catch it all), the piston put down again and the bore given a wipe.
Here's the finished result, free of serious carbon deposits.
��������������������������������
Posted
Old Timer
Looking good. Wish I'd thought of the duc tape over the oil / waterways when I cleaned mine up… Still. Just let it run for a few hundred miles and changed the oil / filter and water… It's always the simple things!
Posted
Old Timer
Bloody good thread this 
Mk1 Golf 16V Conversion FAQ Zip, now located at in the Forum WIKI section:�http://vwgolfmk1.org.uk/index.php?page=cedi&type=misc&id=42%2F26%2F3
Posted
Guest user
mite sound abit stupid this but i dint get a thing you said about the gear boxes? i dnt no the code names for the gearboxes :dontknow: so in my language is the 1.8 16v gear box your putting on to the 2.0 (isit a 9a?) or the 1.8 8v gear box?  ops:
ops:
another thing will the 1.8 16v conversion manifold fit on the 2.0 engine or will i need ot buy another one? :dontknow:
i am loving you motor mate 8) 8)
ops: another thing will the 1.8 16v conversion manifold fit on the 2.0 engine or will i need ot buy another one? :dontknow:
i am loving you motor mate 8) 8)
Posted
Local Hero
kultzz_mk1 said
mite sound abit stupid this but i dint get a thing you said about the gear boxes? i dnt no the code names for the gearboxes :dontknow: so in my language is the 1.8 16v gear box your putting on to the 2.0 (isit a 9a?) or the 1.8 8v gear box?
There's 2 'families' of gearbox you need to worry about - 020 and 02a. The Golf Mk1 and Mk2 (and most Mk3 except 16V and VR6) used 020 boxes (on big block engines). The Passat, Golf Mk3 16V, Corrado (?) used 02a gearbox.
The 02A 'box has cable change, hydraulic clutch, and a different shape (so it needs expensive and/or custom made mounts) (and obviously, conversion to cable change gearstick, and a hydraulic clutch master cylinder, etc) So its a lot of hassle to install but its stronger and better design, and I think they have higher ratio versions too.
The 020 box is what came with the Golf Mk1 originally, so there are no problems fitting - except that the design of the flywheel/clutch is different. The 020 uses a clutch which is all reversed and the pressure plate is inside the flywheel. If a normal engine has: flywheel, friction disc, pressure plate, gearbox hanging off it in that order, the 020 has: pressure plate, friction disc, flywheel, gearbox hanging off it. The input shaft of the box goes through the hole in the centre of the flywheel, to hook up to the friction disc.
I'm putting a 1.8 8V gearbox in (the original one), for now. There are loads of different codes but there are these important differences over the years/variations:
Early (all Mk1 hatchbacks, early cabbies) had 90mm driveshaft flanges and 22mm input shaft
Late cabby, Mk2 GTI 8V has 100mm driveshaft flanges and 22mm input shaft
Mk2 GTI 16V has 100mm driveshaft flanges and 24mm input shaft.
Since the gearbox's input shaft connects to the friction disc, you need to use the right friction disc to match the box (22 or 24mm shaft fitting)!
kultzz_mk1 said
another thing will the 1.8 16v conversion manifold fit on the 2.0 engine or will i need ot buy another one? :dontknow:
i am loving you motor mate 8) 8)
Yes, so long as you're not using a 'tall block' 2.0l 16V - eg the ABF engine code. 9A, 6A and ACE are the codes you're after - this is a 'non-tall block' (don't really want to say short block) but 2 litres and 16 valves. Its externally the same size as the 1.8 16V (KR engine code), hence external parts bolt on and fit nicely.
There's a choice of about 3 companies who supply conversion manifolds. I believe 1 or 2 of these (not Ashley) have a design which allows the height of the downpipe to be adjusted, so it fits the tall block. Also, some people have been able to make an Ashley manifold fit the tall block without issues, others have had issues.
��������������������������������
Posted
Old Timer
The main four options (in the UK), in price order are Ashley, Storm Developments, Raceland (import from german on ebay) and Supersprint (the last two being height adjustable). The other option is to find a Scirocco 16v exhaust manifold, either OEM (RARE), or Aftermarket (Eurotec etc), both found in the states.
The track and 1/4 mile guys use the 1.6 GTI box for low down canage :y:
I didnt realise the mk3 used the O2O box as well…bonus!
Personally i'd just slap the 1.6 box in. I'm running the 1.8 8v box like Paul is going to. No probs at all :mrgreen:
Paul, do you need some 100mm flanges for your box? If you do let me know and i'll prob be able to get some, I had to do the same.
Mk1 Golf 16V Conversion FAQ Zip, now located at in the Forum WIKI section:�http://vwgolfmk1.org.uk/index.php?page=cedi&type=misc&id=42%2F26%2F3
Posted
Local Hero
ManicGTI said
Paul, do you need some 100mm flanges for your box? If you do let me know and i'll prob be able to get some, I had to do the same.
Cheers, I'll let you know once I've decided which box I'm going for - my current box is rather tired, so it will probably be replaced soon anyway. I'd do the upgrade to 100mm flanges too, at that point. But, I might end up obtaining a box with the big flanges already.
��������������������������������
0 guests and 0 members have just viewed this: None.