


Mk1 Golf Gti 83 Restoration Update 2/2/2012

Posted
#1081979
(In Topic #129531)
Old Timer


Mk1 Golf Gti 83 Restoration Update 2/2/2012
Hi guys,
Just a quick introduction before the mayhem begins, you might recognise the car as its from a previous owner on the forum (my brother Jon-boy). I'm about to take on the massive challenge of restoring her. I'm a bit of a dab hand at DIY and mechanics in general but have never taken on anything of this scale.
The direction of the build
I want to keep the car looking relatively OEM, no drastic external changes. I want to make the interior fresher and modern without losing the classic look. Finally the engine bay will have a clean up and possibly a further conversion .
.
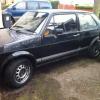
The car a year ago :-


Heres the low down :-
She is in good nick but will require a bit of body work, I plan to strip it down and restore it bit by bit and finish it off with a nice fresh coat (not sure if I should keep it Mars Red though?).
The engine is sweet and was rebuilt 2 years ago.
The engine has been upgraded with a 2 litre Mk3 Golf bottom end, mk1 8v 1.8 gti head (heavily gas flowed and ported), wild cams and ported polished audi tt throttle body.
Areas that need work :-
Rust around the fuel filler cap
Rust on rear archs
Rust on rear valance
Rust spots on sills (needs further investigation)
Sun roof shot
G60 BBS wheels - require refurbishment
I have some brand new panels ready to go
Just a quick introduction before the mayhem begins, you might recognise the car as its from a previous owner on the forum (my brother Jon-boy). I'm about to take on the massive challenge of restoring her. I'm a bit of a dab hand at DIY and mechanics in general but have never taken on anything of this scale.
The direction of the build
I want to keep the car looking relatively OEM, no drastic external changes. I want to make the interior fresher and modern without losing the classic look. Finally the engine bay will have a clean up and possibly a further conversion
.The car a year ago :-
Heres the low down :-
She is in good nick but will require a bit of body work, I plan to strip it down and restore it bit by bit and finish it off with a nice fresh coat (not sure if I should keep it Mars Red though?).
The engine is sweet and was rebuilt 2 years ago.
The engine has been upgraded with a 2 litre Mk3 Golf bottom end, mk1 8v 1.8 gti head (heavily gas flowed and ported), wild cams and ported polished audi tt throttle body.
Areas that need work :-
Rust around the fuel filler cap
Rust on rear archs
Rust on rear valance
Rust spots on sills (needs further investigation)
Sun roof shot
G60 BBS wheels - require refurbishment
I have some brand new panels ready to go
Posted
Local Hero

looks like a good starting block,
foxy
foxy
Posted
Old Timer
Ok, well cracked on Saturday but the camera died so took some snap shots quickly this evening to show progress. Managed to remove all glass, doors, tailgate, headlining and finally the dreaded sunroof (more of that later!).

Bit of rust along the glass seal but doesn't seem to be anything on the underside which is good.

No sign of rust coming through the tar covered floor but I will chisel that back this weekend to reveal any hidden tin worm.


When I pulled the aftermarket sound proofing back it revealed the primed floor, signs of light surface rust, hopefully not so bad once its been revealed.

Ah the sun roof, it was a complete state and not properly isolated from the roof skin. Will clean it back at the weekend but think a new roof skin may be in order


Finally the scuttle panel where the glass seal meets, think I might need to replace this bit lol.


The only major concern is the roof at the mo, there is a slight tear near the sunroof panel and rust that has penetrated from underneath to the top (only slightly visible from the surface).
Bit of rust along the glass seal but doesn't seem to be anything on the underside which is good.
No sign of rust coming through the tar covered floor but I will chisel that back this weekend to reveal any hidden tin worm.
When I pulled the aftermarket sound proofing back it revealed the primed floor, signs of light surface rust, hopefully not so bad once its been revealed.
Ah the sun roof, it was a complete state and not properly isolated from the roof skin. Will clean it back at the weekend but think a new roof skin may be in order
Finally the scuttle panel where the glass seal meets, think I might need to replace this bit lol.
The only major concern is the roof at the mo, there is a slight tear near the sunroof panel and rust that has penetrated from underneath to the top (only slightly visible from the surface).
Posted
Settled In

Nice work, Looks exactly like my mk1 campaign even got same g60 alloys . Anyway there was a guy on ebay today who had a mk1 gti shell he was prepared to remove the roof (factory sunroof) as it was rust free and sell seperatly just thought i'd let you know have a browes on ebay if you can't find it let me know and i have search for you. Keep up good work !
Posted
Old Timer
Thanks for the tip off, think I will need a replacement section for the windscreen scuttle panel and roof at the mo.
If anybody has anything give me a shout.
If anybody has anything give me a shout.
Posted
Old Timer
OK bit of a delay since I posted last on this, have been slowly amassing tools and getting the garage sorted so I have plenty of space.
This weekend I managed to get the car on my rotisserie frame. I've modified it with castor wheels so the whole shell can be pushed around the garage.


This weekend I managed to get the car on my rotisserie frame. I've modified it with castor wheels so the whole shell can be pushed around the garage.
Posted
Old Timer
More pics :-


Posted
Old Timer
This weekend I will be removing the underseal and practice weld a bit more.
Managed to borrow dads air compressor and have loads of new air tools to play with
and practice weld a bit more. Managed to borrow dads air compressor and have loads of new air tools to play with
Posted

Local Hero


You've got some work to do but it will be so much easier with the car on it's side, wish I had space in my garage to do that - it would be a lot less back breaking!!
Andy
LINCOLNSHIRE REGION -�https://www.facebook.com/groups/467122313360002/
1983 MK1 Golf GTI Campaign Model - Under (looooong) resto!
1962 Rover P4 80
2002 BMW 745i
2008 BMW Z4 2.5Si
LINCOLNSHIRE REGION -�https://www.facebook.com/groups/467122313360002/
1983 MK1 Golf GTI Campaign Model - Under (looooong) resto!
1962 Rover P4 80
2002 BMW 745i
2008 BMW Z4 2.5Si
Posted

COTM Team
plenty to keep you going there, its nice to be able to work on a car on its side (makes sense somewhere) mine on its side but not with a rottiserie lol
chris
chris

Chris

Posted
Old Timer
Progress update : -
Well I've started to strip down the passenger side rear axle and sill assembly.
Progress is slow but hoping to pick up now as I'm confident my welding is good enough
Managed to get repair sections for the rear axle mounts from BBT, so decided to start on this first as seemed like a straight forward bit to do. Removed the underseal and general crude to get a better Idea of how it's built.

As you can see below there is quite a bit of corrosion in the inner box section, I removed a part of the sill to get a better look at the damage.


The axle section was relatively simple to remove once we discovered that the axle mount bolts were part of a separate reinforced section. Located the spot welds and drilled them out and air chiselled part of the panel off.


completely removed


Next i ummed and ahhed about removing the complete sill section, In the end I decided to remove most of the outer sill and discoverd it was like new, Oh well can't be a bad thing welding new steel in, at least I have peace of mind.
Once removed I started to repair the inner sill section at the front which was completely gone. Will need to make up a repair section for a tiny section of the floor to build up the sill before the outer sill is replaced.


Anyway this is a start, Wednesday have dad over to give me a hand.
Well I've started to strip down the passenger side rear axle and sill assembly.
Progress is slow but hoping to pick up now as I'm confident my welding is good enough
Managed to get repair sections for the rear axle mounts from BBT, so decided to start on this first as seemed like a straight forward bit to do. Removed the underseal and general crude to get a better Idea of how it's built.
As you can see below there is quite a bit of corrosion in the inner box section, I removed a part of the sill to get a better look at the damage.
The axle section was relatively simple to remove once we discovered that the axle mount bolts were part of a separate reinforced section. Located the spot welds and drilled them out and air chiselled part of the panel off.
completely removed
Next i ummed and ahhed about removing the complete sill section, In the end I decided to remove most of the outer sill and discoverd it was like new
, Oh well can't be a bad thing welding new steel in, at least I have peace of mind.Once removed I started to repair the inner sill section at the front which was completely gone. Will need to make up a repair section for a tiny section of the floor to build up the sill before the outer sill is replaced.
Anyway this is a start, Wednesday have dad over to give me a hand.
Posted
Old Timer
Started making up some repair sections today, they are just tacked on at the mo and require seam welding and copious amounts of grinding!


Posted
Old Timer
More progress, had dad and brother around to help. For some reason I don't have a picture of before! After removing the underseal in the wheel arch I discovered a nasty hole in the strut through to the rear chassis leg. Luckily the chassis leg is in good nick.

New patch panel made.


New strut top made up and test lined up. Requires a bit more tweaking before the final welds.


Got a bit more to do, top of the strut needs a bit of attention.

Started treating and cleaning up rust.


Started cleaning up the front.


New patch panel made.
New strut top made up and test lined up. Requires a bit more tweaking before the final welds.
Got a bit more to do, top of the strut needs a bit of attention.
Started treating and cleaning up rust.
Started cleaning up the front.
Posted

Old Timer
Great work fella! Proper getting stuck in!
That rotisserie will mean welding will have so much better results
That rotisserie will mean welding will have so much better results
Posted

Old Timer
hi
car looked good before you touched it , just shows you what can be hidden behind a nice looking exterior
keep up the good work
cheers
baz
car looked good before you touched it , just shows you what can be hidden behind a nice looking exterior
keep up the good work
cheers
baz
Posted
Old Timer
cars looking good mate,i have 2 tin top roofs already cut off the cars 1 sunroof /campaign model and 1 non sunroof,going cheap as i need the space,let me know if your interested,and good luck with the car
cheers,sean
cheers,sean
Posted
Old Timer
Cheers mate, maybe interested in the roof without the sunroof. What condition is it in (do you have any pictures) plus how much are you looking for?
Cheers
Rich
Cheers
Rich
Posted
Old Timer
hi rich i have it on here for sale theres a couple of pics of it but it was a bit dirty,i can clean it and take a better pic if you like? im open to offers really mate around �50 as i could do with it out the way! its in good condition no rust apart from on the lip where the rear window rubber goes but you wouldnt be using that bit i would imagine?,theres just a couple of very minor dents but nothing that couldnt be sorted
cheers,sean
cheers,sean
Posted
Old Timer
Big Progress update!!
With a lot of help from dad started to make some major progress.
Managed to get the axle mount repair fixed on the passenger side.


And then there was the drivers side!!

Can you see what it is yet?


To…
I had to remake the axle plate as it was badly corroded (pics to follow).
I have more pictures to come on this but this is the finished outcome:


Bit of a clean up on the underside but more to come:


With a lot of help from dad started to make some major progress.
Managed to get the axle mount repair fixed on the passenger side.
And then there was the drivers side!!
Can you see what it is yet?
To…
I had to remake the axle plate as it was badly corroded (pics to follow).
I have more pictures to come on this but this is the finished outcome:
Bit of a clean up on the underside but more to come:
Posted
Local Hero
Wow, top work. That drivers side was rotten as hell but cracking repair work there 8)
Andy
LINCOLNSHIRE REGION -�https://www.facebook.com/groups/467122313360002/
1983 MK1 Golf GTI Campaign Model - Under (looooong) resto!
1962 Rover P4 80
2002 BMW 745i
2008 BMW Z4 2.5Si
LINCOLNSHIRE REGION -�https://www.facebook.com/groups/467122313360002/
1983 MK1 Golf GTI Campaign Model - Under (looooong) resto!
1962 Rover P4 80
2002 BMW 745i
2008 BMW Z4 2.5Si
0 guests and 0 members have just viewed this: None.