


Vw 83 GTI -->TDR bergcup Steel edition!!

Posted
#1378469
(In Topic #180678)

Settling In

metal widening and tuning a td towards 220bhp :)
My name is Thomas, lives in Sweden.
This is my first vw golf but im quite familiar with the vw brand in general.
My last project was a polo from 93, a "stielheck" wich i turned in to a little project.
If some one is interested in reading about this project you can find some info here –>
http://z8.invisionfree.com/POLO3/index.php?showtopic=7338&st=0


But enough said about that now.
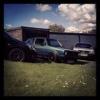
This time i�ve got my hands on a white golf gti from 83.
And fisrt i was thinking to do a resto back to ist former glans period but after seeing all that had to be done�my thoughts changed direction toward bergcup but with diesel.
I let the pics speak…
first some general "before" pics.


then some more work….


Started to disassemble the car and started welding.
Everything was in terrible condition.


Then this:


The rear axle got my attention and this was sandblasted, primed�and painted.


But all the rust issues gave me the idea to go WIDE, LOW and RACE�instead.
Started to draw some ideas on paper and thougth why not!! So one afternoon i�took the grinder and started….
A few hours later this was the result.


To be able to go wide and get a good apperence the front arches had to be approx 80mm wider than std. Each side!!!
To go this wide you can�t modify the original fender so…. rear arches modified to fit the front
Work in progress:


Didnt like the rear ending of the front arches, wanted more flow towards the door opening so i made som changes.
This change had to be transformed on the rear as well so this is how it looks after that. Fully welded:


and the rear:

But the car has to have the whelarcs extensions so i mounted them
�just to get an�idea of what�im doing….


But i wasnt satisfyied�with the shape in the sill area, decided to go for this.
In the meantime got some parts sandblasted and painted as well.


During�christmas holliday i decided to take some time off from the garage.
IP, and headlights etc was done.


But still the enginebay was "untouched", started friday evning at 21 and by 23.00 the engine was out..

Steering gear and gearbox linkaged�etc was removed.


General work on stearing gear and starter.


Got my hands on a rear axle from golf mk2 gti with rear dics. but the condition was not good…. will require some work.


Went on with the enginebay , cleening and scrubbing and finally the�primer was applied.


couldnt resist to put some primer on to the front fender to get the first glims of what�will be….

And i think we are up to speed and this is where the project is at the moment.
The interior are going to be redone, colours will be "of black" and�light grey alcantara.
But first i will modify the front chairs to get the "tilt" version from golf mk2 gti.
sorry for the LOOOOONG�introduction.
br
Thomas
Posted
Old Timer


Posted

Old Timer
top work so far though
Posted
Settling In
Your car looks awesome and I'll keep an eye on this thread
Posted

Moderator

Gotta admire the work going into this build. Best of luck with it. Come back regularly with pic updates if you can.
Smudger


Posted

Settled In

Posted
Settling In
Of course there is a lot of work put in to the car already but its still along way to go.
I will deffinetly come back regulary to update with a lot of pics.
Feel free to comment anything.
Will soon start the engine build.
br
Thomas
Posted

Moderator


Posted

Local Hero
 Looking forward to seeing this finished
Andy
LINCOLNSHIRE REGION -�https://www.facebook.com/groups/467122313360002/
1983 MK1 Golf GTI Campaign Model - Under (looooong) resto!
1962 Rover P4 80
2002 BMW 745i
2008 BMW Z4 2.5Si
LINCOLNSHIRE REGION -�https://www.facebook.com/groups/467122313360002/
1983 MK1 Golf GTI Campaign Model - Under (looooong) resto!
1962 Rover P4 80
2002 BMW 745i
2008 BMW Z4 2.5Si
Posted
Settling In
Will try to finish this in late mars.
Yesterday the rear brakes was treated with electrolysis and then primed and painted.
pics later.
Posted
Settled In
Posted
Settling In
The thing is that i like the widebodies and the low apperence the bergcup cars have.
But i also like the polo s2000 ralley car.
Due to the condition of the car the plastic parts did cross my mind.
The wideningskit from peschmotorsport i.e is getting to common, dont see too many metal widenings done to the vw golf nowadays.
During the mid 1980 the were several builds on shows etc all over europe.
So instead of going the "usual" bergcup way with plastic i choosed to go this way.
Yes it will be heavier that a fully developed bergcup car but i aint going to race the car just build a car thats looks and performe well.
I have allready reduced the wheight by taking out insulation etc by 38kg and then added approx. 20kg
so im still on the possitive side wheight wise
It�s going to be my daily drive so for me its more interesting to have a car that have a better fuel consumption but still feels quick and powerful. thats why i will go for turbodiesel.Thomas
Posted
Old Timer
Matt
Posted
Settling In

Then I tore down the brake load valve , no good condition at all.
Had to renovate.


After renovation , new gaskets , etc. I felt happy and satisfied.
This is of course a constant down strokes of swedish MOT .


But since the car is MUCH wider now so I had to move out brakes or the whole " hub " with 60mm per side.
I made 2pcs spacers in the lathe and drilled the same hole pattern .


All for today.
Posted
Old Timer
That's a fine chunky spacer

Matt
Posted
Settling In
The weekend and the first part of the week has passed and lot has been made in terms of the number of hours spent.
Front brakes ie calipers and brackets renovated with electrolysis, then sandblasted and painted.
Discs from a opel modified and then sandblasted and painted center.
Began to wash the new donor car.
It was so dirty that even the mices didnt wanted to be on it and I �m happy for that.
After a thorough wash you could start inspecting parts, etc.
Tore down the starter and this was full of dirt and old wood lice.
Do not ask me how they got there.
Lucky to have a pretty good stock of parts so it was possible to get it all together for almost new condition. New barings etc were installed.
Always nice to have completely renovated stuff.
pics later.
Today, I will take down the fuel filter holders etc and bodywork unique brackets and weld them in the right place on the car.
Thomas
Posted
Settling In
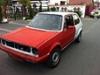
Well I finally got hold of it a gtd�.
All I need to make this motor transplantation should now be at home.
Got a hold of the car from the Hurva dismantling in sothern sweden 350km from home
Was just to drive down and pick it up.Now the car in the driveway and, in general , the driveway starts to look like a car dismantling …
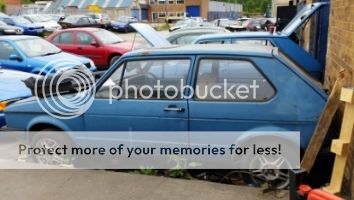
some pics of the gtd.

the general condition of this car rust wise is darn good,�this is the area beneath the windscreen�, yes the notorious rust trap. On this car , there is no rust at all in this area, some dirt only.

The engine have been parked in a barn and been standing still for 14 years ! it becomes a challenge to get it to spin again but it will happen.
I had to wash the engine before these pictures but here it how it�looks under the hood.

intrior.

I was forced to see if the engine was able to turning at all.
I checked the oil and water and they looked good no water in the oil�etc.
Threw in a battery and looked�at the starter,�big crack in the�housing.
Was just to take the new renovated starter�and connect .
Imagine my surprise when the machine goes around without a problem.
Starting, not a chance.
I did not want to start this engine with the 14 years old timing belt, etc.

But I took off these parts again and began to clean out the parts, etc.
there is a pair of brackets in different location on gtd�VS GTI .
The washerbottle sits on the otherside and also the airfilter box etc.
Just to cut them loose�and�and weld them back on to�the car in the garage.


Then there was a lot of time in blasting cabinet.
Brake calipers , valve cover , mounts etc got a good blast and then some paint.

A picture of the brake discs from opel modified and�fitted.

Today , the engine and gearbox will�be�out of the car .
Rely need to increase tempo now, spring is on the way
Need the harness etc to get further on the gti at the moment.Thomas
Posted
Settling In
Unfortunately, there have been way too much stuff in between so the golf has got the lower priority.
Things have happened but mostly small stuff.
But now I�m at it again.
I need a large cooler and a tropic cooler from golf mk2 should work.
I measured it together with an intercooler and it fits rather good.
But the radiator plate, (the one with the fan) are way too short so I had to make one.
I want to make it look stock like, so what do you do?
well lets take 2pcs and make one of these.
Had one of my green golf but that one had seen better days.
Then it struck me that I might want to have a 2-stage blower that I have in the polo.
I have a radiator plate left from the polo build.

After some measuring, cutting and welding to say nothing of blasting and paint it was like this.
Note: check the difference in length (12cm).

Thomas
Posted
Local Hero
Cant wait to see what those arches look like when finally filled, smoothed and painted!
My Build Thread
All My Build Photos - https://www.flickr.com/photos/pix-al/albums/72157622794406840
My other hobby - www.pix-al.co.uk
All My Build Photos - https://www.flickr.com/photos/pix-al/albums/72157622794406840
My other hobby - www.pix-al.co.uk
Posted

Settled In
0 guests and 0 members have just viewed this: None.