


Lhasa Green 1.8 GTI engine fire repair

Posted
#1385779
(In Topic #181887)

Settling In


Was toast but getting better
Progress good on the engine fire rebuild, before fire, �and current state in photos below. Might have some spare Samco hoses available soon.


Posted

Local Hero


Looks like you're making good progress 
Andy
LINCOLNSHIRE REGION -�https://www.facebook.com/groups/467122313360002/
1983 MK1 Golf GTI Campaign Model - Under (looooong) resto!
1962 Rover P4 80
2002 BMW 745i
2008 BMW Z4 2.5Si
LINCOLNSHIRE REGION -�https://www.facebook.com/groups/467122313360002/
1983 MK1 Golf GTI Campaign Model - Under (looooong) resto!
1962 Rover P4 80
2002 BMW 745i
2008 BMW Z4 2.5Si
Posted

Settling In
Surely this was an excuse to go 20vt? Looking very clean though
I love it. I don't care what you think
Posted
Settling In
20vt a temptation but happy with staying as stock as possible. Making headway, rewiring underway. Even remembered to label things.


Posted

Old Timer

Looking good.... 
"Mk1 Golf Gti...all things to all men"
Posted
Settling In
About 60 hours work so far and it's starting to look much better, back on the road by Easter.


Posted
Local Hero
Very clean, not too much left to do now
Andy
LINCOLNSHIRE REGION -�https://www.facebook.com/groups/467122313360002/
1983 MK1 Golf GTI Campaign Model - Under (looooong) resto!
1962 Rover P4 80
2002 BMW 745i
2008 BMW Z4 2.5Si
LINCOLNSHIRE REGION -�https://www.facebook.com/groups/467122313360002/
1983 MK1 Golf GTI Campaign Model - Under (looooong) resto!
1962 Rover P4 80
2002 BMW 745i
2008 BMW Z4 2.5Si
Posted

Moderator
Looking good mate!

Posted
Old Timer
Hello john, small world� 
I'll have the trim in the post before the end of the week�
Matt
I'll have the trim in the post before the end of the week�
Matt
Posted
Settling In
It is indeed a very small world. New photo with revamped loom - tried to tidy it up and all wrapped in heat proof tape. MAF pipe and rubber given a spruce up - air intake bit next on list. Hopefully fitting A pillar deflectors for an extra 120mph!

Posted
Settling In
Anyone any idea where I can get hold of these connectors? They're out of the flat 3 pin connector from the dizzy, which I cunningly cut open.

Posted
Local Hero
Not sure but you could try here;
http://www.vehicle-wiring-products.eu/VWP-onlinestore/home/homepage.php
or here;
Auto Electrical Components, Parts and Accessories for Trade and DIY: Polevolt Ltd
http://www.vehicle-wiring-products.eu/VWP-onlinestore/home/homepage.php
or here;
Auto Electrical Components, Parts and Accessories for Trade and DIY: Polevolt Ltd
Andy
LINCOLNSHIRE REGION -�https://www.facebook.com/groups/467122313360002/
1983 MK1 Golf GTI Campaign Model - Under (looooong) resto!
1962 Rover P4 80
2002 BMW 745i
2008 BMW Z4 2.5Si
LINCOLNSHIRE REGION -�https://www.facebook.com/groups/467122313360002/
1983 MK1 Golf GTI Campaign Model - Under (looooong) resto!
1962 Rover P4 80
2002 BMW 745i
2008 BMW Z4 2.5Si
Posted
Settling In
Nearly there, just some coolant, re-wire the lights, add a battery, position a fire extinguisher and fingers crossed.
Posted
Settling In
Work so far.

Posted
Old Timer
Looking very nice and factory fresh
Matt
Matt
Posted
Settling In
Cheers Matt,
The A Pillar deflectors are looking great but there was much swearing trying to fit them until I used the �parachute cord method, remembered from fitting my Camper windows. All looks good but the dear thing won't start, turns over but no blue spark fron coil to dizzy as per Haynes test. It's time to seek expert help I think.
The A Pillar deflectors are looking great but there was much swearing trying to fit them until I used the �parachute cord method, remembered from fitting my Camper windows. All looks good but the dear thing won't start, turns over but no blue spark fron coil to dizzy as per Haynes test. It's time to seek expert help I think.
Posted
Old Timer
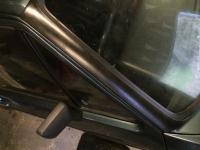
You got a photo of the deflectors, no idea how they go on? (other than difficultly )
)
Posted
Settling In
<div>
<input class="ocp_keep_ui_controlled" readonly="readonly" size="45" title="
Attachment
" type="text" value="attachment tag (dbl-click to edit/delete)" /></div>
<div>
Hello, this is the method I used, adapted from putting windows into my '63 split.<br /></div>
<div>
1. Place a length of electrical tape along the outer guttering, prevents scratches.<br /></div>
<div>
2. Wrap same type of tape around the end of a medium flat blade screwdriver, prevents massive scratches!<br /></div>
<div>
3. Find a long piece of parachute cord or nick the guy rope off your sons tent.<br /></div>
<div>
4. Ease the screwdriver blade under the ouster edge of the window seal.<br /></div>
<div>
5. Place the cord into the gap created by the screwdriver all the way down the seal.<br /></div>
<div>
6. Take the deflector and place the leading inner edge under the seal.<br /></div>
<div>
7. Apply some gentle pressure to keep this edge under the seal as you pull the cord down the windscreen seal.<br /></div>
<div>
8. Your aiming to insert the plastic leading edge into the space vacated by the cord.<br /></div>
<div>
9. When leading edge is well seated, spring the back edge over the electrical tape bad into the gutter.<br /></div>
<div>
10. The deflector should now be wedged between the gutter and windscreen seal.<br /></div>
<div>
11. Remove the electrical tape</div>
<input class="ocp_keep_ui_controlled" contenteditable="true" readonly="readonly" size="45" title="" type="text" value="attachment tag (dbl-click to edit/delete)" />
<input class="ocp_keep_ui_controlled" readonly="readonly" size="45" title="
"C:\fakepath\image.jpg"
<div>
Hello, this is the method I used, adapted from putting windows into my '63 split.<br /></div>
<div>
1. Place a length of electrical tape along the outer guttering, prevents scratches.<br /></div>
<div>
2. Wrap same type of tape around the end of a medium flat blade screwdriver, prevents massive scratches!<br /></div>
<div>
3. Find a long piece of parachute cord or nick the guy rope off your sons tent.<br /></div>
<div>
4. Ease the screwdriver blade under the ouster edge of the window seal.<br /></div>
<div>
5. Place the cord into the gap created by the screwdriver all the way down the seal.<br /></div>
<div>
6. Take the deflector and place the leading inner edge under the seal.<br /></div>
<div>
7. Apply some gentle pressure to keep this edge under the seal as you pull the cord down the windscreen seal.<br /></div>
<div>
8. Your aiming to insert the plastic leading edge into the space vacated by the cord.<br /></div>
<div>
9. When leading edge is well seated, spring the back edge over the electrical tape bad into the gutter.<br /></div>
<div>
10. The deflector should now be wedged between the gutter and windscreen seal.<br /></div>
<div>
11. Remove the electrical tape</div>
<input class="ocp_keep_ui_controlled" contenteditable="true" readonly="readonly" size="45" title="" type="text" value="attachment tag (dbl-click to edit/delete)" />
Posted
Local Hero
Do replacement trims come with sticky pads on the back? I think the originals had these
Andy
LINCOLNSHIRE REGION -�https://www.facebook.com/groups/467122313360002/
1983 MK1 Golf GTI Campaign Model - Under (looooong) resto!
1962 Rover P4 80
2002 BMW 745i
2008 BMW Z4 2.5Si
LINCOLNSHIRE REGION -�https://www.facebook.com/groups/467122313360002/
1983 MK1 Golf GTI Campaign Model - Under (looooong) resto!
1962 Rover P4 80
2002 BMW 745i
2008 BMW Z4 2.5Si
Posted
Settling In
Three at the top and bottom , one in the middle. Here's a pic of them on

0 guests and 0 members have just viewed this: None.