


Gti Mk1 -83 resto


Newbie

It started in August 2015, when there was an advert posted on the �VW Club Sweden forum. It was posted around 10 pm, and I called the advertiser the morning after around 8am. The car was still available�
 The guy said it needed "some" TLC and there was "some" rust but not bad at all. It had been sat in the garage since 1998, so I figured it might be some work left on it.
I rented a trailer and drove up there the three days later. The advertiser said he had around 60 calls so far, people had been like crazy..
Luckily I was first. I felt that I could not let this one slip out of my hands, even if this car probably needed a lot of work and for sure a lot of $$$$$..
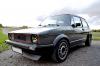
During my first inspection it looked ok, �but you could tell by the smell inside that it had been sat for a while. The brakes where stuck, no battery, it had rust in the rear lower end ( below the boot lid) and a lot of rust on the doors. I thought it was worth it anyway, since the price was fairly low and hence I would have a bit of room for improvements.
This is on the way home. On this picture it looks ok, but as you all know a picture does not show whats underneath.
�

My plans at this stage was to strip it from nearly all parts, repair all rusty parts, sand blast all chassiparts such as rear axle etc.
Then upgrade the suspension with H&R kit, Powerflex bushings, completely restored engine and tran with new bearings and gaskets.
A respray was also in scope.
When the car was finally in my garage, I started with stripping all the parts. I bought some plastic boxes and marked them each with the contents.


Rear axle coming off. You can see all the rust below the rear bumper

Removed some parts from the front suspension.

All this removal of parts took a while since most of the nuts and bolts where stuck completely.
With the rear axle removed, you could see that the the axle mount had seen better days. So this had to be cut out and replace. I bought new pairs and replaced them.
.jpg")
Next step was to replace the rear panel. This was not an easy job, as the the panel was not 100% correct fitting, as well as you will need to spend a few hours on the alignment.
First step was to remove some of it


After some hours of grinding

Then I needed to replace both rear wheel arches, lower corners and fuel filler outer panel.
This is after some grinding.

Both front fenders needed to be replaced

Drivers door needed to be replaced. To find a new one was not easy, as the available on the scrapyard had rust as well, so I had to find one with less rust..
Did a lot of work to prepare it for the respray, I removed the motor and transmission. The painter needed about 5 weeks to respray it, and that would give me enough time to restore the engine. I got the parts back from the sand blasting, and I could mount these on the car before I left it for the respray. Below the rear axle and a new fuel tank fitted.


�
 Last edit: by loadmaster
Posted
Newbie

As said earlier, I took the motor out and put it in the stand.


Removed all parts completely

Put all parts nicely in order

Pistons about to be cleaned

I replaced all the bearings, gaskets and everything. The cylinder head was completely refurbished

The gearbox got a proper clean

Next step was to put all parts together. Unfortunately I dont have all the pics available at the moment, but here are some of them. This camshaft is a fast road one (280')


Unfortunately the respray took longer than expected, so at this point I realized that I was not going to be able to visit any meetings this summer.
Some pics from the respray


Anyway, once I got the car back, I went on with putting back all body parts and the engine etc.
This is what it looked like in August 2016, after a lot of hours spent on mounting parts.

And this is what it looked like in September, after a few hours of aligning some body parts etc.


Some specifications of this car:
Motor & Transmission
1800cc 8v
Completely restored with all new bearings and gaskets, piston rings etc.
Ported and polished cylinder head with fast road camshaft.
Gearbox: �5-speed 020 transmission
Clutch�Black Diamond stage 1
Chassie:
�H&R suspension lowering 35-40 mm.
Powerflex bushings
Body:
Resprayed in Platinum grey �LD7X
Rims: Original 14” Gti Snowflake
Almost everything is either new or replaced and polished. Almost every nut and bolt is replaced. Lots of work done.
�
Posted

Moderator


And what an end product too!
Posted
Newbie
mike.d1979 said
Wow, Nice work
And what an end product too!
Thanks Mike. Though the project ended up in more costs and hours… You all know how it is
Posted
Newbie
Posted

Local Hero


Andy
LINCOLNSHIRE REGION -�https://www.facebook.com/groups/467122313360002/
1983 MK1 Golf GTI Campaign Model - Under (looooong) resto!
1962 Rover P4 80
2002 BMW 745i
2008 BMW Z4 2.5Si
LINCOLNSHIRE REGION -�https://www.facebook.com/groups/467122313360002/
1983 MK1 Golf GTI Campaign Model - Under (looooong) resto!
1962 Rover P4 80
2002 BMW 745i
2008 BMW Z4 2.5Si
0 guests and 0 members have just viewed this: None.