


Green '82 Golf C project

Posted
#1360407
(In Topic #166853)
Settled In

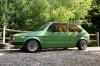
Thought i'd introduce my new project. �Seen a lot of awesome stuff going on on this forum and its motivated me to get this done. �Bought the car 3 years ago from QrazyQuiffs and it has been sat since�then growing rust whilst i was at uni. �It was a rolling shell when i got it and i'm thinking of using it as a base for a track car project. �So far i've just managed to get the car stripped down and all the rust identified. �Thought it was going to be a lot worst after being sat but it should all be fixable.
here's some pictures of when i got the car


and a few after stripping it down


a-pillar and inner wing are a bit crusty on the drivers side

sills and arches need doing on both sides

after my last project i decided that i needed to make a spit to make things a bit more comfortable


works a treat and is really easy to spin by yourself, quite pleased with how they turned out
started today on the drivers side sill, got the old one cut out, joggled the edge on the quarter and got that top edge fitting nicely. �just need to get the bottom seam fitting nicely, punch a few holes and get it welded on. �need to do some repairs on the a-pillar first as well so will hopefully get that done tomorrow.


will hopefully have a bit more to add tomorrow.
Tom
 Last edit: by evileye
Posted
Settled In
Posted
Old Timer


Matt
Posted

Moderator


Posted

Settling In


Posted
Settled In
i've made a bit of a start on the rust repairs, have got a little bit more to do on the drivers side then will turn the car around and start on the pasanger side.
there were a few patches of crustyness that needed cutting out from the inner sill/a-pillar area so started at the front


made some patches up

only had a TIG at home at the start of the week so had to use that to start with, was a nightmare with all the waxoil that starts melting as soon as you start to weld. �have invested in a new MIG now though which has sped things up considerably! �anyway…

not a great job but its not going anywhere!

moving to the rear, where to start ha!


with all the inner sill sorted i could get the outer on. �i did put the door back on to check fitment before welding it on too much. �sorted the hole i'd made in the a-pillar first too as well but didn't take any pics.

this is where i left it yesterday.

carried on with it again today and got a bit more of the a-pillar done. �was scared of the chassis twisting so did this area in sections, not the neatest way but wanted to be safe.


needs tidying up but happy with it for now. �will use rivnuts for when it comes to fitting the wings but i have some time yet before that'll be happening.
anyway that's all for now, more soon hopefully
Tom
Posted

Old Timer


Posted
Old Timer
Matt
Posted
Settled In
Posted

Old Timer

"Mk1 Golf Gti...all things to all men"
Posted

Settled In
Posted

Local Hero

1979 mk1 Golf Gti (Dan)
1983 mk1 Golf gti G60 (little-un)
1991 mk2 Golf Country Chrome Edition
2010 T5 Karmann Colorado
2012 mk6 Golf Tdi convertible
2019 Skoda Octavia Sport ( it’s Golf)
1983 mk1 Golf gti G60 (little-un)
1991 mk2 Golf Country Chrome Edition
2010 T5 Karmann Colorado
2012 mk6 Golf Tdi convertible
2019 Skoda Octavia Sport ( it’s Golf)
Posted
Moderator

Posted
Settled In
here's some pics of whats been done


got a bit carried away with the work and forgot to take pictures for a bit…


from the inside

on to the rear of the inner sill now


and its starting to look a bit more complete


thats it for now, lots of pictures for you, hope you enjoy
Tom
Posted
Moderator

Posted
Settled In
Posted
Old Timer
Posted
Settled In
random brackets


templates made up

floor and sill cleaned and zinc primed

mounts made and fitment checked


welded in place

and zinc primed again

fitment of the top piece was then checked, used the trusty spirit level app on my phone to to check that they were all square and level�
�and then welded in place
have to admit that this is the last one that i did and i'm really pleased with how it turned out however i learnt from mistakes made on the others so they are not so pretty.. �ah well, they're in now and they are solid so they will stay!
also cleaned up the welds on the passenger side sill


need a belt sander to get the last bits
this evening i have started the seam welding but only had time to do the passenger door frame. �will post some pictures up when i have done a bit more.
tom�
Posted
Moderator

Posted
Old Timer
 keep at it matey
0 guests and 0 members have just viewed this: None.