


82' tintop mini resto/winter work


Settled In

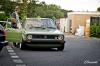
She's an 82' tintop with a polo gt engine and 5 speed box.
So i started off a few weeks ago, around the beginning of december 2014. Many of you who attend the shows might of seen it about, i just plan on sorting out as much of the rust/rot as possible, prepping the car for its respray and also painting/undersealing the underneath and other bits and bobs too a good standard!
Iv never done anything like this before, my first time even properly working on a car (im 19), but hey, everyones got to start somewhere and iv enjoyed it so far!
Iv had problems with uploading pictures on this site before so hopefully things will all go smoothly with the uploading.
I'll try and update things as much as possible. I dont get a great amount of time due to having a week day job (which also envolves being on 24 hour callout for a week every couple of weeks) I fix potholes�
 Also my garage, if you can even call it a garage is a crappy council rented garage so, i have very very limited space to work with and no electricity! Iv spent a lot of money on tools and a generator and everything i need. Managed to pick up a 6kw generator brand new pretty cheap! Not too big either, just slots in perfectly.
Anyway i'll stop rambling on and try and get some piccys uploaded!
Any help with things would be great, need as much help and advise as i can get!
 Some quick pictures of how she was before i get started!


Now some pictures of when i started the strip down. I didnt take as many pictures as i would of (didnt think i'd be doing this thread back then) plus i was too excited to get cracking to take photos


I swapped over my schmidt th lines and put on the crappy teledials while work commences.

Started the strip down, wings off, headlights off, grill and other little bits off, also discovering rust�

The passenger side sill is alot worse then i thought after poking about with a screwdriver, turns out about 3 quarters of the sill will have to be replaced. The inner sill looks solid from what i can see so im safe with that. Only thing is the strip along the bottom as you can see iv pretty much managed to snap that off the whole way along. Now i need some help, is that the outer sill and inner sill joined or is that 3 layers or just the outer sill edge?? what i snapped off seems very thick to be one layer of metal??

Anyway so i started doing me first ever bit of body fillering. I started smoothing off the rear wiper and washer holes. Didnt turn out too bad, though i did in the end go over it again and re do it after several times.

I also took the inner wings down to bare metal just to see what they were like as the current underseal was so thick i couldent tell if there was anything wrong underneath it all! so using a flap wheel on the angle grinder and a dremel in the harder to reach areas i got it all down to bare metal. what was underneath was too bad! i found a few little bits of surface rust, so i took that down with a wire wheel etc and treated it with a rust killer.

Take so much longer having to use a generator and keep getting the car out all the time!!
�
Miranda the 1982 manilla Green 5-door tintop
�

�
Posted
Settled In

Cleaned up and treated what i could treat and left what would need cutting out and replacing!
I have this to tackle with!! Part of the inner wing mount and above the turret to replace! im suspecting that this rot/rust spreads all over the turret but i really hope not!!

I knew i'd have the windscreen corners to sort out but oh my, i didnt think i'd have to replace the inner wing just below it! i'll have to somehow get my head around how to do it! Here's a picture of each side..


Next up i took a look at the must worrying bit.. (though the sill is just as worrying!) The rear seatbelt mounting point. a few months ago en route to a show, i heard something rattling from the rear, turns out my rear seatbelt was no longer connected


Really not good, had a good look inside with a torch and i can see it's spread along the joint where the tub meets the inner part you see from inside the boot (near the rear washer bottle mounting point) I dont know how much of the tub has gone around it yet but im hoping not a lot!!!
�I knew the filler area was another thing on the list and im thinking now that this seatbelt mounting point has something to do with it.. What do you think??
Hidden under loads of filler!!


While i was depressed about the extent of the rust/rot i started p400 sanding the rear of the car for its respray, making it loverly and smooth and keyed in.

I next cut out a little patch in the spare wheel well. Nervous to do my first ever bit of welding after practising a little.

I found out a bit problem with my welder, which i should have looked into before i set out to buy a welder. I stupidly bought a gassless mig welder, cheaper than cheap sealey 100 amp. well i will now be investing in a gas mig welder which adjusts down to around 30amps seen as im welding thin sheet metal. I know how bad gassless ones are so dont tell me how stupid i am, i know! all part of the learning curve i guess!
Anyway before i realised all this i did do the patch in the spare wheel well. this is how it looked half way through, not too bad for a first attempt!!

Thats all for now! Any help would be great!
�
Miranda the 1982 manilla Green 5-door tintop
�
�
Posted

Local Hero


Golf GTI Campaign 1983 Mars Red, Ford S-Max 2015, Audi TT 180 quattro 2003, Fiat 500C 2013, Golf GTE MK7.5

�
�
Posted
Old Timer

Your car looks great in the first photos, but looks like the dreaded rust is lurking under the paint. You should maybe do a full strip down, find out how bad the rust is and where it is.
Look at meltdrummer's thread, he's changed pretty much everything on his shell with great success, a good guide on what needs doing
Your welding looks very good for a first timer, it's hard welding these cars as they're so thin steel, but your off to a flyer
Good luck with the project.
Matt
Posted

Settled In

Jamie
Posted
Settled In
RichardHall said
Looks really good, especially working in such cramped conditions. I can't work out if the colour is standard which it seems to be in the pictures when you are working on it, to the one with the Scirocco in the background when it looks like it's in the same Vioer Green?
Its manilla green, which is one of those colours that just changes shade in so many different lights.
Miranda the 1982 manilla Green 5-door tintop
�
�
Posted
Settled In
mk1 Jamie said
Good work …Nice to see someone else young doing all the work themselves
Jamie
Thanks!
Miranda the 1982 manilla Green 5-door tintop
�
�
Posted
Settled In

 Got the area on the inner wing mount/turret cleaned up abit more and just playing around generally with the new dremel. So im thinking this is going to be abit tricky, but if you look closely you can see the marking i made on the metal. im thinking of welding the new piece to the seam of the turret (hopefully you'll know what i mean).
 Whilst playing about i started stripping around the windscreen corner area, to uncover it's a little more worse on this one side than i first thought (and i havent even touched the other side yet!!) As you can see it's gone through the inner wing top part (where in poking my finger through), im scared at the fact it may have spread to the a pillar? �fingers crossed it hasnt or im screwed really, just means another thing too much for me that i'll have to leave for the bodyshop.
 I managed to get the patch i did in the spare wheel well zinc primed and filler'd also. Rubbed it down today nice and flat, wasnt quite happy so put another skim of filler over the top tonight and left it for tomorrow..
 Another good thing, not that rust is ever a good thing��but the filler cap area isnt as bad as i thought, managed to catch it before it spread too far really, stops just above the trim line. Think i'll just cut the circle out and replace that as the metal around it is good, as you can see..
 Also sanded down the drivers side rear arch with a dremel and detail sander. SO SO MUCH FILLER!!!! There was cracks showing before on two parts of the arch, with a little bit of bubble just poking through. So i got it down to find that the arch was replaced previously! good thing really, it's not rusty, and those 2 cracks and bubbles are just two pinholes now i'v grinded it down. So i'v rust treated it and left it overnight to dig in nicely and dry. �Just got to re make the arch tomorrow with filler, it's going to take a long time to get this all perfect seen as the filler is SO thick..

 So thats all folks for now, OH i forgot, i properly taped and masked and sheeted off all the windows and seals for the sanding (took alot of time!!) and also p400'd the roof and rear doors
 As always, all help welcomeEnjoy a pic of my rubbish garage haha…

Miranda the 1982 manilla Green 5-door tintop
�
�
Posted
Settled In
My new mig welder arrived (took a while) which is why its been going slow, that and being on callout at work. But i got it all set up and got practising with it.
So the hole in the spare wheel well is finished… and i forgot to get a picture of it, so not picture of that!
I also managed to smooth out mot of the rear valance (smoothing out the factory bobbly texture) and got rid of some light surface rust. It took a very long time and alot of hours of sanding but it's mostly done now and alot of it zinc sprayed.

I then started to crack on with the wing mount/turret which is what iv been doing all this weekend.
I cut out all the rot and fabb'd up a piece for the inner wing mount..

Then i tacked it in place and sprayed it with weldable zinc spray..

Next i fabb'd up a piece for the bit between the turret and the wing mount and tacked it in place then joined up the tack welds..


I then finished it all up and zinc sprayed it. I then grinded all the welds down and applyed some filler to just smooth things out etc etc.
Im yet to sand the filler smooth but this is how i left it tonight..

Im happy with what iv done so far, im going to try and make a start with the windscreen corners once iv finished this.�
 I'll update probably next weekend
Miranda the 1982 manilla Green 5-door tintop
�
�
Posted
Settled In
The bottom lip of the sill is the floor pan, inner sill and outer sill spot welded together which is why it is so thick
Will be watching this one
Posted
Settled In
Morgie said
Brilliant start and top marks for doing it all yourself!
The bottom lip of the sill is the floor pan, inner sill and outer sill spot welded together which is why it is so thick
Will be watching this one
Thanks! oh god so i'll need to weld the floorpan, inner sill and outersill
 might be beyond something i can do then!
Miranda the 1982 manilla Green 5-door tintop
�
�
Posted
Old Timer
matt
Posted
Settled In
pazwaa said
nice job on the repairs
matt
Thanks matt
Miranda the 1982 manilla Green 5-door tintop
�
�
Posted

Old Timer
 Looks like your unearthing somebody's previous bodgery. Keep going , you'll get there !!
 Ad.
Posted

Old Timer
Posted
Settled In
So i cut out both windscreen corners tonight, only to discover i am going to have to replace abit of the apiller on one side and both sides of the inner wings at the back plus the mount on the top of the inner wings (both sides) oh and a bit of the rain tray on both sides.
This isnt going to be easy and i have no pictures due to my phone dieing but it's not a nice site to see
I need to remove the dash before i do any more cutting or welding, i can see the loom and wireing through the holes, dont want to set the car on fire! I do however plan to get atleast one side finnished this week, even if i have to stay there untill 11pm again haha
Miranda the 1982 manilla Green 5-door tintop
�
�
Posted
Settled In
Baggie82 said
Good work so far dude
Ad.
tell me about it!! i cut out both windscreen corners tonight to find out it was held together with screws, cardboard..yes cardboard and filler
Miranda the 1982 manilla Green 5-door tintop
�
�
Posted
Old Timer
Posted
Settled In
So i'v got some pictures of the apiller and windscreen corners on both sides.First up is the passenger side apiller which is the worst bit. I set out to remove the dashboard tonight but got sidetracked half way through haha. Good thing is i did get to see what it all looked like from the inside and to be honest, it's really not too bad! it hasnt spread far and it should be something i can fix and weld up

Any tips on welding here?? i havent seen any threads on it at all, but im most worried about a fire or damaging the fusebox or loom or setting fire to the sound deadening.
Over to the drivers side.. it has quite a nice size hole in the inner wing now
but the apiller on this side is alot more solid and i dont think i'll need to weld it at all.
On the bad side of things that hole in the inner wing, i'v looked through from the inside and pulled the carpet up etc; ok it could be alot worse, alot more worse, so its not really that bad. It seems to be like that previous repair you can see below the hole wasnt sealed properly and waters got in etc and its started to eat its way up. God knows how i never had any water in the footwell or a wet carpet
 �Seems to be alot of 'mot' rush rush welding repairs on this car..

Advise please on anything guys
thanks.�
Miranda the 1982 manilla Green 5-door tintop
�
�
Posted

Local Hero

Lovely colour that, will be nice when it's all done. Sanding filler - I hate that job! lol
Looks like you're getting stuck in well. A couple of comments if you don't mind them?
First off, I can understand if you want to do a windows in re-spray, although out is ideal (I assume that what you're doing) but take the rear lights off. It's so quick to, and will make finishing and painting the rear panel much easier.
(sorry if I've got the wrong end of the stick!
)Second, good call on zinc priming the inner wings. I had an inner sill repair on mine sit for 5 years (
 ) in just zinc primer in my garage and it never rusted.
 Good luck with the resto, looking forward to updates
Andy
LINCOLNSHIRE REGION -�https://www.facebook.com/groups/467122313360002/
1983 MK1 Golf GTI Campaign Model - Under (looooong) resto!
1962 Rover P4 80
2002 BMW 745i
2008 BMW Z4 2.5Si
LINCOLNSHIRE REGION -�https://www.facebook.com/groups/467122313360002/
1983 MK1 Golf GTI Campaign Model - Under (looooong) resto!
1962 Rover P4 80
2002 BMW 745i
2008 BMW Z4 2.5Si
0 guests and 0 members have just viewed this: None.