


The Speaker Build.

Posted
#941621
(In Topic #111069)
Settling In

The Speaker Build.
as you may know (or may not) i have been sitting on the forums quite quietly doing my research and slowly doing the car up. (as you probably have seen from the Wanted forum!)
Finally the car is now taking shape and this week, i began and *almost* finished my speaker pod build.
Bit of history…the guy(s) that owned the car before me made a bleeding mess of pretty much everything including the electrics, body, alarm, stereo, door cards etc…you name it… they f'd it!
So i have pretty much rewired the whole car, removed the old immobiliser, fitted remote central locking alarm, electric windows, bonnet struts, new exhaust, repaired the front bumper and i'm now creating new doorcards from scratch.
To finish off the door cards, i wanted a nice set of speakers and opted for some JBL 16.5cm speakers. Obviously there wasn't much space in the actual door for these as the window mech and the door check strap foul anything behind there. i also went for the electric windows as when i was initially building the pods, i realised that the winders would foul the pods.
anyway…here are my shots from the build. Enjoy!
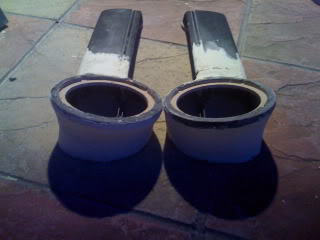
1st i had to dremel the existing pods slightly to fit onto my template:
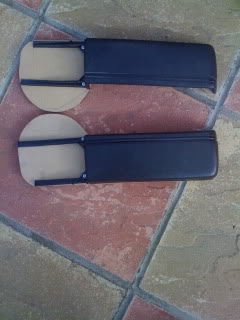
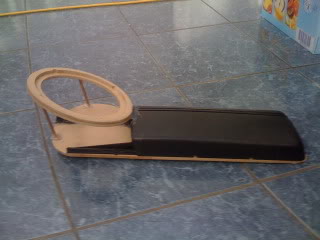
I then created the speaker rings. i went for a recessed look which involved creating one ring opening wider than the other and then mounting them on each other and then beveling the edge of the top. i mounted these on the templates at an angle using a hot glue gun and struts:
I then stretched an old t-shirt over the top of it which gave me my desired pod shape and then applied fibreglass resin over it and let it set for about an hour:
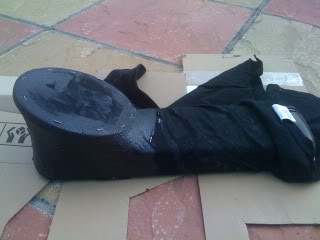
I applied a few coats, and let it dry out until it was rock hard. I then cut off any excess material that was getting in the way:
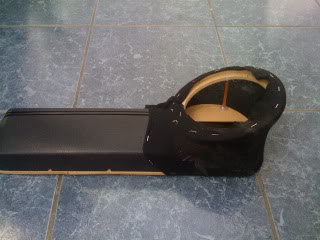
I then sanded it down and filled in any dodgy bits with bodyfiller and kept doing this process till it was fairly smooth:
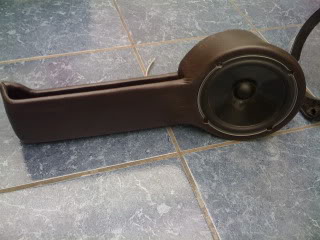
Then in to finish it off (which was probably the hardest step of all!) i decided to wrap it in a brown leatherette vinyl ( the doorcards are going to be a Brown and Cream vinyl combo…more on that in another thread later this week) and mounted the speaker in it:
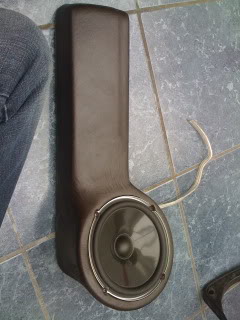
i know there are some stretch marks and creases, but i need to use the heat gun to work these out, shouldn't really be an issue. I'll be finishing the drivers side pod tomorrow and will post pictures on this thread of that one. As i mentioned earlier, i will take shots of my doorcard build and post them up too.
any comments?
Posted
Social Media Manager


1983(Y) VW GOLF GTi

Posted

Local Hero
Posted

Local Hero
T
Call yourself a breast man? Donate to Breast Cancer Awareness.
Christian Cochrane is fundraising for Breast Cancer Campaign
http://www.vwgolfmk1.o…topic&t=108667&highlight=
Christian Cochrane is fundraising for Breast Cancer Campaign
http://www.vwgolfmk1.o…topic&t=108667&highlight=
Posted
Local Hero
Posted
Settling In
Posted
Settling In
1987 gti cabby
Posted
Old Timer


G60
Posted
Settling In
Also trimmed the window push buttons in the same vinyl which should offset nicely against the cream doorcards.
Yeah i've had to think about ways around the speaker holes, and then the window winder fouling the pods etc
Thanks for the comments!
Posted
Settled In

Posted

Twitter Manager
:clap:
Posted
Settling In
If you get the stretch of the material right from the outset, then hardly any fillering is required.
we are making a back shelf for a mk1 mini cooper at the moment and this is the stretch of the material across the rings.
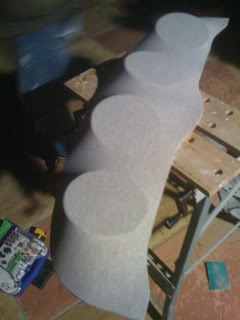
once the material is stretched nicely it then pretty much hardens in that same shape and usually just requires sanding to get smooth…the actual laying of the vinyl is the hardest part.
Posted
Local Hero
S4NUP said
Really…it looks more daunting than it actually is.
If you get the stretch of the material right from the outset, then hardly any fillering is required.
we are making a back shelf for a mk1 mini cooper at the moment and this is the stretch of the material across the rings.

once the material is stretched nicely it then pretty much hardens in that same shape and usually just requires sanding to get smooth…the actual laying of the vinyl is the hardest part.
Yeah right, mate it looks hard and anything that looks hard and that good is well done!
What's the part in the pic for? Is it the mini?
T
Call yourself a breast man? Donate to Breast Cancer Awareness.
Christian Cochrane is fundraising for Breast Cancer Campaign
http://www.vwgolfmk1.o…topic&t=108667&highlight=
Christian Cochrane is fundraising for Breast Cancer Campaign
http://www.vwgolfmk1.o…topic&t=108667&highlight=
Posted
Settling In
I think this car is gonna shake!
Yeah, so thats the speaker rack going into the back shelf which so far we've only stretched the t-shirt and resined up. having said this its very smooth and probably only requires one more brush over of resin and then we can sand and probably vinyl up.
obviously if your painting it up then i would definitely recommend using extra fibreglass / filler and then running through the sand/fill/sand/fill sand/fill with gradually using finer papers until your at around 1200 grit. then as usual wet dry sand with primer and paint.
It's quite funny,i never imagined myself giving advice about this kind of thing, let alone be confident with my work to show it off on a forum.
I've been quite selfish, unfortunately and not taken photos of the step by step build of the doorcards, and instead just went ahead and did them quickly.
i'll take some finished shots and whilst i am really happy with them, i did make a mistake with the actual positioning of the vinyl as it has 2 different coloured panels (like the original cards) and so the drivers side is lower than the passenger side…this is quite apparent especially with the armrest/handle in place. I think for now, i'll leave it where it is, but may spend time later this year to re-stitch a new passenger cover.
I'll have pictures up tomorrow night.
Thanks
Posted
Local Hero
Small world eh.
T
Call yourself a breast man? Donate to Breast Cancer Awareness.
Christian Cochrane is fundraising for Breast Cancer Campaign
http://www.vwgolfmk1.o…topic&t=108667&highlight=
Christian Cochrane is fundraising for Breast Cancer Campaign
http://www.vwgolfmk1.o…topic&t=108667&highlight=
Posted
Settling In
Theres another guy on the same road that has a silver MK1 cabby, who i think is doing his up for the summer…but haven't managed to speak to him yet.
Posted
Settling In
I think this car is gonna shake!
Yeah, so thats the speaker rack going into the back shelf which so far we've only stretched the t-shirt and resined up. having said this its very smooth and probably only requires one more brush over of resin and then we can sand and probably vinyl up.
obviously if your painting it up then i would definitely recommend using extra fibreglass / filler and then running through the sand/fill/sand/fill sand/fill with gradually using finer papers until your at around 1200 grit. then as usual wet dry sand with primer and paint.
It's quite funny,i never imagined myself giving advice about this kind of thing, let alone be confident with my work to show it off on a forum.
I've been quite selfish, unfortunately and not taken photos of the step by step build of the doorcards, and instead just went ahead and did them quickly.
i'll take some finished shots and whilst i am really happy with them, i did make a mistake with the actual positioning of the vinyl as it has 2 different coloured panels (like the original cards) and so the drivers side is lower than the passenger side…this is quite apparent especially with the armrest/handle in place. I think for now, i'll leave it where it is, but may spend time later this year to re-stitch a new passenger cover.
I'll have pictures up tomorrow night.
Thanks
0 guests and 0 members have just viewed this: None.