


Rebuilding cylinder head - NOW WITH PICS

Posted
#697634
(In Topic #84161)
Local Hero

Rebuilding cylinder head - NOW WITH PICS
How easy is it to replace the valve seals? I read the Haynes manual and it says you need a special tool to push the seals down with, if you don't use it you'll damage the seals and have high oil consumption, etc. Also, is it worth the hassle, since I'd have to spend ?30 or so on a valve spring compressor. Also, worth lapping the valves in while I'm here?
��������������������������������
Posted
Local Hero

Regards Volkswarren
X2 1983 A REG EW CAMPAIGN In WHITE(Awaiting full rebuild solid body) �& T Reg S1 GTi Project, Still�Looking for Series 1 GTi's or a 16S Oettinger to restore (Complete Cars only) �or an A reg Lhasa Green or White Gti to restore, also consider �Black, Red or Blue, Also Golf Driver Project Wanted anything considered WHY
X2 1983 A REG EW CAMPAIGN In WHITE(Awaiting full rebuild solid body)
�& T Reg S1 GTi Project, Still�Looking for Series 1 GTi's or a 16S Oettinger to restore (Complete Cars only) �or an A reg Lhasa Green or White Gti to restore, also consider �Black, Red or Blue, Also Golf Driver Project Wanted anything considered WHY
Posted
Local Hero
volkswarren said
i'm sure the place that skimmed it would have done that if you ask them, you'll kick yourself if you don't do them and it smokes like hell, we use a bit of pipe you have to make sure you don't push the middle down as the spring comes out, only ever had one problem, and that just hadn't been pushed home completely.
Yeah, I wanted to do as much as I can on my own. So I only asked them to check and skim the head…..
��������������������������������
Posted
Settled In

Posted
Local Hero
never seen this, and i've fitted loads of head sets, where do u get your gasket sets from??Oldfart said
the real 'special tool' is the little plastic sleeve which should come with the set of seals. This is a small tapered tube of very thin clear plastic which fits over the top of the valve stem and lets you smoothly slide the seal over the stem -especially the little ridges where the collets fit.
Regards Volkswarren
X2 1983 A REG EW CAMPAIGN In WHITE(Awaiting full rebuild solid body)�& T Reg S1 GTi Project, Still�Looking for Series 1 GTi's or a 16S Oettinger to restore (Complete Cars only) �or an A reg Lhasa Green or White Gti to restore, also consider �Black, Red or Blue, Also Golf Driver Project Wanted anything considered WHY
X2 1983 A REG EW CAMPAIGN In WHITE(Awaiting full rebuild solid body)
�& T Reg S1 GTi Project, Still�Looking for Series 1 GTi's or a 16S Oettinger to restore (Complete Cars only) �or an A reg Lhasa Green or White Gti to restore, also consider �Black, Red or Blue, Also Golf Driver Project Wanted anything considered WHY
Posted

Local Hero

Found it in this uselful list of VW tools
My local VW dealer said they could get one and they hadn't had one one in the garage for years - probably a fob off as I didnt want to pay one of their fitter monkeys to do it. I ended using a socket, doesn't need much effort to get on. The little plastic sleeves should come with the new seals.
Cheers
1981 1600 GTI (coming to a road near you soon…)
1983 1100 C
1983 1100 C
Posted
Local Hero
��������������������������������
Posted
Settled In
volkswarren said
never seen this, and i've fitted loads of head sets, where do u get your gasket sets from??Oldfart said
the real 'special tool' is the little plastic sleeve which should come with the set of seals. This is a small tapered tube of very thin clear plastic which fits over the top of the valve stem and lets you smoothly slide the seal over the stem -especially the little ridges where the collets fit.
Its just a little tube made of Mylar that sits on the end of the valve after youve pushed the valve into its guide, then you pop the stem seal over it.
It just prevents the valve tip from cuttung into the seal.
Ive got one someplace……now if only i could find it… :dontknow:
Posted
Settled In
I found a short piece of plastic tubing that was just too narrow, softened it in steam from a boiling kettle so it fitted part-way over the valve stem, and hey presto - one "valve stem seal tool".
You'll need a small socket, (9mm?) with a central hole big enough for the valve stem to fit through.
I found that a magnetic screwdriver/grabber was a real help with the valve collets - they can be very hard to get out/off otherwise.
AliCabrio
PS - got my valve spring compressor from; http://www.fine-tools.co.uk/
Mars Red 1.8 GTi Cabrio 1985
Seat Covers
Scratches
Leaky roof
1 million smiles per hour
Seat Covers
Scratches
Leaky roof
1 million smiles per hour
Posted
Local Hero
I tried my FLAPS but their valve spring compressor was ?60, so I went to - believe it or not - Halfords, whose similar tool was ?35. I've checked prices with my favourite online tool suppliers (and the link supplied - thanks!) and they're all around that mark.
I feel somewhat relieved that I haven't just bought the tools in vein - I tried pulling out the old valve seal and it was really brittle and just fell to bits. So at least now I know the engine will have had a complete top end rebuild, once all the stuff is done. Wish me luck….
��������������������������������
Posted
Local Hero

Regards Volkswarren
X2 1983 A REG EW CAMPAIGN In WHITE(Awaiting full rebuild solid body)�& T Reg S1 GTi Project, Still�Looking for Series 1 GTi's or a 16S Oettinger to restore (Complete Cars only) �or an A reg Lhasa Green or White Gti to restore, also consider �Black, Red or Blue, Also Golf Driver Project Wanted anything considered WHY
X2 1983 A REG EW CAMPAIGN In WHITE(Awaiting full rebuild solid body)
�& T Reg S1 GTi Project, Still�Looking for Series 1 GTi's or a 16S Oettinger to restore (Complete Cars only) �or an A reg Lhasa Green or White Gti to restore, also consider �Black, Red or Blue, Also Golf Driver Project Wanted anything considered WHY
Posted
Settled In
It'll be worth it for that "I re-built this engine myself" smug feeling as you cruise down the local drag…..
…..checking the oil-temp and oil light every 30 seconds…..
Ali Cabrio

Mars Red 1.8 GTi Cabrio 1985
Seat Covers
Scratches
Leaky roof
1 million smiles per hour
Seat Covers
Scratches
Leaky roof
1 million smiles per hour
Posted
Local Hero
Initially it was really frustrating and took ages, but once I'd developed the 'knack' of slipping the collets on before compressing the valve, its going fine and I've got the process down to 10 minutes each valve, including cleaning all the parts super-clean, then slipping the valve stem seal over, then putting it all together and oiling up the area before popping the hydraulic tappet over.
In the end, fitting the valve stem seals is a non-issue - they slip over the top of the valve with no troubles, maybe because I soaked them in oil beforehand. Then pushing them firmly onto the valve guide is easy, an 8mm 3/8" drive socket does the job nicely.
6 valves done, 10 to do tomorrow……
��������������������������������
Posted
Local Hero

Posted
Settled In
Hopefully, you get that slightly scary feeling of cautious success, where you frantically riun around topping up the coolant, followed by those worrying few minutes when you think 'where the f**k did all this smoke come from, as the grease and oil burns off the manifold!
Then you have a beer… :mrgreen:
Posted
Local Hero
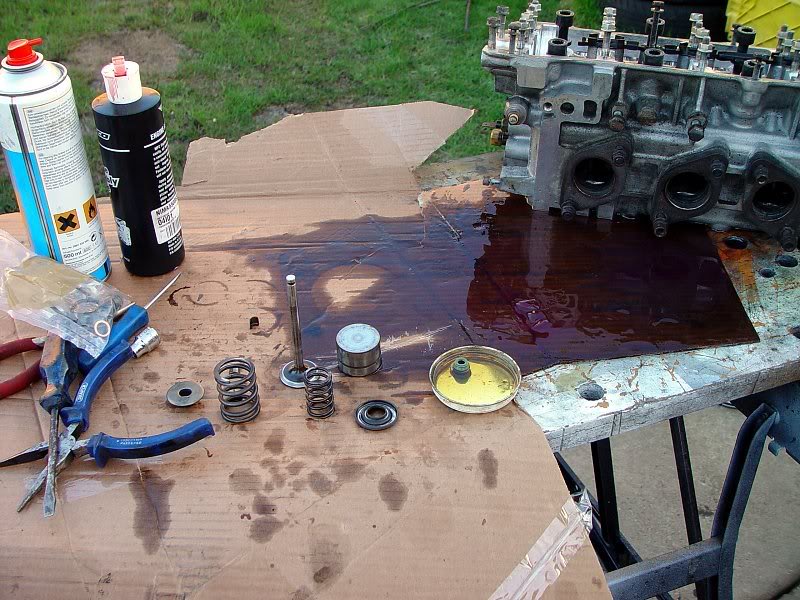
Laying out the parts ready for cleaning and refitting. Note the dish with oil in it, smothering the valve stem seal in oil.

The middle valves are most awkward, I needed to dangle the head on the edge of the workbench. Valve stem seal is pushed in with an 8mm x 3/8" drive socket.
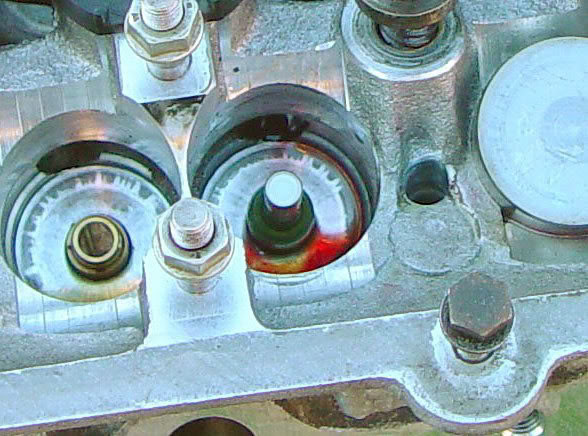
Close-up showing the valve stem seal in place. Note the red stuff, which is engine assembly lube, a thick and sticky lubricant

This is the trick I found works best. I put the bottom spring cup in, then both springs, then the top spring cover, then the collets, before fitting the valve spring compressor tool over it all

The tool is fitted and very gradually I wound down the spring, during which I ensured the tiny collets were more or less in place. Once wound down enough, I could push one collet onto the recess and the assembly lube held it there; then a wound down a little further and I could push the other one in. Then wound it all up again.
After this, a test 'press' on the valve is done, to make sure everything stays in place (but you can see the collets going on properly), then dousing the valve in engine oil, followed by a blob of assembly lube which would stay in place even if the oil drains away between now and startup. Finally, the tappet is cleaned up and popped over the top.
��������������������������������
Posted
Settled In
Startup
While I had my cylinder head off, I changed the fuel filter.
When I came to start the engine, I had to turn it over for quite some time before it caught and ran.
This probably had the desirable effect of circulating oil to the cylinder head (and getting the oil up to pressure) before the engine actually started, and raised the revs above cranking speed.
Might be worth bearing in mind if you're concerned about the head being properly lubed before the engine starts.
Ali cabrio
Mars Red 1.8 GTi Cabrio 1985
Seat Covers
Scratches
Leaky roof
1 million smiles per hour
Seat Covers
Scratches
Leaky roof
1 million smiles per hour
Posted
Newbie

Posted
Local Hero
Also, did you get your valve stem seals from VW or GSF, or somewhere else?
I'm about to rebuild my 1.6 8v head this week, and want to get it right first time (I hope!)
Cheers
Rich
Posted
Local Hero
��������������������������������
0 guests and 0 members have just viewed this: None.