timing belt seals.
Posted
#1361812
(In Topic #167063)
Settled In


is there anyone out there who has done these before and could give me a few tips or heads up before i start the job?
i have a few questions so anyone who knows the answers please speak up!
1. where are the locking points in the flywheel casing to stop the engine from rotating whilst the timing belt is off, and are there any other locking points on the engine?
2. how much oil does the whole system take after a drain?
3. are there any specialist tools required to do the jobs? i am thinking of just using some self tapping screws and a bit of pulling to get the seals out, wondering if that will work?
i shall try create a write up/ how to, so that it can be put on here for others
wish me luck!
Posted
Local Hero

Don't know what you mean by oil pump seal, the oil pump is in the sump so nothing to do with the timing belt?
Before you remove the timing belt get the timing to TDC and mark all the timing marks with some white paint/tipex, Haynes manual tells you where they all are and how to see all the marks. As far as I know there is no locking points to stop things moving, if it moves you should have marked all the marks to put it back.
Camshaft - take the rocker cover off, get a metal bar and a bit of wood, place the wood on the edge of the head and put the bar through camshaft cog to stop it moving then losen the bolt on the end of the camshaft. Now move the Intermediate shaft and put the bar through the cog onto the block and losen the nut on the shaft.
Now take the cambelt off, take off the cap nearest the timing belt on the head (The caps MUST be undo in a certain order or the camshaft can get bend, Haynes tells you the order) and take the cog off the camshaft becareful not to lose the woodruff key when removing the cog and make sure you mark which is the outside of the cog so the timing marks match up once back together, now with the cap removed you will see the seal, it will slide easy off the shaft, put the new seal on with a little oil on the outside and I found putting a little bit of "blue hylomar" between the cap and the head will stop any oil leaks under the cap, put the woodruff key and cog back on, tighten up/torque all the caps in the right order. Put the bar back throught the cog and torque up bolt
Intermediate shaft - take the cog off as before and mark outside, losen the two nuts holding the bit which holds the seal and remove, poke the seal out with a big screw driver, get a large socket the same size as the seal and push the new seal in the the holder (a little oil will help) put it back onto the engine torque up and put the cog on (again don't lose the woodruff key) and torque that back up
When finished put a NEW cambelt and tensioner on check and double check timing marks as they would of moved the Intermediate spins very easy, once you think its right turn the engine over by hand then check again, put the rocker cover back on and see if the engine starts.
Oil is about 4L for a change thats with pouring some into the filter before fitting.
You will need something to tension up the timing belt, I use this sort of thing,
http://www.ebay.co.uk/itm/4-Piece-Combination-Circlip-Internal-External-Plier-Snap-Ring-Tool-Set-/350574851722?pt=UK_Hand_Tools_Equipment&hash=item519fe3b68a
the bent 90o is just right to fit into the holes of the tensioner to tension the belt, and make sure you turn the tensioner the right way as if it the wrong way the plastic lower cover will not fit back on, if it wrong you will see what I mean………
As 'Ive said a haynes maual will tell you most of this in more detail than I have so if you don't have one I strongly recommend getting one.
Good luck and let us know how you get on and if you need anymore help or I'm not clear on anything.
Best to either change the oil first and check everything working or do the seals and check the engine runs before changing the oil as if anything goes wrong it less to check if you've not touched it before a problem happens.
 Last edit: by mark1gls
1988 Mk1 Golf GTi Cabriolet 1.8cc DX, K-jet. Daily drive. 317,000 miles and counting
1978 Mk1 Scirocco GLS 1.6cc FR, Webber carb. Weekend toy.
1978 Mk1 Scirocco GLS 1.6cc FR, Webber carb. Weekend toy.
Posted
Settled In


it just says to prise the seals out with a screwdriver with tape on the end of it!
now i have all the parts we shall see how it goes! picking up an o-ring for the intermediate shaft oil seal housing. looking through the illustrated parts catalogue i have i missed the seal, so didn't start the job incase the one on the car at the moment is perished
so tomorrow i will be logging all i do and trying to make a how to for others
Posted
Local Hero

Let us know how you get on and any problem just ask.
1988 Mk1 Golf GTi Cabriolet 1.8cc DX, K-jet. Daily drive. 317,000 miles and counting
1978 Mk1 Scirocco GLS 1.6cc FR, Webber carb. Weekend toy.
1978 Mk1 Scirocco GLS 1.6cc FR, Webber carb. Weekend toy.
Posted
Settled In


it took me a good 5 hours to do, this is my first how to so bare with me!
this method is how i managed to do it and is for engines with the code: EX
steps
1. remove air filter
2. remove top timing belt cover,
by unlatching the two clips at the upper most point and wiggling it free
3. jack the front of car up and put on axle stands.
4. take forward right hand (from drivers seat) wheel off.
5. remove auxiliary drive belt,
by loosening the adjustment bolt on the alternator and moving the alternator downwards.
6. remove the crankshaft pulley and the water pump pulley
this i found easiest to use a pair of plug pliers to hold the pulley allowing me to apply enough force to the allen key bolts.
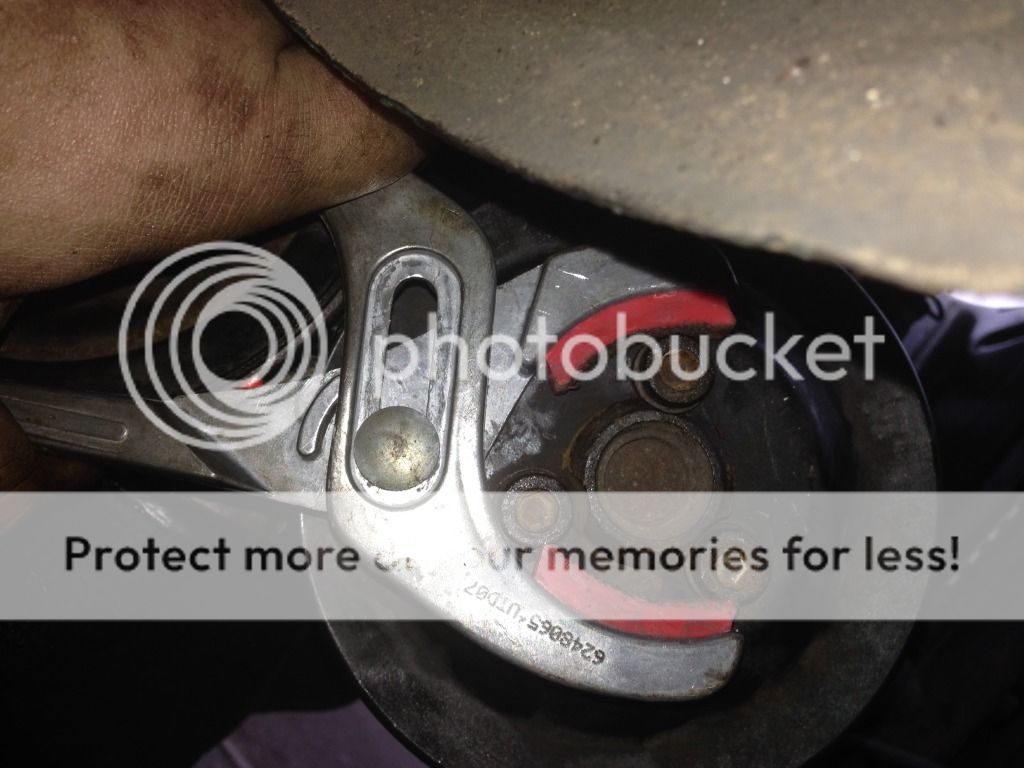
7. remove the lower timing belt cover,
to do this the crankshaft pulley and water pump pulley need to be removed, to allow access to hiding bolts and to allow the cover to be removed.
8. remove the number one piston HT lead and spark plug
9. remove the flywheel inspection cap on gearbox
10. place a long screwdriver into the piston chamber
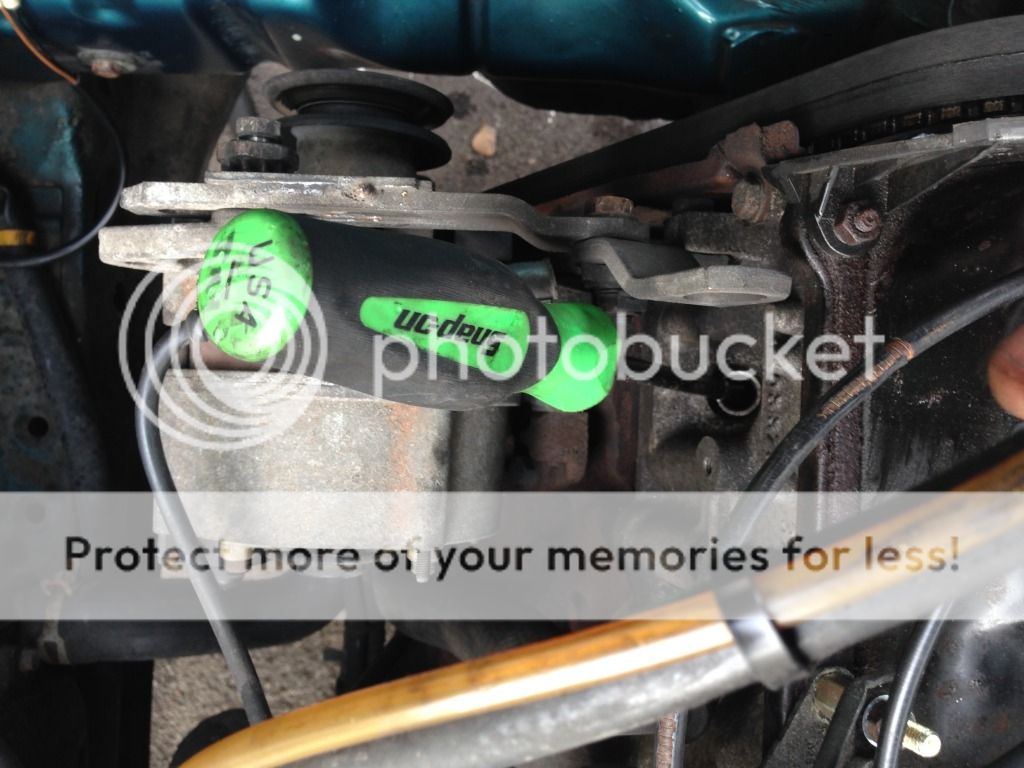
NOTE: ENSURE WHEN TURNING THE CRANKSHAFT THAT THE PISTON DOESNT TRAP THE SCREWDRIVER AS IT MOVES UP AND DOWN, THIS COULD CAUSE DAMAGE TO THE PISTON OR BORE
11. turn the crankshaft with a 19mm socket until the screwdriver is at its up most position and the markings on the cam shaft sprocket (O T) are inline with the markings (arrow) on the plastic cover the top timing belt top cover was latched onto, and remove the screwdriver.

12. look to see if there is a distinct mark on the flywheel, looks like a chisel has been smashed into it!
NOTE: THE CRANKSHAFT PULLEY ONLY FITS ONE WAY, THERE IS A SMALL NIPPLE TO ENSURE THIS CANT BE FITTED THE WRONG WAY. AS CAN BE SEEN AT THE 9 O'CLOCK POSITION ON THE PHOTO BELOW
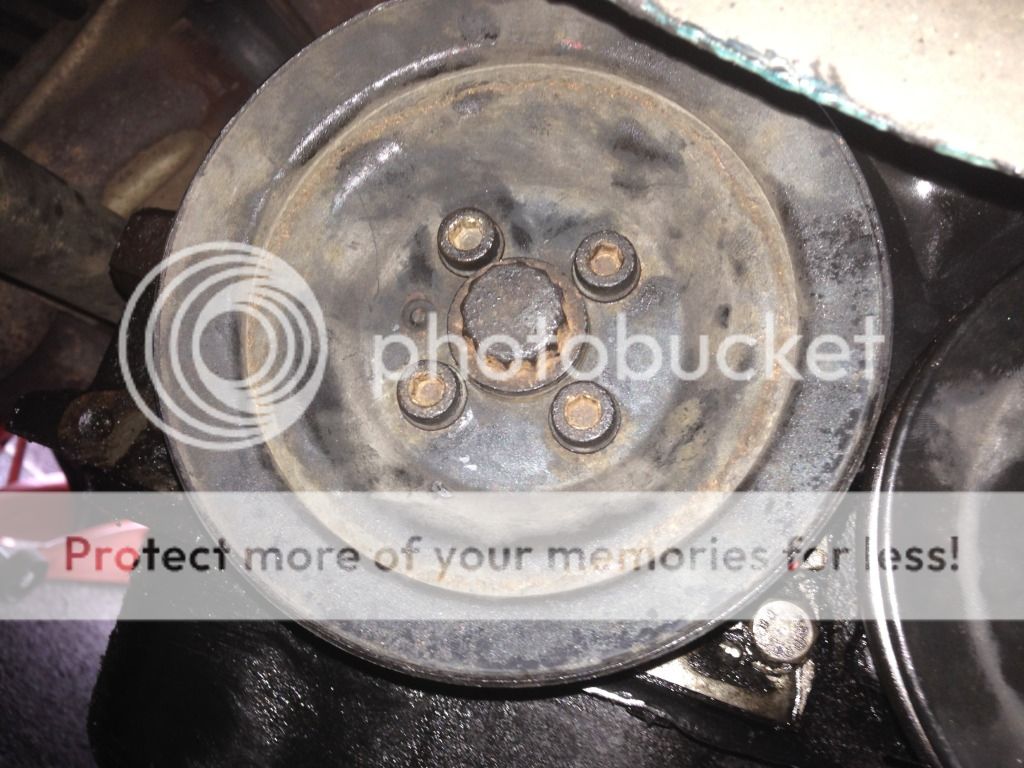
13. refit hand tight the crankshaft pulley to the sprocket.
14. check that the timing mark on the pulley lines up with the mark on the intermediate shaft sprocket
the mark on the sprocket looks like a punch has been hit into the side of it, and the mark on the pulley looks like a chisel has been hammered into the lip closest to the engine block.
NOTE: IF ONE OR MORE OF THESE MARKS DONT LINE UP YOUR TIMING COULD WELL BE OUT.
15. once you are happy all these marks line up its time to mark everything!
i used torque seal, as i had it to hand, but tip-ex works just as well.
16. where to mark:

a) cam shaft sprocket to the plastic shield
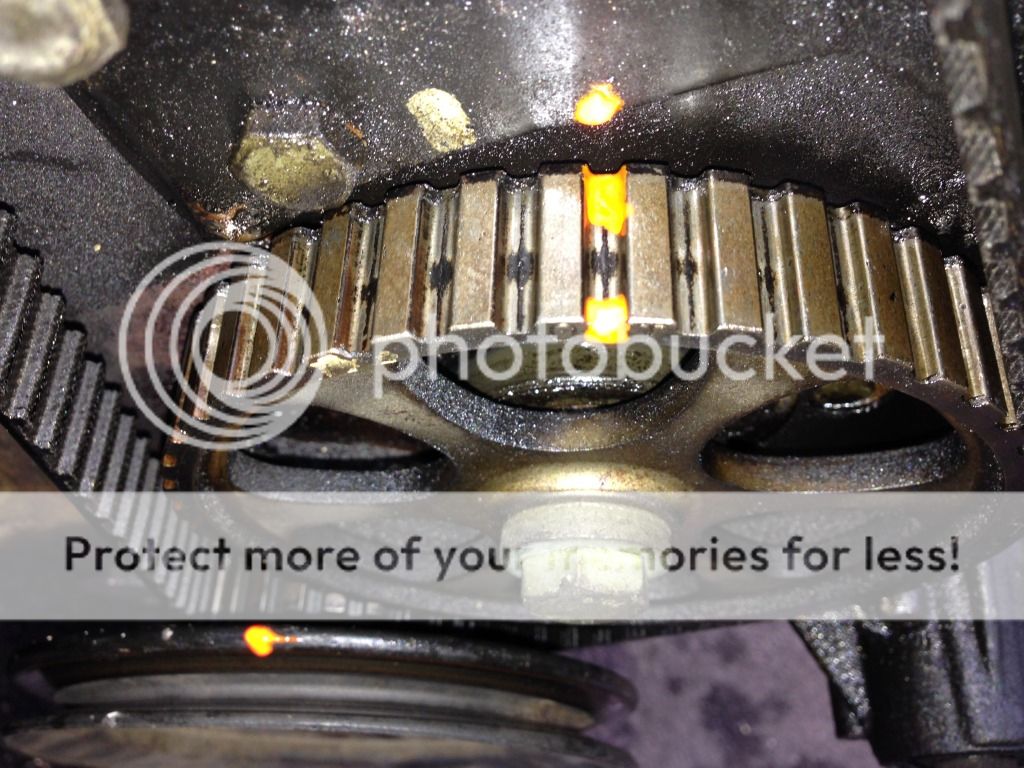
b) intermediate shaft sprocket to the engine block

c) crankshaft pulley to the intermediate shaft sprocket ( do this in two places i.e at each point where the outer circumferences cross) (i couldnt get a good enough angle onto the sprocket so took a photo when it was off the shaft)
17. once your happy and have checked double checked and maybe triple checked that all the markings are in the correct place and that the flywheel is in the correct position and that the screwdriver is in the correct position, move onto the next step!
18. loosen the nut on the timing belt tensioner
19. turn the tensioner by hand anti clockwise to slacken the belt.
20. last chance to check everything again!
21. remove the timing belt
NOTE: I REPLACED THE OIL DURING THIS PROCESS, AND REMOVED THE OIL BEFORE REPLACING THE SEAL SO DONT KNOW IF THE OIL COULD COME OUT OF THE HOUSING. I DOUBT IT AS THE OIL SHOULDN'T BE UP THAT HIGH ON THE ENGINE BUT WORTH KNOWING THAT THE OIL COULD HAVE TO BE REPLACED!
NOTE: THE TORQUE ON THE SPROCKET SECURING BOLT IS ROUGHLY 80NM, ENSURE THE CAR IS STABLE ON THE AXLE STANDS BEFORE ATTEMPTING TO LOOSEN THE BOLT.
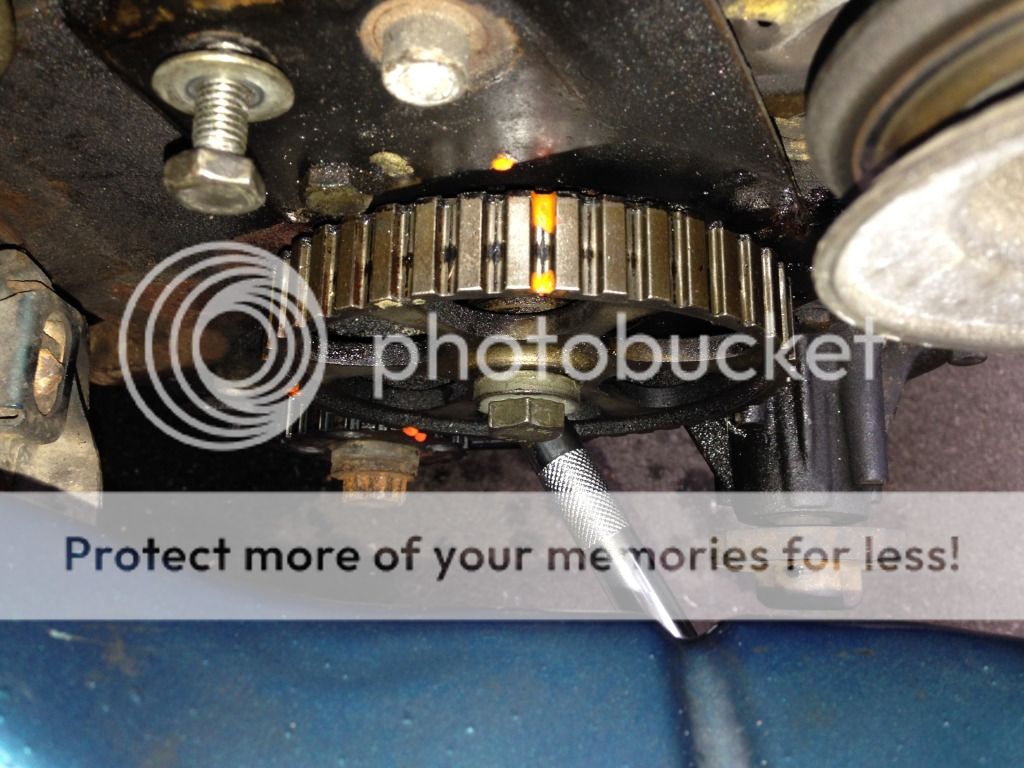
22. put a large punch or extension through the intermediate shaft sprocket so it stops the shaft turning against the oil housing bolts, and remove the sprocket securing nut.
i had to extend the ratchet handle by adding a spanner to increase the turning moment produced to budge the bolt, i think it is torqued to 80Nm.
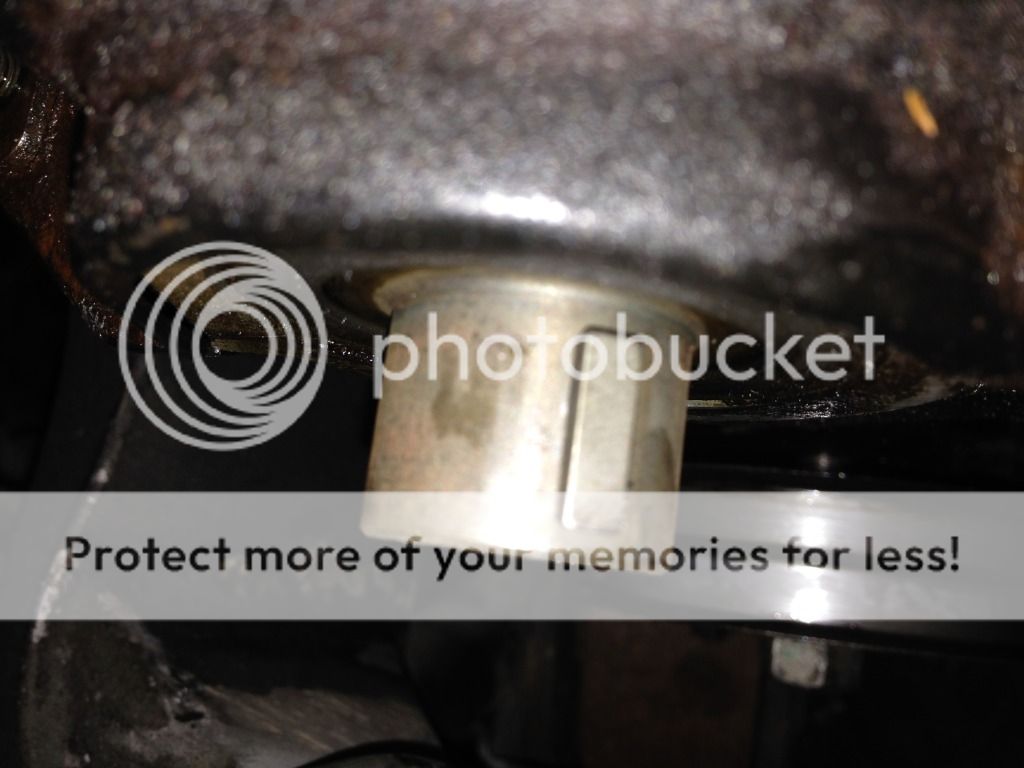
23. remove the sprocket ensuring the woodruff key isn't lost.
for those that don't know what the woodruff key is, it is a small half moon shaped piece of material, the radius goes into the shaft and the flat edge is poking out only allowing the sprocket to be fitted in one orientation. (shown in the picture above)
NOTE: PLACE DRIP TRAY UNDER TIMING BELT SIDE OF THE ENGINE TO ENUSRE THE CAPTURE OF OIL THAT COULD DRIP OUT.
24. remove the seal housing from the engine block
there is a slot at the top end of the seal housing which allows a screwdriver to be pushed in to assist removing the housing.
25. take the old o-ring out from the housing and discard it
26. from the back of the housing using a punch and a hammer, remove the old seal.
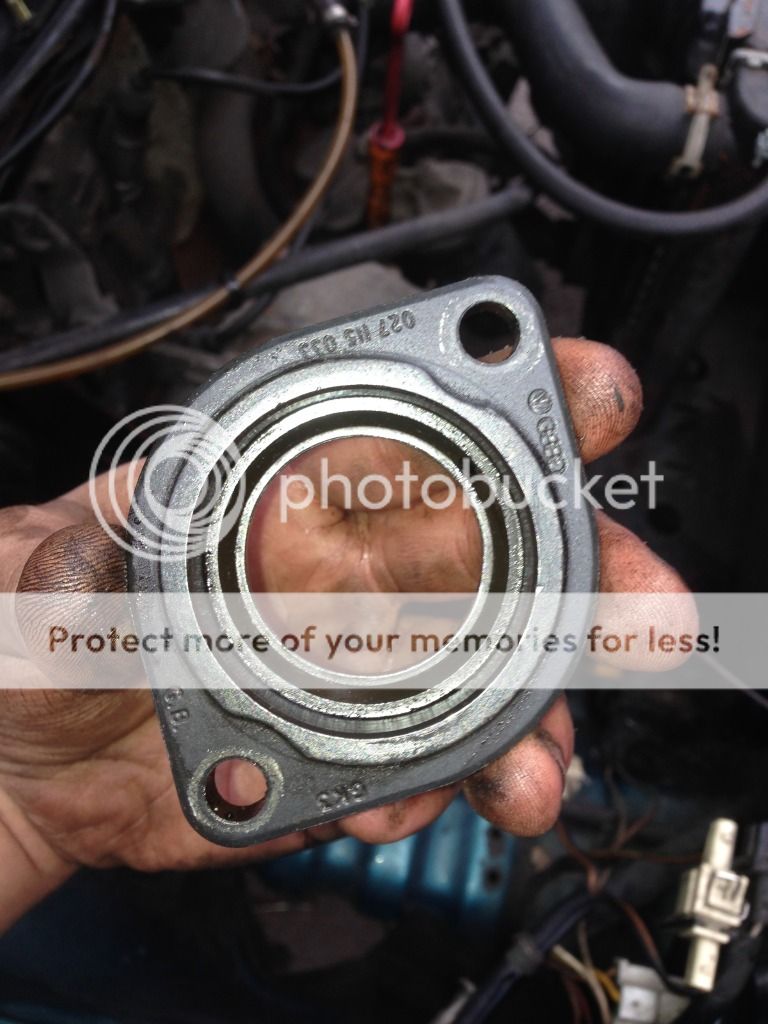
27. inspect the seal housing, clean it with nail varnish to remove any residuals.
28. if any burrs or scores are on the housing inside surface, use 400 grit emery cloth to polish them out.
29. rub a thin layer of gasket sealant (RTV) on the inside of the oil seal housing and also to the outer edge of the oil seal.
30. push seal into the seal housing, use a large socket to evenly punch the seal all the way into the housing.
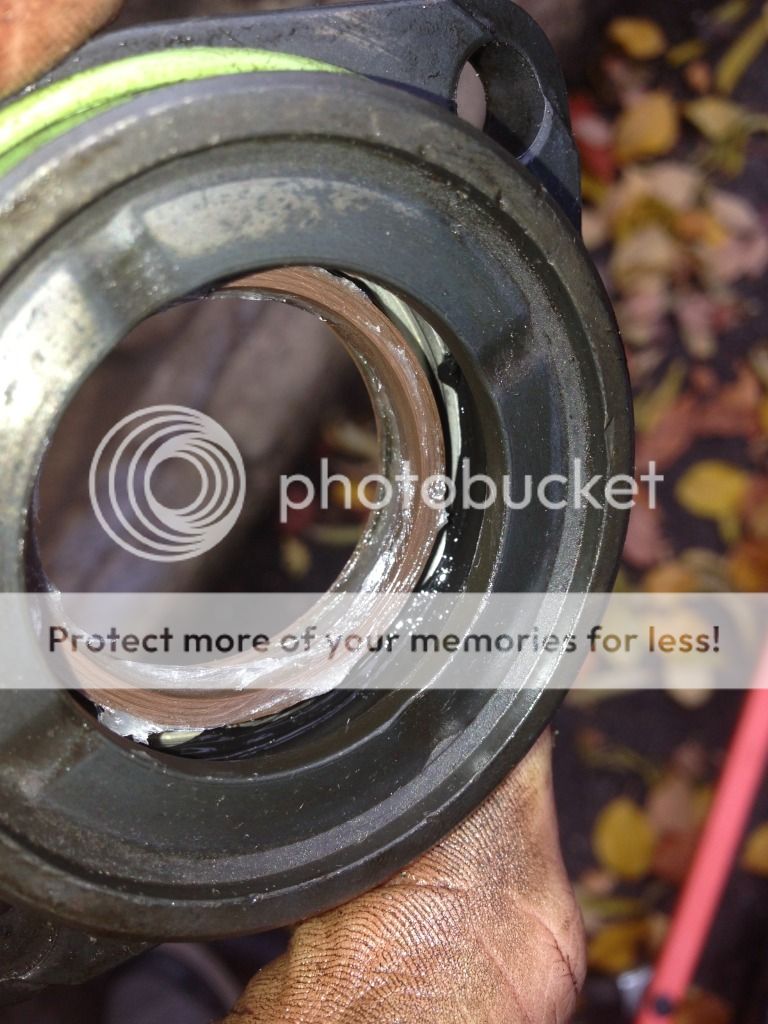
31. rub vaseline to all the inside contact surfaces with the intermediate shaft
this helps stop the oil seal overheating and burning on its first run before the oil gets inside the seal to help cool it down.
32. put new o-ring on the housing
33. install the seal housing back into the engine block. and tighten bolts a little bit at a time until the housing is seated correctly and bolts tight.
34. put the woodruff key into the slot on the shaft radius first
35. fit the intermediate shaft sprocket onto the shaft, ensuring the woodruff key doesn't get pushed out of the shaft.
36. tighten the bolt to the sprocket to 80Nm or there a bouts!
37. line up all the marks on the sprockets with the marks made before the belt was taken off.
38. fit the timing belt, start from the crankshaft, then make sure there isn't any slack between the intermediate shaft and then again make sure there isn't any slack up to the camshaft, all the slack should be over the tension roller.
39. turn the tensioner clockwise and hold it so the belt is tight as you tighten the nut to secure the tensioner.
40. refit the crankshaft and water pump pulleys
41. refit the ancillary drive belt and take the slack out by moving the alternator back up to its original position.
NOTE: BEFORE STARTING THE ENGINE ENSURE TO TURN THE CRANKSHAFT THROUGH A FULL CYCLE OF ALL THE PISTONS TO ENSURE THE PISTONS DONT ENGAGE WITH THE VALVES CAUSING DAMAGE.
42. if the pistons do all turn freely then its time to try starting the engine, ensure the spark plug has been refitted first!
43. if all is well then remove the ancillary belt again
44. remove the crankshaft and water pulleys again
45. refit the timing belt lower cover
46. refit the crankshaft and water pump pulleys
47. refit the ancillary belt
48. refit the top timing belt cover
49. refit the air filter
50. relax and have a cup of tea!
hope this is clear enough for you all! i was originally going to do all three but couldn't see a reason not to!
Posted

Moderator

Posted
Posted
Local Hero

The cam shaft seal is a little easier to fit as once the caps off it just slides onto the cam shaft and now you have all the the timing marks painted its easy to find them again.
If you looked and there is no oil leaking out don't worry about changing it unless you are removing the cam from the head, as the saying goes…..if it isn't broke don't fix it…..
1988 Mk1 Golf GTi Cabriolet 1.8cc DX, K-jet. Daily drive. 317,000 miles and counting
1978 Mk1 Scirocco GLS 1.6cc FR, Webber carb. Weekend toy.
1978 Mk1 Scirocco GLS 1.6cc FR, Webber carb. Weekend toy.
Posted
Settled In


as long as i make a mental note that is!
Posted
MOTY 2013

Hello my name is John and I'm a dub addict.
My wiring diagrams and other documents have moved here:
VAG Documents & Downloads
You'll need to sign into google/gmail for the link to work! (its free!)
My wiring diagrams and other documents have moved here:
VAG Documents & Downloads
You'll need to sign into google/gmail for the link to work! (its free!)
0 guests and 0 members have just viewed this: None.


