


HOW TO: Repair your troublesome 1.6/1.8 2e2 carb


MOTY 2013

HOW TO: Repair your troublesome 1.6/1.8 2e2 carb
TTV & idle over run valve:
These should both get 12v when the ignition is on, and there should be an audiable 'click' from the engine bay when the key is turned.
3/4 Point Unit:
When engine is off, should be extended to 14.5mm. When engine is started should retract to about 8.5mm after a varying delay, depending on temperature.
Pull Down Unit:
When engine is running, you should be able to close the choke flab by hand easily until the last 5mm or travel, then resistance should be felt. If not the pulldown unit is defective or incorrectly adjusted (it has a small screw on the end of the plastic lever, but this should not need to be adjusted)
Inlet manifold preheater:
Located at the bottom of the inlet manifold, looks like a hedgehog. The electrical connection is at the back of the engine bay behind the carb, should get 12v when engine is cold, should switch off when engine has warmed up. (controlled by red temperature sender, see below)
Vacumm Unit Stage 2:
This opens the second throttle butterfly when you have your foot down, not had a problem with this myself but I imagine sympoms for a failed unit would be no power under full throttle.
Waxstat, also known as 'Expansion Element':
Helps control the idle untill the autochoke switches off completely. Is full of wax which is heated by coolant. As the wax expands a pin exends from the unit pressing a lever which brings the idle down. Check by throwing into a bowl of hot water, the pin should extend. This has been known to fix dodgy units as it 'resets' the wax apparently!
Autochoke:
Should get 12v with the ignition on & engine is cold, should switch off when the engine is up to temp. (controlled by the grey sender, see below)
The autochoke should pass current, test by placing one prong of a multimeter on the plug, and the other on the autochoke housing.
You can check the autochoke heater visually by removing it and checking the heater spring around the outside of the unit, looks like the kind of spring you find in a ball point pen. When refitting, align the mark on the housing with the notch on the choke.
Temperature Senders:
At the front of the engine block there are 2 temperature senders, red & grey. The grey sender controlls the autochoke, the red controls the inlet manifold preheater. When the engine is cold these should pass current, when the engine has warmed up they should stop passing current. You can test units from the scrap yard by putting them in a tray filled with boiling water (just immerse the metal bit at the bottom!) to make sure they switch off correctly.

Last but by no means least, the inlet manifold coolant channel o'ring, the o'ring degrades over time eventually blocking the coolant channel completely. Often overlooked this is key to having a 2e2 carb that actually works! If this coolant channel is blocked expect poor running when cold, smoking, petrol smells, engine overruns and having the engine rev up to 1.5k+ at random until the engine is VERY hot.
Before you start, MAKE SURE you can reach ALL 6 bolts on the inlet, the third one from the right is wedged between the inlet and exhaust manifolds and is tricky to get to. You'll need a new gasket and the o'ring, part 32 in the diagram below.
First take the carb off:
Remove the airbox
Remove the fuel line from the carb
unplug the 2 electrical bits on the left side at the back
remove the earth connection from the front
Unplug the vacuum connection to the green reservoir
Remove the coolant connection to the inlet manifold
Remove 3 securing bolts
Check the condition of all the vacuum pipes, do one at a time its a bit complex back there
That should give you enough slack to move the carb over to the right out the way, next get the manifold off:
Undo all 6 bolts, remove manifold.
Then lever out the knackered old oring and clean up the hole it came out of. While you're here check the inlet manifold preheater. Then fit the new gasket & oring, refitting is the reverse of removal
Edit: Whilst you're there you might want to replace the core plugs that are only accessible when manifold is off. (thanks for the tip pmhpmh!)
Edit2: While the manifold is off check for free coolant flow, bits of o'ring or other garbage might have dislodged and ended up stuck in the inlet as what happened to Spanish Mike, see page 4 [LOL]

Hello my name is John and I'm a dub addict.
My wiring diagrams and other documents have moved here:
VAG Documents & Downloads
You'll need to sign into google/gmail for the link to work! (its free!)
My wiring diagrams and other documents have moved here:
VAG Documents & Downloads
You'll need to sign into google/gmail for the link to work! (its free!)
MOTY 2013
the channel heater unit should get a permanent 12v and is earthed through the carb, if not working check the volts at the connector and check the carb earth strap
3/4 point unit, when you turn the engine off the piston should fully withdraw and the extend to its starting position. Failiure to do this indiates a fault with the overrun solenoid.
pull down unit
to check for vac leaks in this unit attach a pipe to the lower port and unplug the upper port. Suck on the pipe. The arm should move a small amount and then stop when the vac collapes. Then if you put your finger over the upper port ad keep sucking the arm should withdraw a bit more and hold vacuum. If it fails to hold vac then replace.
hot air flap, this can seize during the summer as it doesn't get much use. So as the weather gets colder its worth spraying ome WD40 on this and making sure it moves
poor running can be caused by air leaks around the base flange, can be a cheap fix if you're having problems with missing at idle. To locate vac leaks try spraying gamping gaz (carefully) around the vac pipes and the base of the carb. Changes in idling should be heard when you find the leak!!
and some more from mark25
some stuff about the part throttle channel heater:
With the ignition off and the heater supply wire dissconnected, the resistance of the heater is about 3.8 ohms measured back to the negative of the battery. So this value includes all the wiring and earth straps back through the carb and engine.
With the ignition on and the heater supply wire connected, I have 11.3 at the heater supply wire. Therefore I am loosing about 0.5v across the switch or relay that controls the heater.
I think the symptoms if it?s not working are; the car runs rough until the engine is totally warm. You can get round this with a manual choke by just leaving it out longer. With mine I can put the choke in as soon as I?m out the drive way, in all but the coldest, ie ?5oC, weather.
Mark
EDIT: the above tests were done on a unit that had been transfered to a weber.
Hello my name is John and I'm a dub addict.
My wiring diagrams and other documents have moved here:
VAG Documents & Downloads
You'll need to sign into google/gmail for the link to work! (its free!)
My wiring diagrams and other documents have moved here:
VAG Documents & Downloads
You'll need to sign into google/gmail for the link to work! (its free!)
Posted
MOTY 2013
Rear of carb, the tube in the red circle is where the vacuum pipe to the airbox connects:

Front of carb, the tube in the red circle is where the pipe that splits off from the vacuum reservoir green pipe connects:

Vacuum overview:

Stage II vacuum control unit:

1. Thermo-pneumatic valve
2. Restrictor
3. Straight connection hose
Stage ll vacuum control unit
1 This device is fitted to 1.6 litre manual gearbox models and 1.8 automatic gearbox models from August 1984 on. Its function is to delay the Stage ll opening slightly whilst the coolant temperature is below 18?C. It achieves this by venting the vacuum hose via the thermo-pneumatic valve and the resistor (see illustration).
2 Check that the straight hose at connection 3 on the thermo-pneumatic valve is not blocked and check the valve itself by blowing through it. It should be open at 18?C and close when the temperature rises above 28?C.
Hello my name is John and I'm a dub addict.
My wiring diagrams and other documents have moved here:
VAG Documents & Downloads
You'll need to sign into google/gmail for the link to work! (its free!)
My wiring diagrams and other documents have moved here:
VAG Documents & Downloads
You'll need to sign into google/gmail for the link to work! (its free!)
Posted
MOTY 2013
I shall abbreviate pulldown unit to PDU for convenience
I'm going to assume that you have tested the old unit in accordance with Drew21's method detailed above, and it has failed. You should also check carefully all the vac hoses going to the PDU and replace if they look anything but recent. The one that goes down to the bottom of the carb from the "A" port on the PDU may degrade/perish due to proximity to manifold warmth.
Tools required: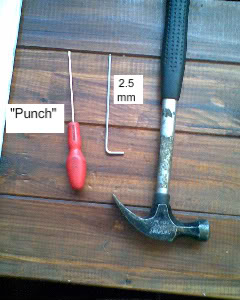
In order to show the process clearly, I've photographed a stripped-down carb, and you'll notice that the PDU is incomplete too…but not in any relevant sense.
I managed to change one of these without stripping any parts from the carb, but it is a bit tricky, as the autochoke assy is rather in the way.
Judicious juggling and bending can remove the old (easy 'cos it doesn't matter if it breaks) and insert the new; you run the risk of snapping plastic parts, however. You may prefer to make a note of approx. how far the adjustment screw protrudes into the 'slot' and then remove it to make insertion easier. Access to replace this screw isn't that nice however, as it's from the rear of the carb, and there are parts in the way, as always. I think it is the safer option probably.
Of course removing the autochoke assembly makes the job easy, but you may not need to if you are brave (the bendy method), or nimble-fingered (screw out method).
View of PDU in-situ. The red arrow shows the direction it moves when the diaphragm is 'pulled' by vacuum. The green arrow points at the part that actually touches the choke flap linkage. The blue arrow shows the stop that limits its overall movement:

The pin securing it: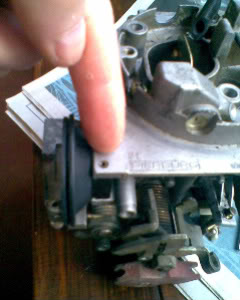
Knocking it out/down: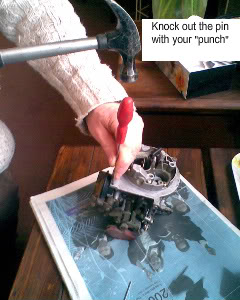
The adjustment screw: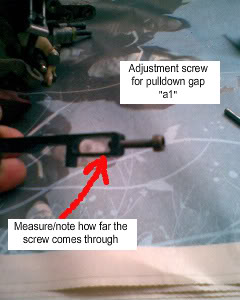
Access to adj screw: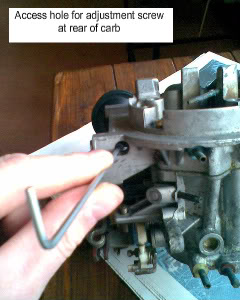
Once you've got the new PDU in and secured with the pin (I think you even get a little 'grippy washer' that fits over the stop too), you will want to set it up for your carb. Don't attach the vac hoses yet, you can set it up without even starting the engine. You just need one longer hose attached to the lower port "A", that you can suck on.
There are two adjustments, the black circular part at the front adjusts the first stage , the little Allen screw mentioned above sets the second stage. Look up the settings required for your engine code, my manual transmission EZ requires 2.8mm and 5.6mm for the two stages. Find some drill bits or similar of the right diameter, measurement is down the front edge of the choke flap, between it and the edge of the barrel.
With a completely cold engine, so that the choke spring holds the flap shut, suck on port "A" with port "B" open to atmosphere. You should see the flap open about the right amount, adjustable by screwing in, or out, the round plastic bit. Once you're happy with that, you can set the second stage by continuing to suck on "A" but now with "B" blocked with a little finger. You will find that the choke flap opens more now. If this second stage needs adjustment it's that little Allen screw round the back. You may struggle to do this while sucking and blocking things, so cheat! Just manually pull the long plastic part of the PDU forwards, as far as it will go. If that's too far you need to screw the Allen screw further in, and vice-versa.
Now you can plumb it all in with the correct vac hoses, and away you go.
See below for a table of the settings for all the various engine codes
Please reply if you've done this by an easier method.

Car / years / engine code(s) / transmission
Pulldown gap, first stage (a), mm
Pulldown gap, second stage (a1), mm
Audi 80 1.6CL / '83-'86 / DT / manual
2.6
5.0
Audi 80 1.6CL / '83-'86 / DT / automatic
2.9
6.0
Audi 80 GL & Coupe 1.8 / '83-'86 / DS/NE / manual
2.6
4.9
Audi 80 GL & Coupe 1.8 / '83-'86 / DS/NE / automatic
2.7
5.1
Audi 100 & Avant 1.8/ '83-'87/ DS / -
2.6
4.9
Golf/Jetta/Scirocco 1.6 / '83-'92 / EW/EZ / manual
2.8
5.6
Golf/Jetta 1.6 / '83-'92 / EW/EZ / automatic
2.9
6.0
Scirocco 1.6 / '83-'92 / EW / automatic
2.9
6.0
Caddy 1.6 / '83-'92 / EW / -
2.8
5.6
Golf/Jetta 1.6 Cat. / '86-'92 / RF / manual
2.5
5.0
Golf/Jetta 1.6 Cat. / '86-'92 / RF / automatic
2.9
4.8
Golf Cabrio/Scirocco 1.8 / '83-'92 / EXZ / manual
2.5
4.9
Golf/Jetta/Synchro 1.8 / '84-'92 / GU / manual
2.5
4.9
Golf/Jetta/Synchro 1.8 / '84-'92 / GU / automatic
2.3
4.7
Scirocco 1.8 / '86-'92 / EXZ / automatic
2.7
5.1
Golf/Jetta 1.8 Cat. / '86-'92 / RH / manual
2.1
4.4
Golf/Jetta 1.8 Cat. / '86-'92 / RH / automatic
2.1
4.4
Passat 1.6 / '83-'88 / DT / manual
2.6
5.0
Passat 1.6 / '83-'88 / DT / automatic
2.9
6.0
Passat 1.8 / '83-'88 / DS / manual
2.6
4.9
Passat 1.8 / '83-'88 / DS / automatic
2.7
5.1
In every case a rather tight tolerance is suggested of +/-0.2mm for the "a" dimension and +/-0.15mm for "a1" Can't really believe it's that critical myself
Hello my name is John and I'm a dub addict.
My wiring diagrams and other documents have moved here:
VAG Documents & Downloads
You'll need to sign into google/gmail for the link to work! (its free!)
My wiring diagrams and other documents have moved here:
VAG Documents & Downloads
You'll need to sign into google/gmail for the link to work! (its free!)
0 guests and 0 members have just viewed this: None.