


part-way through renovation of underside

Posted
Old Timer

part-way through renovation of underside
Posted
Local Hero

I don't think I'd have had the patience to keep removing and refitting the wheels etc!
Posted
Local Hero

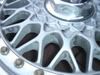
I didn't like watching TV anyway……yay, the new tyres on newly-refurbished wheels have been fitted (Dunlop SP Sport 200 175/70R13, which is coincidentally the closest match to original equipment).

Spray can paint - I really loathe spraying, but I'd much rather its covered up than left in primer, so its getting a quick spray and maybe later on I'll seek the help of a bodyshop or something to tidy it all up.

The inside floor came up nicely using 2 thin coats of stonechip. All thats left now is the sides of the boot, in topcoat

A rare shot of the pair of little troublemakers together. The cabby is temporarily back on the Avus alloys, while the GTI has the 'second' set of 9 spokes. I don't want to put the fresh set of Dunlops on until I'm sure there's going to be no rubbing issues.
Posted

Local Hero
question is though, which one will you be taking to Gaydon?

Posted
Local Hero

Posted
Old Timer

My car has been lowered 40mm and I have abbout 120mm clearance which doesn't seem a lot. There are loads of hills in Sheffield and I have a feeling my spoiler is going to get a lot of abuse!
Posted
Local Hero
Today's work has been the stripdown of the front calipers, flexi hoses, brake pipes, master cylinder and servo. Problems all round, starting with the new calipers having the wrong bolts/holes. The brake pipe connections were too far gone, so I simply sawed them off and used an 11mm socket combined with a breaker bar, to undo! The master cylinder connections were really yukky to get to until I took off the coolant expansion tank and fuel distributor, its well buried under loads of other components. But the connections themselves came off with not too much hassle. The servo was a right pain to remove, due to a little clip in a terribly inaccessible place, which held me up for ages, but eventually (through luck more than anything) came off. Only just finished, packing up at around 11pm under the floodlights. I also managed to cut my hands in 3 places and am now covered in plasters - ouch.

Draining the hydraulic fluid

Car once again in bits and tools all over the place

Part-way through

Master cylinder off, servo still attached
Posted
Local Hero

From left to right are a 16V servo with original thread, another 16V servo with the thread cut down, and the original servo. I took measurements from the back of the servo to the end of the thread and its 97mm for the original and 107mm for the 16V version. You need to use the original clevis pin because it has a hole in it for the return spring. This pin is longer than the 16V version. If you were to drill a hole in the 16V clevis pin, then it would be in the wrong place, since its shorter.
For info, the plunger in the servo is in a markedly different place (the 16V one is much further in) which means that you need to use the matching master cylinder and servo together.
I spent the morning driving around parts stores buying brake pipe and researching T pieces. VW do it, its off a VW Beetle and the part number is 803 611 755. But its over ?15……..so I found that the part off a Mini, is the same, except its 3 times cheaper.
Posted
Local Hero

Posted
Settling In

Posted
Local Hero

Posted
Local Hero

German plates (needless to say, it will be wearing its UK ones for the MoT!)

A final check underneath, secured a brake line.
Posted
Local Hero
chudd said
Good work Paul .
Looks the Dogs ………
Well done , garden restoration deserves respect mate .
Cheers………
[rabbit okay
]
Posted
Settling In
Posted

Secretary


:wink:
First Golf, lots of work. I've started so I'll finish!
Posted
Old Timer
Posted
Old Timer
Sorry! Car is looking really good thogh.

Posted
Local Hero
marsredgti said
ah! you have what i had, two differnt front headlights, drives me mad.
Sorry! Car is looking really good thogh.
Yeah you've reminded me, thats another job to do before the MoT. Luckily, I have 6 headlamps between the 2 cars, although only 3 are good enough for the MoT. So I need to swap them around a bit!
Posted
Local Hero
Not much to do now before its proper debut at Gaydon (MoT dependant!)
Posted

Local Hero

Crazyquiff's Mk1 Golf Parts Emporium
www.golfmk1.co.uk - you know you want to….

www.golfmk1.co.uk - you know you want to….
0 guests and 0 members have just viewed this: None.