


part-way through renovation of underside

Posted
Local Hero

part-way through renovation of underside

Posted

Local Hero
Posted

Local Hero


Like the pic 8)
Andy
LINCOLNSHIRE REGION - https://www.facebook.com/groups/467122313360002/
1983 MK1 Golf GTI Campaign Model - Under (looooong) resto!
1962 Rover P4 80
2002 BMW 745i
2008 BMW Z4 2.5Si
LINCOLNSHIRE REGION - https://www.facebook.com/groups/467122313360002/
1983 MK1 Golf GTI Campaign Model - Under (looooong) resto!
1962 Rover P4 80
2002 BMW 745i
2008 BMW Z4 2.5Si
Posted
Old Timer

G60
Posted
Local Hero
Posted
Local Hero
paul_c said
Took advantage of the longest day today (or is it tomorrow?) and worked outside until 10:30pm, the final assembly and packing up the tools, under spotlight:

Concered the 'Rabbit' is missing 8O

Posted
Local Hero
chudd said
paul_c said
Took advantage of the longest day today (or is it tomorrow?) and worked outside until 10:30pm, the final assembly and packing up the tools, under spotlight:

Concered the 'Rabbit' is missing 8O
Its been caught and found by its rightful owners, after an extended holiday in my garden. Poor little rabbit, they don't look after it properly! It enjoyed its stay alongside the Golfs.
Posted
Local Hero

Posted

Old Timer
I didnt know you had to repair your fuel filler cap panel cos it looks like its been sprayed in primer :dontknow:
So what needs to be done now for the MOT?
Posted
Local Hero
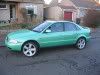
nice shot of the car in mid air

Posted
Local Hero
Rich
Posted
Secretary

First Golf, lots of work. I've started so I'll finish!
Posted
Local Hero
Not much for MoT now. I'm waiting on the wheels to be refurbished, then a set of new tyres, then I can set the ride height properly and do the camber and tracking. There's a bit of tidying up of the bodywork, a bit of paint and a thorough clean. The fuel filler area was a little bit rusty so it was cut out and a new panel made for this.
Posted
Settled In

Posted

Settled In
Remember, VW made the last car in 1992. After that they started making vehicles.
Posted
Local Hero
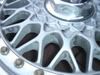
I picked the wheels up today, took them straight to the tyre fitter for 5x brand new Dunlop SP Sport 200 175/70R13s to be fitted, they'll look as good as new!
So the rest of the day was spent swapping over to the 'other' set of 9 spokes (quite tiring in the midday heat!) and setting up the final ride height, camber and tracking. Here's how I did the camber:

The car is supported by the wishbones to simulate weight on the wheels, one side by bricks and a sheet of board, the other side by trolley jack and a board, this allows it to be precisely levelled (see spirit level on front panel).

Then I attached the gauge to the brake disc and adjusted the eccentric bolt, I wanted to set 0.5? negative camber but in the end I could only set 0.4?.
I spent a couple of hours setting up the tracking, but then I noticed some minor rubbing (inner side of tyre on spring base) so I had to go up 10mm at the front, so I need to recheck the camber and tracking! The final ride height is 85mm lowered, although with the 175s I could probably go to 100mm lowered if I compromised on the camber setting, making the wheels less negatively cambered.

Anyway, here is the result of todays work, you can now see the desired look on the 9 spokes with the lowering. I took it for a tiny little drive up and down the street, and its well bumpy (a couple of bangs on severe bumps) but it can negotiate speed humps and no funny noises on the straight & level!
Posted
Old Timer
stunning
look.


Posted
Local Hero
marsredgti said
i took my bbs rs wheels off and put my original 9 spokes (also refurbed) on and really do think the car looks great on them
stunning
look.
I had a set of BBS wheels, also have a set of Scala (Avus) alloys, but for me the 9 spokes are the right looking wheels. I'm going for the original look, the only difference is the lowering. I've seen cars with BBSs, other alloys, different grilles, subtle chrome additions, M3 style rear lights, non-stock colours, etc. There's something 'right' about the original which I find very appealing.
Posted
Local Hero
I did some more bodywork on the outside, its getting flat using knifiny putty which is a very smooth filler in a tube. Black is such a pain to prepare, its not going to look perfect but it will do me for now. I can't afford to get it done by a bodyshop!
I also wire brushed, scraped, cleaned, degreased and painted in etch primer the inside floor area. I was running low on primer so I only did the rusty areas, which ended up being around 2/3 of the floor! These areas will be hidden by the carpet and floor mat eventually, so I'm going to paint the floor section in a thin coat of stonechip, with the visible sides of the boot in the correct topcoat finish.

Half way through, this will be painted black tomorrow.
Posted
Settled In
you make it look easy for when i goota do it. will be looking back at these and making notes
0 guests and 0 members have just viewed this: None.