


AL's (not so) mini build... August 2015 - Paint!

Posted
Local Hero

AL's "Mini Build" *04/12 - 6 months later...*
Hard work without much room under the car!
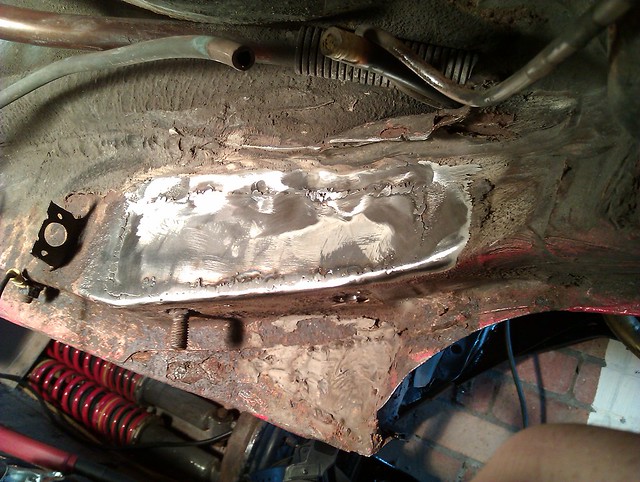
Weld 3 by www.pix-al.co.uk, on Flickr
No the best, but ground them back a bit more a did a few more buzzes after this pic.
Primed it with Acid etch and will give it a coat of underseal tomorrow.
Need to tackle the lower triangular section too as this is pretty bad.
My Build Thread
All My Build Photos - https://www.flickr.com/photos/pix-al/albums/72157622794406840
My other hobby - www.pix-al.co.uk
All My Build Photos - https://www.flickr.com/photos/pix-al/albums/72157622794406840
My other hobby - www.pix-al.co.uk
Posted
Local Hero
But, I am itching to get back at it! So much so that I bought some bolts to sort the snapped axle mount stud.
I am just finishing up fitting a new kitchen to keep the wife happy, but hopefully, next dry weekend we have, I am going to make some more progress!
Watch this space…
My Build Thread
All My Build Photos - https://www.flickr.com/photos/pix-al/albums/72157622794406840
My other hobby - www.pix-al.co.uk
All My Build Photos - https://www.flickr.com/photos/pix-al/albums/72157622794406840
My other hobby - www.pix-al.co.uk
Posted
Local Hero
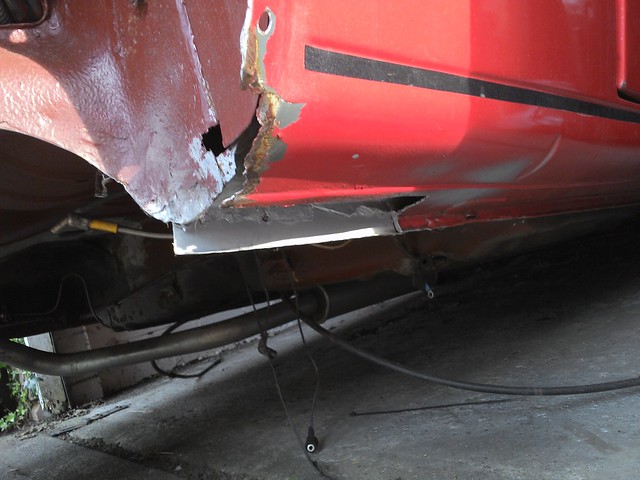
Took about 2 mins to cut it out, then spent about 20 min pondering how to patch it back up again!
No turning back though - I've cut it now!
Need to cut out a section of the outer sill too and then I'll take some pics and start trying to build it back up again.
Not going to be easy with just the back end on axle stands - got no room to swing a welder or a grinder round properly…
My Build Thread
All My Build Photos - https://www.flickr.com/photos/pix-al/albums/72157622794406840
My other hobby - www.pix-al.co.uk
All My Build Photos - https://www.flickr.com/photos/pix-al/albums/72157622794406840
My other hobby - www.pix-al.co.uk
Posted
Local Hero
1 year, 1 month and 1 week later and I have just started working on the car again!
I am so sick and tired of this lump of steel sitting on axle stands in my garage that I can't bear it anymore - I have to finish it!
Yesterday, I finished welding up a frame to sit the back of the car on while it is missing the rear axle. The mian reason for this is to give me something solid to stick some axle stands under that will lift it high enough in the air and not be in the way of me sliding under the car!
Hopefully will be able to crack on with fixing the actual car over the coming weeks and give you some reall progress pics to look at!
My Build Thread
All My Build Photos - https://www.flickr.com/photos/pix-al/albums/72157622794406840
My other hobby - www.pix-al.co.uk
All My Build Photos - https://www.flickr.com/photos/pix-al/albums/72157622794406840
My other hobby - www.pix-al.co.uk
Posted

Local Hero


Look forward to seeing some pic updates

Andy
LINCOLNSHIRE REGION - https://www.facebook.com/groups/467122313360002/
1983 MK1 Golf GTI Campaign Model - Under (looooong) resto!
1962 Rover P4 80
2002 BMW 745i
2008 BMW Z4 2.5Si
LINCOLNSHIRE REGION - https://www.facebook.com/groups/467122313360002/
1983 MK1 Golf GTI Campaign Model - Under (looooong) resto!
1962 Rover P4 80
2002 BMW 745i
2008 BMW Z4 2.5Si
Posted
Local Hero
I actually did some welding on the car today!
Only took a "finished" pic as didn't have my phone on me at the time…
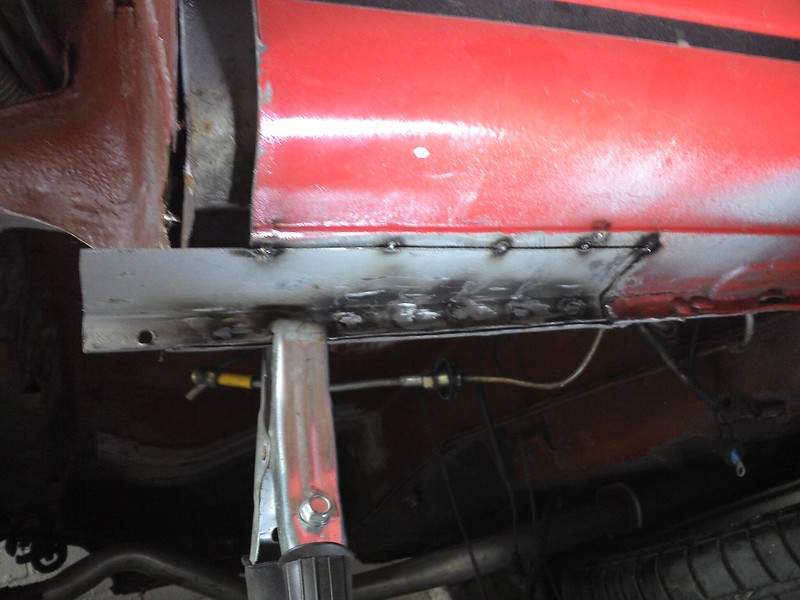
I plug welded the lower tringlular piece in place. Ground all of the welds back flush primed then sealed the whole area.
I don't know if I should really have seam welded around the whole piece? This peice isn't really structural, just a finishing piece between the chassis leg and the sill, so I thought it would be ok? Couldn't get the grinder into the corner properly anyway and went through a couple of drill mounted stones to grind the spots down as it was!
Anyway - PICS!
Here is the frame I knocked up to stand the car on.
It is attached to the bumper mounts and the little mounts on the rear of the chassis leg (Used in the factory, I think):

Untitled by www.pix-al.co.uk, on Flickr
The plate in and sealed (Still got to sort the snapped stud:

Untitled by www.pix-al.co.uk, on Flickr
Just the outer sill to look at now before I can start on the arch!
Untitled by www.pix-al.co.uk, on Flickr
My Build Thread
All My Build Photos - https://www.flickr.com/photos/pix-al/albums/72157622794406840
My other hobby - www.pix-al.co.uk
All My Build Photos - https://www.flickr.com/photos/pix-al/albums/72157622794406840
My other hobby - www.pix-al.co.uk
Posted

Moderator


Posted

Moderator
Posted
Local Hero
Started shaping up some bits for the sill repair.
Used an old vice and a hammer for forming my repair panels:

Untitled by www.pix-al.co.uk, on Flickr
Untitled by www.pix-al.co.uk, on Flickr
Over bent it a little, but once pulled back, was a good fit.
Started shaping up a couple of other bits to see how they will line up with the arch repair panel too.
Hopefully, some more pics soon!
AL.
 Last edit: by AL_Mk1
My Build Thread
All My Build Photos - https://www.flickr.com/photos/pix-al/albums/72157622794406840
My other hobby - www.pix-al.co.uk
All My Build Photos - https://www.flickr.com/photos/pix-al/albums/72157622794406840
My other hobby - www.pix-al.co.uk
Posted
Old Timer

Posted
Local Hero
Andy
LINCOLNSHIRE REGION - https://www.facebook.com/groups/467122313360002/
1983 MK1 Golf GTI Campaign Model - Under (looooong) resto!
1962 Rover P4 80
2002 BMW 745i
2008 BMW Z4 2.5Si
LINCOLNSHIRE REGION - https://www.facebook.com/groups/467122313360002/
1983 MK1 Golf GTI Campaign Model - Under (looooong) resto!
1962 Rover P4 80
2002 BMW 745i
2008 BMW Z4 2.5Si
Posted
Local Hero
Posted
Moderator

Posted
Moderator
Melteddrummer said
Looking good Al, hope your not using that axe on the bodywork tho
That's for the wife when she tells him to give it a rest for the day
Posted
Local Hero
Oh - You know Amie do you… LOLsmudger1980 said
Melteddrummer said
Looking good Al, hope your not using that axe on the bodywork tho
Actually, I was using the back edge of it to hammer the steel over in the vice.
My hammer was in my tool box which was in the house and I was too lazy to go and get it…

My Build Thread
All My Build Photos - https://www.flickr.com/photos/pix-al/albums/72157622794406840
My other hobby - www.pix-al.co.uk
All My Build Photos - https://www.flickr.com/photos/pix-al/albums/72157622794406840
My other hobby - www.pix-al.co.uk
Posted
Old Timer
Posted
Local Hero
pazwaa said
Could you not make some pivot frames from the box section you have, they do make life far more comfortable.
I would have loved to but I'm not that confident in my welding skills TBH! This was a simpler, safer option.
Also, my garage is quite tight - I don't think I would have had the space to rotate the car.
My Build Thread
All My Build Photos - https://www.flickr.com/photos/pix-al/albums/72157622794406840
My other hobby - www.pix-al.co.uk
All My Build Photos - https://www.flickr.com/photos/pix-al/albums/72157622794406840
My other hobby - www.pix-al.co.uk
Posted
Local Hero
Spent most of the day fighting with teh car today. Re-arranged some bits around the garage to give me a bit of room to lie along side the car and crack on with the welding! Started by getting that sill repair in place. plug welded along the sill and then seamwelded (series of spots, anyway!) along the cut lines.
Untitled by www.pix-al.co.uk, on Flickr
Couple more spots, ground back and…

Then tackled the hole at the lower edge of the tub where it meets the sill. Made up a piece with a curved edge…
Untitled by www.pix-al.co.uk, on Flickr
All looks quite horrible in the pics!
 After grinding bach the welds as flat as I could, I applied some acid etch and then plenty of sealer.
I am using some Upol "Grey Stripe" stuff which goes on quite thick and covers up the unsightly welding marks nicely. Will paint over the top of it all when finished.
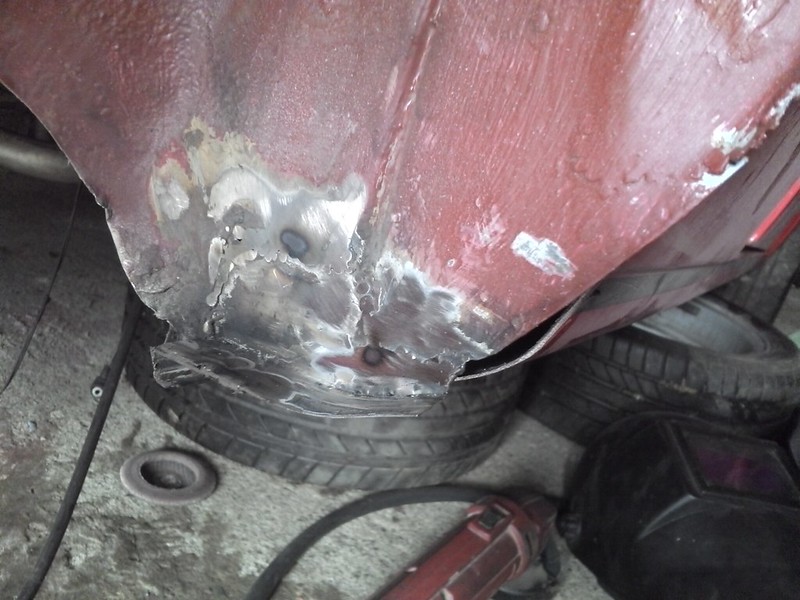
Moved on to cut out the front section of my rear arch which has seen better days.
This was the bit I was dreading as this will now be visible! Took ages to cut out the arch, then cut the repair panel to a slightly larger fit, then fettle the two down until everything was snug. Had to cut some of the inner arch out too as it was well rotten.

Untitled by www.pix-al.co.uk, on Flickr
Tacked the outer repair in place which was better than I had hoped… My gas bottle ran out so I swapped in the replacement I had waiting in the wings. The old one was the straight CO2 which came with my welder. The new one is CO2 with a bit of Argon in it. What a difference! This gas seems to make the welds so much better. the Sizzling sound is different too!
Anyway…
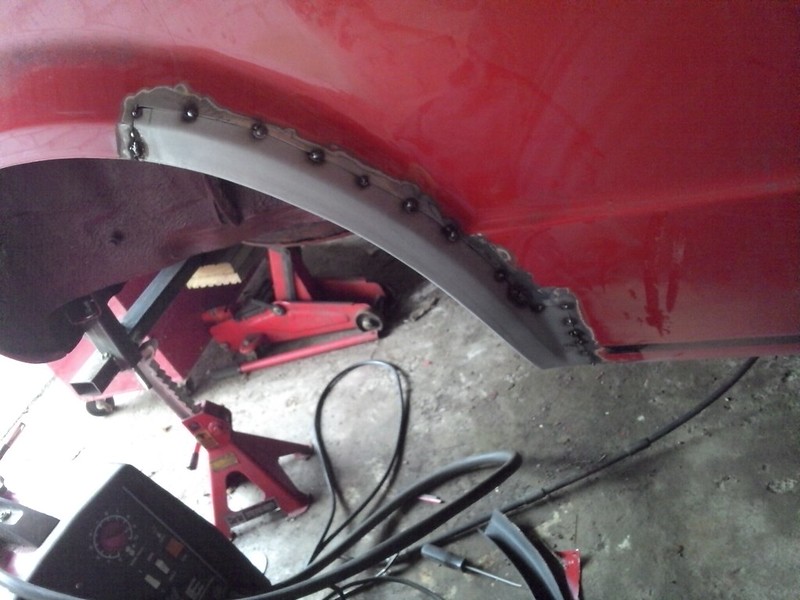
Untitled by www.pix-al.co.uk, on Flickr
It is a good fit and is nice and solid. I will finish it up another day as I'm going to make up a curved piece that I can fit in to the inner arch now that this one is in place.
I know this is probably the wrong way round, but I scratched my head about it and decided to try it this way.
It won't be a perfect repair, but as it is on the inside I am not so bothered. I'll make some cardboard templates and as long as I can tack a piece in to join the inner and outer arches to prevent water ingress, I'll apply a liberal amount of sealer and it should be good.
That is all for today - hope to have another update soon!
AL.
My Build Thread
All My Build Photos - https://www.flickr.com/photos/pix-al/albums/72157622794406840
My other hobby - www.pix-al.co.uk
All My Build Photos - https://www.flickr.com/photos/pix-al/albums/72157622794406840
My other hobby - www.pix-al.co.uk
Posted
Old Timer

Posted
Moderator
0 guests and 0 members have just viewed this: None.