


Louie's 83 GTI Build

Posted
#1526329
(In Topic #203270)
Settled In

I bought this GTI as a rolling shell off the forums on here last summer after my 82 GTI went into blasting and turned out to be 'a bit' more work than first thought. It'll make its way back onto the road, just not soon!
The new shell I went to pick up was meant to have new Sills, Scuttle, Rear Arches and Front Panel so looked ideal for just dropping my old engine and running gear into. Initially thought I'd have it on the road by the end of the year (2015) but new target is this summer (2016).
As you'll see this didn't happen as there was a massive amount of work to be done to the shell. Still, this gave me the opportunity to put time towards making what my personal vision for a Mk1 GTI should be.
Here's how it started.


More progress pictures to follow soon..
 Last edit: by louiesmall
Posted
Settled In
Started removing all the under seal so it was ready for blasting.

Dent in the passenger side above the sill.

Phone died and i lost all my blasting pictures, still have a few from priming it. Only in the back garden but was enough just for now to get it through the metalwork.

Didn't bother removing any from the floor pans as i ran out of time. Doesn't matter anyhow as they're both ruined and being replaced.

Plenty more metal work has been completed, will be update the thread soon.
�
Last edit: by louiesmall
Posted

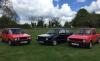
Local Hero


Golf GTI Campaign 1983 Mars Red, Ford S-Max 2015, Audi TT 180 quattro 2003, Fiat 500C 2013, Golf GTE MK7.5

�
�
Posted
Local Hero

Posted
Settled In
RichardHall
- Cheers mate, hoping to have the garage clear enough for it when it's back from bodywork, real nightmare in the rain!
Yomp
Yeah is scary to think someone thought it was acceptable!
Posted
Settled In
Started with the roof as someone previously bodged in an aerial at the rear. Inside and outside areas both repaired.


Settled In


As we didn't have the roof and rear quarters blasted with the rest of the shell the roof was paint stripped back to bare metal.

Final area with the roof that needed some attention was between the support bars, the bonding had come away in areas and mild rust behind so they were removed, cleaned and will be put back into place.


Posted
Settled In


Chassis rails were removed, blasted again inside and out before being straightened, primed and reattached.


Posted
Settled In
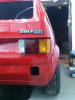
First image shows a previous sill repair which is another addition to the to-do list.


Rear quarters were the last part with original paint on after the roof was paint stripped. They were rubbed back to bare metal and thin layer of primer applied.


Last edit: by louiesmall
Posted
Settled In
Swage line needs some work to bring out to the original depth and door gaps still need some work.


Posted
Settled In
Before the valance was welded in to place the spare wheel well was replaced. I sourced a genuine cut out which I removed all underseal from before having it blasted to ensure it was solid.
Spare wheel well went in great before he finished valance and made up the small joining piece between the two. Happy with the results.


Posted
Settled In


Posted
Settled In


After that it was onto the previous A Pillar repairs, the scuttle also had a previous single wiper conversion on the scuttle which wasn't great so it was best to replace the whole section. Sourced an original cut out, this was rubbed this down to bare metal, primed and painted to match the cars new colour- it will soon be welded into place. Colour is Atlas Grey - LP7V.


The scuttle hasn't been welded into place just yet, instead we moved onto the front panel. For this it had to be taken off the jig and put back onto some wheels. The car had the front panel replaced previously but again this was poor so bought in a new panel.


The front end was trial fitted, looked OK but requires work to get the panel gaps perfected.


Posted
Settled In
Dan
Posted
Settled In
 thumbs up!
VW GOLF MK5 / VW GOLF MK1 Owner
Posted
Settled In
Posted

Settled In
Where did you get your front wings from? Are they a good fit line up ok?
Posted
Settled In
chrisL
cheers mate. Excited for paint soon, Bet you are too!�As for the wings I got them off Heritage as the genuine wings. We haven't finished lining them up yet as I've changed bonnets but first impressions are good. They need a little work but quality wise they're very good.�
Hope this helps.�
Posted
Settled In
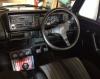
Just waiting to dig out the air box to line up the mount.


Posted
Settled In


0 guests and 0 members have just viewed this: None.