


Shellby - 83 gti ABF on carbs

Posted
Old Timer

Shellby - 83 gti ABF on carbs
smudger1980 said
�20 for RS Recaros……..Bargain !!!
Was actually �17.68, I bid �70 in the last few seconds, expecting to get trumped, but obviously no one was interested! One needs work on the bolster, but want to retrim them in leather, so all good!
Posted
Local Hero

pazwaa said
Going to strip down the mk1 seats and use the bases to mount the recaros. Time to get my creative head on!
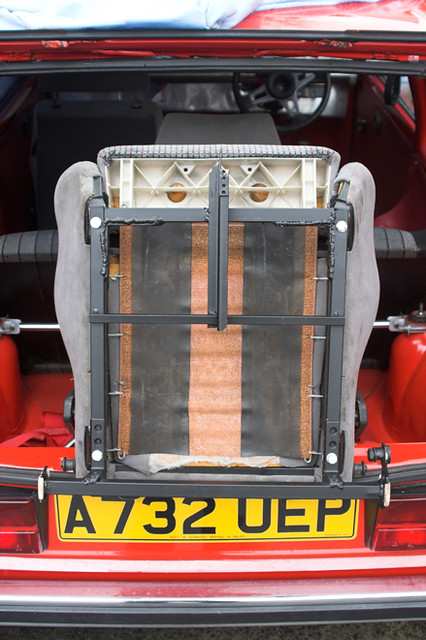
I made my own bases for my recaros…
Used some old mk1 frames and cut off the bits that fit into the runners in the car etc.
Welded up a simple steel box section frame and attached the bits from the mk1 frame to them.
Nee to be careful with angles so that the seats can still slide smoothly. Mine get tighter as you push them forward, so no short people allowed!
I'm 6'4", so mounted them quite low and quite far back compared to a normal Mk1 seat.
Few pics of mine:
Sub frame 2 by www.pix-al.co.uk, on Flickr
Sub frame 1 by www.pix-al.co.uk, on Flickr
Final product:
IMG_1267 by www.pix-al.co.uk, on Flickr
My Build Thread
All My Build Photos - https://www.flickr.com/photos/pix-al/albums/72157622794406840
My other hobby - www.pix-al.co.uk
All My Build Photos - https://www.flickr.com/photos/pix-al/albums/72157622794406840
My other hobby - www.pix-al.co.uk
Posted
Old Timer
Posted
Local Hero
The square section tubing I used was stuff I picked up in B&Q of all places…
The right angle brackets you can see were used to bolt the frames together originally to allow a trial fitment in the car to ensure everything was alright. Once happy, all the joints were welded up (The brackets were steel too, which made this quite easy) and the bolts removed.
My Build Thread
All My Build Photos - https://www.flickr.com/photos/pix-al/albums/72157622794406840
My other hobby - www.pix-al.co.uk
All My Build Photos - https://www.flickr.com/photos/pix-al/albums/72157622794406840
My other hobby - www.pix-al.co.uk
Posted
Old Timer
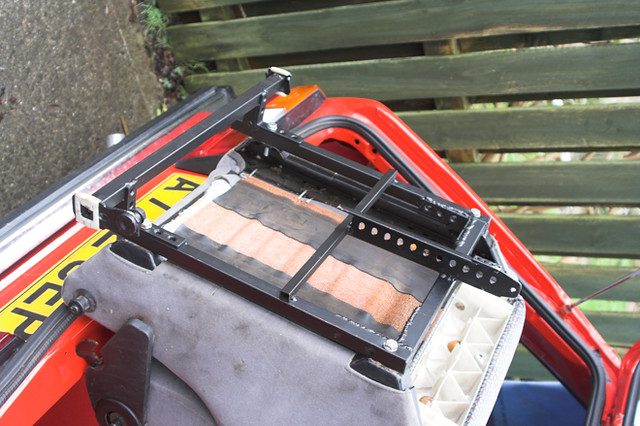
Armed with a cutting disc and grinder, I chopped out what wasn't needed


Made a mounting frame up

Ground the welds flush on the side that bolts to the seat and drilled the mounting holes

Tacked the mounting frame to the base

Made sure it fit in the car before welding up

Checked the seat could be mounted on to the frame

Added a front plate, welded between the sub-base and the mounting frame, add some strength.
Finally, after about 8 hours of tinkering, the fitted article


Need to repeat the process for the passenger side, which should be easier as I can use the drivers side as a template. Then at some point will add a bit more strength and some side plates, make them look a bit more appealing. Another job done!
 Last edit: by pazwaa
Posted

Moderator


Posted
Old Timer
Cheers smudger! �smudger1980 said
Nice work, they're going to look right at home in there
Started on the second seat today. First thing I did was snap one of the bolts holding the sub frame to the recaro. FFS, how tight does a seat bolt need to be � �
�
Managed to get it out tapping it round with a chisel and hammer.
Then onto the frame, much easier and quicker second time round. Soon had twins.


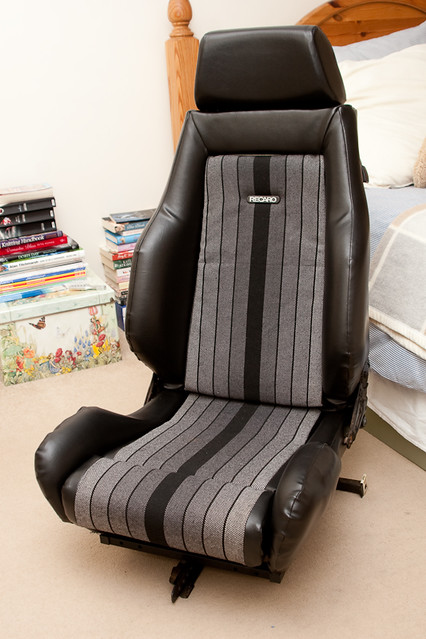
And the seats fitted, looking nice.

That's the seats done for now. Back on with the engine.
Last edit: by pazwaa
Posted
Moderator

Nice fabrication skills too

Posted
Old Timer
smudger1980 said
Told you they'd look right at home mate
Nice fabrication skills too
You were correct sir! Sat behind the wheel making brum brum noises, very comfy seats

Posted
Local Hero
My Build Thread
All My Build Photos - https://www.flickr.com/photos/pix-al/albums/72157622794406840
My other hobby - www.pix-al.co.uk
All My Build Photos - https://www.flickr.com/photos/pix-al/albums/72157622794406840
My other hobby - www.pix-al.co.uk
Posted
Old Timer
AL_Mk1 said
Nice one - You got on to them pretty quick!
Cheers Al
Spent a few hours whilst at work just staring at a photo of the base, figuring it out, but once I'd worked what I needed to do, it went well. They lack a bit of finesse at the minute, but will make them look nicer a bit further down the line.
Posted
Old Timer
Some progress though. Firstly got my cylinder head back from the machinists. Head skim, and new valves


All shiny and nice!
Also cleaned up the drive shafts, ready for primer

Managed to come to an arrangement with a fixings company my work uses who let me buy stainless fixings in exact quantities at trade price and pay cash.

Ones above replace all the gearbox bolts, the studs on the cylinder head to mount the exhaust and carb manifolds and the rocker cover and sump fixings. �15 for the lot. If anyone needs any stainless fixings, drop me a pm and ill get you a price, hopefully save you some pennies.�
Last edit: by pazwaa
Posted

Moderator


 It's going to be sweet mate!!

Posted
Old Timer
Melteddrummer said
Shiny new head looks lovely Matt
Cheers Andy. Hopefully some more progress tomorrow night, getting to spend a few hours on her.
Posted
Old Timer
Posted
Old Timer
chipster2407 said
Mate ur car.is.gonna be sweet.wen.its.done keep up the good work!!
Thanks Chipster. Hoping to get my engine looking like yours soon. Got it primered, just needs a couple of coats of black. Hopefully photos soon.
Posted
Moderator
Good luck
Posted
Old Timer
smudger1980 said
Great looking shiny engine mate. Now all you gotta do is put it all back together again
Good luck
Cheers smudger. Possibly start rebuilding the engine tonight, if I can find a torque wrench.
Posted
Old Timer
Firstly a new clutch and flywheel from meltdrummer, cheers Andy

Also got the final gasket I needed to re-assemble the engine.
Sump bolted on

New head gasket

New head bolts

Rocker cover back on

Need to finish the painting, gonna be all black, not as it is now.�
Then refurb the bolt on parts and attach with stainless steel fixings.
Last edit: by pazwaa
Posted

Marketing Manager

1973 BMW 3.0CS "Helga"
1981 VW Golf GTi "Agolf"
1986 Ford Escort RS Turbo S2
1987 BMW M535i - 'Klaus'
Instagram: @ahmet_e9
0 guests and 0 members have just viewed this: None.