Pistolpete's Mars Red Mk1 GTi restoration
Posted
Old Timer


Restoration thread for my 1983 Y-reg Mars Red GTi, non-sunroof model
Thanks for all the comments, it really does help to keep me going, as it can be tedious at times getting to this level of OCD !!
Engine block stripped, cleaned, degreased using Bilt Hamber surfex HD, wire wheeled for many many hours, then de-greased again, then POR15 metal prep, rinsed and dried thoroughly followed by 2 coats of POR15 engine enamel. I'm very pleased with the finish, although I would have preferred less of a gloss finish. I guess it will be much easier to keep clean though! It probably took me 2 hours just to mask everything off so carefully, I'm a dab hand with the razor blade now alright.

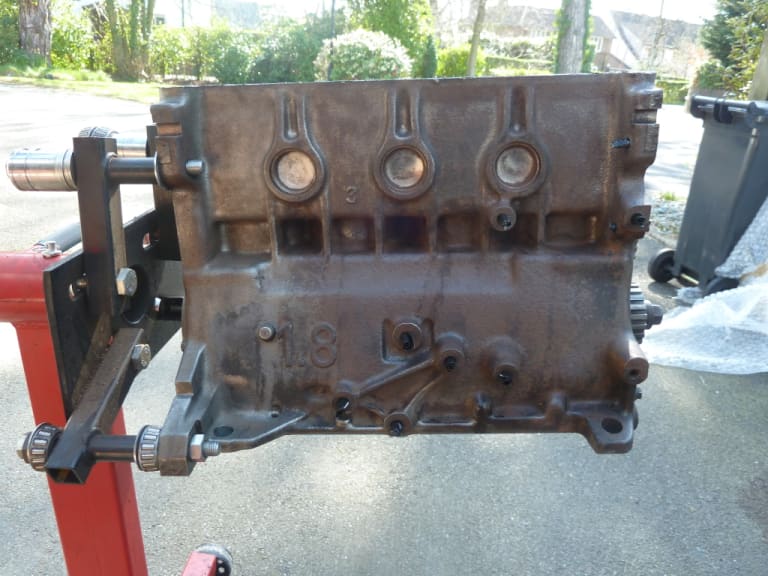
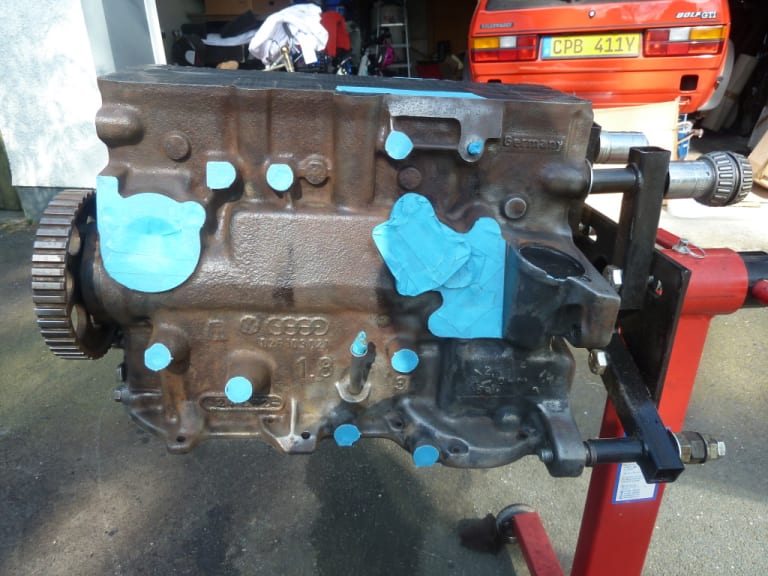
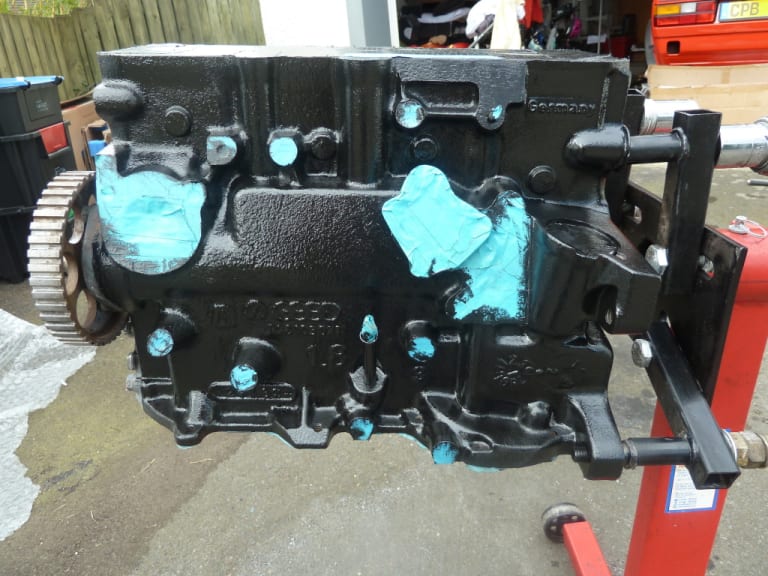


Engine block stripped, cleaned, degreased using Bilt Hamber surfex HD, wire wheeled for many many hours, then de-greased again, then POR15 metal prep, rinsed and dried thoroughly followed by 2 coats of POR15 engine enamel. I'm very pleased with the finish, although I would have preferred less of a gloss finish. I guess it will be much easier to keep clean though! It probably took me 2 hours just to mask everything off so carefully, I'm a dab hand with the razor blade now alright.


Nut & Bolt Resto Complete (Mars Red GTi original): https://vwgolfmk1.org.uk/forum/index.php?page=topicview&type=misc&id=projects%2Fyour-mk1-golfs_2%2Fpistolpete-s-mars-red&start__keyed=
Nut & Bolt Resto in Progress (Lhasa 16v): https://vwgolfmk1.org.uk/forum/index.php?page=topicview&type=misc&id=projects%2Fyour-mk1-golfs_2%2Fpistolpete-s-lhasa&redirected=1
Nut & Bolt Resto in Progress (Lhasa 16v): https://vwgolfmk1.org.uk/forum/index.php?page=topicview&type=misc&id=projects%2Fyour-mk1-golfs_2%2Fpistolpete-s-lhasa&redirected=1
Posted
Old Timer


The bad news is that I have now realised the car will definitely not be anywhere near ready to attend the show this weekend. The good news is that I have been pressing on with getting it as far forward as I can. I have the rocker cover, engine mount, sunp pan, timing belt guards away for powder coating and won't be back til Thursday. I have had to order new crankshaft pulley bolts from VW Classic Parts in Germany, and I found my plastic timing belt inner guard is cracked so I'm waiting on VW Heritage getting them back into stock. The upshot of this being I cannot get the new head fitted and continue the engine build. Bit of a shame, but I'm not going to rush it at this stage.
Some finished bits waiting for fitting to the engine:-
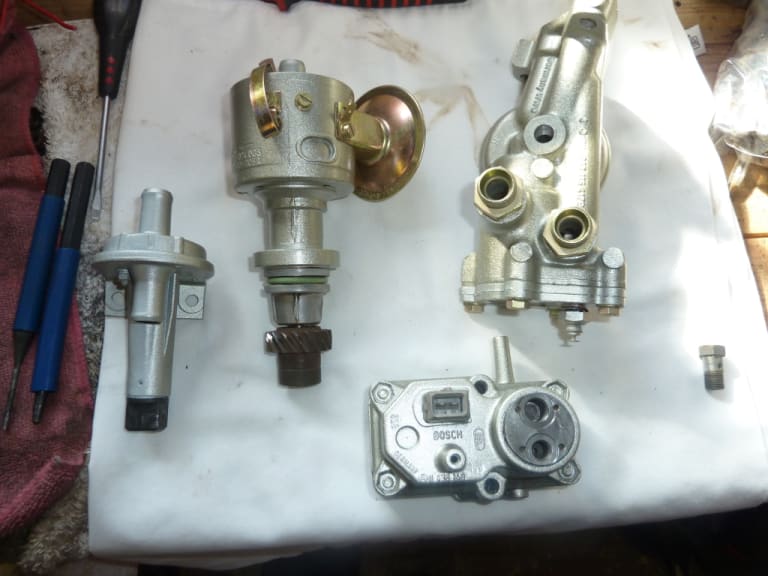

Some finished bits waiting for fitting to the engine:-


Nut & Bolt Resto Complete (Mars Red GTi original): https://vwgolfmk1.org.uk/forum/index.php?page=topicview&type=misc&id=projects%2Fyour-mk1-golfs_2%2Fpistolpete-s-mars-red&start__keyed=
Nut & Bolt Resto in Progress (Lhasa 16v): https://vwgolfmk1.org.uk/forum/index.php?page=topicview&type=misc&id=projects%2Fyour-mk1-golfs_2%2Fpistolpete-s-lhasa&redirected=1
Nut & Bolt Resto in Progress (Lhasa 16v): https://vwgolfmk1.org.uk/forum/index.php?page=topicview&type=misc&id=projects%2Fyour-mk1-golfs_2%2Fpistolpete-s-lhasa&redirected=1
Posted
Old Timer


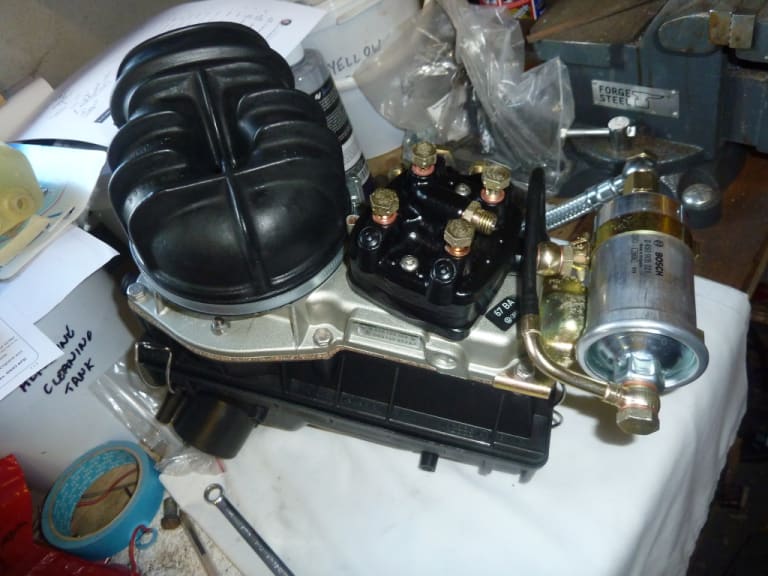
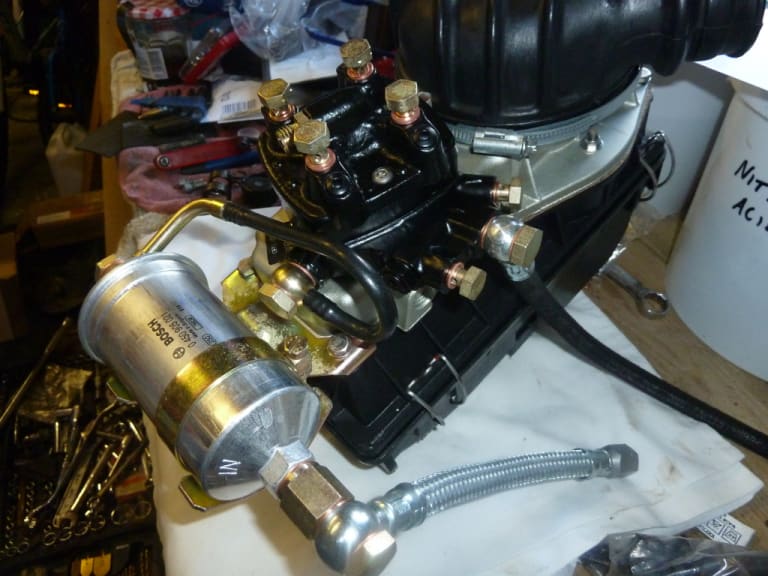
Metering head assembly now complete with new fuel filter, banjo washers and new flexible connection hoses from Mark at Classic VW. I've also got a K&N filter element in there to help the engine a bit, and have drilled out the lower airbox section (I know some people hate that, but I couldn't resist).


Nut & Bolt Resto Complete (Mars Red GTi original): https://vwgolfmk1.org.uk/forum/index.php?page=topicview&type=misc&id=projects%2Fyour-mk1-golfs_2%2Fpistolpete-s-mars-red&start__keyed=
Nut & Bolt Resto in Progress (Lhasa 16v): https://vwgolfmk1.org.uk/forum/index.php?page=topicview&type=misc&id=projects%2Fyour-mk1-golfs_2%2Fpistolpete-s-lhasa&redirected=1
Nut & Bolt Resto in Progress (Lhasa 16v): https://vwgolfmk1.org.uk/forum/index.php?page=topicview&type=misc&id=projects%2Fyour-mk1-golfs_2%2Fpistolpete-s-lhasa&redirected=1
Posted
Old Timer


Also got the inlet manifold finished. This had been sent away with the cylinder head to "The Man In The Shed" for port matching to the head and also opened up to accept the Audi 2.2 throttle body. Dave's work is as good as it gets. Once I got it back, the manifold was given a few coats of etch primer, Aluma Blast and Diamond Clear Lacquer to match the rest of the bits.


Nut & Bolt Resto Complete (Mars Red GTi original): https://vwgolfmk1.org.uk/forum/index.php?page=topicview&type=misc&id=projects%2Fyour-mk1-golfs_2%2Fpistolpete-s-mars-red&start__keyed=
Nut & Bolt Resto in Progress (Lhasa 16v): https://vwgolfmk1.org.uk/forum/index.php?page=topicview&type=misc&id=projects%2Fyour-mk1-golfs_2%2Fpistolpete-s-lhasa&redirected=1
Nut & Bolt Resto in Progress (Lhasa 16v): https://vwgolfmk1.org.uk/forum/index.php?page=topicview&type=misc&id=projects%2Fyour-mk1-golfs_2%2Fpistolpete-s-lhasa&redirected=1
Posted
Old Timer


Looking great Pete!
I'm at a really similar stage to you (and have finally updated my build thread). I'm not going to the same level of detail as you as it's taken me so long to make any progress at all (although when I see the pictures I keep questioning myself).
Keep it up!
I'm at a really similar stage to you (and have finally updated my build thread). I'm not going to the same level of detail as you as it's taken me so long to make any progress at all (although when I see the pictures I keep questioning myself).
Keep it up!
Posted
Old Timer


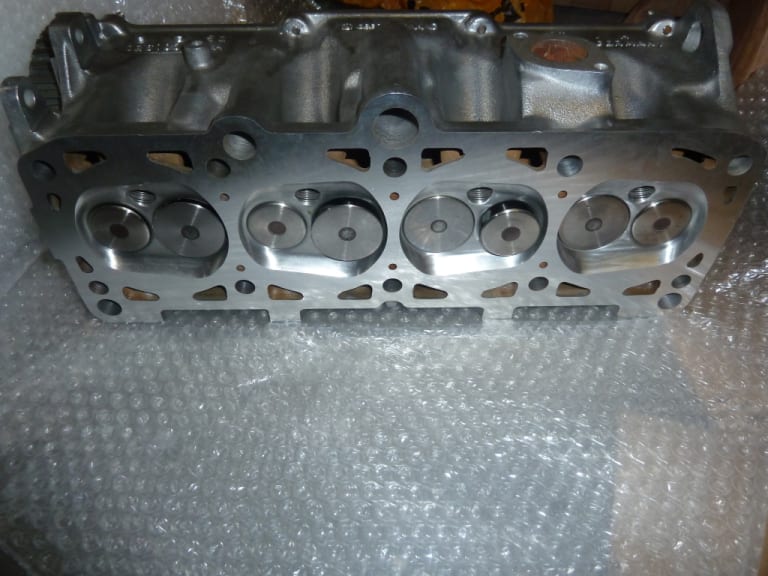
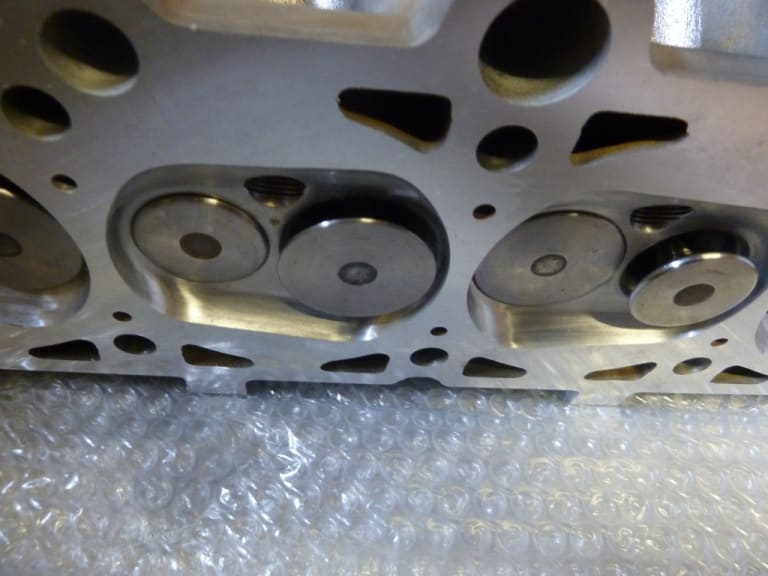
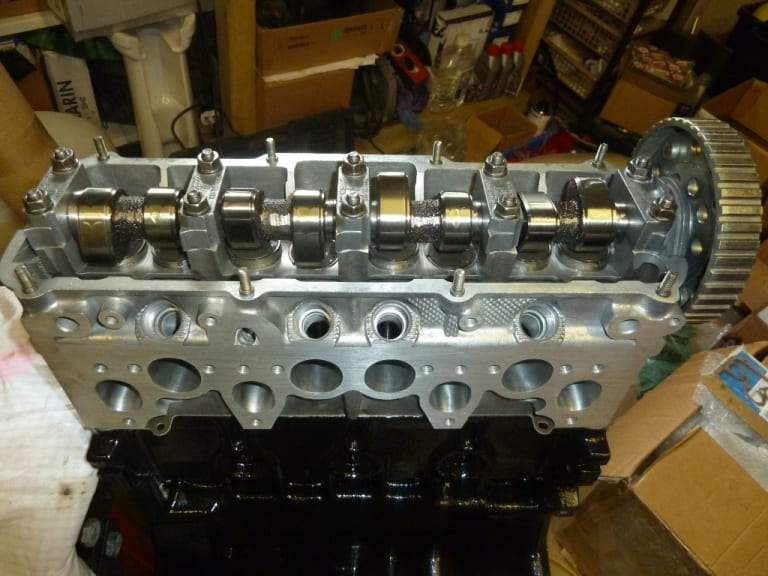
So I mentioned earlier that I wasn't going to be re-using my original head, the reason being I fancied something that looked totally original but had a bit more power. Nothing too crazy. I had bought a 2nd hand head in 2010 for this very reason (nothing like planning ahead), as well as a Schrick 288 cam (and the head I bought came with a Piper BP320 race cam). There was only one man who would be doing this work, and after a long time on the phone with Dave Crissel (aka The Man in the Shed) discussing what I wanted, he advised the Schrick 288 would be a bit too much for road use, so I bit the bullet and ordered a brand new Schrick 276 from Germany. Once received, this was all shipped off to Dave and he worked his magic. It has been returned as a Stage 2 upgrade, with the new 276 cam re-shimmed, new valves and springs, guides etc. I am really delighted with the quality of workmanship and Dave was such a gent to deal with. Not cheap by any means, but hopefully worth it.



Nut & Bolt Resto Complete (Mars Red GTi original): https://vwgolfmk1.org.uk/forum/index.php?page=topicview&type=misc&id=projects%2Fyour-mk1-golfs_2%2Fpistolpete-s-mars-red&start__keyed=
Nut & Bolt Resto in Progress (Lhasa 16v): https://vwgolfmk1.org.uk/forum/index.php?page=topicview&type=misc&id=projects%2Fyour-mk1-golfs_2%2Fpistolpete-s-lhasa&redirected=1
Nut & Bolt Resto in Progress (Lhasa 16v): https://vwgolfmk1.org.uk/forum/index.php?page=topicview&type=misc&id=projects%2Fyour-mk1-golfs_2%2Fpistolpete-s-lhasa&redirected=1
Posted
Old Timer


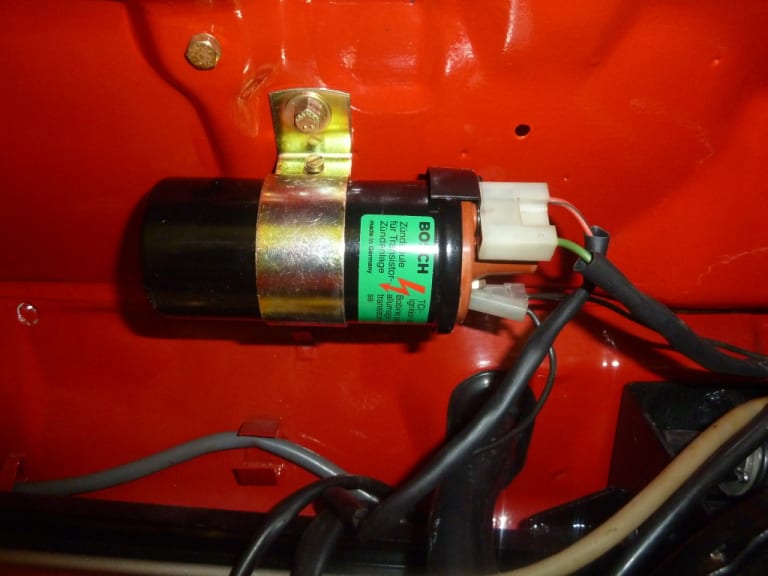
Original Bosch ignition coil refurbished, the terminal connectors were zinc plated, and the coil body rubbed back to bare metal and etch primed, Eastwood Underhood Black and Diamond Clear Lacquer. After Yomp's previous suggestion, new Bosch sticker sourced from DMB Graphics.

Nut & Bolt Resto Complete (Mars Red GTi original): https://vwgolfmk1.org.uk/forum/index.php?page=topicview&type=misc&id=projects%2Fyour-mk1-golfs_2%2Fpistolpete-s-mars-red&start__keyed=
Nut & Bolt Resto in Progress (Lhasa 16v): https://vwgolfmk1.org.uk/forum/index.php?page=topicview&type=misc&id=projects%2Fyour-mk1-golfs_2%2Fpistolpete-s-lhasa&redirected=1
Nut & Bolt Resto in Progress (Lhasa 16v): https://vwgolfmk1.org.uk/forum/index.php?page=topicview&type=misc&id=projects%2Fyour-mk1-golfs_2%2Fpistolpete-s-lhasa&redirected=1
Posted
Old Timer


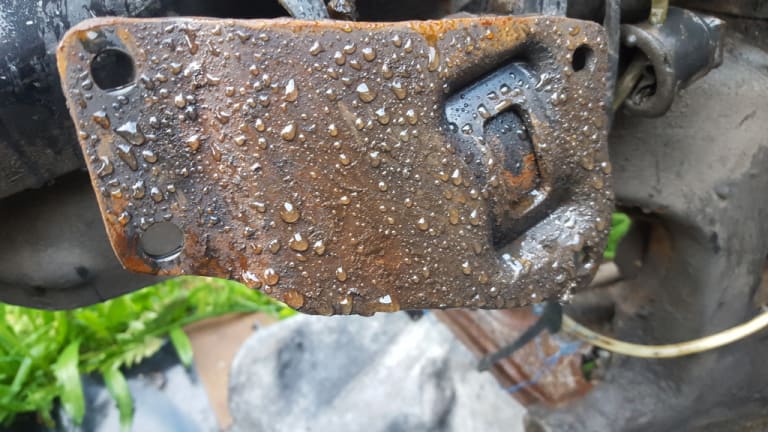
I've had a bit of a set-back. Picked up some final bits from the powder coaters yesterday, and when I got home to start re-assembling the timing belt end of the engine, I found this:-
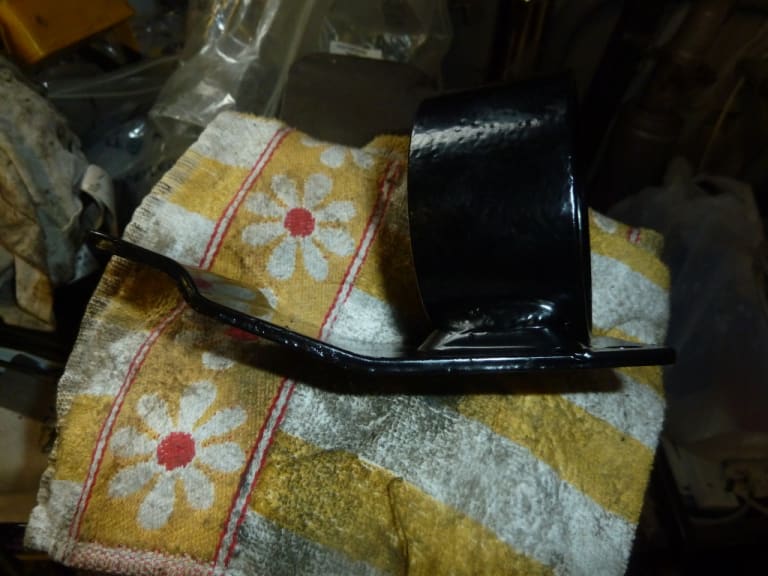
It must have been driven over or something to bend it like that, but the guys mustn't have realised because they powdercoated it as normal.
Anybody got a spare one they'd sell? Or do you think it will be possible to bend this one back and re-use?

It must have been driven over or something to bend it like that, but the guys mustn't have realised because they powdercoated it as normal.
Anybody got a spare one they'd sell? Or do you think it will be possible to bend this one back and re-use?
Nut & Bolt Resto Complete (Mars Red GTi original): https://vwgolfmk1.org.uk/forum/index.php?page=topicview&type=misc&id=projects%2Fyour-mk1-golfs_2%2Fpistolpete-s-mars-red&start__keyed=
Nut & Bolt Resto in Progress (Lhasa 16v): https://vwgolfmk1.org.uk/forum/index.php?page=topicview&type=misc&id=projects%2Fyour-mk1-golfs_2%2Fpistolpete-s-lhasa&redirected=1
Nut & Bolt Resto in Progress (Lhasa 16v): https://vwgolfmk1.org.uk/forum/index.php?page=topicview&type=misc&id=projects%2Fyour-mk1-golfs_2%2Fpistolpete-s-lhasa&redirected=1
Posted
Old Timer


That's annoying!
If that is the LH engine mount I sold my spare just last week!
I guess if you got enough heat on it it should bend back. Given the load will be across the widest section perpendicular to the bend it shouldn't bend again in normal use. You'd need to get it recoated though.
If that is the LH engine mount I sold my spare just last week!
I guess if you got enough heat on it it should bend back. Given the load will be across the widest section perpendicular to the bend it shouldn't bend again in normal use. You'd need to get it recoated though.
Posted
Old Timer


Not too much progress due to work and then school holidays, but this evening I managed to get the new Febi oil pump fitted followed by the new Febi sump. I used a new genuine VW rubber gasket and stainless bolts and washers.
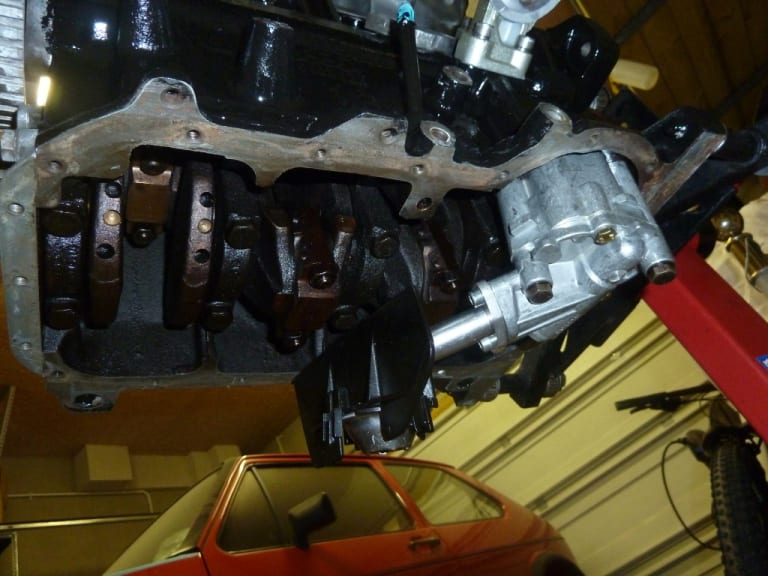

Apart from that, I've just been bolting on the bits of the engine following restoring them:-


Apart from that, I've just been bolting on the bits of the engine following restoring them:-

Nut & Bolt Resto Complete (Mars Red GTi original): https://vwgolfmk1.org.uk/forum/index.php?page=topicview&type=misc&id=projects%2Fyour-mk1-golfs_2%2Fpistolpete-s-mars-red&start__keyed=
Nut & Bolt Resto in Progress (Lhasa 16v): https://vwgolfmk1.org.uk/forum/index.php?page=topicview&type=misc&id=projects%2Fyour-mk1-golfs_2%2Fpistolpete-s-lhasa&redirected=1
Nut & Bolt Resto in Progress (Lhasa 16v): https://vwgolfmk1.org.uk/forum/index.php?page=topicview&type=misc&id=projects%2Fyour-mk1-golfs_2%2Fpistolpete-s-lhasa&redirected=1
Posted
Regional Host NE


did you sort out a mounting mate


Do not know a lot but willing to help if possible
1989 Sapphire Blue Mk1 Cabriolet KR
1985 Atlas Grey Mk2 GTI 2.0 ABF
1989 Sapphire Blue Mk1 Cabriolet KR
1985 Atlas Grey Mk2 GTI 2.0 ABF
Posted
Settled In


Paul you been magnet fishing again bud

Posted
Old Timer


nicci21paul said
did you sort out a mounting mate

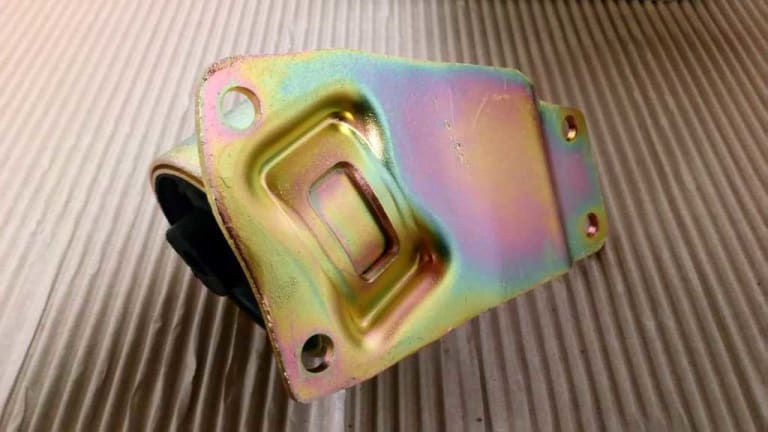
Got sorted thanks, managed to straighten it again. Have now had it vapour blasted and zinc plated with new bush pressed in.
Nut & Bolt Resto Complete (Mars Red GTi original): https://vwgolfmk1.org.uk/forum/index.php?page=topicview&type=misc&id=projects%2Fyour-mk1-golfs_2%2Fpistolpete-s-mars-red&start__keyed=
Nut & Bolt Resto in Progress (Lhasa 16v): https://vwgolfmk1.org.uk/forum/index.php?page=topicview&type=misc&id=projects%2Fyour-mk1-golfs_2%2Fpistolpete-s-lhasa&redirected=1
Nut & Bolt Resto in Progress (Lhasa 16v): https://vwgolfmk1.org.uk/forum/index.php?page=topicview&type=misc&id=projects%2Fyour-mk1-golfs_2%2Fpistolpete-s-lhasa&redirected=1
Posted
Old Timer


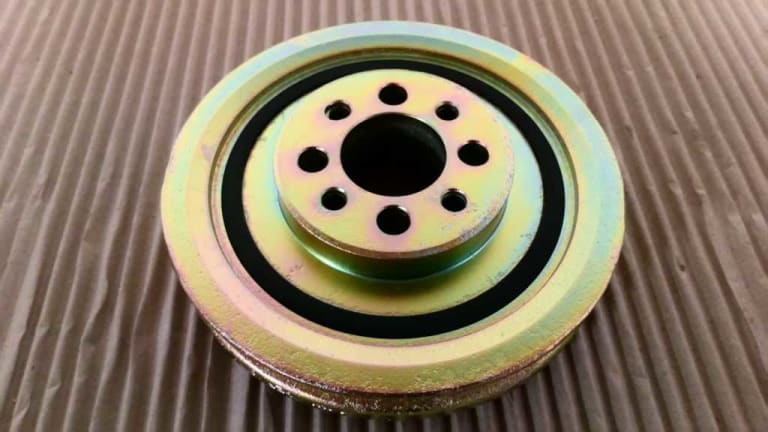
Thanks to Paceman, also got a crankshaft pulley wheel as the dampener insert on mine was a bit cracked & split in places. This has also now been vapour blasted and zinc plated.

Nut & Bolt Resto Complete (Mars Red GTi original): https://vwgolfmk1.org.uk/forum/index.php?page=topicview&type=misc&id=projects%2Fyour-mk1-golfs_2%2Fpistolpete-s-mars-red&start__keyed=
Nut & Bolt Resto in Progress (Lhasa 16v): https://vwgolfmk1.org.uk/forum/index.php?page=topicview&type=misc&id=projects%2Fyour-mk1-golfs_2%2Fpistolpete-s-lhasa&redirected=1
Nut & Bolt Resto in Progress (Lhasa 16v): https://vwgolfmk1.org.uk/forum/index.php?page=topicview&type=misc&id=projects%2Fyour-mk1-golfs_2%2Fpistolpete-s-lhasa&redirected=1
Posted
Old Timer


Pistol said
Thanks to Paceman, also got a crankshaft pulley wheel as the dampener insert on mine was a bit cracked & split in places. This has also now been vapour blasted and zinc plated.

Wow! Looks great!
Out of interest, how did you clean up your distributor? Was that vapour blasting as well?
Posted
Old Timer


Thanks.
I thought distributor was a bit delicate for any blasting so just used different wire wheels on a drill and 240 grit sandpaper. After a good degreasing it came up pretty well anyway.
I thought distributor was a bit delicate for any blasting so just used different wire wheels on a drill and 240 grit sandpaper. After a good degreasing it came up pretty well anyway.
Nut & Bolt Resto Complete (Mars Red GTi original): https://vwgolfmk1.org.uk/forum/index.php?page=topicview&type=misc&id=projects%2Fyour-mk1-golfs_2%2Fpistolpete-s-mars-red&start__keyed=
Nut & Bolt Resto in Progress (Lhasa 16v): https://vwgolfmk1.org.uk/forum/index.php?page=topicview&type=misc&id=projects%2Fyour-mk1-golfs_2%2Fpistolpete-s-lhasa&redirected=1
Nut & Bolt Resto in Progress (Lhasa 16v): https://vwgolfmk1.org.uk/forum/index.php?page=topicview&type=misc&id=projects%2Fyour-mk1-golfs_2%2Fpistolpete-s-lhasa&redirected=1
Posted
Old Timer


Thanks Pete,
I was thinking the same so thanks for confirming!
I was thinking the same so thanks for confirming!
Posted
Old Timer


Time for an update. After quite a wait for crankshaft pulley bolts from VW Classic parts, I have been able to complete the engine build. One thing I had to do was make up a blanking plate for the air supply port on the new head, as I am using the original injectors and not the air shrouded ones.

Got a small plate of 6mm thick Aluminium and some 0.75mm gasket paper, made a template and got my Dad to cut it out properly for me (he's a retired Silversmith which is handy!!).


Got a small plate of 6mm thick Aluminium and some 0.75mm gasket paper, made a template and got my Dad to cut it out properly for me (he's a retired Silversmith which is handy!!).


Nut & Bolt Resto Complete (Mars Red GTi original): https://vwgolfmk1.org.uk/forum/index.php?page=topicview&type=misc&id=projects%2Fyour-mk1-golfs_2%2Fpistolpete-s-mars-red&start__keyed=
Nut & Bolt Resto in Progress (Lhasa 16v): https://vwgolfmk1.org.uk/forum/index.php?page=topicview&type=misc&id=projects%2Fyour-mk1-golfs_2%2Fpistolpete-s-lhasa&redirected=1
Nut & Bolt Resto in Progress (Lhasa 16v): https://vwgolfmk1.org.uk/forum/index.php?page=topicview&type=misc&id=projects%2Fyour-mk1-golfs_2%2Fpistolpete-s-lhasa&redirected=1
Posted
Old Timer


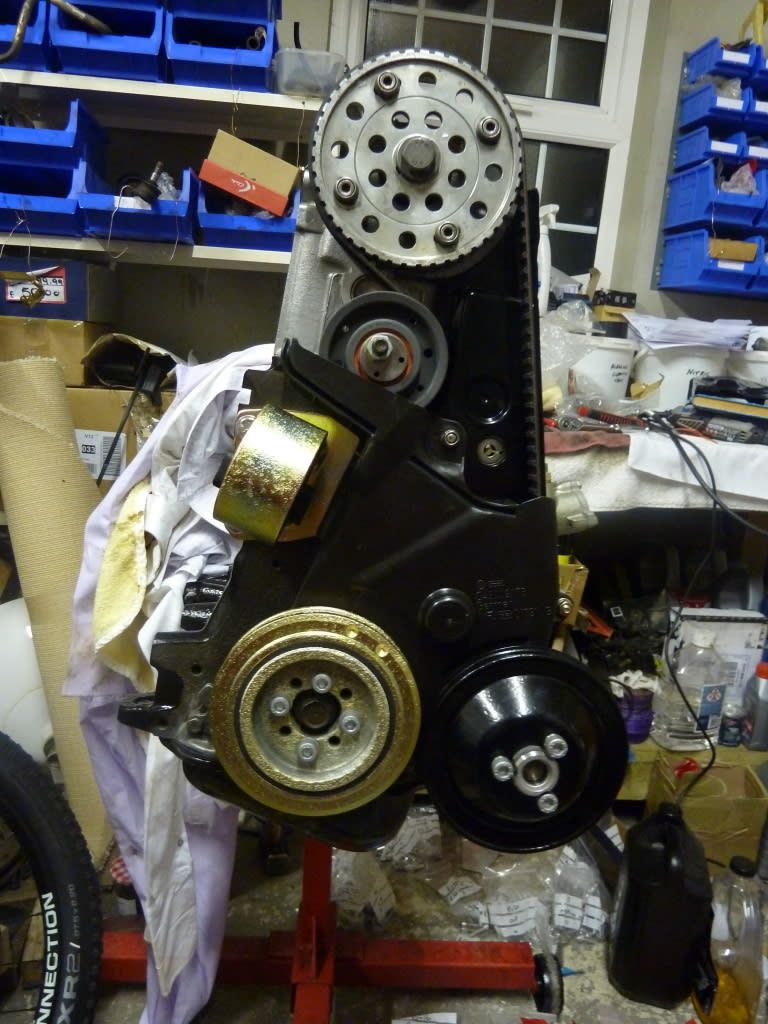
Timing belt end all fitted up with new genuine belt and tensioner. I had to mark the venrier pulley myself to coincide with No. 1 cylinder valves being in correct position for TDC, using feeler gauges under cam lobes to confirm they were equal. New genuine lower timing belt cover fitted as my original one had a crack. I did have to trim the plastic moulding a bit on the new one as it was fouling on the tensioner pulley a bit.

Nut & Bolt Resto Complete (Mars Red GTi original): https://vwgolfmk1.org.uk/forum/index.php?page=topicview&type=misc&id=projects%2Fyour-mk1-golfs_2%2Fpistolpete-s-mars-red&start__keyed=
Nut & Bolt Resto in Progress (Lhasa 16v): https://vwgolfmk1.org.uk/forum/index.php?page=topicview&type=misc&id=projects%2Fyour-mk1-golfs_2%2Fpistolpete-s-lhasa&redirected=1
Nut & Bolt Resto in Progress (Lhasa 16v): https://vwgolfmk1.org.uk/forum/index.php?page=topicview&type=misc&id=projects%2Fyour-mk1-golfs_2%2Fpistolpete-s-lhasa&redirected=1
Posted
Old Timer


Alternator fitted, then realised my original tensioning bracket was not correct, so had to get another one off eBay and this still needs to be zinc plated.
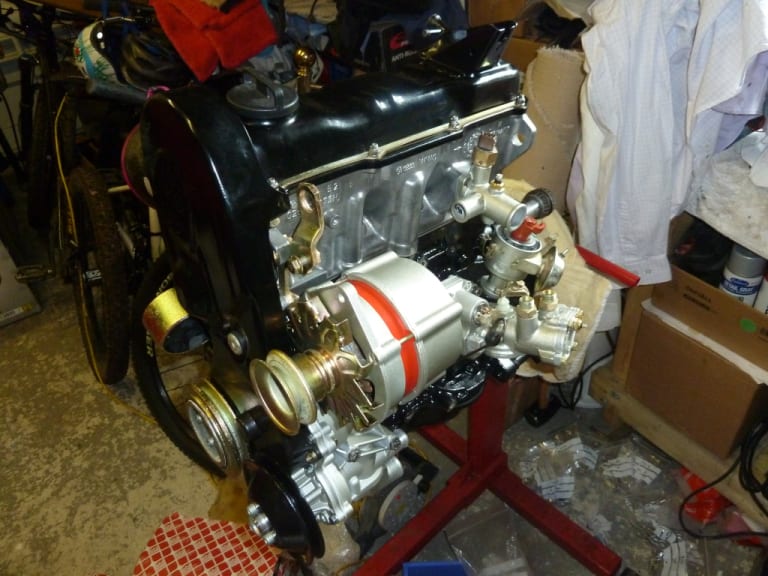
And finally got the inlet manifold bolted up.


And finally got the inlet manifold bolted up.

Nut & Bolt Resto Complete (Mars Red GTi original): https://vwgolfmk1.org.uk/forum/index.php?page=topicview&type=misc&id=projects%2Fyour-mk1-golfs_2%2Fpistolpete-s-mars-red&start__keyed=
Nut & Bolt Resto in Progress (Lhasa 16v): https://vwgolfmk1.org.uk/forum/index.php?page=topicview&type=misc&id=projects%2Fyour-mk1-golfs_2%2Fpistolpete-s-lhasa&redirected=1
Nut & Bolt Resto in Progress (Lhasa 16v): https://vwgolfmk1.org.uk/forum/index.php?page=topicview&type=misc&id=projects%2Fyour-mk1-golfs_2%2Fpistolpete-s-lhasa&redirected=1
0 guests and 0 members have just viewed this: None.


