Pistolpete's Mars Red Mk1 GTi restoration
Posted
Settled In


Restoration thread for my 1983 Y-reg Mars Red GTi, non-sunroof model
Posted
Old Timer


I then got the brake linkage finally assembled and started routing some of the wiring where it needs to be:-

New blower fan installed as the original was very noisy:-

Nut & Bolt Resto Complete (Mars Red GTi original): https://vwgolfmk1.org.uk/forum/index.php?page=topicview&type=misc&id=projects%2Fyour-mk1-golfs_2%2Fpistolpete-s-mars-red&start__keyed=
Nut & Bolt Resto in Progress (Lhasa 16v): https://vwgolfmk1.org.uk/forum/index.php?page=topicview&type=misc&id=projects%2Fyour-mk1-golfs_2%2Fpistolpete-s-lhasa&redirected=1
Nut & Bolt Resto in Progress (Lhasa 16v): https://vwgolfmk1.org.uk/forum/index.php?page=topicview&type=misc&id=projects%2Fyour-mk1-golfs_2%2Fpistolpete-s-lhasa&redirected=1
Posted
Old Timer


I might order replacements from Mk1 Autohaus in the States along with a few other things to make the most of the inevitable shipping charges. I cannot get a lower bonnet latch new anywhere for example, but they keep them in stock.
Nut & Bolt Resto Complete (Mars Red GTi original): https://vwgolfmk1.org.uk/forum/index.php?page=topicview&type=misc&id=projects%2Fyour-mk1-golfs_2%2Fpistolpete-s-mars-red&start__keyed=
Nut & Bolt Resto in Progress (Lhasa 16v): https://vwgolfmk1.org.uk/forum/index.php?page=topicview&type=misc&id=projects%2Fyour-mk1-golfs_2%2Fpistolpete-s-lhasa&redirected=1
Nut & Bolt Resto in Progress (Lhasa 16v): https://vwgolfmk1.org.uk/forum/index.php?page=topicview&type=misc&id=projects%2Fyour-mk1-golfs_2%2Fpistolpete-s-lhasa&redirected=1
Posted
Old Timer


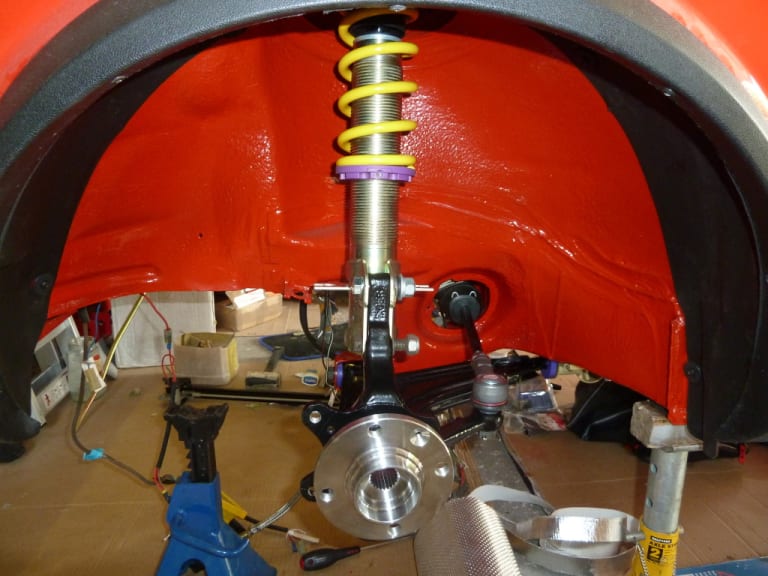
Refurbished and powdercoated 5-cylinder Audi caliper carriers trial fitted and thankfully everything is good for the full Mk2 16v front set-up. It was only when I went to fit the new genuine dust shields that I realised that there was an old sheared bolt left in one of the threads on the hub carrier, so had to take the whole lot off again to drill out and re-tap the thread. Bit of a pain, but only a couple of hours extra work (For the eagle eyed amongst you, the lower shock bolt fitted was just for the trial fit, this has now been replaced with a new lower bolt…it sticks out like a sore thumb) .

So now I have the new dust shields installed, along with refurbed carriers and new Mk2 16v calipers with standard Pagid discs and ATE standard pads (this will be more than enough stopping power).

I used to have 280mm discs fitted with the original Mk1 calipers on spacer brackets, but this set-up looks so much beefier, I can't wait to feel the difference with the big servo and 22mm master cylinder.
 Last edit: by Pistol
Nut & Bolt Resto Complete (Mars Red GTi original): https://vwgolfmk1.org.uk/forum/index.php?page=topicview&type=misc&id=projects%2Fyour-mk1-golfs_2%2Fpistolpete-s-mars-red&start__keyed=
Nut & Bolt Resto in Progress (Lhasa 16v): https://vwgolfmk1.org.uk/forum/index.php?page=topicview&type=misc&id=projects%2Fyour-mk1-golfs_2%2Fpistolpete-s-lhasa&redirected=1
Nut & Bolt Resto in Progress (Lhasa 16v): https://vwgolfmk1.org.uk/forum/index.php?page=topicview&type=misc&id=projects%2Fyour-mk1-golfs_2%2Fpistolpete-s-lhasa&redirected=1
Posted
Old Timer


As I have the same calipers to fit - can you tell me what pads you fitted? Are they the 16v vw part, or the Audi part (if they are different) - I'm not sure which I need.
Cheers!
Jason
Posted
Old Timer


I've fitted standard Mk2 16v pads for 256x20mm vented discs. Part number is 1HM698151A.
Nut & Bolt Resto Complete (Mars Red GTi original): https://vwgolfmk1.org.uk/forum/index.php?page=topicview&type=misc&id=projects%2Fyour-mk1-golfs_2%2Fpistolpete-s-mars-red&start__keyed=
Nut & Bolt Resto in Progress (Lhasa 16v): https://vwgolfmk1.org.uk/forum/index.php?page=topicview&type=misc&id=projects%2Fyour-mk1-golfs_2%2Fpistolpete-s-lhasa&redirected=1
Nut & Bolt Resto in Progress (Lhasa 16v): https://vwgolfmk1.org.uk/forum/index.php?page=topicview&type=misc&id=projects%2Fyour-mk1-golfs_2%2Fpistolpete-s-lhasa&redirected=1
Posted
Old Timer


Posted
Settled In

Are those new arch trims?
Posted
Local Hero

1988 Mk1 Golf GTi Cabriolet 1.8cc DX, K-jet. Daily drive. 317,000 miles and counting
1978 Mk1 Scirocco GLS 1.6cc FR, Webber carb. Weekend toy.
1978 Mk1 Scirocco GLS 1.6cc FR, Webber carb. Weekend toy.
Posted
Old Timer


chrisL said
Looks lovely under the arches and in the Engine bay.
Are those new arch trims?
Cheers for the comment.
I bought 3 different sets of arch trims until I was happy with the quality, finally settled on the Eurowagens ones.
Nut & Bolt Resto Complete (Mars Red GTi original): https://vwgolfmk1.org.uk/forum/index.php?page=topicview&type=misc&id=projects%2Fyour-mk1-golfs_2%2Fpistolpete-s-mars-red&start__keyed=
Nut & Bolt Resto in Progress (Lhasa 16v): https://vwgolfmk1.org.uk/forum/index.php?page=topicview&type=misc&id=projects%2Fyour-mk1-golfs_2%2Fpistolpete-s-lhasa&redirected=1
Nut & Bolt Resto in Progress (Lhasa 16v): https://vwgolfmk1.org.uk/forum/index.php?page=topicview&type=misc&id=projects%2Fyour-mk1-golfs_2%2Fpistolpete-s-lhasa&redirected=1
Posted
Old Timer


mark1gls said
Have you got braided brake hoses to fit onto those calipers?
Of course, new Goodridge Phantom stainless hoses and an Automec copper nickle brake line kit which I might have to modify slightly to work as it's a Mk1 GTi kit and of course I'm tying into 4-port 22mm master cylinder so will need t-pieces for the brake light switches.
Nut & Bolt Resto Complete (Mars Red GTi original): https://vwgolfmk1.org.uk/forum/index.php?page=topicview&type=misc&id=projects%2Fyour-mk1-golfs_2%2Fpistolpete-s-mars-red&start__keyed=
Nut & Bolt Resto in Progress (Lhasa 16v): https://vwgolfmk1.org.uk/forum/index.php?page=topicview&type=misc&id=projects%2Fyour-mk1-golfs_2%2Fpistolpete-s-lhasa&redirected=1
Nut & Bolt Resto in Progress (Lhasa 16v): https://vwgolfmk1.org.uk/forum/index.php?page=topicview&type=misc&id=projects%2Fyour-mk1-golfs_2%2Fpistolpete-s-lhasa&redirected=1
Posted
Local Hero

Just something to think about…
1988 Mk1 Golf GTi Cabriolet 1.8cc DX, K-jet. Daily drive. 317,000 miles and counting
1978 Mk1 Scirocco GLS 1.6cc FR, Webber carb. Weekend toy.
1978 Mk1 Scirocco GLS 1.6cc FR, Webber carb. Weekend toy.
Posted
Settled In

Pistol said
chrisL said
Looks lovely under the arches and in the Engine bay.
Are those new arch trims?
Cheers for the comment.
I bought 3 different sets of arch trims until I was happy with the quality, finally settled on the Eurowagens ones.
Have you had them a while, checked their website and it just looks like lighting.
Posted
Old Timer


chrisL said
Pistol said
chrisL said
Looks lovely under the arches and in the Engine bay.
Are those new arch trims?
Cheers for the comment.
I bought 3 different sets of arch trims until I was happy with the quality, finally settled on the Eurowagens ones.
Have you had them a while, checked their website and it just looks like lighting.
😀 Quite possibly no longer in business, I've been stockpiling bits for years for this car. Just had a spare head done to stage 2 (more on that later), I checked back and I bought it in 2011!
Nut & Bolt Resto Complete (Mars Red GTi original): https://vwgolfmk1.org.uk/forum/index.php?page=topicview&type=misc&id=projects%2Fyour-mk1-golfs_2%2Fpistolpete-s-mars-red&start__keyed=
Nut & Bolt Resto in Progress (Lhasa 16v): https://vwgolfmk1.org.uk/forum/index.php?page=topicview&type=misc&id=projects%2Fyour-mk1-golfs_2%2Fpistolpete-s-lhasa&redirected=1
Nut & Bolt Resto in Progress (Lhasa 16v): https://vwgolfmk1.org.uk/forum/index.php?page=topicview&type=misc&id=projects%2Fyour-mk1-golfs_2%2Fpistolpete-s-lhasa&redirected=1
Posted
Old Timer


As you foolishly told me you took loads of pictures before you started, I'm taking your wiring route as correct (better than me anyway). I've marked up your pic as I have a question.

I initially thought the grey wire tube ran through the clips marked in blue, but you have it differently. Again, I'm probably wrong, but if the wire doesn't run through those clips - what does?
The clip marked yellow must have something else running through it, but I can't work out what that is.
Finally (thanks for sticking with me) do you have any pics of where the other main harness runs round the front…?
Thanks
Jason
Posted
Old Timer


On mine, the brake pipe to the drivers side front was running through the blue clips.
Unfortunately I'm away with work for a while now so I don't have access to my photos to post for you. I'm sure someone on here has pics they could provide.
Nut & Bolt Resto Complete (Mars Red GTi original): https://vwgolfmk1.org.uk/forum/index.php?page=topicview&type=misc&id=projects%2Fyour-mk1-golfs_2%2Fpistolpete-s-mars-red&start__keyed=
Nut & Bolt Resto in Progress (Lhasa 16v): https://vwgolfmk1.org.uk/forum/index.php?page=topicview&type=misc&id=projects%2Fyour-mk1-golfs_2%2Fpistolpete-s-lhasa&redirected=1
Nut & Bolt Resto in Progress (Lhasa 16v): https://vwgolfmk1.org.uk/forum/index.php?page=topicview&type=misc&id=projects%2Fyour-mk1-golfs_2%2Fpistolpete-s-lhasa&redirected=1
Posted
Settled In

Posted
Old Timer


Glad I checked though - it could have been awkward, although brakes lines are next on the list so it wouldn't have been too bad!
Jason
Posted
Old Timer


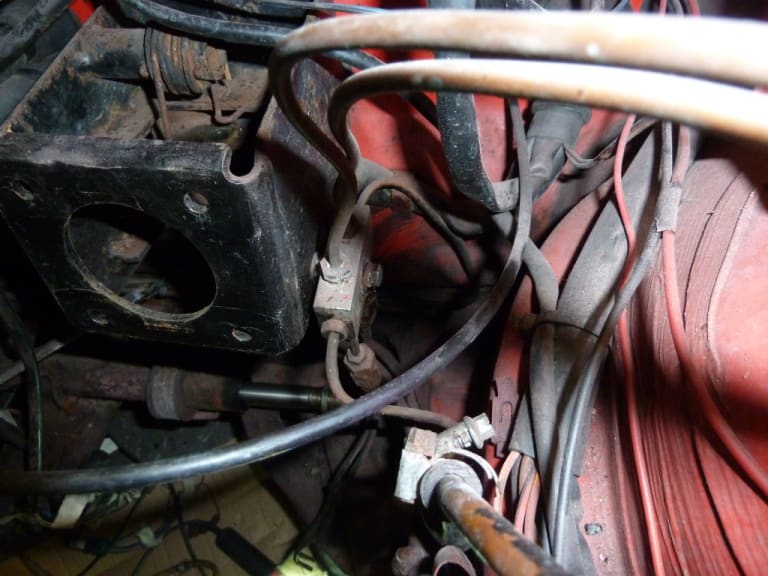
My previous set-up also used a 4-port master cylinder, although it wasn't 22mm. Instead of fitting tee-pieces for the brake light switches, the 2 left hand ports had the break light switches fitted, and then 2 brake lines were run from the right hand ports into a distribution block as per below, before being diverted off to each of the 4 corners.

This is actually quite a tidy way of doing it as the block bolts nicely to the side of the servo bracket as per pic above. Anybody seen this set-up before and should I re-use it or just use tee-pieces for the brake light switches and come straight off the 4 master cylinder ports?
Nut & Bolt Resto Complete (Mars Red GTi original): https://vwgolfmk1.org.uk/forum/index.php?page=topicview&type=misc&id=projects%2Fyour-mk1-golfs_2%2Fpistolpete-s-mars-red&start__keyed=
Nut & Bolt Resto in Progress (Lhasa 16v): https://vwgolfmk1.org.uk/forum/index.php?page=topicview&type=misc&id=projects%2Fyour-mk1-golfs_2%2Fpistolpete-s-lhasa&redirected=1
Nut & Bolt Resto in Progress (Lhasa 16v): https://vwgolfmk1.org.uk/forum/index.php?page=topicview&type=misc&id=projects%2Fyour-mk1-golfs_2%2Fpistolpete-s-lhasa&redirected=1
Posted
Old Timer


Anyway - I'm going to come straight out the MC, and ditch the brake light switches in favour of a switch on the brake pedal - I just think it will look tidier. Plus I have no idea where that distribution block ended up when I pulled everything out, I've also managed to loose the in-line pressure valves that are at the start of the rear run!
Don't forget the brake distribution should be diagonally split. i.e front port goes to rear left/front right etc.
0 guests and 0 members have just viewed this: None.


