


GarytheGolf

Posted

Old Timer


GarytheGolf

Posted

Old Timer
Posted
Old Timer
Plus congrats on post no 100
Posted

Settled In

Wouldn't like to be in your shoes looking at the tablecloth

<a href="http://s398.photobucket.com/albums/pp63/JoeMk1/?action=view?t=sig3.jpg"><img src="http://i398.photobucket.com/albums/pp63/JoeMk1/sig3.jpg" border="0" alt="Photobucket"></a>
Posted
Old Timer
Posted
Old Timer
I have installed the original discs and pads for now. They have been cleaned up. It seems that were pretty new when I got the car, they had very liitle wear.
I also managed to drill the attachment holes for the front anti roll bar which will be retrofitted later.

A view from the inside.

Looking to sort the master cylinder and the brake hoses next.
 Last edit: by Malcolm
Posted
Old Timer
I have installed the original discs and pads for now. They have been cleaned up. It seems that were pretty new when I got the car, they had very liitle wear.
I also managed to drill the attachment holes for the front anti roll bar which will be retrofitted later.

A view from the inside.

Looking to sort the master cylinder and the brake hoses next.
Last edit: by Malcolm
Posted
Old Timer
I decided not to strip down the master cylinder, however I did submerge it in clean brake fluid and flushed it out by pumping it.
I sealed up all the connections by connecting pipe fittings and masking tape, then the usual to remove the rust and apply new paint.

The vacuum servo got refurbished and I also got an as new steering gaitor courtesy of Raffles, thanks very much.

The reservoir was completely contaminated internally with grey residue and I tried a number of methods to get it clean. It is sectionalised and you cannot access the front compartment. The final method worked a treat.
Get some uncooked rice and put it inside add soapy water and shake like mad, it comes clean, then you need to get the rice out!
During the week I managed to get the number plate done and some front anti roll bar clamps. Note the clean reservoir.

I have a small problem with one of the clamps, with a stud that's sheared, I shall repair that another day.

The brake servo and cylinder installed, I also installed the right hand engine loom as some of it has to go behind the brake operating mechanism.


The left hand bellcrank and new steering gaitor installed.

My days work today. Pretty happy.

My tub of citric acid, the radiator shroud is getting it now and has been for some time, it is being a bit stubborn.


Looking to sort the brake pipes next.
Last edit: by Malcolm
Posted
Old Timer
I',m really impressed on how POR 15 works using the proper process. The Metal ready product seems to transform the remaining rust elements.


POR 15'd, I don't like the gloss finish, it shows too many flaws.

The finished article after spraying satin black on top of the POR 15. I do this when the POR 15 is slightly tacky. The satin finish shows less imperfections.


Weekend over, though I have two driveshafts pickling away for next week.
Last edit: by Malcolm
Posted
Old Timer
Had a go at fitting the brake pipes and bled the system.
I needed to replace the front two pipes and recent acquired a brake pipe flaring kit and some tubing. I also got a Laser bending tool which came in quite handy.
My first efforts at brake pipe swaging were terrible, so had a look on YouTube and realised I was doing it all wrong. With a bit of practice I think I got some decent results.
Have cut the pipe to length and fitted the 2 x connections onto the pipe, . I used masking tape, you need to clamp the pipe with about 1/4" sticking out, make sure it is square to the tool.

Then pop the swage mandril / former in the pipe.

Slide the pressing tool over the clamp, (continuity issue here, this pic is in fact removing the tool from the clamp after swaging).

And fit onto the mantril and tighten.

Tighten the press as far as you can.

Remove the madril to reveal the swaged end.

Remove from clamp.


Pipes fitted to car and system bled.


Not too scary.
Last edit: by Malcolm
Posted
Old Timer
Decided to overhaul the gear linkage. I am going to fit a 5 speed box to replace my four speed.
I have looked at the ETKA, done a comparison and noted that most components between 4 & 5 speed for an 83 1.5 GL are basically the same.
It seems that only the Cover / Gate Plate (where the gear stick pivots) and the small linkages by the gearbox need replacing.
4 speed items stripped and cleaned. Note the Boot is split and a bit is missing.

Did some gearbox mounts as well, aquire the 5 speed mount via ebay.

Bought some items from VW, gave them a list of parts and got 100% of them!.
Here to tidy the braking system,

including a new linkage boot, in the meantime I decided to repair the old one with a puncture repair outfit and some super glue in case the new one did not turn up.

plus some choke cable bits for the weber install, I got the cable from ebay.

and the 5 speed cover plate / gate. I cannot see much difference between the two items, the 4 speed is at the front, 5 speed at the back.

New items from ebay.

The gear stick and plate installed.

The linkages installed. New bushes installed where required, I am leaving it clean for now and will fully lubricate when the gearbox is installed.


Cleaned and fitted the last engine loom (Yellow plug) before finishing for the day.


Think I need to start looking at the engine next.
The wife decided to take a picture. The neighbours normally do a double take.

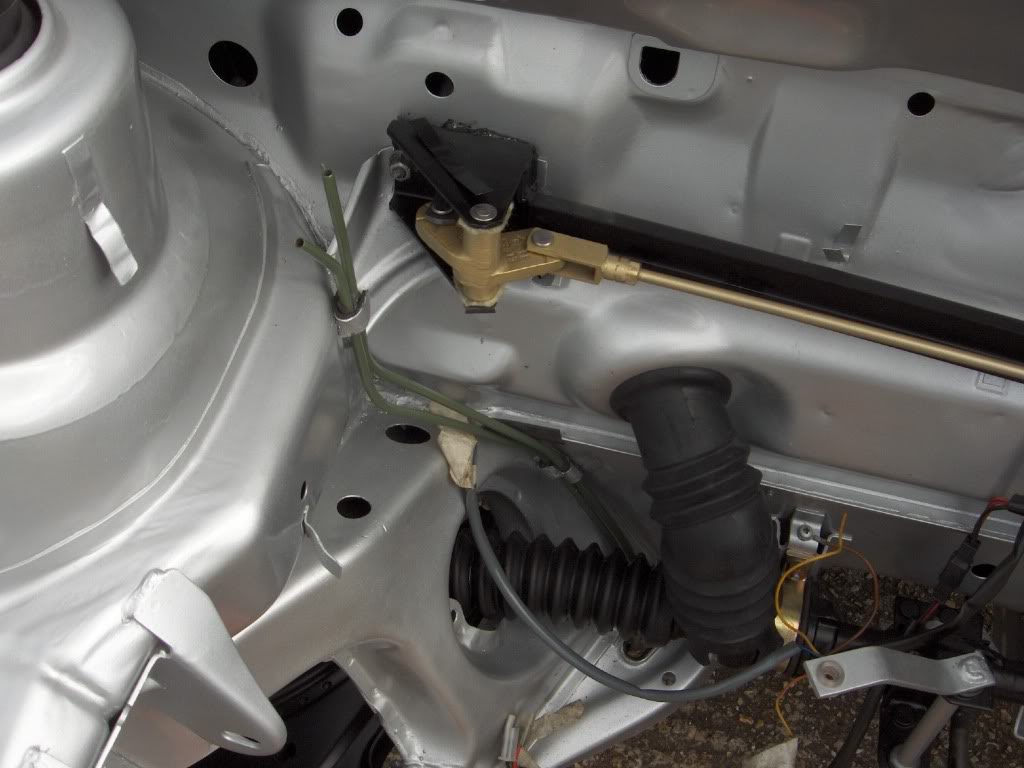
I have had a few questions on the fitting of the fuel tank anti-gravity valve and how it attaches to the car.
Here are some photos showing that the sponge fitting fills the gap between the rear arch liner and the car body. It attaches to the arch liner by a nut and bolt.
I have used a plastic number plate nut and bolt with a load spreader washer as the original nut an stud had corroded and enlarged the hole when it was removed.


Hope this helps.
Last edit: by Malcolm
Posted
Settled In
i m learning lots of things from u :notworthy: :notworthy:
You know that game :wink:

Posted

Web Team


Posted
Old Timer
Posted
Settled In
 the 1st page is pretty much the same stuff i had to do to mine! pretty damn good condition with just fiddly bits of rust etc here and there. looking great though bud
\'Check Your Nuts!\' My partner has just been through an operation and chemotherapy for Testicular Cancer and is only 29. He had no lump or pain, just became swollen… If in doubt, get to the doctor!
Posted
Old Timer
I removed the gearbox and clutch and placed the engine on a proper stand, I have found this very useful tool getting access to the engine. The clutch looks contaminated with oil. I think that rear crankshaft oil seal is leaking.


I removed the external engine components.


The preheater from the manifold has got some broken bits in it.


Note the two coloured seal. The black side is on the inside of the manifold.
Next I removed the cylinder head but in the process damaged one of the cylinder bolts. I used a six point point torq drive and it should have been a 12 point spline. Access was pretty restricted with it being in the corner of the head.

The problem got worse when I drilled out the bolt head and used an extractor tool that promptly snapped!!
After a week or so I managed to get some cobalt drills from Toolstation, drilled the head of bolt a bit more and managed to remove the bolt by jamming the next size up 6 point torq drive.

I marked up and removed the camshaft and bucket tappet and shims. I used a magnet to lift the buckets out.


I removed the sump, it was full of swarf despite my trying to prevent it.
It took ages to remove the head gasket from the block, but it looks clean now.


I cleaned the piston heads and the bores , however I think I might have some issues with the outer two cylinder bores as there are some horizontal line in them, I think they are carbon deposits. I might take a piston out to investigate.

I have yet to attack the cylinder head.
Last edit: by Malcolm
Posted
Old Timer
Will check the valves and lap in as required another day.


Before

and after


Last edit: by Malcolm
Posted
Old Timer
I had to purchase another valve compressor, my old one did not have the deep insert required for recessed valves, this one has a double lever mechanism.


I kept the valves and springs in their own numeric compartments


The cylinder head without valves.

Valve s seats are not bad with no burn through.


Valve seals removed with a pair of pliers.


Valve seats lapped using grinding paste.


Fitted valve seals, spot the obvious mistake. The lower valve seat / ring must be fitted before the valve seal is fitted.

New seals come with a plastic tube to protect the seals when sliding over valve stem.


Valves and seals correctly assembled with plenty of engine oil.


Camshaft fitted and tightened down.

Still to do the pistons and main bearings.
Last edit: by Malcolm
Posted
Old Timer

I have had trouble sourcing new parts for a 1500 cc engine. I managed earlier to order the cranshaft seal, pistons rings, main and conrod bearings from Eurocarparts. No conrod bolts though.
So I started stripping the engine down. Remember to identify the parts with punch marks on the conrods for later assembly. Main bearing caps are already numbered.

And permanent marker, It will come off.

A typical piston removed from the block, note that the oil scraper and top ring should have the gaps at least 120 degrees apart.

Same here.

Bearing shells do not look too bad. Just a little wear.

The crankshaft, nothing too scary.

The engine cylinder bores looking reasonable, just need a clean up.

From underneath.

Went to pick the items up today, no conrod bearings and piston rings supplied only for one piston!. Gave the rings back.
Found a good engine overhaul place in Cadnam, nr Southampton, met them for the first time today.
Over the moon to find a place at hand. The guy informed me that my conrod bolts are OK to use again as they are not the new type of stretch bolts used in later day models.
I was able to order a bottom set of gaskets, conrod shells and piston rings from him.
I have got the main bearing shells and crankcase seal from Eurocarparts.


Also bought a cylinder honing tool from machinemart to clean the cylinders up.

Last edit: by Malcolm
Posted
Old Timer
To be fair it seems that my JB engine might be a hybrid. In the Etka and Haynes manual, the central No3 bearing is shown as a saddle bearing incorporating thrust washers.
My engine has a normal bearing with separate thrust washers normally found on the Mk2 engines. I had to order the correct set from the engine shop.
In the mean time I deglazed the cylinders, cleaned the block and resprayed it with the engine enamel.
The tool, lubricate stones and cylinders with WD 40.

The tool in use, low speed, moving up and down to create cross hatch. The picture does not reflect the cross hatch very well.

I sprayed the block with engine enamel.


Point to note, after deglazing the cylinders you have to wash them with detergent to remove any debris from the honing tool. I was surprised how quickly the cylinders would rust without protection whilst I sprayed the block.
Anyway having finally got all the parts I need, I made a start this weekend.
The pistons were stripped of the original rings, cleaned up and new rings fitted, having made sure that the piston ring gap was correct in each cylinder.

New rings, instructions on the packet.

Piston cleaned, use a broken ring to clear the carbon from the relevant groove.

New rings installed.

Before and after.

The pistons all done and lubricated with the assembly grease. Magic stuff, very thick and goes a long way. Will protect engine on initial start up and running in.

The block ready to new bearing shells.

Main bearings in with assembly grease. Note the cylinders also covered in grease.

The crankshaft laid in.

The crankshaft main bearing caps on and torqued down.

Pistons in next. Ran out of light.
Last edit: by Malcolm
There are too many online users to list.