


The other project.

Posted
#1159885
(In Topic #138749)
Settled In

The other project.
Obviously i still have the MK1 ( i will finish it one day i promise) but 2 years ago i got a hankering for another audi.
Me being me i went and bought the engine before the car…
 the plan being to upgrade the engine to a more pokey and modern unit.
Took me a couple of months but i found what i wanted- an Ur Quattro.


Very definitely in need of some tlc and money spending on it.
The only real rust damage was created by various establishments jacking it up carelessly over its nearly 30 year life which took a while to fix.
Plenty of other faults and problems have been found and fixed since i got it home and tucked up and its still a work in progress, but its not a million miles away from running!
Stripping it down to sort it out.

Story so far is here, sorry about the length of it.
: http://www.classic-audi.co.uk/forum/showthread.php?t=3747
Posted
Local Hero


good luck with project and make sure you keep them picture updates coming :-)
SOUTHWEST Regional Host. Bristol Meet - 1st Friday of the month - Toby Carvery Bradely Stoke Bristol Bristol Region Facebook Group
1.8T CABBY
TINTOP THREAD (SOLD 2016) SPORTLINE THREAD (SOLD 2015) CLIPPER THREAD (SOLD 2012)
1.8T CABBY
TINTOP THREAD (SOLD 2016) SPORTLINE THREAD (SOLD 2015) CLIPPER THREAD (SOLD 2012)
Posted
Local Hero
��������������������������������
Posted
Settled In
Took off all the old paint and rusty patches over the course of a week or so and then acid etch primed the bay and applied a couple of coats of hi-build primer to flat down after for the colour.

Once id done the flatting down and was happy with the surface it was time to apply a basecoat colour of Montego Black metallic which was the original colour.
For some reason the first owner had the cars resprayed in plain black…. :dontknow:

Once the laquer is put over the top it brings the colour out.
It has a slightly purple hue to here because the torch is an led with a slight tinge to it.

Stripped out all the front suspension, was in a mess and needed almost every single component replacing and remember the same parts are present on the rear too, so i had double the cost….oh dear my poor wallet.
Front strut, bit manky for sure heavily rusted.

Rather than go to the expense of getting them blasted which would have been quicker maybe, i decided to diy rust remove it , by electrolysis.
This is the same strut in the bath asfter just a couple of hours.

Once its been in a few hours the rust just falls away, even the heaviest deposits will come off with just a stream of water from a hose.

I also decided to dispense with the big single piece cibie headlights as i dont particularly like the way they look, so i opted to retrofit a set of the quad lights found on my old early coupe.
This car is just outside the year to be fitted with those units but they look so much nicer i think.
Had to glass bead the frames to remove years of rust and grime and repainted them.


In between various little jobs i got the rear trailing edges of the arches done as theyd completely gone to the great scrapper in the sky.
Reason i think is the flange had been drilled to fit the rear apron on and self tappers used which separate the layers and water gets in.
Took a couple of days but i rebuilt both sides, inner and outer curves too so its as good as new.
Couple of coats of por15 over it to keep it looking good and im quite happy with it.
Trailing edge of the osr arch. Messy huh?

Since i cant buy repair panels at anything like a sensible cost the only method is patch panel repair which is fine when done well.
These bits are the repair parts to accurately rebuild that rotten flange/trailing edge.

Once i removed all the rot i set about getting it all repaired. took a couple of days to get it done but it looks immeasurably better now i think.


The other side.

Refurbed rear strut.
Cost over 500 quid to do each one.
Thats cos of bearings, pads, discs (20valvers for the rear) pad carriers, top mounts, spring cap as the originals were cracked, dampers, bump stops, shock tube bellows, lower balljoints….
I dont actually mind that as it was necessary work to make it right and safe and this is all i spend my money on, still no wonder im skint.


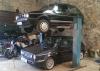
Sitting there patiently with its replacement 20valve 5 cylinder turbo motor waiting for me to pull monsieur finger out.

Amongst the large amount of receipts i have for this car from before my ownership, one was found for the amount of 84 quid.
Turns out it was the cost for some monkey establishment to do this:

Why? Well, the clutch master sits under there and it can be a fiddle to get to, so rather than take out the pedal assy they simply chopped the scuttle panel thru and created more damage.
Water has also gotten in through the years and sezied the steering column bearing, luckily i sourced a brand new one.
So, i had to put that right.
Luckily i have a good friend who was breaking a coupe gt so i cut out a repair panel from that.
Old damaged material i cut out.

Repair panel from the coupe which is identical so fits lovely.

Because the ecu is now a big fat motronic item it took a while to figure out where i could put it out the way.
That required a hole to be cut in the panel for the cabling to go through and reinforcing ring tacked on behind it.


Once i was satisfied with all that it was welded in and sealed, painted with por15 to keep it rust free.

And a bitumen sound deadening sheet cut to fit over the top and glued down as per oem.

Ecu sits nicely under the right side of the dash out the way and leaves the wiring (eventually) nice and neat.

The wiring harness took a little deciphering but i shortened it and set it up so the ignition amps are under the scuttle panel under a shield along with the wiring to the ecu.

Chased some electrical shorts and found a wire bodged into the back of the lighting switch that meant the switched "15" line (smae as on golfs) was permanently powered…..
Once i rectified that i could start testing the lights and other stuff. Found some dirty connections etc but hey ho, heads all work!


Also piped the brake lines in and got a functional pedal.
On the quattro the servo is a hydraulic item that works of the ps pump but i wanted rid of all that complication so i used an audi 80 servo and master as per my old coupe gt.


At this point ive still to finish the ecu wiring, just a matter of a few connections, do the rear diff seals and get it bolted back up, and sort out the engine services-exhaust, cooling intercooler and piping.
Theres also the matter of the rear panel thats been distorted due to a shunt at some time so thats got to be removed and replaced/welded in.
Getting there, just a bit slowly.
Posted

Local Hero
Andy
LINCOLNSHIRE REGION -�https://www.facebook.com/groups/467122313360002/
1983 MK1 Golf GTI Campaign Model - Under (looooong) resto!
1962 Rover P4 80
2002 BMW 745i
2008 BMW Z4 2.5Si
LINCOLNSHIRE REGION -�https://www.facebook.com/groups/467122313360002/
1983 MK1 Golf GTI Campaign Model - Under (looooong) resto!
1962 Rover P4 80
2002 BMW 745i
2008 BMW Z4 2.5Si
Posted
Life Member
I went to by one of these 2 years ago traveled down 150miles to buy it cash in hand insured the car the day before paid a mate to drive me down etc when i got to the house saw the car on the drive and felt sick as the pics i had seen advertising the car on pistonheads must have been taken 10yrs previous pain flaking off the rear spoiler the guy hasn't een been bothered to empty the door pockets of dirty tissues. I had a blast in it and loved the drive but not the car drove home very disappointed I will have one one day
look forward to seeing the finished item nice work you are doing too
Dont ask what your club can do for you, but what can you do for your club? 
Posted
Settled In
finding out,how is your build being recieved by the Audi boys some can be very picky when it comes
to swapping things around and not leaving it " origional " The best fellow out there is Mr Brignall the Chairman
of the quattro owners club you wont find a more honest man in the quattro scene.If you was to need any advice
then if he dosent know he will know someone who does.
Good luck with the build.
Posted
Settled In
Mine is indeed a money pit, mind you if i didnt have this id have to take up smoking,drinking and spending my money on cheap women… this is a lot less hassle.
As for what the purists might think, ah well, each to his own i say, although Audi did a fine job on the Ur as it originally stood at the time, many suffer from kjet issues and the access as we know is a right pain, especially when taking heads on and off.
I decided to go 20 valve purely for the extra power, modern top end, better injection system…itll just end up being more reliable and nicer to play with when its done.
Met JB once or twice now, nice guy, in fact i think i may have spoken to you before?? Im usually on classic audi, username 4v6 so its quite possible.
Thanks for the good wishes.

Settled In
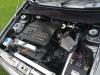
Audis getting there though!

Still have to sort out the abysmal rats nest of wiring under the bonnet and spray up the rear apron plus some other odds and ends.
Oh and it runs nice too!
0 guests and 0 members have just viewed this: None.