Problem with new top (VW Cabriolet Mk1)
Posted
#1600429
(In Topic #217759)
Newbie

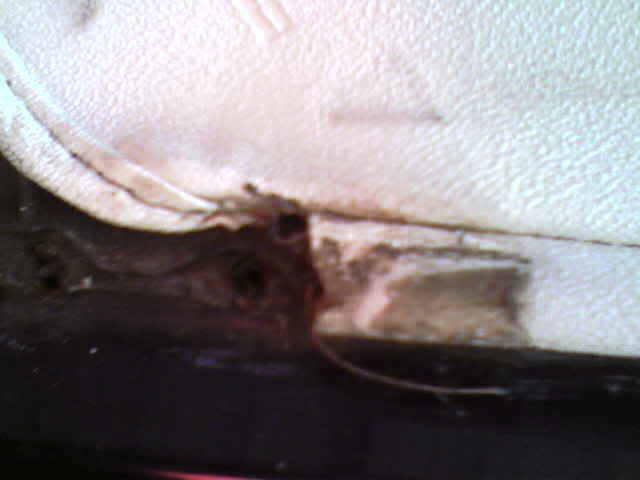
I have installed a new top (Cabriozentrum) but on the sides it does not fit correctly. See photo…
Do you know how to solve this problem?

Thanks you.
†
Posted
Local Hero

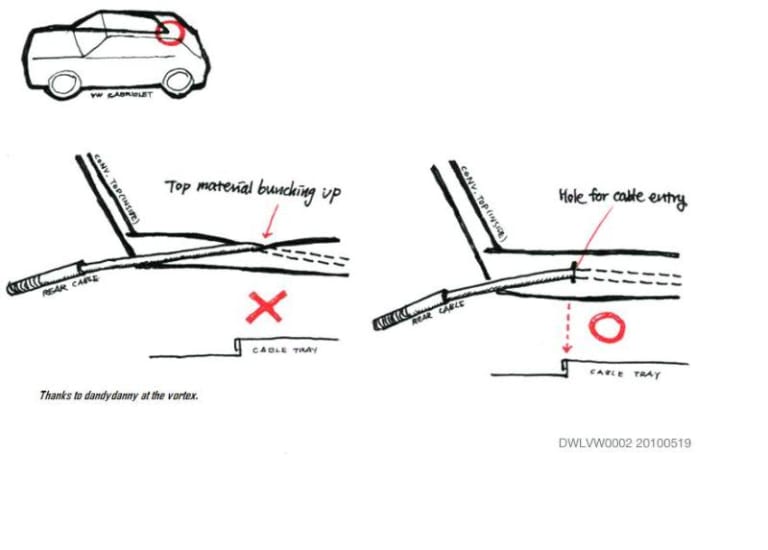
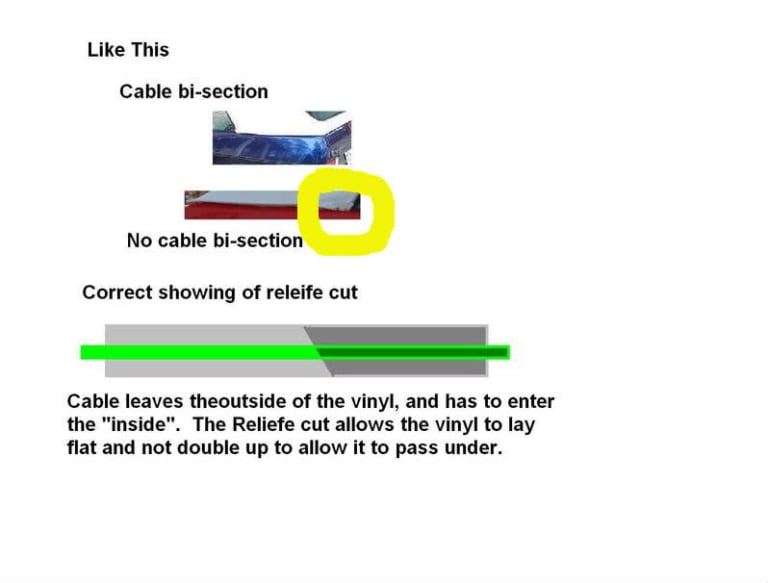
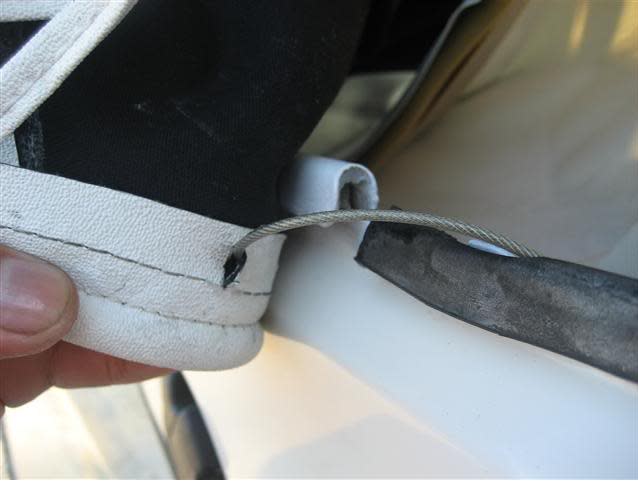
That is a result of not placing a relief cut or pass through for the rear cable where it enters the inside of the car from the external cable tray.
A very common mistake as it wasn't mentioned in most of the Tops how-to's, especially the first "forrest kings word doc. The only one I could find many years ago.
I have found that over the years installing these things that if you trim off the "extra" material on the top that is the overages at the bead seam cutting close to the seam without cutting the seam you don't have to make this relief cut.

There was never a mention of this additional material needing to be removed to make the cable tray insertion easier.
In addition there are Stiffeners that need to be added to the inner bead to hold the bead flat to the body so they don't "hump" out (this is after the relief cut is made and the cable is in correctly).
The Stiffeners are about 8 Inches long and if they weren't included in your kit can be made out of Aluminum Coat hangers (steel ones can rust).
†
What do Divorces, Great Coffee, and Car Electrics all have in common?
They all start with GOOD Grounds.
Where are my DIY Links?
They all start with GOOD Grounds.
Where are my DIY Links?
Posted
Newbie

The hole for rear cable is not the problem, the top already had the hole made to pass the rear cable.
But… the last thing you explain about a reinforcement, if it could be. Since I did not know that you had to put any reinforcement.
How is that reinforcement? Do you have any photo? Where is it introduced?
THANKS!
Posted
Newbie

The hole for rear cable is not the problem, the top already had the hole made to pass the rear cable.
But… the last thing you explain about a reinforcement, if it could be. Since I did not know that you had to put any reinforcement.
How is that reinforcement? Do you have any photo? Where is it introduced?
THANKS!
Briano1234 said
Yes.
That is a result of not placing a relief cut or pass through for the rear cable where it enters the inside of the car from the external cable tray.
A very common mistake as it wasn't mentioned in most of the Tops how-to's, especially the first "forrest kings word doc. The only one I could find many years ago.
I have found that over the years installing these things that if you trim off the "extra" material on the top that is the overages at the bead seam cutting close to the seam without cutting the seam you don't have to make this relief cut.

There was never a mention of this additional material needing to be removed to make the cable tray insertion easier.


In addition there are Stiffeners that need to be added to the inner bead to hold the bead flat to the body so they don't "hump" out (this is after the relief cut is made and the cable is in correctly).
The Stiffeners are about 8 Inches long and if they weren't included in your kit can be made out of Aluminum Coat hangers (steel ones can rust).
†
Thanks Briano
The hole for rear cable is not the problem, the top already had the hole made to pass the rear cable.
But… the last thing you explain about a reinforcement, if it could be. Since I did not know that you had to put any reinforcement.
How is that reinforcement? Do you have any photo? Where is it introduced?
THANKS!
Posted
Local Hero

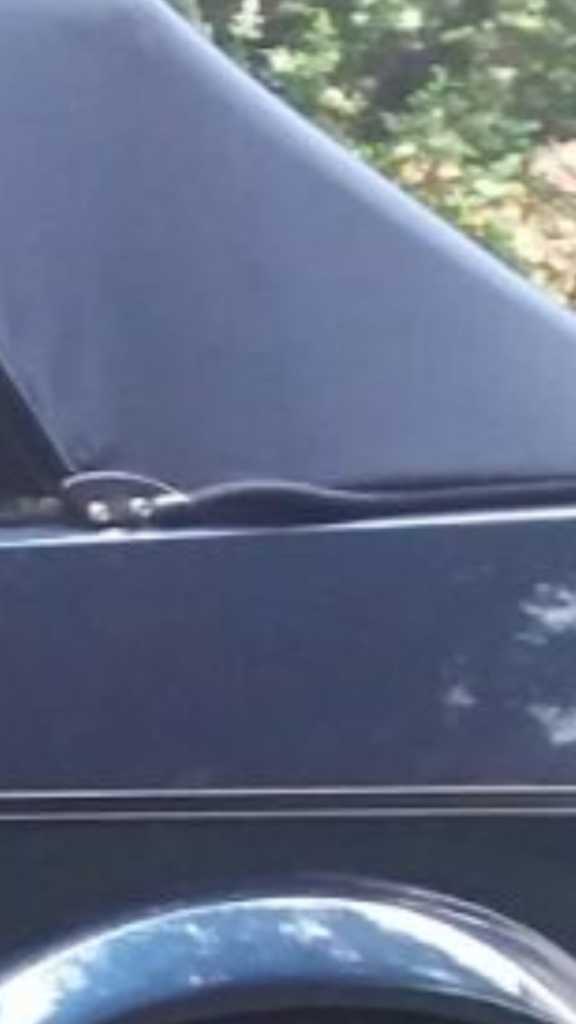
The the last issue prior to the installation of the stiffners
is that you didn't trim the inner inner bead prior to putting on the corner caps.
I don't have a picture of it, but I will try to describe it accurately.
With the corner caps removed (the 2 Phillips screws with bezels and snap)
If you look at the bead from the open end, you can see that it is a hollow tube. This hollow tube that is inside the vinyl or canvas has to be pulled out a wee bit and trimmed or cut back, so that the tops corner can fit flat to the body and up to to the corner cover. I usually have to trim this inner piece about 1/2 to an inch some times.

I didn't have a picture so I drew a crude one….
see this
http://forums.vwvortex.com/showthread.php?8895049-2-steel-rods-came-with-new-top-what-are-they-for&highlight=top+lay+flat+rod
Kind of a bad pic, but I think you can see that I am getting to.
HINT WARNING
Take care in inserting the stiffeners, and if you make your own, be sure that they are flat on the ends and sanded smooth and round the edges, use some Vaseline to grease them prior to inserting.
Take care as you can pierce the inner tube and they will poke out of the material really really easy…. Insert them slowly and straight.
What do Divorces, Great Coffee, and Car Electrics all have in common?
They all start with GOOD Grounds.
Where are my DIY Links?
They all start with GOOD Grounds.
Where are my DIY Links?
Posted
Newbie

Briano1234 said
Ok, if you have the relief cut or hole and your cable isn't bunching up.

The the last issue prior to the installation of the stiffners
is that you didn't trim the inner inner bead prior to putting on the corner caps.
I don't have a picture of it, but I will try to describe it accurately.
With the corner caps removed (the 2 Phillips screws with bezels and snap)
If you look at the bead from the open end, you can see that it is a hollow tube. This hollow tube that is inside the vinyl or canvas has to be pulled out a wee bit and trimmed or cut back, so that the tops corner can fit flat to the body and up to to the corner cover. I usually have to trim this inner piece about 1/2 to an inch some times.

I didn't have a picture so I drew a crude one….
see this
http://forums.vwvortex.com/showthread.php?8895049-2-steel-rods-came-with-new-top-what-are-they-for&highlight=top+lay+flat+rod

Kind of a bad pic, but I think you can see that I am getting to.
HINT WARNING
Take care in inserting the stiffeners, and if you make your own, be sure that they are flat on the ends and sanded smooth and round the edges, use some Vaseline to grease them prior to inserting.
Take care as you can pierce the inner tube and they will poke out of the material really really easy…. Insert them slowly and straight.
Thanks Briano.
Look

Now much better.
The problem was what you explained. you are a genious
Regards.
Posted
Local Hero

Problem with new top (VW Cabriolet Mk1)
What is the other side like?
Could it be you’ve fitted the top incorrectly and have more material to the one side? Hence it’s bunching up?
Very hard to diagnose from a piccy.
If you’re not far from me I’ll be happy to take a look.
I’m in Derby
Sent from my iPhone using Tapatalk
"Making Cabbies More Beautiful One Roof at a Time"†
Posted
Newbie

both sides are the same.
but it has already been solved with the reinforcement explained by Briano.
I am from Spain.
Thanks
Posted
Newbie

chortle said
Ok for the stiffening rods I use 4mm stainless steel rod.
What is the other side like?
Could it be you’ve fitted the top incorrectly and have more material to the one side? Hence it’s bunching up?
Very hard to diagnose from a piccy.
If you’re not far from me I’ll be happy to take a look.
I’m in Derby
Sent from my iPhone using Tapatalk
Hi!
Diameter 4 mm OK!
And long? How many centimeters?
Thanks!!!
Posted
Local Hero

Problem with new top (VW Cabriolet Mk1)
However your top isn’t fitted correctly.
You need to undo the lower pieces that glue to the frame.
These need to be moved forward so the edge aligns with the edge of the metal.
Sent from my iPhone using Tapatalk
"Making Cabbies More Beautiful One Roof at a Time"†
Posted
Newbie

chortle said
Approx 20 cm
However your top isn’t fitted correctly.
You need to undo the lower pieces that glue to the frame.
These need to be moved forward so the edge aligns with the edge of the metal.
Sent from my iPhone using Tapatalk
OK! Perfect! I will buy a piece of stainless steel 4 mm and 20 cm long.
Yesterday I tried a piece of 3mm and 13 cm long. But I will put one of 4mm and 20cm in length.
When I have finished I show you how it has been!
Thank you very much.
Thanks you!
0 guests and 0 members have just viewed this: None.


