


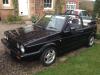
'86 Black GTI Cabriolet

Posted
#1398988
(In Topic #183852)
Settled In


first GTI and first project
Bought this in January after sitting unused on a driveway for 5 years. It belonged to friend so know a bit about the history and what had been done . - New fueling system, including fuel tank, metering unit and distributor among others. New radiator and roof too.
140K on clock and hasn’t had an MOT for almost 6 years!!
It hadn't been protected from the elements and the roof was leaking at the Header Seal. So both front seats were sodden. Also floor on near side was soaking too and looks like the near side door is leaking. Managed to get it under cover and dried out but it will need replacement header seal and weather sheets behind the door panels. Probably door seals too. Little rust on near side sill but doesn't look too deadly.
I'll need to clean mould off the interior too.
Really not sure what I make of the all-in-one full wrap around body kit – it could well be hiding something!!
Looks like it may have had an attempt at a repsray as some of the paint is peeling off - possibly too much paint been applied. But overall seems pretty solid.
Oh, and the Tailgate doesn't open!
Wasn't sure where to start so rather than spending time on the bodywork decided to clean what I could inside and out and try to get the thing going. Siphoned off the old fuel, put in fresh stuff and fitted a new battery.�Naively�thinking that would be it!
Surprise surprise, nothing but it did sound like it was turning. Initially it wasn't sparking and managed to trace it back to a faulty Ignition Coil. Eventually tracked down a new coil at Euro Car Parts and really didn't think it would start after sitting for so long. However, after 3 attempts the car did start and now starts first time, every time! No Black smoke, no spluttering it just sounds amazing. Great result so far!
I've got the obvious service parts; oil, oil filter, fuel filter�and coolant needs replaced. While I'm at it I'll attempt the timing and alternator belts - Anyone know where I should go to get the belts??
Other than that I really don’t know where to go so would welcome any advice.
I'll add some photos below if I can work out howto and I'll try to keep this thread updated as I go….
Thanks in Advance
KP


 Last edit: by KPCabrio
Posted

Local Hero


For belts and other parts, try Crazyquiff or Classic-VW, both adverts/links on the site here, also VW Heritiage, AVS too.
Looking forward to your updates

Andy
LINCOLNSHIRE REGION -�https://www.facebook.com/groups/467122313360002/
1983 MK1 Golf GTI Campaign Model - Under (looooong) resto!
1962 Rover P4 80
2002 BMW 745i
2008 BMW Z4 2.5Si
LINCOLNSHIRE REGION -�https://www.facebook.com/groups/467122313360002/
1983 MK1 Golf GTI Campaign Model - Under (looooong) resto!
1962 Rover P4 80
2002 BMW 745i
2008 BMW Z4 2.5Si
Posted
Settled In
��Yep, lots of sweat so far. I suppose I should have posted a photo before I cleaned it up - I'll see if I've got some on my phone.It's a shame it had been unused for so long - may not have had any rust on sill at all!
Anyway, so far I'm loving it..
Last edit: by KPCabrio
Posted
Local Hero
Andy
LINCOLNSHIRE REGION -�https://www.facebook.com/groups/467122313360002/
1983 MK1 Golf GTI Campaign Model - Under (looooong) resto!
1962 Rover P4 80
2002 BMW 745i
2008 BMW Z4 2.5Si
LINCOLNSHIRE REGION -�https://www.facebook.com/groups/467122313360002/
1983 MK1 Golf GTI Campaign Model - Under (looooong) resto!
1962 Rover P4 80
2002 BMW 745i
2008 BMW Z4 2.5Si
Posted
Old Timer

With regards on where to go with it, just browse other peoples builds and see what takes your fancy, a bit of everything on here

Matt
Posted
Settled In
 �- A lot of talented people on here.
I've ordered some bits and pieces already from Classic-vw and Crazy Quiffs - there's gonna be quite a bit to do to get it back on the road I reckon, so will focus on that first. Really eager to start driving it. Then�We'll see�what we can do….
cheers

Local Hero
Andy
LINCOLNSHIRE REGION -�https://www.facebook.com/groups/467122313360002/
1983 MK1 Golf GTI Campaign Model - Under (looooong) resto!
1962 Rover P4 80
2002 BMW 745i
2008 BMW Z4 2.5Si
LINCOLNSHIRE REGION -�https://www.facebook.com/groups/467122313360002/
1983 MK1 Golf GTI Campaign Model - Under (looooong) resto!
1962 Rover P4 80
2002 BMW 745i
2008 BMW Z4 2.5Si
Posted

Moderator

Posted
Settled In
��More jobs added to the list� cf_emoticons__BangHead:�

Anyone know where I could get the missing bracket which is supposed to hold this accelerator cable in place on the strut tower:

Someone has had fun:

Well, well, well - not so much fun:

Boot now opening, but looks like I'll have to evict Spidey and his entire family


Not bad at all:

All in all a productive weekend. Much happier now knowing what is under the carpets and in the boot - still very solid…..
Posted
Local Hero
Try
 funk-star
for the bracket
funk-star
for the bracket 
Good work
Andy
LINCOLNSHIRE REGION -�https://www.facebook.com/groups/467122313360002/
1983 MK1 Golf GTI Campaign Model - Under (looooong) resto!
1962 Rover P4 80
2002 BMW 745i
2008 BMW Z4 2.5Si
LINCOLNSHIRE REGION -�https://www.facebook.com/groups/467122313360002/
1983 MK1 Golf GTI Campaign Model - Under (looooong) resto!
1962 Rover P4 80
2002 BMW 745i
2008 BMW Z4 2.5Si
Settled In
Posted
Settled In

closer look and it has gone through to the underside :

On the plus side I'm quite pleased with the way the Visors have turned out.


Polycell Mould remover and bit of elbow grease seems to have done trick. Another job ticked off
Posted
Local Hero
Andy
LINCOLNSHIRE REGION -�https://www.facebook.com/groups/467122313360002/
1983 MK1 Golf GTI Campaign Model - Under (looooong) resto!
1962 Rover P4 80
2002 BMW 745i
2008 BMW Z4 2.5Si
LINCOLNSHIRE REGION -�https://www.facebook.com/groups/467122313360002/
1983 MK1 Golf GTI Campaign Model - Under (looooong) resto!
1962 Rover P4 80
2002 BMW 745i
2008 BMW Z4 2.5Si
Posted
Settled In
Hairyarse said
Those visors cleaned up nice. Has the metal rusted through or could you just put some kurust or similar on it and paint it? (Skim of filler too if you want it smooth again)
It's not right through so I can see the ground. There just seems to be an extra metal plate underneath that may be rusted too. Will the Kurust stop it getting any worse?
If the Kurust will stop it getting any worse I could apply it, fill it and then paint it? would that work ok?
Posted
Local Hero
Give it a bash and keep an eye on it
Andy
LINCOLNSHIRE REGION -�https://www.facebook.com/groups/467122313360002/
1983 MK1 Golf GTI Campaign Model - Under (looooong) resto!
1962 Rover P4 80
2002 BMW 745i
2008 BMW Z4 2.5Si
LINCOLNSHIRE REGION -�https://www.facebook.com/groups/467122313360002/
1983 MK1 Golf GTI Campaign Model - Under (looooong) resto!
1962 Rover P4 80
2002 BMW 745i
2008 BMW Z4 2.5Si
Posted
Settled In
 Wee update on the carnage:
Spiders have left the building - not a proper wash yet just a wipe away and vacuum:
almost…..

seem to be doing a lot of dismantling rather than fixing and re-assembling:


Vintage Car, Vintage Gum:

Probably going to have to rebuild most of the front end too:

was a nightmare getting that bleed nipple out!


The more I take it apart, the more I am happy that I've got a decent solid car. Just hope I can remember how to put it all back together again
 �I intend to fix it up in sections and eventually re-paint in situ rather than going to bodyshop for full respray.
regards
KP
Posted
Local Hero
Like the old chewy!!
Andy
LINCOLNSHIRE REGION -�https://www.facebook.com/groups/467122313360002/
1983 MK1 Golf GTI Campaign Model - Under (looooong) resto!
1962 Rover P4 80
2002 BMW 745i
2008 BMW Z4 2.5Si
LINCOLNSHIRE REGION -�https://www.facebook.com/groups/467122313360002/
1983 MK1 Golf GTI Campaign Model - Under (looooong) resto!
1962 Rover P4 80
2002 BMW 745i
2008 BMW Z4 2.5Si
Posted
Settled In

Posted
Settled In

Also, had a bash at some badges, Not yet complete but here are the before shots:

After a little rub down with some 'Red' very fine Alumimium Oxide 'denibbing' pads and soapy water, I dried them off (while wearing latex gloves to stop any oil from my hands touching the clean surface) applied some plastic primer and 3 lights coats of Satin Black paint - All from a rattle can!! so who knows if it will last:


The pics don't really do them justice - they actually look better in the flesh.
I have purchased a 'silver' oil based marker pen with a chisel tip - I heard someone on here used this to write the lettering and the badge - But I'm just wondering should I apply the silver pen fist and then apply a lacquer to the badges? or should I apply the lacquer next and then do the delicate pen markings last?
Really not sure how the lacquer will react with the oil based marker pen.
Posted
Settled In


0 guests and 0 members have just viewed this: None.