Rocker cover gasket?
Posted
#1576758
(In Topic #212700)
Old Timer


Rocker cover
 Last edit: by BAZ-GTI
Posted
Local Hero

If you go that route, place a washer over the studs prior to removing them to prevent scratching the surface of the head. Use a Stud remover, or the double nut method. I have even used small Vice Grip pliers clamped above the washer and a hammer (4oz) ball-peen to break them loose.
Clean the head face well remove all traces of the old cork. I use Brake-kleen and swabs.

While you have the cover off clean the breather screen out.

Place the 2 longer ones at the Valve cover end, works out better, and the shorter ones at the other holes.
Replacing the gasket over the new studs, I have had to use a long Socket to assist the gasket over the studs.

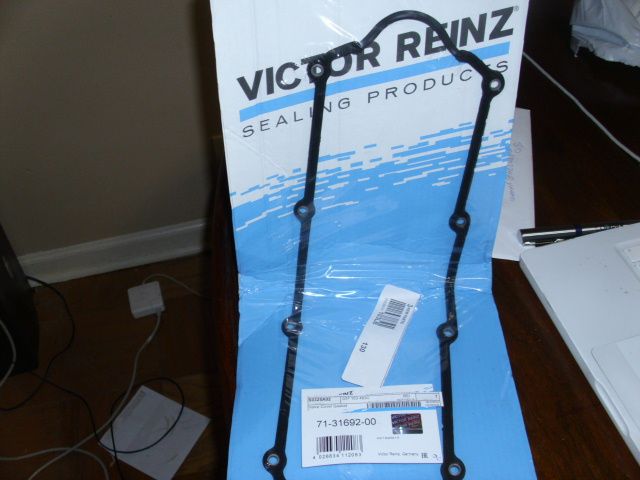
Victor-Reinz makes the g60 gasket with metal sandwiched between the rubber Superior to rubber only as it retains its shape.
Do not use but 2 drops of Ultra RTV on the Gasket where the Cam Over Seal meets with the plane of the head. Same for Cork.
I have never used any RTV or sealant on the Valve cover gaskets at all but at the corner of the Cam Over seal, as it allows the gasket to slide while you are tighten it.
Be sure that when you re-tighten your nuts, that you start in the middle and work towards the outside in Zig-Zag fashion. Take the nuts down hand tight, then use a 1/4 drive Torque Wrench to set the nuts to 87in/lbs that is the key to no leaks, too tight and the gasket puckers and leaks too loose and the gasket slides and leaks.

I learned the 87 in/lbs the hard way…3 cork gaskets in 4 weeks…. You would think that the tighter you make them the less it would leak, but alas that isn't the case here.
I had to replace my cork gasket after 6 years because of hardening…… The rubber upgrades are re-usable.
my 2 pence on this.
What do Divorces, Great Coffee, and Car Electrics all have in common?
They all start with GOOD Grounds.
Where are my DIY Links?
They all start with GOOD Grounds.
Where are my DIY Links?
Posted
Old Timer


Posted
Local Hero

If you look at a shouldered stud, and then at the rubber gasket there is now way to "make it fit" the hole is too small for the shoulder to go through.
What do Divorces, Great Coffee, and Car Electrics all have in common?
They all start with GOOD Grounds.
Where are my DIY Links?
They all start with GOOD Grounds.
Where are my DIY Links?
Posted
Local Hero

What do Divorces, Great Coffee, and Car Electrics all have in common?
They all start with GOOD Grounds.
Where are my DIY Links?
They all start with GOOD Grounds.
Where are my DIY Links?
Posted
Old Timer


Posted
Local Hero

RTV is the black silicone Sealer (ok lots of varieties and colors), I use Permatex Ultra RTV is Room Temperature Vulcanization… (the slight vinegar smell means it air cures to hardness).
Double nut is you run a nut down the stud, then run another nut down and lock them together tightly. This usually allows the studs to be turned by using the bottom nut to remove it. The top nut will lock the bottom one so it can't move, I have had to place a lock washer between them a time or two. Also you can lock a small pair of Vice-Grips on the nut (lower one), and tap it with a small hammer to torque break the stud once you see the Vice-Grips move you are usually able to turn it by hand.
They make a ratchet driven stud remove as well, but I have never had to purchase one. I have heard of folks that once the shouldered studs are removed they go back with either Allen headed bolts or Grade 8 hex bolts for a more cleaner look.
The two ones that are usually more difficult are the 2 at the number 0ne piston, Cam over. Not very much clearance.
What do Divorces, Great Coffee, and Car Electrics all have in common?
They all start with GOOD Grounds.
Where are my DIY Links?
They all start with GOOD Grounds.
Where are my DIY Links?
Posted
Old Timer


Posted
Old Timer


Posted
Local Hero

BAZ-GTI said
Sorry to ask but just got a brain dead moment where is the valve end is it near the side where the timing belt is or the opersite end so i can replace the longer bolts thanks
The Longer bolts would go to the open end of the valve cover gasket on each side of the opening for the cam/timing cover.
What do Divorces, Great Coffee, and Car Electrics all have in common?
They all start with GOOD Grounds.
Where are my DIY Links?
They all start with GOOD Grounds.
Where are my DIY Links?
Posted
Old Timer


Posted
Settling In

Posted
Local Hero

You need to fully seat the new studs (shoulderless if you are going to be using the new rubber one-piece gasket.)
I would strongly suggest that you use a washer between your stud and the head face to prevent scratching the head whilst you either remove or replace the studs.
Getting the older ones out can be a challenge, and use a washer to prevent scratching the head, you can either use the Double nut method, or the Vice-grip and small hammer to break the studs loose then you can usually take them out easily. The Vice-Grip method requires that you clamp them against the stud as low as you can go which is why I suggest that you place a washer between the pliers and the head to prevent scratching…
ONLY TAP the vice-grips not a smack…
Shouldered Studs are for the Cork Gasket set only, and no sealant at all save for 2 drops where the cam-over meets the place of the head…One drop per side.
You torque the nuts only, that is 87 in/lbs
What do Divorces, Great Coffee, and Car Electrics all have in common?
They all start with GOOD Grounds.
Where are my DIY Links?
They all start with GOOD Grounds.
Where are my DIY Links?
Posted
Settling In

Posted
Old Timer


When I decided to fit a rubber gasket I automatically started removing the old studs.
3 came out easy and then one gave me hell, eventually it sheared and I had to helicoil it.
Had I checked to start with however I would of seen that I didnt need to remove them at all and my existing studs would of been fine
So now I have 4 new and the rest original, nice Mk3 rubber gasket and no leaks
Current rides:
2003 BMW 330d Manual Saloon Msport
1985 GTI cabriolet black edition (42k miles)
1999 Triumph Daytona 955i Post apocalyptic, rat, brat, scrambler, steam punk, cafe racer

2003 BMW 330d Manual Saloon Msport
1985 GTI cabriolet black edition (42k miles)
1999 Triumph Daytona 955i Post apocalyptic, rat, brat, scrambler, steam punk, cafe racer

Posted
Local Hero

zod said
Thanks Briano, How do you know so much? I don't have Never-Seize. Can I get away with Waxoil or WD40? Thanks again.
Don't use waxoyl or WD40 it will melt or just wear off, copper grease is what I use on my studs, nuts and bolts, I smear it over most things to stop them rusting/seizing up.
Good on wheel bolts as well as brakes.
Big tub like this will last years.
https://www.eurocarparts.com/ecp/p/car-accessories/car-maintenance-accessories/maintenance-fluids-and-greases/copper-grease/?526770130&0&cc5_151
1988 Mk1 Golf GTi Cabriolet 1.8cc DX, K-jet. Daily drive. 317,000 miles and counting
1978 Mk1 Scirocco GLS 1.6cc FR, Webber carb. Weekend toy.
1978 Mk1 Scirocco GLS 1.6cc FR, Webber carb. Weekend toy.
Posted
Local Hero

zod said
Thanks Briano, How do you know so much? I don't have Never-Seize. Can I get away with Waxoil or WD40? Thanks again.
Near 40 years of wrenching on the mk1 chassis.
20 years of Mk1 Diesel 4dr Westy Rabbit ownership, and about 10-15 years of Cabriolet driving. Not to mention that I had a plethora of British Leylands in my youth.
Diesel and Digifant I have tons of experience with CIS not so much.
I started my Gofereing at the age of 5 helping my father wrench on cars.
Electrical issues, I have been diagnosing since about 1976 working on Aircraft to large Dinosaur mainframes to the current server lines. Yep I have worked on everything from Aircraft to Zebco fishing reels.
What do Divorces, Great Coffee, and Car Electrics all have in common?
They all start with GOOD Grounds.
Where are my DIY Links?
They all start with GOOD Grounds.
Where are my DIY Links?
Posted
Settling In

And Briano; U-Da-Man, as the young people like to say.
Posted
Local Hero

WATERNAIR said
Before you go about removing studs, actually check that you need to first!
When I decided to fit a rubber gasket I automatically started removing the old studs.
3 came out easy and then one gave me hell, eventually it sheared and I had to helicoil it.
Had I checked to start with however I would of seen that I didnt need to remove them at all and my existing studs would of been fine
So now I have 4 new and the rest original, nice Mk3 rubber gasket and no leaks
Depends on which gasket type that you use. The rubber cladded metallic gasket that Victor-Reinz sells for the g60 doesn't use the standard shouldered studs and the old ones had to be removed. This Gasket won't move or pucker out of position as it is rigid between the studs. I have ordered the other type that the holes for the studs were larger, but it wasn't rubber coated metallic, and wasn't as rigid.
The key either way is that you don't need Gasket Sealer but a couple of drops where the Cam Over Seal goes on the cork or one-piece, and the proper torque setting of the nuts, which according to the Bentley/haynes is 87 inch/pounds.
Decades ago I was going through the cork gaskets on my Diesel, when the parts shop I was buying parts from the owner said what is up with you and your gaskets…..When I told him how "I did it" then, he laughed and said, don't use sealer except for the Cam over meeting of the cork and rubber, and when you tighten the Valve cover bolts do not use your torque elbow…use a torque wrench to 87 in/lbs. Lesson learned as that gasket lasted about 4 years before it leaked.
Here is a metal clad one that I had to return as they shipped it wrong.


When I called the vendor on it, they said flatten it out it will work…,,,,,Yeah, Right.
I too had issues removing a Shouldered stud on my 93, so I decided to leave well enough alone, and returned to the Cork gasket….Not wanting to break a stud….
So I have one rubber and one cork on my rides. Both are leak free, but I know I will have to be replacing the cork one in about a year due to hardening…but only when it starts to leak…
What do Divorces, Great Coffee, and Car Electrics all have in common?
They all start with GOOD Grounds.
Where are my DIY Links?
They all start with GOOD Grounds.
Where are my DIY Links?
Posted
Regional Host NE


complicated to replace
a rocker cover gasket
Do not know a lot but willing to help if possible
1989 Sapphire Blue Mk1 Cabriolet KR
1985 Atlas Grey Mk2 GTI 2.0 ABF
1989 Sapphire Blue Mk1 Cabriolet KR
1985 Atlas Grey Mk2 GTI 2.0 ABF
0 guests and 0 members have just viewed this: None.


