


Door water shredder sheets

Posted
#1254857
(In Topic #150419)
Settled In

Hi, doesanyone know if and where you can get the shredder sheets (clear water barriers) off the doors behind the trim pads
Thanks
Thanks
Posted

Old Timer


Not sure if theyre oem, but i found these looking for some bits on the bay.
http://www.ebay.co.uk/itm/Vw-Golf-mk1-mk2-GTI-16v-8v-G60-Door-Card-Plastic-Sheets-Euro-Campaign-Caddy-/200878866983?pt=UK_CarsParts_Vehicles_CarParts_SM&hash=item2ec5504227
(not sure how to edit link title, sorry)
http://www.ebay.co.uk/itm/Vw-Golf-mk1-mk2-GTI-16v-8v-G60-Door-Card-Plastic-Sheets-Euro-Campaign-Caddy-/200878866983?pt=UK_CarsParts_Vehicles_CarParts_SM&hash=item2ec5504227
(not sure how to edit link title, sorry)
Posted
Local Hero

It's just polyethene sheeting, you can buy a big sheet of it from B&Q (used for decorating etc) and cut down the sheet using your door card as a template.
http://www.diy.com/nav/garden/garden-care-watering/growing/plant_care/-specificproducttype-plant_protection___support/B-and-Q-Polythene-Sheet-6m-x-2m-10278279?noCookies=false
Good old ebay, that seller must be laughing every time he sells them!�
http://www.diy.com/nav/garden/garden-care-watering/growing/plant_care/-specificproducttype-plant_protection___support/B-and-Q-Polythene-Sheet-6m-x-2m-10278279?noCookies=false
Good old ebay, that seller must be laughing every time he sells them!�
Mk1 Golf floor mats - for tin top and cabriolet - Zero7796 17298Five
Posted
Old Timer
i was going to suggest that, ive got a van full of rubble sacks thatd cut up just as well!
but thought an enthusiasts forum would be the first place i got laughed out of the door!
but thought an enthusiasts forum would be the first place i got laughed out of the door!
Posted
Settled In
Yeah well i thought the 'enthusiasts' would do things properly i realise if not made you have to make stuff but new ones come pre glued ready to stick on so would make a much better job but there you go
Posted

Local Hero
If you look at the originals you will see there is a section which is doubled up which goes over the vent. the doubled up overlaps inside the door so any water which drips through the window seal doesn't enter the car through� the door vent. there should also be a rubber flap on the inside of the door which goes over the door vent.
Posted
Settled In
But what do use to stick them ?
Posted
Local Hero
I bought some carpet tape from wickes, Sticky as hell!� I have a roll of shrink wrap that goes on food packaging and used that for the liner.
Cut it to size then added the extra flap to the sheet� with the carpet tape.
stuck it to the door and then used a heat gun to tighten the plastic and stick the 2 shhets of plastic together so the water couldn't get between the main sheet and the flap over the vent.
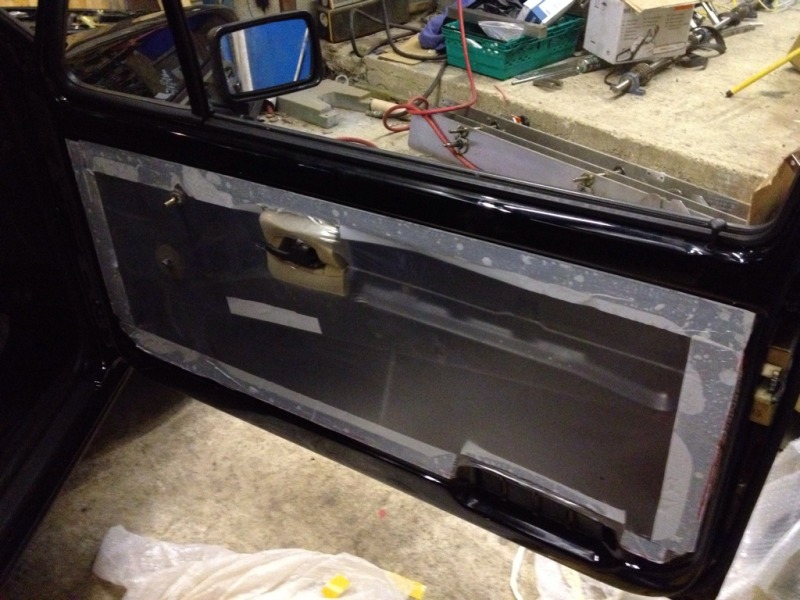
I only have a picture of my 1st attempt and didn't have this extra flap over the vent which is why I highlighted it as I had water leaking in and had to re do it. It gives an idea of how I got it to look though……….
Cut it to size then added the extra flap to the sheet� with the carpet tape.
stuck it to the door and then used a heat gun to tighten the plastic and stick the 2 shhets of plastic together so the water couldn't get between the main sheet and the flap over the vent.
I only have a picture of my 1st attempt and didn't have this extra flap over the vent which is why I highlighted it as I had water leaking in and had to re do it. It gives an idea of how I got it to look though……….
Posted
Old Timer
that looks like a good job, pal..
Posted

Settling In

hi yomp,
please could you elaborate on this 'doubled up' flap thingy that should be part of the plastic sheeting and the rubber flap you advise should be over the vent on the inside of the door.
on mine�i have found that just above the vent, there is a thin strip of black plastic about 15cm long (one side is curiously furry for some unknown reason) and this clips in, via (about) 4 little pegs, which might secure a flap but I found no such flap - might this be there to secure the rubber flap you mention?
as regards the flap that is part of the plastic sheeting, can you clarify what do you mean by doubled up?…I see from your picture from your first attempt that there is a gap in your sheet where the vent is and i can easily see that if you had not cut out that gap the vent would/could be covered and even taped on, if you wished, by applying some tape to it and to the door just below the vent (although the tape would ultimately peep out from below the door trim) but, if you taped it up, it would certainly hamper the functioning if the vent so i'm pretty sure that's not what you mean.
maybe on the original plastic sheeting this 'gap' flap extends twice as much below the rest of the sheet so that you could fold it up on itself and then hang the bottom�part over the inside of the vent so you end up with 2 flaps - one of each side of the vent but then why would you need this if there is the rubber flap I've imagined above?
cheers
ben
�
Posted

MOTY 2013
aye the plastic strip you mention is what holds the rubber flap over the vents.
the '2 sheet' method has been around for a while, what you do is get a sheet cut to half the height of the door and stick it down the middle of the door and tuck it in all along the bottom of the door. this is done so any water that makes it past the glass gets directed straight into the bottom of the door rather than drippign down the inside of the main sheet.
the reason is to get a fully watertight vapour barrier with just 1 sheet is tricky, you have to get it stuck on just right and use a good quality waterproof glue (hence why peeling the oem barriers off is very difficult!!)
if you look close at the inner door skin you'll notice it kinks inwards, and along the bottom edge there are a series of holes, these are there so that any water that comes down the sheet gets caught and drains away. if you dont get the outer seal 100% perfect it'll sit in the bottom and eventually ruin whatever you use to stick the barriers down, unless you use very good adhesive.
the 2nd lower flap bypasses all this hassle
Hello my name is John and I'm a dub addict.
My wiring diagrams and other documents have moved here:
VAG Documents & Downloads
You'll need to sign into google/gmail for the link to work! (its free!)
My wiring diagrams and other documents have moved here:
VAG Documents & Downloads
You'll need to sign into google/gmail for the link to work! (its free!)
Posted

Settled In
rubjonny said
aye the plastic strip you mention is what holds the rubber flap over the vents.
the '2 sheet' method has been around for a while, what you do is get a sheet cut to half the height of the door and stick it down the middle of the door and tuck it in all along the bottom of the door. this is done so any water that makes it past the glass gets directed straight into the bottom of the door rather than drippign down the inside of the main sheet.
the reason is to get a fully watertight vapour barrier with just 1 sheet is tricky, you have to get it stuck on just right and use a good quality waterproof glue (hence why peeling the oem barriers off is very difficult!!)
if you look close at the inner door skin you'll notice it kinks inwards, and along the bottom edge there are a series of holes, these are there so that any water that comes down the sheet gets caught and drains away. if you dont get the outer seal 100% perfect it'll sit in the bottom and eventually ruin whatever you use to stick the barriers down, unless you use very good adhesive.
the 2nd lower flap bypasses all this hassle
Sounds like a great idea but I'm struggling to picture that in my head. Does the second piece tuck down in behind the door vent? It would be good to see the finished article if anyone has a photo?
Here's what I've done so far to cut the shape -

what shape would the second piece look like? and stuck to where on the door:

- I know the top of the door has been butchered. that'll get fixed too
 …
…
cheers
KP
Posted
Local Hero
The side view just shows the piece that fits down inside the door but hope this gives you an idea.
The film is in red and the door frame is green.

The film is in red and the door frame is green.
Posted
Settled In
Ah ok. Thanks - that helps.
Could I stick the second piece to the beam that holds the grab handle first? tuck it in behind and over the vent and then put the whole piece over the top??
and would the 2nd piece need to be secured at the sides??
�
Could I stick the second piece to the beam that holds the grab handle first? tuck it in behind and over the vent and then put the whole piece over the top??
and would the 2nd piece need to be secured at the sides??
�
Posted
Local Hero
Looking at OEM ones the second piece wasn't secured at the sides. The front edge of the second piece ends under the quarter glass which doesn't leak water into the door. The back edge needs to be as close as possible to the back but isn't secured. Any water running in at the back of the main window should hit the bottom of the 2nd piece if its sitting correctly and is cut virtually to the bottom of the door.
I guess you could stick it to the "beam" that supports the pull handle. The important thing is that any water dripping off the bottom of the window is deflected away from the bottom of the door card.
Attach the second piece to the door as you want to and then poor water down the outside of the moving window you should see where the water drops in and where this second piece then does its job.
Posted
MOTY 2013
yes see the lower opening behind the speaker hole, make a sheet that covers that/. then rather than stick it on top, tuck the lower edge in all the way along the bottom edge of the door, and yes it will be behind the flap that covers the vent holes at the bottom right.
then stick the top sheet over the entire door, later vw use a foam sheet similar to what you lay under laminate floorign, this gives a little bit of sound deadening. only thing is I dont think there is any room behind the doorcard for this kind of thing so probably best to stick with plastic sheeting
then stick the top sheet over the entire door, later vw use a foam sheet similar to what you lay under laminate floorign, this gives a little bit of sound deadening. only thing is I dont think there is any room behind the doorcard for this kind of thing so probably best to stick with plastic sheeting
Hello my name is John and I'm a dub addict.
My wiring diagrams and other documents have moved here:
VAG Documents & Downloads
You'll need to sign into google/gmail for the link to work! (its free!)
My wiring diagrams and other documents have moved here:
VAG Documents & Downloads
You'll need to sign into google/gmail for the link to work! (its free!)
Posted
Settled In
Thanks guys. All now makes sense- I just need to Get on with it…..
i don't have the rubber flap on the inside. I'm guessing these are no longer available? And would it even be required anyway with the second internal sheet?
I suppose I could add a smaller piece of the sheet to the outside of the vents? But just not secure it at the bottom?
cheers
�
i don't have the rubber flap on the inside. I'm guessing these are no longer available? And would it even be required anyway with the second internal sheet?
I suppose I could add a smaller piece of the sheet to the outside of the vents? But just not secure it at the bottom?
cheers
�
Posted
MOTY 2013
the flap is there so the cabin can ventilate, plus I assume so when you shut the door the air pressure inside can go somewhere. its just a bit of rubber sheet, nowt special about it. as you say your lower sheet will stop any water getting in
Hello my name is John and I'm a dub addict.
My wiring diagrams and other documents have moved here:
VAG Documents & Downloads
You'll need to sign into google/gmail for the link to work! (its free!)
My wiring diagrams and other documents have moved here:
VAG Documents & Downloads
You'll need to sign into google/gmail for the link to work! (its free!)
Posted
Local Hero
The rubber flap must also act as a sound deadener and also acts as a one way valve for air. Air can leave the cabin but cannot come in from the door.
The Mk2 also has the flaps but they were fitted into a plastic housing that clipped in the boot right down by the chassis leg where the bumper irons bolt.
Back to the MK1 there are also pieces of thick, low density foam around the winder handle and the pull handle.
Fitting all of the above makes a big difference to how much unwanted noise and draughts can get into the cabin. Its worth doing properly.
0 guests and 0 members have just viewed this: None.