


Shellby - 83 gti ABF on carbs

Posted
Old Timer

Shellby - 83 gti ABF on carbs
Regress and progress!
Regress
ive been getting the shell ready for paint, but really struggling to get the near side wing to fit, just can't get the front hole to line up. Assumed it was me and my lack of experience. I am now being helped by a gentleman called chris, who has painted and repaired cars for about 700 years, thought he would get it to fit, but no!! cf_emoticons__BangHead:it seems the near side of the car is 10mm shorter than the offside, hence the wing won't bolt on. Chris's first reaction was that the shell may have been crashed and twisted, not what I wanted to hear after nearly two years of work on it! So we dug the tape measure out, did a few checks, and it just seems to be short from the third wing bolt hole from the windscreen to the front of the car. Felt slightly better! We then put the windscreen in knowing if the shell was twisted it won't fit snugly on all four sides. It fit like a glove! Phew!
Both inner wings have had repair work/new steel done to them, so think the near side repair steel has been welded in wrongly making the front of the car short. So…
split the inner wing and unpicked the front panel


we could then bolt the near side wing on properly. Then bolted the bonnet on and the latch to get the front panel in the right place

then tacked the inner wing back together. Will need to weld a strip in place where the gap is and repair the damage done to the engine bay, bit of a bu#ger, but not the end of the world.
Progress
after that setback we got on with fitting the rest of the body panels to make sure they all lined up.
Doors line up nicely


as does the boot

please with how that went.
heres a picture of chris working on the roof

and some filler applied to the side

put the old suspension on so we can drop it off the pivot frames and check the wheel centres. Had to put the rear beam on by myself about a metre in the air, here's a bad photo of the 400 blocks of wood involved in that task

And here's how I left her.

Hopefully more progress next week!
Regress
ive been getting the shell ready for paint, but really struggling to get the near side wing to fit, just can't get the front hole to line up. Assumed it was me and my lack of experience. I am now being helped by a gentleman called chris, who has painted and repaired cars for about 700 years, thought he would get it to fit, but no!!
cf_emoticons__BangHead:it seems the near side of the car is 10mm shorter than the offside, hence the wing won't bolt on. Chris's first reaction was that the shell may have been crashed and twisted, not what I wanted to hear after nearly two years of work on it! So we dug the tape measure out, did a few checks, and it just seems to be short from the third wing bolt hole from the windscreen to the front of the car. Felt slightly better! We then put the windscreen in knowing if the shell was twisted it won't fit snugly on all four sides. It fit like a glove! Phew!Both inner wings have had repair work/new steel done to them, so think the near side repair steel has been welded in wrongly making the front of the car short. So…
split the inner wing and unpicked the front panel


we could then bolt the near side wing on properly. Then bolted the bonnet on and the latch to get the front panel in the right place

then tacked the inner wing back together. Will need to weld a strip in place where the gap is and repair the damage done to the engine bay, bit of a bu#ger, but not the end of the world.
Progress
after that setback we got on with fitting the rest of the body panels to make sure they all lined up.
Doors line up nicely


as does the boot

please with how that went.
heres a picture of chris working on the roof

and some filler applied to the side

put the old suspension on so we can drop it off the pivot frames and check the wheel centres. Had to put the rear beam on by myself about a metre in the air, here's a bad photo of the 400 blocks of wood involved in that task

And here's how I left her.

Hopefully more progress next week!
Posted

Moderator


Looking good mate, at least you were able to figure out what was wrong. N/S wing looks spot on now mate!!

Posted
Old Timer
Melteddrummer said
Looking good mate, at least you were able to figure out what was wrong. N/S wing looks spot on now mate!!
Cheers meltdrummer. Yeah better finding these problems now rather than when it's painted!
Posted

Moderator
Nice work dude. Looks like a nice job on the doors and boot. Keep up the good work matey. 


Posted
Old Timer
smudger1980 said
Nice work dude. Looks like a nice job on the doors and boot. Keep up the good work matey.
Cheers Smudger.
Posted
Old Timer
Quick update. Got the wheels back on and dropped her off the pivot frames so paint prep can continue.


no idea how long it's been since she was on wheels, probably never on three!And a photo of my friend jerry next to her, man she looks low!!

Just need to put the offside wheel hub and wheel back on, then leave her in chris's capable hands. Engine next I think.


no idea how long it's been since she was on wheels, probably never on three!
And a photo of my friend jerry next to her, man she looks low!!
Just need to put the offside wheel hub and wheel back on, then leave her in chris's capable hands. Engine next I think.
Posted
Old Timer
Got a few things done today.
front wheel back on, so now back on four wheels.

then made a start on a manifold for the carbs. Had a manifold flange made up.

Cut some lengths of 40nb tube.

Crushed one end in a vice to elongate it.

Then used a hydraulic ram to bend the tube, essential kit for any wannabe golf builder!
Then used a disc cutter to cut the end square.

Then welded the tubes to the plate.

And the almost finished article.


just need to dress the welds up, especially the horrendous one on the left!
front wheel back on, so now back on four wheels.

then made a start on a manifold for the carbs. Had a manifold flange made up.

Cut some lengths of 40nb tube.

Crushed one end in a vice to elongate it.

Then used a hydraulic ram to bend the tube, essential kit for any wannabe golf builder!

Then used a disc cutter to cut the end square.

Then welded the tubes to the plate.

And the almost finished article.


just need to dress the welds up, especially the horrendous one on the left!
Posted
Old Timer
Engine problems
Made a start cleaning up the gearbox and engine.
First removed the drive shafts.


Will clean the drive shafts up soon. This left me with a dirty gearbox.

After a few hours with a wire wheel and brush it looks loads better.

Going to finish cleaning, replace the seals and gaskets, then paint. Any further suggestions whilst its off?
Next onto the engine.
First lift the engine with the engine hoist - aka a fork lift truck.
Then onto the stand.

Removed all the exhaust studs, plus a lot of skin off my knuckles!

Next removed the head. Found piles of iron filings on top of each piston.cf_emoticons__BangHead:

Obviously this was worrying. But I found none in the head or the oil sump. So I started to strip the pistons to check them and the bores. Checked the first three and found no problems, until this:-

Destroyed one of the piston rings putting it back in!cf_emoticons__BangHead: Does anyone know where I can get an abf 2.0l 16v piston ring set?
Until I've got some new piston rings ill start on this:-

£45 off eBay. Only problem is its meant for a kr block.

should be able to modify it to suit.
Thats about it for now. If anyone has any gearbox suggestions or can point me to some piston rings it would be much appreciated.
Thanks
Matt
Made a start cleaning up the gearbox and engine.
First removed the drive shafts.


Will clean the drive shafts up soon. This left me with a dirty gearbox.

After a few hours with a wire wheel and brush it looks loads better.

Going to finish cleaning, replace the seals and gaskets, then paint. Any further suggestions whilst its off?
Next onto the engine.
First lift the engine with the engine hoist - aka a fork lift truck.

Then onto the stand.

Removed all the exhaust studs, plus a lot of skin off my knuckles!

Next removed the head. Found piles of iron filings on top of each piston.
cf_emoticons__BangHead:

Obviously this was worrying. But I found none in the head or the oil sump. So I started to strip the pistons to check them and the bores. Checked the first three and found no problems, until this:-

Destroyed one of the piston rings putting it back in!
cf_emoticons__BangHead: Does anyone know where I can get an abf 2.0l 16v piston ring set?Until I've got some new piston rings ill start on this:-

£45 off eBay. Only problem is its meant for a kr block.

should be able to modify it to suit.
Thats about it for now. If anyone has any gearbox suggestions or can point me to some piston rings it would be much appreciated.
Thanks
Matt
Posted
Old Timer
Got a piston ring set off eBay and fitted them. Head has been sent away to be skimmed and have the valves done.

Then spent about 6 hours cleaning the grime and gunk off the engine. The exhaust side is easy to do with a wire wheel, but the other side is horrendous to clean, so many knucks and cranys. Did most of this side scraping with a screwdriver and emery cloth.
Before

After

Then cleaned up the rocker cover

Cut the tabs off and smoothed the casting marks

Then primered

Then primed the engine block


Ordered some vht black paint, need to finish cleaning the gearbox, prime it, then paint it all black. Need to order some stainless steel bolts to replace the original engine and gearbox ones, hopefully will look good in black with some shiny bolt details.
Posted
Moderator
Nice effort mate. It'll look smashing when it's all painted up.
Posted
Old Timer
smudger1980 said
Nice effort mate. It'll look smashing when it's all painted up.
Thanks smudger. You still waiting for your loom?
Posted
Moderator
pazwaa said
smudger1980 said
Nice effort mate. It'll look smashing when it's all painted up.
Thanks smudger. You still waiting for your loom?
Yes mate. Believe it's been posted back as of Saturday so should be any day now. Cannot fookin wait

Posted
Old Timer
Mine will be on carbs, so will probably only have half the wiring yours does, but really not looking forward to wiring, destroys my brain thinking about it.
Posted
Moderator
I've got 3 gauges to do at some point in the future as well. Scares the living £$%£ out of me
Posted
Local Hero
I never thought I'd say this, but I think I prefer wiring to welding!
Project is looking good mate. Will really start to look like it is taking shape when the paint is done!
Project is looking good mate. Will really start to look like it is taking shape when the paint is done!
My Build Thread
All My Build Photos - https://www.flickr.com/photos/pix-al/albums/72157622794406840
My other hobby - www.pix-al.co.uk
All My Build Photos - https://www.flickr.com/photos/pix-al/albums/72157622794406840
My other hobby - www.pix-al.co.uk
Posted
Old Timer
AL_Mk1 said
I never thought I'd say this, but I think I prefer wiring to welding!
Project is looking good mate. Will really start to look like it is taking shape when the paint is done!
Wish I felt that way, I knew what I was doing with the welding, now it's done it's head first into the unknown!!
Thanks for the comments. Yeah, looking forward to it being all one colour, will look like a real car then.
Posted
Old Timer
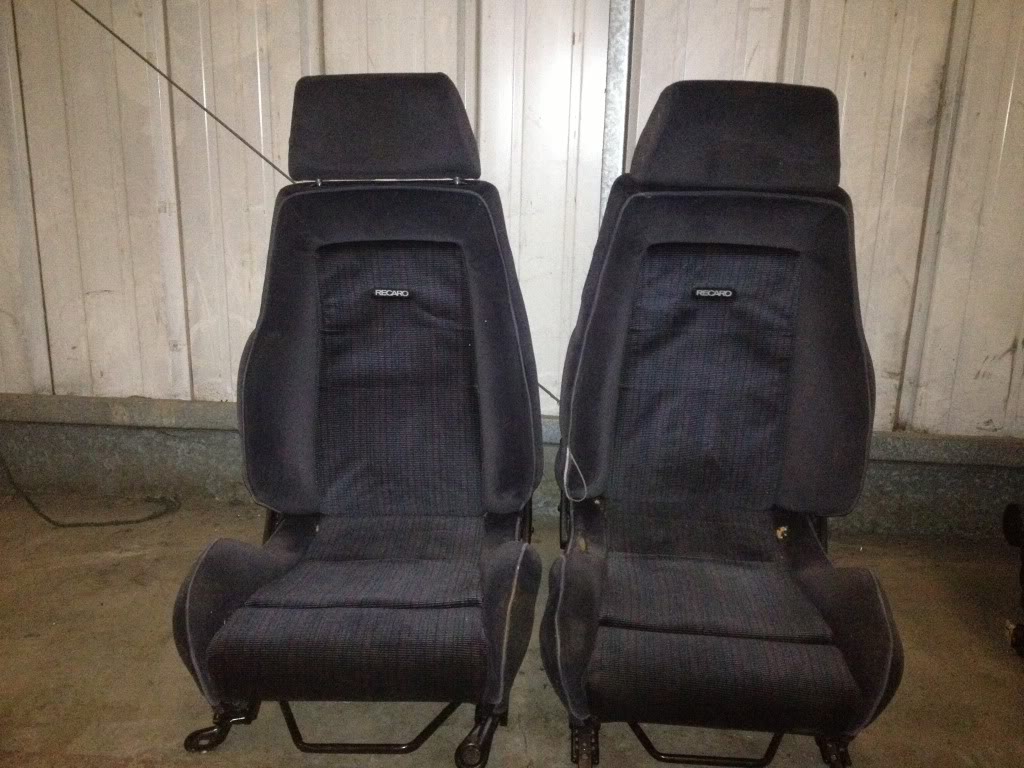
Seats - after many months of hunting, bidding and losing out on seats on eBay, I've finally come up trumps, twice!
First I won a set of RS recaros for £20!
Then the next day I won a set of tatty mk1 seats, also £20!
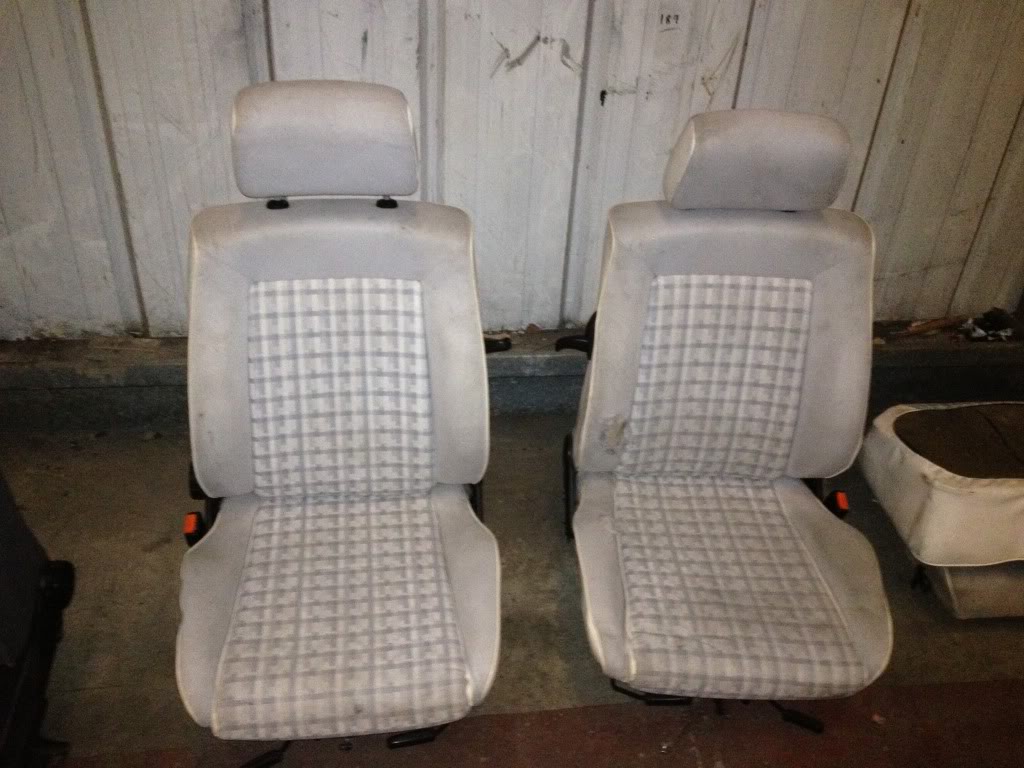
Going to strip down the mk1 seats and use the bases to mount the recaros. Time to get my creative head on!
First I won a set of RS recaros for £20!

Then the next day I won a set of tatty mk1 seats, also £20!

Going to strip down the mk1 seats and use the bases to mount the recaros. Time to get my creative head on!
 Last edit: by pazwaa
Posted
Settled In

Looking really good this bud
Carn't wait to see it in colour,will sit nice on those rims I'm sure
Carn't wait to see it in colour,will sit nice on those rims I'm sure
2000 R1 TOY ;-)
2003 CIVIC TYPE R reliable daily
1989 cabby 1.8 gti ongoing project (my 1st vw)
husqvarna te 410 supermoto
just aquired a series 1 tintop
2003 CIVIC TYPE R reliable daily
1989 cabby 1.8 gti ongoing project (my 1st vw)
husqvarna te 410 supermoto
just aquired a series 1 tintop
Posted
Old Timer
jaybo said
Looking really good this bud
Carn't wait to see it in colour,will sit nice on those rims I'm sure
Cheers jaybo
will be nice to see her just in primer, all one colour!I do spend a sad amount of time looking at the alloys, can't wait to fit them for the first time! That alone is gonna be a mammoth task, they're 5 x 114 pcd, which is a nightmare to adapt being so close to the original 100 pcd! But I will find a way to sort it!
Posted
Moderator
£20 for RS Recaros……..Bargain !!!
0 guests and 0 members have just viewed this: None.