


Buddy MK1

Posted
#1353036
(In Topic #165792)
Settled In

1983 Pirelli Edition
I started a couple of threads on other forums so thought I would copy my progress so far over to here.
I use to own a mk4 golf gti which I built up to this stage:

The mk4 was a great daily and served me well for a good few years but I felt I had taken it as far as I wanted to so stripped it for parts and purchased a new daily and a new project.
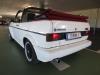
The new project is a 1983 mk1. It came with a 16V lump in it, mk2 leathers and some banded steels. I made the trip down from Kent to Bridgewater to pick it up and the drive home was brilliant. Drove well and sounded great.


 Initial plans were to simply tidy it up, find a nice set of wheels and deck it. It had already had some work done to it including a full respray, new wings, sills, and front end. I was offered some turbo its in p/x for the banded steels so before I knew it I had an engine build on the c ards aswell.
 I then set about removing the 16V inlet manifold and the 4 branch exhaust manifold to make way for the turbo bits. These includ ed T3 Turbo, Turbo manifold, 16V/ 20V inlet manifold with AGU TB, 20V fuel rail and injectors, and a front mount.


 I then got a little distracted away from the engine and started gutting the interior. This included seats out, carpet out and remove all the original sound deadening (which took TIME)


 Once the bulk of it was out I cleaned it up with some thinner, repaired a few areas which were rusty and applied some zinc primer. The passenger footwell has rusted badly where it met the sill so I bought a replacement panel and ditched the rusty one. The replacement panel is pretty thin in comparison to the original material so I tried to keep as much original metal as possible.


 While working on the inside I also put in some sound proofing. I work for an AV installation company and we use Silent Coat in some of our speaker boxes which works really well so I decided to use it in the mk1 aswell. The doors, rear arches, roof have been done so far and I will be doing the footwells and the boot floor later on. This stuff really is impressive. I cant wait so see how much it reduces the road noise.


1983 Pirelli Edition -�http://vwgolfmk1.org.uk/forum/index.php?page=topicview&type=view&id=165792
Posted
Settled In


�The plastic backs were pretty beaten up so I pulled them apart and retrimmed them in a suede/ alcantara material. I think the result will help to make them look more at home and not too put of place. It certainly helps to date them slightly.


�I initially didnt cover the airbags but after refitting them it was obviously that they would need to be covered aswell


The base panels will also be trimmed once I find some spare time.�
1983 Pirelli Edition -�http://vwgolfmk1.org.uk/forum/index.php?page=topicview&type=view&id=165792
Posted
Settled In


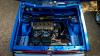
As the bay was empty it would have been rude to just put the 1.8T in there and not tidy it up a little so out came the battery tray, off came the brake servo, MC and balance bar, off came all the seem sealer, and all the unwanted holes are being welded up. Im new to a lot of this kind of work so its taken me quite a bit longer that it would most.


In between working on the bay and interior, I started to tidy up the new engine. All unwanted items were stripped off, 16V tensioner, new waterpump, cambelt, custom engine mount, and a lick of paint.�


1.8 non turbo cam cover

1983 Pirelli Edition -�http://vwgolfmk1.org.uk/forum/index.php?page=topicview&type=view&id=165792
Posted
Settled In
 Porsche twists
 Teledials
 My old ETA Betas lol (a little big)
 Pirelli P Slots (a strong contender)
 H's RSs
 The came in a lovely shade or orange and had 2.5" dishes up front (9J) and 3" on the back (9.5J). After a quick test fit on another mk1 it was clear that these specs werent going to work.

 So I took the tyres off and discovered just a little bit of silicon.


 I sent the barrels off to be powdercoated, ordered 1.5" and 2.5" Radinox stainless dishes, ordered new bolts and had the stripped the centers.
 The dishes and bolts came from FelgenFuchs in German. Great service and very quick delivery.


 Stripping the centers

 As I had already painted some of the engine parts in crackle black, I thought I would continue this onto the wheels.


 Putting them back together


 I also have quire a good stockpile of parts ready to go in/on.
AP coilovers
Front mount
Polo top fill rad
Full loom made up by Vagtronics
I also have quire a good stockpile of parts ready to go in/on.
AP coilovers
Front mount
Polo top fill rad
Full loom made up by VagtronicsNew carpets
New headliner Downpipe flange etc


1983 Pirelli Edition -�http://vwgolfmk1.org.uk/forum/index.php?page=topicview&type=view&id=165792
Posted

Moderator

Good luck getting her finished off.
Smudger


Posted

Old Timer


 great write up looking forward to your updates !
Out of interest was the car for sale on SW Dubs forum? I think I recognise it??
Scott
South West Regional Host
Previous;
1991 Clipper, 1978 S1 GLS, 1983 Type25, 1989 Clipper GTI
Current;
Zero, zilch, nought, zero, nothing….

Previous;
1991 Clipper, 1978 S1 GLS, 1983 Type25, 1989 Clipper GTI
Current;
Zero, zilch, nought, zero, nothing….
Posted
Old Timer

Matt
Posted
Settled In
Scott - not that I know of but it may well have been. I found it through eBay
1983 Pirelli Edition -�http://vwgolfmk1.org.uk/forum/index.php?page=topicview&type=view&id=165792
Posted
Old Timer
kwwp up thw good work buddy, them wheels look amazing
Posted
Settled In
i want to do the same with the crackle paint on my block- what did you use to do it ? and also it looks like you pianted it with normal paint first then did the crackle ?
Posted
Design Manager


2018 Up! GTi 1.0 TSI
2015 Mk7 Golf R 2.0 TSI 4motion DSG
2011 Caddy Maxi Kombi 1.6 TDi
1982 Mk1 Golf GTi 3 Door 1.8t - Build Thread
Posted

Old Timer
like the crackle black stuff

Posted

Marketing Manager
Can't wait to see this finished

1973 BMW 3.0CS "Helga"
1981 VW Golf GTi "Agolf"
1986 Ford Escort RS Turbo S2
1987 BMW M535i - 'Klaus'
Instagram: @ahmet_e9
Posted
Settled In
Had a good weekend on the car. Finished stripping the underside back to bare metal. one of my rear beam studs snapped when removing it so I cut it down, drilled it out and dropped a new bolt in from the top.
 There is a handy little slot inside the car which is nearly directly above the studs. I dropped the bolt in and welded around the head to keep it in place. once secured I trimmed it down to match the others.
 Last night I managed to get the last of the underseal sprayed. I always manage to get more on me and in my hair than I got on the car lol.
I also managed to start getting the front control arms, hubs and suspension back on. I had the control arms, rear beam, ARBs and a few other bits powdercoated. Iv also fitted super pro bushes.
Last night I managed to get the last of the underseal sprayed. I always manage to get more on me and in my hair than I got on the car lol.
I also managed to start getting the front control arms, hubs and suspension back on. I had the control arms, rear beam, ARBs and a few other bits powdercoated. Iv also fitted super pro bushes.

 Its nice to see parts finally going back on. Hoping to have him back on the ground within the next week or two.
1983 Pirelli Edition -�http://vwgolfmk1.org.uk/forum/index.php?page=topicview&type=view&id=165792
Posted
Settled In
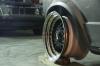
 Bolted it on to see how the 1.5" dishes sat and was happy with how they looked. A little bit of poke but no where near as much as before. The should tuck in a little more then the car is actually on the ground and at a sensible height.
 It was only when I tried to raise the wheel up closer to the arch that I realized that the coilover collar is going to foul on the barrel. I currently have the camber adjusted to maximum so it may be that they will clear when reduced. I dont really want to space them as they poke enough already.
A few suggested options would be to raise the strut towers, narrower barrels, smaller dishes and then space the wheels, remove the helper springs. Plenty of options so im sure I can sort it out.
It was only when I tried to raise the wheel up closer to the arch that I realized that the coilover collar is going to foul on the barrel. I currently have the camber adjusted to maximum so it may be that they will clear when reduced. I dont really want to space them as they poke enough already.
A few suggested options would be to raise the strut towers, narrower barrels, smaller dishes and then space the wheels, remove the helper springs. Plenty of options so im sure I can sort it out.


1983 Pirelli Edition -�http://vwgolfmk1.org.uk/forum/index.php?page=topicview&type=view&id=165792
Posted
Settled In


1983 Pirelli Edition -�http://vwgolfmk1.org.uk/forum/index.php?page=topicview&type=view&id=165792
Posted
Old Timer
Nice job
Matt
Posted
Settled In
I managed to get the rear arb on the rear beam last night. The arb brackets are such a pig to fit but I got there in the end. They went on a little wonky but a bench vice straightened things out.


 The rear beam is now back on the car and Im hoping to put the stub axel and disc assembly back together tonight. Can offer up the rears then. Cant get enough of these


1983 Pirelli Edition -�http://vwgolfmk1.org.uk/forum/index.php?page=topicview&type=view&id=165792
Posted
Moderator

I am blown away by your skills!
Oh I nearly forgot, a very warm welcome to the Club.
Sent by a smartphone and not a smartperson!
Play Guess the Asking Price 'SEASON 4' as of Sunday the 29th of October 2017.
https://vwgolfmk1.org.uk/forum/index.php?page=topicview&id=chat%2Fmk1-golf-chat_2%2Fguess-the-asking-price_2
OLD.
https://vwgolfmk1.org.uk/forum/index.php?page=topicview&id=chat%2Fmk1-golf-chat_2%2Fold-guess-the-asking
Ever wondered who's behind the scenes of this forum?
https://vwgolfmk1.org.uk/index.php?page=committee
Mike
There's me building mine 28 years ago, almost finished!

Be proud of your VW Golf Mk1, it's very special!
Play Guess the Asking Price 'SEASON 4' as of Sunday the 29th of October 2017.
https://vwgolfmk1.org.uk/forum/index.php?page=topicview&id=chat%2Fmk1-golf-chat_2%2Fguess-the-asking-price_2
OLD.
https://vwgolfmk1.org.uk/forum/index.php?page=topicview&id=chat%2Fmk1-golf-chat_2%2Fold-guess-the-asking
Ever wondered who's behind the scenes of this forum?
https://vwgolfmk1.org.uk/index.php?page=committee
Mike
There's me building mine 28 years ago, almost finished!
Be proud of your VW Golf Mk1, it's very special!
Posted

Settling In

0 guests and 0 members have just viewed this: None.